Stop & Go Station: Difference between revisions
Metalex123 (talk | contribs) |
(Small corrections) |
||
| (44 intermediate revisions by 17 users not shown) | |||
| Line 1: | Line 1: | ||
{{ | {{level infobox | ||
|image=[[File:Stop & Go Station.png]] | |||
|image=[[File:Stop & Go Station.png | |||
|code=2-4 | |code=2-4 | ||
|world=[[Monkey Mines]] | |world=[[Monkey Mines]] | ||
|game=''[[Donkey Kong Country]] | |game=''[[Donkey Kong Country]] | ||
|before=[[Bouncy Bonanza|<<]] | |before=[[Bouncy Bonanza|<<]] | ||
|after=[[Millstone Mayhem|>>]] | |after=[[Millstone Mayhem|>>]] | ||
| | |track=Misty Menace | ||
}} | }} | ||
'''Stop & Go Station''' is the ninth level of | '''Stop & Go Station''', also named '''Stop and Go''',<ref>''Nintendo Magazine System'' (UK) issue 28, page 58.</ref> is the ninth [[level]] of ''[[Donkey Kong Country]]'' and the fourth level of [[Monkey Mines]]. It takes place inside a mine tunnel, featuring green lighting and several [[Rock Kroc]]s moving around. Aside from Rock Krocs, there are also [[Klaptrap]]s, which first appear in the level. The level is divided into segments by the [[Stop & Go Barrel]]s, which are used to temporarily immobilize the Rock Krocs so that [[Donkey Kong]] and [[Diddy Kong]] can move by them safely. When the [[Kong]]s hit a Stop & Go Barrel "GO", it changes to "STOP", and the lighting changes to red. However, after a few seconds, the stage and hue revert back to "GO" and green, respectively, and the Rock Krocs resume their movement. | ||
==Layout== | |||
{{multiframe|[[File:Stop & Go Station GBC.png]] [[File:Stop&GoStation-GBA-1.png|180px]]|Stop & Go Station's appearance in the Game Boy Color version, top, and Game Boy Advance version, bottom|align=left|size=200}} | |||
At the beginning of the level, the Kongs exit a small tunnel and make their way towards several small ledges. After dropping down the second ledge, they find a Klaptrap and a barrel switch that displays the word 'Go'. Once they hit it, the [[Rock Kroc]] dashing in the small area of land ahead crouches into a ball, allowing the primates to cross. A [[DK Barrel]] and another barrel switch is located nearby, and they are followed by several ledges with more Rock Krocs on the edge of them. The Kongs can find a Klaptrap on the top ledge, which is followed by a lower area containing the [[KONG Letters|letter K]] and a [[tire]] that can assist them in crossing a pit and reaching a barrel switch high in the air. Two Rock Krocs race in the small area after here, avoiding another pit found farther ahead. | |||
On the opposite side of this abyss, the heroes can find a flat piece of ground with a Klaptrap on it and a barrel switch above it that they can hit to flip the color of the lights, causing the Rock Krocs to curl into balls if they are not already in their hiding position. An abyss can be found after the barrel switch with a small platform guarded by a Rock Krocs in it. The primates are able to locate a pair of Klaptraps and an additional barrel switch on other other side of the pit. Two more small pits are ahead of here, and the platform surrounded by them holds a pair of Rock Krocs. Another barrel switch is also in the second abyss, which is followed by an additional pit that can only be crossed with the use of a moving platform that is occupied by a Rock Kroc. The Kongs can discover a DK Barrel and another barrel switch on the other end of the drop. They are followed by an additional pit with several ledges after it. Most of the ledges hold Rock Krocs, but others carry Klaptraps. At the top ledge, the heroes can find a small pit containing the letter O and then the level's [[Star Barrel|Continue Barrel]]. | |||
If the Kongs continue forward, they drop down a tall ledge with a [[barrel]] next to it, which is supported by a smaller ledge that is followed by a flat area with a Rock Kroc and a barrel switch on it. Another Rock Kroc runs in a lower area located just before a higher area of ground that supports a Klaptrap. The Kongs can find a trio of Klaptraps in a slightly lower area nearby with a wall of [[banana]]s in front of it. After climbing a ledge found ahead of the enemies, the primates reach an area containing a DK Barrel and a tire that they can roll towards a barrel switch found high in the air. The tire can help them bounce to the switch, which then causes the Rock Krocs to roll up into a ball for a limited amount of time. A few Klaptraps march around the area, which is followed by a wide abyss containing several small platforms, each being guarded by a Rock Kroc. A Klaptrap attacks the heroes as they access the other end of the abyss. Two alcoves are located ahead of here, and a Klaptrap and the letter N stand in the small space between them. | |||
[[ | |||
Another Klaptrap is located just before another abyss with a barrel switch above the beginning of it. Two platforms occupied by Rock Krocs hover in the abyss, moving back and forth in a horizontal path. They can be used to help the heroes cross the abyss and reach an area containing a sign that indicates that the level is near complete. The duo can find two Stop & Go Barrel along a flat stretch of land ahead of here. Several Rock Krocs cover the pathway. A tire sticks out of the end of the land, which can be used to reach another Stop & Go Barrel placed high over a slightly lower stretch of land, also consisting of Rock Krocs. A tire stands on it that can be rolled under the next Stop & Go Barrel so that the heroes can bounce up to it. These Stop & Go Barrels are only set to "STOP" for one second before reverting. A few ledges are also ahead, leading into a raised area of ground containing a few more Rock Krocs. At the end of this area, the two friends can locate the letter G on a ledge that is followed by a exit sign. If the Kongs walk into the tunnel ahead of here, they complete the level. | |||
==Enemies== | |||
The following enemies appear, in the following quantities: | |||
<gallery> | |||
Klaptrap DKC.png|[[Klaptrap]] (blue) (16) | |||
Rockkroc DKC sprite.png|[[Rock Kroc]] (28) | |||
</gallery> | |||
==Items and objects== | |||
The following items and objects appear, in the following quantities: | |||
<gallery> | |||
Banana DKC SNES.png|[[Banana]] (88){{footnote|main|a}} | |||
Banana Bunch DKC SNES.png|[[Banana Bunch]]{{footnote|main|b}} | |||
DK Barrel DKC.png|[[DK Barrel]] (4) | |||
Expresso Token Sprite SNES.png|[[Expresso]] [[Animal token|token]] (1){{footnote|main|c}} | |||
Winky Token Sprite SNES.png|[[Winky]] [[Animal token|token]] (1){{footnote|main|d}} | |||
</gallery> | |||
{{footnote|note|a|Of the 88 bananas, 30 appear in the main level, and 28 and 30 appear in the first and second Bonus Levels, respectively.}} | |||
{{footnote|note|b|One Banana Bunch appears in the first Bonus Level, and two appear in the second Bonus Level.}} | |||
{{footnote|note|c|To find the Expresso token, the Kongs have to go past the letter K, travel over some more pits, and avoid some more Rock Krocs and Klaptraps. When they find the second Rock Kroc on the floating platform, they must quickly jump from the left to reach the token.}} | |||
{{footnote|note|d|The Winky token is in the second Bonus Level, where it can be obtained by blasting through the row of bananas on the right.}} | |||
===K-O-N-G Letters=== | |||
*'''K:''' The letter K is floating in midair just after the second Klaptrap. | |||
*'''O:''' After the Expresso Token, the Kongs must go a bit further and climb up a few wide stairs with two Klaptraps and two Rock Krocs. The letter O is hovering in the following pit, and a roll jump is required to obtain it. | |||
*'''N:''' About halfway in the level, the Kongs must jump from several small platforms, each guarded by a Rock Kroc, across a pit. The letter N is floating above a Klaptrap who is standing on a platform between two very narrow gaps. | |||
*'''G:''' The letter G is located right before the level exit, on the same platform. | |||
===Key items=== | |||
{{multiframe|[[File:Sticker Pad SnGS.png]] [[File:Stop and Go Station GBA photograph.png]]|size=420|The locations of the DK Sticker Pack and Photograph in the Game Boy Color and Game Boy Advance versions, respectively.}} | |||
*'''[[DK Sticker Pack]]''' ([[Donkey Kong Country (Game Boy Color)|Game Boy Color version]] only): The DK Sticker Pack is hidden beneath a gap just right a Klaptrap and the letter N. [[Donkey Kong]] must Hand Slap on to the patch to unearth it. | |||
*'''[[Photograph]]''' ([[Donkey Kong Country (Game Boy Advance)|Game Boy Advance version]] only): After the Expresso Token, the Kongs must continue onward and pass a DK Barrel. After crossing to the next platform, the Kongs must go left to find a photograph floating over a pit. They can reach it by using a roll jump. The photograph is of Rock Kroc, who appears in the fourth page of the [[Scrapbook (Donkey Kong Country series)|scrapbook]]. | |||
{{br}} | {{br}} | ||
==Bonus Levels== | |||
{{multiframe|[[File:Stop & Go Station Bonus 1.png|200px]] [[File:Stop & Go Station Bonus 2.png|200px]]|size=420|The first and second Bonus Levels respectively}} | |||
Ropey Rampage has two Bonus Levels, listed by their type in the Game Boy Advance version: | |||
*'''''Find the Exit!''''': After crossing the Continue Barrel, the Kongs can notice a barrel lying in plain sight. They must pick it up and carry it, and walk into a Stop & Go Barrel along the way. There is a wall behind the second Rock Kroc, which the Kongs must break to enter into the [[Bonus room|Bonus Level]]. In the Bonus Level, the Kongs have the option to shoot in a square path with four [[Barrel Cannon]]s, collecting bananas along the way. There is a [[Banana Bunch]] in the center of the area. The Kongs can exit either by falling down the pit or from the exit on the right side. | |||
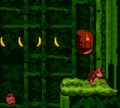
*'''''Collect the Prizes!''''': After exiting the first Bonus Level, the Kongs can go a bit further to discover three bananas arranged vertically in midair. They must go a bit further to find a [[Tire (object)|tire]], which they must roll back to the area with the three bananas. They must then bounce up to the bananas which lead directly above into the Bonus Level. In the Bonus Level, the Kongs are inside of a vertical-facing Barrel Cannon, and can blast straight into the prizes, which are arranged in three columns. Each column has ten single bananas and a collectible at the top. The first two columns have a Banana Bunch at the top while the third, latter column has a Winky Token. After blasting up, the Kongs either fall down the pit or land back into the Barrel Cannon; by missing the Barrel Cannon, they return into the main level. | |||
==Warp== | |||
The warp is in the level entrance at the very start. By walking back into it, the Kongs are teleported near the end of the level, just at the arrow sign indicating the nearby level exit. | |||
==Gallery== | ==Gallery== | ||
<gallery> | <gallery> | ||
Stop & Go Station SNES 3.png|Diddy | Stop & Go Station K.png|The location of the letter K | ||
Stop & Go Station SNES | Stop & Go Station O.png|The location of the letter O | ||
Stop | Stop & Go Station N.png|The location of the letter N | ||
Stop | Stop & Go Station G.png|The location of the letter G | ||
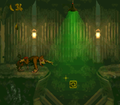
Stop & Go Station SNES 1.png|The Kongs standing at a chasm. | |||
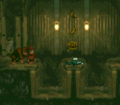
Stop & Go Station SNES 2.png|The primates stand in the beginning portion of the level. | |||
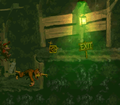
Stop & Go Station SNES 3.png|Diddy walks into a stopped Stop & Go barrel. | |||
Stop & Go Station SNES 4.png|Donkey Kong is attacked by some Rock Krocs. | |||
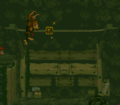
Stop & Go Station tire bouncing.png|The Kongs bouncing at a Stop & Go Barrel from a tire near the level exit. | |||
Stop and Go Station GBC Letter O.png|Diddy cartwheeling to the letter O in the Game Boy Color version | |||
Stop and Go Station GBC Bonus Area 1 exit.png|Diddy standing at the first Bonus Level's exit in the Game Boy Color version. | |||
</gallery> | </gallery> | ||
==Names in other languages== | ==Names in other languages== | ||
{{foreign names | {{foreign names | ||
|Jap=ストップ&ゴー ステーション | |Jap=ストップ&ゴー ステーション | ||
|JapR=Sutoppu & | |JapR=Sutoppu & Gō Sutēshon | ||
|JapM= | |JapM=Stop & Go Station | ||
|Spa=Barriles Semáforo | |Spa=Barriles Semáforo | ||
|SpaM=" | |SpaM=Traffic Light Barrels | ||
|Fre=Station Feux Rouge et Vert | |||
|FreM=Red and Green Lights Station | |||
|Ger=Ruckzuck-Station (SNES)<br>Stop & Go-Station (GBA) | |||
|GerM="Ruckzuck" means "in no time" or "easily"<br>- | |||
|Ita=Attiva il Semaforo | |||
|ItaM=Activate the Traffic Lights | |||
}} | }} | ||
{{DKC | ==References== | ||
[[Category: | <references/> | ||
[[Category:Donkey Kong Country | |||
{{DKC levels}} | |||
[[Category:Mines]] | |||
[[Category:Donkey Kong Country levels]] | |||
Latest revision as of 23:08, April 20, 2024
| Level | |
|---|---|
| Stop & Go Station | |

| |
| Level code | 2-4 |
| World | Monkey Mines |
| Game | Donkey Kong Country |
| Music track | Misty Menace |
| << Directory of levels >> | |
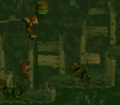
Stop & Go Station, also named Stop and Go,[1] is the ninth level of Donkey Kong Country and the fourth level of Monkey Mines. It takes place inside a mine tunnel, featuring green lighting and several Rock Krocs moving around. Aside from Rock Krocs, there are also Klaptraps, which first appear in the level. The level is divided into segments by the Stop & Go Barrels, which are used to temporarily immobilize the Rock Krocs so that Donkey Kong and Diddy Kong can move by them safely. When the Kongs hit a Stop & Go Barrel "GO", it changes to "STOP", and the lighting changes to red. However, after a few seconds, the stage and hue revert back to "GO" and green, respectively, and the Rock Krocs resume their movement.
Layout[edit]


At the beginning of the level, the Kongs exit a small tunnel and make their way towards several small ledges. After dropping down the second ledge, they find a Klaptrap and a barrel switch that displays the word 'Go'. Once they hit it, the Rock Kroc dashing in the small area of land ahead crouches into a ball, allowing the primates to cross. A DK Barrel and another barrel switch is located nearby, and they are followed by several ledges with more Rock Krocs on the edge of them. The Kongs can find a Klaptrap on the top ledge, which is followed by a lower area containing the letter K and a tire that can assist them in crossing a pit and reaching a barrel switch high in the air. Two Rock Krocs race in the small area after here, avoiding another pit found farther ahead.
On the opposite side of this abyss, the heroes can find a flat piece of ground with a Klaptrap on it and a barrel switch above it that they can hit to flip the color of the lights, causing the Rock Krocs to curl into balls if they are not already in their hiding position. An abyss can be found after the barrel switch with a small platform guarded by a Rock Krocs in it. The primates are able to locate a pair of Klaptraps and an additional barrel switch on other other side of the pit. Two more small pits are ahead of here, and the platform surrounded by them holds a pair of Rock Krocs. Another barrel switch is also in the second abyss, which is followed by an additional pit that can only be crossed with the use of a moving platform that is occupied by a Rock Kroc. The Kongs can discover a DK Barrel and another barrel switch on the other end of the drop. They are followed by an additional pit with several ledges after it. Most of the ledges hold Rock Krocs, but others carry Klaptraps. At the top ledge, the heroes can find a small pit containing the letter O and then the level's Continue Barrel.
If the Kongs continue forward, they drop down a tall ledge with a barrel next to it, which is supported by a smaller ledge that is followed by a flat area with a Rock Kroc and a barrel switch on it. Another Rock Kroc runs in a lower area located just before a higher area of ground that supports a Klaptrap. The Kongs can find a trio of Klaptraps in a slightly lower area nearby with a wall of bananas in front of it. After climbing a ledge found ahead of the enemies, the primates reach an area containing a DK Barrel and a tire that they can roll towards a barrel switch found high in the air. The tire can help them bounce to the switch, which then causes the Rock Krocs to roll up into a ball for a limited amount of time. A few Klaptraps march around the area, which is followed by a wide abyss containing several small platforms, each being guarded by a Rock Kroc. A Klaptrap attacks the heroes as they access the other end of the abyss. Two alcoves are located ahead of here, and a Klaptrap and the letter N stand in the small space between them.
Another Klaptrap is located just before another abyss with a barrel switch above the beginning of it. Two platforms occupied by Rock Krocs hover in the abyss, moving back and forth in a horizontal path. They can be used to help the heroes cross the abyss and reach an area containing a sign that indicates that the level is near complete. The duo can find two Stop & Go Barrel along a flat stretch of land ahead of here. Several Rock Krocs cover the pathway. A tire sticks out of the end of the land, which can be used to reach another Stop & Go Barrel placed high over a slightly lower stretch of land, also consisting of Rock Krocs. A tire stands on it that can be rolled under the next Stop & Go Barrel so that the heroes can bounce up to it. These Stop & Go Barrels are only set to "STOP" for one second before reverting. A few ledges are also ahead, leading into a raised area of ground containing a few more Rock Krocs. At the end of this area, the two friends can locate the letter G on a ledge that is followed by a exit sign. If the Kongs walk into the tunnel ahead of here, they complete the level.
Enemies[edit]
The following enemies appear, in the following quantities:

Items and objects[edit]
The following items and objects appear, in the following quantities:

DK Barrel (4)


a - Of the 88 bananas, 30 appear in the main level, and 28 and 30 appear in the first and second Bonus Levels, respectively.
b - One Banana Bunch appears in the first Bonus Level, and two appear in the second Bonus Level.
c - To find the Expresso token, the Kongs have to go past the letter K, travel over some more pits, and avoid some more Rock Krocs and Klaptraps. When they find the second Rock Kroc on the floating platform, they must quickly jump from the left to reach the token.
d - The Winky token is in the second Bonus Level, where it can be obtained by blasting through the row of bananas on the right.
K-O-N-G Letters[edit]
- K: The letter K is floating in midair just after the second Klaptrap.
- O: After the Expresso Token, the Kongs must go a bit further and climb up a few wide stairs with two Klaptraps and two Rock Krocs. The letter O is hovering in the following pit, and a roll jump is required to obtain it.
- N: About halfway in the level, the Kongs must jump from several small platforms, each guarded by a Rock Kroc, across a pit. The letter N is floating above a Klaptrap who is standing on a platform between two very narrow gaps.
- G: The letter G is located right before the level exit, on the same platform.
Key items[edit]


- DK Sticker Pack (Game Boy Color version only): The DK Sticker Pack is hidden beneath a gap just right a Klaptrap and the letter N. Donkey Kong must Hand Slap on to the patch to unearth it.
- Photograph (Game Boy Advance version only): After the Expresso Token, the Kongs must continue onward and pass a DK Barrel. After crossing to the next platform, the Kongs must go left to find a photograph floating over a pit. They can reach it by using a roll jump. The photograph is of Rock Kroc, who appears in the fourth page of the scrapbook.
Bonus Levels[edit]


Ropey Rampage has two Bonus Levels, listed by their type in the Game Boy Advance version:
- Find the Exit!: After crossing the Continue Barrel, the Kongs can notice a barrel lying in plain sight. They must pick it up and carry it, and walk into a Stop & Go Barrel along the way. There is a wall behind the second Rock Kroc, which the Kongs must break to enter into the Bonus Level. In the Bonus Level, the Kongs have the option to shoot in a square path with four Barrel Cannons, collecting bananas along the way. There is a Banana Bunch in the center of the area. The Kongs can exit either by falling down the pit or from the exit on the right side.
- Collect the Prizes!: After exiting the first Bonus Level, the Kongs can go a bit further to discover three bananas arranged vertically in midair. They must go a bit further to find a tire, which they must roll back to the area with the three bananas. They must then bounce up to the bananas which lead directly above into the Bonus Level. In the Bonus Level, the Kongs are inside of a vertical-facing Barrel Cannon, and can blast straight into the prizes, which are arranged in three columns. Each column has ten single bananas and a collectible at the top. The first two columns have a Banana Bunch at the top while the third, latter column has a Winky Token. After blasting up, the Kongs either fall down the pit or land back into the Barrel Cannon; by missing the Barrel Cannon, they return into the main level.
Warp[edit]
The warp is in the level entrance at the very start. By walking back into it, the Kongs are teleported near the end of the level, just at the arrow sign indicating the nearby level exit.
Gallery[edit]
The location of the letter K
The location of the letter O
The location of the letter N
The location of the letter G
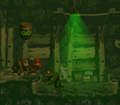
The Kongs standing at a chasm.
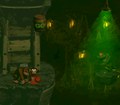
The primates stand in the beginning portion of the level.
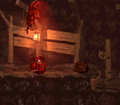
Diddy walks into a stopped Stop & Go barrel.
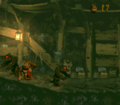
Donkey Kong is attacked by some Rock Krocs.
The Kongs bouncing at a Stop & Go Barrel from a tire near the level exit.

Diddy cartwheeling to the letter O in the Game Boy Color version
Diddy standing at the first Bonus Level's exit in the Game Boy Color version.


Names in other languages[edit]
| Language | Name | Meaning |
|---|---|---|
| Japanese | ストップ&ゴー ステーション Sutoppu & Gō Sutēshon |
Stop & Go Station |
| French | Station Feux Rouge et Vert |
Red and Green Lights Station |
| German | Ruckzuck-Station (SNES) Stop & Go-Station (GBA) |
"Ruckzuck" means "in no time" or "easily" - |
| Italian | Attiva il Semaforo |
Activate the Traffic Lights |
| Spanish | Barriles Semáforo |
Traffic Light Barrels |
References[edit]
- ^ Nintendo Magazine System (UK) issue 28, page 58.