Kong Krazy: Difference between revisions
Fawfulfury65 (talk | contribs) (New page: {{image}} {{level |title=Kong Krazy |image= |difficulty=Hard |code=4 - 2 |game=''Donkey Kong Land'' |notes=This level features several Kong Letters, which can be used for platforms...) |
No edit summary |
||
| (38 intermediate revisions by 23 users not shown) | |||
| Line 1: | Line 1: | ||
{{level infobox | |||
{{level | |image=[[File:Kong Krazy.png]] | ||
| | |code=4-2 | ||
|code=4 - 2 | |||
|game=''[[Donkey Kong Land]]'' | |game=''[[Donkey Kong Land]]'' | ||
| | |track=Airship | ||
|after=[[ | |after=[[Balloon Barrage|>>]] | ||
|before=[[ | |before=[[Construction Site Fight|<<]] | ||
}} | }} | ||
'''Kong Krazy''' is | '''Kong Krazy'''<ref>''Donkey Kong Land'' instruction booklet, page 19.</ref> is the twenty-fifth level in ''[[Donkey Kong Land]]'' and the second level of [[Big Ape City]]. Kong Krazy takes place in a blimp, and it has a unique mechanic where [[Donkey Kong]] and [[Diddy Kong]] must collect three sets of [[KONG Letters]] as objects, each of which are used to form a platform over a gap by jumping on a [[KONG button]]. Even if the Kongs miss a letter in a set, an incomplete platform is still created. | ||
==Layout== | |||
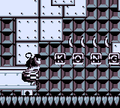
[[File:KongKrazy-Stairs.png|thumb|left|Diddy standing on the second set of KONG Letter platforms]] | |||
When the Kongs begin the level, the must grab the fake letter K and hop over a gap. Then, they should bounce off of a Kremling to reach the letter O, high in the air. After that, they need to roll under a Zinger while dodging two Klaptraps, and then jump up to snatch the letter N, followed by the letter G. Once all is collected, the Kongs must leap onto the switch nearby. It will take the KONG Letters out of their inventory and form them into a small bridge for the Kongs to cross. After that, they need to drop down a ledge and follow the path of bananas down, where they'll land on an Army. Then, the heroes should hop into the barrel by the ledge and shoot to the letter K below. They must bounce off the [[tire (object)|tire]] to get back in the barrel, and then shoot out to the east ledge. Here, they will defeat two Slippas and grab the letter O next to them. Moving on, the heroes should snatch the letter N under a Kremling and pick up a [[TNT Barrel]] to the right. They should carry it down the path and throw it at the Zinger in front of the letter G, then get the item. After that, the apes must cling onto a rope. It will take them to the next switch. When they land on it, the KONG Letters will, again, leave their inventory and form stairs so the Kongs can reach a high ledge. From that point, they will find the [[Continue Point]]. | |||
After that, the heroes need to walk down the path and grab the letter K, as well as the letter O hidden under a Zinger. They must sneak under another Zinger and bounce off a tire to reach the letter N above a fast-moving Zinger. When this is obtained, the Kongs must carefully continue up the path, where they will see the letter G right next to a Zinger. With caution, they should quickly jump up to it when the bee is lower to the ground, and snatch the letter before getting hit. With all the letters obtained, the Kongs must hop into a barrel and shoot across a large abyss. On the other end, they'll roll under another Zinger and jump on a switch. It will take the first two letters out of the [[Donkey Kong|Donkey]] and [[Diddy Kong|Diddy's]] inventory, and then place them over a large gap. The Kongs must be careful, as the two letters are far apart, and they can fall in between them. After that, the heroes will spy another switch. They need to jump on this one, and make the last two letters form the rest of the bridge. Again, they are spaced apart, so the Kongs must be careful. Off the platforms, the Kongs must hop off a big ledge and continue east, where they'll find the real letter O, that will not be used for a bridge. They will then have to beat a Mini-Necky as they travel along and hop across a large gap, where they'll find a tire. After defeating two Armies, they can use the tire to bounce up to the real letter N. The Kongs can also find the real letter G as they continue east. It is right next to a Hogwash above their heads. Soon, the Kongs will finally find a portal, leading out of the level. | |||
==Enemies== | |||
*[[Army]] | |||
*[[Hogwash the Flying Pig|Hogwash]] | |||
*[[Klaptrap]] | |||
*[[Kritter]] | |||
*[[Gnawty]] | |||
*[[Mincer]] (Bonus Area only) | |||
*[[Slippa]] | |||
*[[Zinger]] | |||
==Items and objects== | |||
The following items and objects appear in the following quantities: | |||
*[[DK Barrel]]s: 2 | |||
*[[Kong Token]]s: 2 | |||
*[[Tire (object)|Tire]]: 1 | |||
*[[TNT Barrel]]: 1 | |||
After crossing the third | ===KONG Letters=== | ||
The fourth and final set of KONG Letters are the actual collectible items: | |||
*K: Found in the Bonus Area. | |||
*O: West of where the heroes are deposited after the bonus level. | |||
*N: A tire is needed to reach the N Letter, which is among some Bananas above two Army enemies. | |||
*G: Floating near a Hogwash. | |||
==Bonus Area== | |||
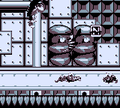
[[File:KongKrazy-K.png|thumb]] | |||
Kong Krazy has one [[Bonus room|Bonus Area]]: | |||
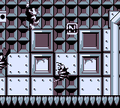
*After crossing the third bridge of KONG Letters, the Kongs must jump down a large ledge, following the trail of [[banana]]s as they fall. By doing so, the Kongs can open a hole in the ground from landing, causing a [[rope]] to come out. The Kongs must grab on the rope, which carries them up into a [[Bonus Area]]. The Bonus Area takes place on a rooftop in a construction site with three Mincers that move up and down. Donkey Kong and Diddy Kong must avoid the Mincers while moving across, and they can jump between them to collect two [[Kong Token]]s and the actual letter K. After the Mincers, the Kongs can jump into a [[Blast Barrel]] to the right to return into the main level. | |||
==Gallery== | |||
<gallery> | |||
Kong Krazy DKL first letter O.png|The first letter O | |||
Kong Krazy DKL first letter N.png|The first letter N | |||
Kong Krazy DKL bridge.png|Diddy forms a bridge from the first set of KONG Letters | |||
Kong Krazy DKL second letter O.png|The second letter O | |||
Kong Krazy DKL third letter O.png|The third letter O | |||
Kong Krazy DKL third letter N.png|The third letter N | |||
</gallery> | |||
==Names in other languages== | |||
{{foreign names | |||
|Jap=飛行船1 | |||
|JapR=Hikōsen1 | |||
|JapM=Blimp 1 | |||
|Spa=La locura de Kong | |||
|SpaM=The Kong's crazyness | |||
|Ita=Kong Krazy<ref>''[[Donkey Kong Land]]'' Italian booklet, pag. 19</ref> | |||
}} | |||
==References== | |||
<references/> | |||
{{DKL}} | {{DKL}} | ||
[[ | [[Category:Airship areas]] | ||
[[ | [[Category:Donkey Kong Land levels]] | ||
Latest revision as of 15:04, December 15, 2023
| Level | |
|---|---|
| Kong Krazy | |

| |
| Level code | 4-2 |
| Game | Donkey Kong Land |
| Music track | Airship |
| << Directory of levels >> | |
Kong Krazy[1] is the twenty-fifth level in Donkey Kong Land and the second level of Big Ape City. Kong Krazy takes place in a blimp, and it has a unique mechanic where Donkey Kong and Diddy Kong must collect three sets of KONG Letters as objects, each of which are used to form a platform over a gap by jumping on a KONG button. Even if the Kongs miss a letter in a set, an incomplete platform is still created.
Layout[edit]

When the Kongs begin the level, the must grab the fake letter K and hop over a gap. Then, they should bounce off of a Kremling to reach the letter O, high in the air. After that, they need to roll under a Zinger while dodging two Klaptraps, and then jump up to snatch the letter N, followed by the letter G. Once all is collected, the Kongs must leap onto the switch nearby. It will take the KONG Letters out of their inventory and form them into a small bridge for the Kongs to cross. After that, they need to drop down a ledge and follow the path of bananas down, where they'll land on an Army. Then, the heroes should hop into the barrel by the ledge and shoot to the letter K below. They must bounce off the tire to get back in the barrel, and then shoot out to the east ledge. Here, they will defeat two Slippas and grab the letter O next to them. Moving on, the heroes should snatch the letter N under a Kremling and pick up a TNT Barrel to the right. They should carry it down the path and throw it at the Zinger in front of the letter G, then get the item. After that, the apes must cling onto a rope. It will take them to the next switch. When they land on it, the KONG Letters will, again, leave their inventory and form stairs so the Kongs can reach a high ledge. From that point, they will find the Continue Point.
After that, the heroes need to walk down the path and grab the letter K, as well as the letter O hidden under a Zinger. They must sneak under another Zinger and bounce off a tire to reach the letter N above a fast-moving Zinger. When this is obtained, the Kongs must carefully continue up the path, where they will see the letter G right next to a Zinger. With caution, they should quickly jump up to it when the bee is lower to the ground, and snatch the letter before getting hit. With all the letters obtained, the Kongs must hop into a barrel and shoot across a large abyss. On the other end, they'll roll under another Zinger and jump on a switch. It will take the first two letters out of the Donkey and Diddy's inventory, and then place them over a large gap. The Kongs must be careful, as the two letters are far apart, and they can fall in between them. After that, the heroes will spy another switch. They need to jump on this one, and make the last two letters form the rest of the bridge. Again, they are spaced apart, so the Kongs must be careful. Off the platforms, the Kongs must hop off a big ledge and continue east, where they'll find the real letter O, that will not be used for a bridge. They will then have to beat a Mini-Necky as they travel along and hop across a large gap, where they'll find a tire. After defeating two Armies, they can use the tire to bounce up to the real letter N. The Kongs can also find the real letter G as they continue east. It is right next to a Hogwash above their heads. Soon, the Kongs will finally find a portal, leading out of the level.
Enemies[edit]
Items and objects[edit]
The following items and objects appear in the following quantities:
- DK Barrels: 2
- Kong Tokens: 2
- Tire: 1
- TNT Barrel: 1
KONG Letters[edit]
The fourth and final set of KONG Letters are the actual collectible items:
- K: Found in the Bonus Area.
- O: West of where the heroes are deposited after the bonus level.
- N: A tire is needed to reach the N Letter, which is among some Bananas above two Army enemies.
- G: Floating near a Hogwash.
Bonus Area[edit]

Kong Krazy has one Bonus Area:
- After crossing the third bridge of KONG Letters, the Kongs must jump down a large ledge, following the trail of bananas as they fall. By doing so, the Kongs can open a hole in the ground from landing, causing a rope to come out. The Kongs must grab on the rope, which carries them up into a Bonus Area. The Bonus Area takes place on a rooftop in a construction site with three Mincers that move up and down. Donkey Kong and Diddy Kong must avoid the Mincers while moving across, and they can jump between them to collect two Kong Tokens and the actual letter K. After the Mincers, the Kongs can jump into a Blast Barrel to the right to return into the main level.
Gallery[edit]
The first letter O
The first letter N
Diddy forms a bridge from the first set of KONG Letters
The second letter O

The third letter O
The third letter N


Names in other languages[edit]
| Language | Name | Meaning |
|---|---|---|
| Japanese | 飛行船1 Hikōsen1 |
Blimp 1 |
| Italian | Kong Krazy[2] |
- |
| Spanish | La locura de Kong |
The Kong's crazyness |
References[edit]
- ^ Donkey Kong Land instruction booklet, page 19.
- ^ Donkey Kong Land Italian booklet, pag. 19