Congo Carnage: Difference between revisions
LinkTheLefty (talk | contribs) No edit summary |
No edit summary |
||
| (10 intermediate revisions by 5 users not shown) | |||
| Line 1: | Line 1: | ||
{{ | {{level infobox | ||
|image=[[File:CongoCarnage-1.png]] | |image=[[File:CongoCarnage-1.png]] | ||
|code=1-8 | |code=1-8 | ||
| Line 6: | Line 6: | ||
|before=[[Riggin' Rumble|<<]] | |before=[[Riggin' Rumble|<<]] | ||
}} | }} | ||
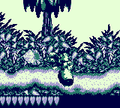
'''Congo Carnage'''<ref>''Donkey Kong Land'' instruction booklet, page 16.</ref> is the eighth level in ''[[Donkey Kong Land]]'' and of the first world, [[Gangplank Galleon Ahoy!]] | '''Congo Carnage'''<ref>''Donkey Kong Land'' instruction booklet, page 16.</ref> is the eighth level in ''[[Donkey Kong Land]]'' and of the first world, [[Gangplank Galleon Ahoy!]] Congo Carnage is a short level taking place in a jungle where [[Donkey Kong]] and [[Diddy Kong]] swing from [[rope]]s to move across [[pit]]s. The [[Kong]]s encounter many [[Zinger]]s circling the ropes, as well as [[Kritter]]s, [[Gnawty]]s, and perched [[Necky]]s. This is the first level to feature [[Steel Keg]]s, which can defeat enemies in succession or break open walls. | ||
Congo Carnage is a short level | |||
==Layout== | ==Layout== | ||
| Line 17: | Line 14: | ||
==Enemies== | ==Enemies== | ||
The following enemies appear in the following quantities: | |||
*[[Gnawty|Gnawties]]: 3 | *[[Gnawty|Gnawties]]: 3 | ||
*[[Kritter]]s: 6 | *[[Kritter]]s: 6 | ||
*[[Necky | *[[Necky]]s: 2 | ||
*[[Zinger]]s: 7 | *[[Zinger]]s: 7 | ||
==Items and objects== | ==Items and objects== | ||
The following items and objects appear in the following quantities: | |||
*[[DK Barrel]]: 3 | *[[DK Barrel]]: 3 | ||
*[[Kong Token]]: 4 (3 of which are in a Bonus Area) | *[[Kong Token]]: 4 (3 of which are in a Bonus Area) | ||
| Line 31: | Line 32: | ||
*K: Found by climbing up the rope at the start of the level and going right. | *K: Found by climbing up the rope at the start of the level and going right. | ||
*O: Hovering over a gap shortly after three Gnawty. | *O: Hovering over a gap shortly after three Gnawty. | ||
*N: In the air during a | *N: In the air during a rope climbing section. | ||
*G: After five Zingers in a later rope section, the "G" should be hovering high. | *G: After five Zingers in a later rope section, the "G" should be hovering high. | ||
{{br}} | {{br}} | ||
==Bonus Areas== | ==Bonus Areas== | ||
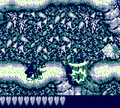
[[File:CongoCarnage-3.png|thumb|The first Bonus Area]] | |||
Congo Carnage has two [[Bonus room|Bonus Areas]]: | |||
*When the Kongs grab on the first rope in the level, they must climb near the bottom of it. Directly below the letter K is a [[Blast Barrel]], which they must fall into to access the [[Bonus Area]]. In it, Donkey Kong or Diddy must jump up a ship mast and collect four Kong Tokens along the way while avoiding some [[Mincer]]s. They can return into the main level by entering a Blast Barrel at the top-right. | |||
*When the Kongs encounter the second perched [[Necky]], they must jump down from the ledge and enter a nearby Blast Barrel that takes them into the second Bonus Level. There, the Kongs can jump on a button to make a barrel release their Kong Tokens, which they can jump at to obtain [[extra life|extra lives]]. After the Kongs use all of their Kong Tokens, they are automatically sent back into the main level. | |||
|When the Kongs grab on the first rope in the level, they must climb near the bottom of it. Directly below the letter K is a [[Blast Barrel]], which they must fall into to access the [[Bonus Area]]. In it, Donkey Kong or Diddy must jump up a ship mast and collect four Kong Tokens along the way while avoiding some [[Mincer]]s. They can return into the main level by entering a Blast Barrel at the top-right. | |||
==Gallery== | ==Gallery== | ||
| Line 61: | Line 58: | ||
|JapM=Rope Jungle 2 | |JapM=Rope Jungle 2 | ||
|Spa=Batalla en el Congo | |Spa=Batalla en el Congo | ||
|SpaM=Battle in the Congo}} | |SpaM=Battle in the Congo | ||
|Ita=La carneficina del Congo<ref>''[[Donkey Kong Land]]'' Italian booklet, pag. 16</ref> | |||
|ItaM=The Congo massacre | |||
}} | |||
==References== | ==References== | ||
<references/> | <references/> | ||
{{DKL}} | {{DKL}} | ||
[[Category: | [[Category:Jungles]] | ||
[[Category:Donkey Kong Land | [[Category:Donkey Kong Land levels]] | ||
Latest revision as of 13:48, December 15, 2023
| Level | |
|---|---|
| Congo Carnage | |

| |
| Level code | 1-8 |
| Game | Donkey Kong Land |
| << Directory of levels >> | |
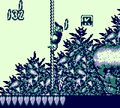
Congo Carnage[1] is the eighth level in Donkey Kong Land and of the first world, Gangplank Galleon Ahoy! Congo Carnage is a short level taking place in a jungle where Donkey Kong and Diddy Kong swing from ropes to move across pits. The Kongs encounter many Zingers circling the ropes, as well as Kritters, Gnawtys, and perched Neckys. This is the first level to feature Steel Kegs, which can defeat enemies in succession or break open walls.
Layout[edit]
From the start of the level, the heroes must hop in a barrel to shoot to a rope. The rope will guide them to the letter K, and then take them to a high ledge. There, they will have to drop down a smaller ledge and come up to a Steel Keg. They should throw it down the path and defeat all the enemies walking by. Once the Kongs follow the barrel until it falls into a pit, they must sneak under a nut-throwing Necky and quickly cling onto a nearby rope. It will lead them to another rope, which must be grabbed onto. This rope will take them to land again, where the Continue Point is.
Halfway through the level, the Kongs need to continue east and sneak under another Necky, before it hits them with its coconuts. Traveling down more of the path will lead the Kongs into a ditch. The walls here are too large to jump over, but there is another Steel Keg which they should throw at the wall on the right to break it, opening a small tunnel they can walk through. The group must journey along more of the jungle from there and soon reach a rope. It will guide them over a large pit. However, as it moves to the other end of the abyss, the heroes must watch out for many Zingers flying all around the area. Shortly after collecting the letter G, they will make it to a platform with a barrel on it. When they jump in the barrel, it will blast them to a portal. Jumping into this portal will take the Kongs to the next level.
Enemies[edit]
The following enemies appear in the following quantities:
Items and objects[edit]
The following items and objects appear in the following quantities:
- DK Barrel: 3
- Kong Token: 4 (3 of which are in a Bonus Area)
- Steel Keg: 2
K-O-N-G Letters[edit]

- K: Found by climbing up the rope at the start of the level and going right.
- O: Hovering over a gap shortly after three Gnawty.
- N: In the air during a rope climbing section.
- G: After five Zingers in a later rope section, the "G" should be hovering high.
Bonus Areas[edit]

Congo Carnage has two Bonus Areas:
- When the Kongs grab on the first rope in the level, they must climb near the bottom of it. Directly below the letter K is a Blast Barrel, which they must fall into to access the Bonus Area. In it, Donkey Kong or Diddy must jump up a ship mast and collect four Kong Tokens along the way while avoiding some Mincers. They can return into the main level by entering a Blast Barrel at the top-right.
- When the Kongs encounter the second perched Necky, they must jump down from the ledge and enter a nearby Blast Barrel that takes them into the second Bonus Level. There, the Kongs can jump on a button to make a barrel release their Kong Tokens, which they can jump at to obtain extra lives. After the Kongs use all of their Kong Tokens, they are automatically sent back into the main level.
Gallery[edit]
DK near the letter K
DK finds the Blast Barrel that leads to the first Bonus Area, at the bottom right.
DK next to the Blast Barrel that leads to the second Bonus Area
DK walks through a tunnel discovered by breaking a feeble wall.
Diddy rolls on a Steel Keg down a footpath.


Names in other languages[edit]
| Language | Name | Meaning |
|---|---|---|
| Japanese | ロープ・ジャングル2 Rōpu Janguru2 |
Rope Jungle 2 |
| Italian | La carneficina del Congo[2] |
The Congo massacre |
| Spanish | Batalla en el Congo |
Battle in the Congo |
References[edit]
- ^ Donkey Kong Land instruction booklet, page 16.
- ^ Donkey Kong Land Italian booklet, pag. 16