Workshop (Mario vs. Donkey Kong series)
- "Construction Zone" redirects here. It is not to be confused with Construction Site or Work Zone.

- “Create your own original masterpiece.”
- —Mario vs. Donkey Kong 2: March of the Minis instruction booklet
The Workshop, previously known as the Construction Zone, is a game mode in the Mario vs. Donkey Kong series that allows the player to create and save their own levels, as well as exchange custom levels with other players. It is introduced in Mario vs. Donkey Kong 2: March of the Minis, and returns in Mario vs. Donkey Kong: Minis March Again!, Mario vs. Donkey Kong: Mini-Land Mayhem!, and Mario vs. Donkey Kong: Tipping Stars. In Mario and Donkey Kong: Minis on the Move, a similar mode known as Create & Share makes its debut. Prior to the discontinuation of the Nintendo Wi-Fi Connection service in 2014, players could utilize the service to distribute their own levels online.
The concept for the Construction Zone dates back to the DESIGN mode of Wrecking Crew, with a similar level editor being planned for the original Mario vs. Donkey Kong.
History[edit]
Mario vs. Donkey Kong 2: March of the Minis[edit]
The Construction Zone game mode is introduced in Mario vs. Donkey Kong 2: March of the Minis, allowing the player to create, play, and share their own levels, as well as receive levels from other players.
Play Level[edit]
If the player selects Play Level, they can play certain levels made in the Construction Zone.
- Your Levels: levels that the player has created which have passed the play test. Up to 8 of these levels can be stored.
- Received Levels: levels that the player has received from other players, either locally or via Nintendo Wi-Fi Connection. Up to 24 of these levels can be stored.
Edit Level[edit]

To create or edit a level, the player must select Edit Level, then select one of 8 slots to edit. Slots with a blue outline indicate a level which has passed the play test, while all other slots use a yellow outline. To erase a level, the player must tap Erase Level and select a level to erase. If the player chooses an empty slot, they must select a construction kit to begin creating a new level. Before selecting a construction kit, the player can toggle the Template button to create a sample level instead of a level with only one Mini and the exit. There are a total of 11 construction kits.
| Construction kit | How to unlock |
|---|---|
| Mushroom Mayhem | Available from the start. |
| Tropical Island | Complete Boss Game 2. |
| Pipe Works | Complete Boss Game 3. |
| Magnet Mania | Complete Boss Game 4. |
| Lava Dome | Complete Boss Game 5. |
| Toadstool Castle | Complete Boss Game 6. |
| Spooky Attic | Complete Boss Game 7. |
| Jungle Hijinks | Complete Boss Game 8. |
| Special Kit 1 | Reach the goal score for Shy Guy Smash! in Mushroom Mayhem, Tropical Island, and Pipe Works. |
| Special Kit 2 | Reach the goal score for Shy Guy Smash! in Magnet Mania, Lava Dome, and Toadstool Castle. |
| Special Kit 3 | Reach the goal score for Shy Guy Smash! in Spooky Attic and Jungle Hijinks. |

The level creation screen features a Full View[1] on the top screen, allowing the player to view their entire level. A toolbar with several buttons is displayed on the top of the Touch Screen:
- Confirmation Menu:[1] Represented by a green Mini Mario button. Opens a drop-down menu with objects the player can use in their level. Tapping an object highlights it; tapping it again selects it and closes the menu. Tapping an empty space in the level inserts that object into the level. The player can drag the stylus across some objects (such as Pink Blocks) to change their size.
- Edit Menu:[1] Represented by a blue hammer button. Lets the player change the current mode, indicated by an icon to the immediate right of the button; if no icon is displayed, the player has selected an object from the Confirmation Menu.
- Erase: Lets the player remove objects by tapping them. Dragging the stylus across multiple objects removes them all at once.
- Move: Lets the player move objects by dragging them. Dragging the stylus across multiple objects selects them, allowing them to be moved all at once.
- Flip: Lets the player flip certain objects by tapping them, including Minis, most enemies, conveyor belts, rafts, and Moving Platforms.
- Reset: Clears the level (if Template is set to off) or resets the level back to the sample level (if Template is set to on).
- End Menu:[1] Represented by a red gear button. Lets the player save the level, test it, or exit editing. The player must name their level before saving it for the first time.
- Undo & Redo[1] buttons: Let the player undo their last action or restore their last undone action, respectively.
- Meter:[1] Decreases as more level elements are placed. If the meter runs out, the player cannot place any more objects into the level.

To share a level created in the Construction Zone with other players, the level must pass the play test. To test a level, the player must tap the Play Test button in the End Menu. The player must save their level before testing it. To pass the play test, the player must direct all of the Minis in the level so that they reach the exit within 600 seconds; otherwise, the level does not pass the play test.
Nintendo WFC[edit]
Before Nintendo Wi-Fi Connection was discontinued, players could use it to send or receive levels from other players.
- Synchronize: By connecting to Nintendo Wi-Fi Connection, players could synchronize their levels to make them available to others.
- Receive: As long as players knew each other's friend codes and had them installed under their friends list, they could receive levels from each other. Every so often, Nintendo also published an official level.[citation needed]
- Nintendo WFC Config: Allows the player to enter Nintendo Wi-Fi Connection Setup.
- WFC Friends: Up to 60 friends can be stored here, registered with a friend code. The player's friend code is displayed on the top screen.
Multi-Card[edit]
Two players, each with a copy of the game and with Nintendo DS systems close to each other, can locally send and receive levels made in the Construction Zone.
- Broadcast - One player can send a level to another player, if the other player chooses "Receive".
- Receive - One player can receive a level from another player, if the other player chooses "Broadcast".
Mario vs. Donkey Kong: Minis March Again![edit]

Construction Zone returns in Mario vs. Donkey Kong: Minis March Again!, with similar functionality that allows the player to create, play, and share custom levels. Its menu has been simplified from its previous appearance, with only three buttons present:
- Play: Opens a menu which allows the player to view and play levels they have created or received from other players. The player can also view more information about these levels, sort them, or delete them. Up to 140 levels can be saved.
- Edit: Opens a menu similar to the Play menu; however, by selecting a level, the player can open that level in the level editor instead of playing it. Additionally, a Create button is present, which allows the player to build a level from scratch.
- Share: Opens a menu with four options:
- Online Share: A mode similar to the Nintendo WFC mode in Mario vs. Donkey Kong 2: March of the Minis, which allowed the player to share custom levels online prior to the discontinuation of Nintendo Wi-Fi Connection.
- Local Share: A mode similar to the Multi-Card mode in Mario vs. Donkey Kong 2: March of the Minis, where the player can share and receive levels locally using the Broadcast and Receive features.
- Friend Roster: The player can view their Friend Code, as well as add or remove friends to their roster by registering their Friend Codes. Up to 60 Friend Codes can be stored.
- WFC Setup: Allows the player to enter Nintendo Wi-Fi Connection Setup.
Mario vs. Donkey Kong: Mini-Land Mayhem![edit]


Construction Zone returns in Mario vs. Donkey Kong: Mini-Land Mayhem!. To start using features in the Construction Zone, the player is required to create a user name.
Level Creation 101[edit]
Before the player can design their own levels, they must first complete a short tutorial in a mode called Level Creation 101 (or simply Tutorial in the British English version). The tutorial is presented in four short lessons, each of which brings the player in a nearly finalized level where a specific type and amount of elements must be placed in order to make the level possible to pass when play-tested.
- The first lesson, titled Ground Tiles 1, has the player position up to three ground tiles to form a staircase, enabling the Minis to reach an exit door.
- The second lesson, titled Ground Tiles 2, is similar to the first lesson in that it requires the player to form a staircase and a bridge over a gap using six ground tiles.
- The third lesson, titled Red Girder Rivets 1, has the player position two Red Girder Rivets beside two other that are already set up, then build a bridge of three Red Girders between them. During gameplay, this setup would allow the player to conveniently reposition the Red Girders, so as to prevent the Minis from falling into spikes.
- The fourth lesson, titled Red Girder Rivets 2, has the player similarly place three Red Girder Rivets on different levels and six Red Girders between these rivets.
When play-tested, these lessons function as actual levels where the Minis can collect M-Tokens and Mini Mario Cards, and the player can earn a score based on their performance. Once all of these lessons are complete, the player can begin using all features of the Construction Zone.

Lesson 1
Ground Tiles 1
(Goal Score: 14680)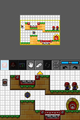
Lesson 2
Ground Tiles 2
(Goal Score: 14240)
Lesson 3
Red Girder Rivets 1
(Goal Score: 14400)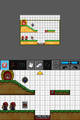
Lesson 4
Red Girder Rivets 2
(Goal Score: 14200)


Create[edit]

The Create feature represents the level editor, which is grid-based. Before starting a new level, the player must choose a Game Rule and Template Type for the level. The Game Rule refers to any of the four level types, whether they are Normal, Multi-Door, Key, or Magnet-based. Template Type refers to the default proportions of a level, designated as standard, wide, or tall. The dimensions of a level can later be adjusted in horizontal, vertical, or all directions (depending on the Template Type chosen) by dragging a special cursor on the top-right corner of the editing space. Preferences for Game Rule and Template Type are unlocked as the player progresses through the game; for example, the "Key" and "Multi-Door" Game Rules become available after completing Coaster Hills. After choosing a preference, the player should tap "OK" to begin editing.
Building starts out from a floor of ground tiles, where two Mini Marios, a Mini Mario Card and an M-Token are ordered before an exit door. These elements cannot be removed, as they are mandatory to exist in each level. There are ten sets of elements that can be used to build a level, eight main and two extra, based on each attraction of the game. These sets include objects and background themes. The Coaster Hills set, which includes ground tiles and Red Girders, is accessible from the start; more sets are unlocked once their corresponding attractions are completed. Completing Final Ferris Wheel grants access to both the Rainbow Summit and Secret Storage sets.
The player has a number of editing options to choose from a toolbar at the top of the screen. In order, the toolbar contains:
- two buttons that open drop-down menus where the player can locate and select elements to use in the level; each menu is divided into two separate columns that are navigated via a scrollbar;
- the Object Menu features fixed objects (e.g. tiles, pipes, cannons) in one column and resource items (e.g. Red Girders, Springs, Green Pipes) in the other;
- the Character / Item Menu features Minis and collectables in one column and enemies in the other;
- a button that accesses the Background Menu, where the player can change the theme of the level;
- the Move tool, a hand cursor that can be used to move elements on the screen; dragging it across multiple objects allows the player to move them all at once;
- the Erase tool, which can be used to remove elements on the screen; dragging it across multiple objects removes them all at once;
- the Flip tool, which can be used to swap the direction of Minis and enemies;
- a System Menu, which the player can tap and then choose to save, play-test, reset, or exit the level;
- two buttons that undo or redo actions.
In addition, the toolbar features a blue bar that drains as more elements are placed on the screen. When the bar is completely empty, no more elements can be placed.
In the process of saving a level, the player has to give it a name. After play-testing a level, the player is given the option to retry it, edit it, create a new level, or exit.
Play & Edit[edit]
The Play & Edit feature lists the player's own levels, as well as levels downloaded from other users. Levels that had been uploaded online and those that were downloaded are marked accordingly as "Uploaded" or "Downloaded". Selecting a level from the list on the bottom screen allows the player to view its layout on the top screen. Tapping the level a second time opens a window where the player can see its name, creator, high score, number of downloads from other users, and type of level. Here, the player can also choose to play, edit, or delete the level. If a level has not been completed in Play mode, then it will be marked as incomplete. The levels can be sorted by latest, name, creator's name, and size. Up to 160 levels on eight pages can be found here. The topmost level of each page is viewed on the top automatically after a change to the page number or a change to the sort type.
[edit]

The Share feature allows distribution of custom levels between users, either locally or online. In the "Share" center, there are two options to choose:[2][3]
- Local Share, an option that allows users to send or receive levels from nearby players, which is done via the DS Wireless Communications.
- Online Share, an option that made uploading and sharing levels online possible. It required Nintendo Wi-Fi Connection, which is discontinued as of May 20th, 2014, rendering the feature obsolete. The table below lists all actions that could be selected here.
| Share My Levels | Upload levels either publicly or privately. Public Upload enabled anyone to see the uploader's level, while Private Upload limited visibility to the uploader's contacts. |
| View My Online Levels | View a list of the player's own uploaded levels. As in the Play and Edit feature, the player could tap any level to display its creator, high score, number of times it had been downloaded, and template. They could also choose to upload, rename, or delete the level in case it had already been uploaded. In addition, levels could be sorted by latest, name, and size. |
| Get Public Levels | Search for levels made by other creators. The player could download and rate levels with up to five stars. Levels with a high general rating would appear as popular. By following a level's creator, the player registered their profile in the "Friends & Favorites" section. Levels could be selected by category, size and game rule. |
| Get Nintendo Levels | Search for levels made by Nintendo themselves. |
| Friends & Favorites | View and download levels from a separate list that only displayed friends and favorite creators. The player could register friends using Friend Codes; other creators could be marked as favorite by accessing their profile in the "Get Public Levels" feature. The player could store the profiles of up to thirty friends or favorite creators, and likewise delete them from the list at any time. |
In addition, the Online Share menu would link to the Challenge Center menu.
Challenge Mode[edit]
This section is about a work that used to be available to the public, but is now partially or entirely inaccessible.
Details: There is seldom any information online about the contests Nintendo held as part of this mode. One contest, called "Sunny Day", is instantiated in a UK trailer for the game (at 0:58). Other videos, uploaded by user Samzilla33 to YouTube, show levels submitted for contests allegedly titled "Conveyor Cut Up" and "My Gravity".
Our documentation of the subject is inadequate. Only remove this notice if the complete work is recovered and made available publicly.

The Challenge Mode feature allowed players to take part in level creation contests run by Nintendo every two weeks[4] prior to the termination of the Nintendo WFC. Each competition had a theme that was announced by Nintendo via the newsletter in the Challenge Center. To enter a competition, players had to download a template issued by Nintendo and create a level based on the template, then submit their entry and wait for other players to vote them. The candidate that garnered the most votes would win the competition. Players could only participate with one entry per contest and could download up to sixty Challenge Mode levels overall onto their system.
Below is a list of all items that could be selected in the Challenge Menu, accompanied by a description of the action they allowed.
| Create & Edit Level | Design a level based on the contest's template. The feature functioned like the level editor in the "Create" feature, except the player was limited to using only a certain number of elements within the course. If the template had not been downloaded beforehand, the game would automatically connect to the network to fetch it. This would overwrite the template that was currently saved on the player's console. | |
| Play & Judge Levels | Play and vote levels designed by other players. The feature was similar to the "Play & Edit" feature, in that it listed the player's own levels along with levels downloaded from other users. After playing a downloaded level, the player could judge it by giving it a number of stars, which were submitted online as a rating for that course. | |
| Challenge Center | Get Challenge Template | Download the template used in the current contest. The template could only be downloaded with the player's permission to overwrite the current template on their system. |
| Submit Challenge Template | Upload a level, only after clearing it during a play-test. After submission, the level could not be edited again. Levels could not be submitted to specific contests if their deadlines were up or the contest itself came to an end. | |
| View Challenge Entries | Search and download levels submitted by other users. The player could choose to see levels from the current or past contests. | |
Additionally, the Challenge Center menu featured a button that linked the player back to the Online Share menu.
Mario and Donkey Kong: Minis on the Move[edit]

Mario and Donkey Kong: Minis on the Move introduces a mode known as Create & Share, which features similar functionality to the Construction Zone modes from previous games; however, because Mario and Donkey Kong: Minis on the Move features significantly different gameplay from other games in the series, the Level Editor in Create & Share is accordingly distinct. The Create & Share menu features options similar to those found in Construction Zone:
- My Levels: The player can view and play levels that they have made. Tapping a New button highlights it; tapping it again opens the Level Editor.
- Find Levels: The player can connect online to find levels that other players have shared. Each level has a 12-digit ID number. The player can play these levels or save them to their Saved Levels.
- Top Weekly: Levels with a high popularity rating made in the past seven days.
- Random: Levels chosen at random.
- Popular: Levels with the highest popularity ratings of all time.
- Friends: Levels made by players on a player's Friend List.
- Saved Levels: The player can play any levels that they have saved.
- Settings: The player can access Create & Share Settings.
- Edit User Name: The player can change their user name.
- Clear Create & Share Data: The player can clear all levels in My Levels and Saved Levels.
Level Editor[edit]

In the Level Editor, the player can build their own level by placing tiles into a grid. All custom levels follow the rules of Mario's Main Event. Each new level starts from a grid with a start tile, the goal, and three M-Tokens. These elements are required in every level, and cannot be removed. A variety of buttons are available on the right side of the Touch Screen:
- Green tab: A tab with a red tile icon. Tapping it allows the player to select a level element, which they can then place into the level grid. The player can tap Red tiles placed on the grid do not appear in a level during gameplay; instead, they can be used to visualize a fully formed path between a Mini and the goal.
- Blue tab: A tab with a wrench icon. Tapping it allows the player to access tools:
- Move: Allows the player to move tiles by tapping and dragging them.
- Erase: Allows the player to remove tiles by tapping them.
- Rotate: Allows the player to rotate certain tiles by 90 degrees at a time by tapping them.
- Resize: Allows the player to resize the level grid by tapping and dragging its corners.
- Reset: Allows the player to reset the level back to the default template.
- Yellow arrow buttons: The left arrow button allows the player to undo their previous actions, while the right arrow button allows the player to redo such actions.
- Gear: A red button with a gear icon. Tapping this button allows the player to access level settings.
- Save & Test: Allows the player to name their level, set a time limit for the level (from 30 to 300 seconds, in increments of 10 seconds), and save the level. The player can then test their level. If the player completes their level with all three M-Tokens, the player can share their level online.
- Tile Control: Allows the player to determine which tiles appear in the tile pipe, as well as how often they appear. The player can choose between None, Some, and Many for each type of red tile, bomb tiles, and trash cans, as well as reset all options to their defaults.
- Exit Editor: Allows the player to quit the Level Editor, with or without saving their level.
Mario vs. Donkey Kong: Tipping Stars[edit]
As Mario vs. Donkey Kong: Tipping Stars returns to the gameplay style of Mario vs. Donkey Kong: Mini-Land Mayhem!, it also features a game mode similar to previous Construction Zone modes, known as the Workshop. Like previous games in the series, the Workshop allows players to design, store, and share custom levels. A total of 50 custom levels can be stored, but only up to 20 could be shared online. Levels can be transferred between both the Nintendo 3DS and the Wii U versions of the game.
To start building a level from scratch, the player can select an empty level slot labeled "New" and choose an Edit Mode between Single-Door Mode and Multi-Door Mode. The player can also edit and finish one of the three built-in template levels. Selecting a level slot with an existing level allows the player to either play, edit, or share the level. The player must complete a level before sharing it.

(uses Rolling Hills background)

(uses Crumbling Cavern background)

(uses Twilight Valley background)
In the Workshop menu, the player can enter the Workshop Store, a section in the Workshop where stars that the player has collected or received can be used to unlock objects and other elements for use in custom levels. The Workshop menu also allows the player to view their Stamp Collection, a gallery containing stamps awarded for tipping stars to other players. There are 72 stamps in total.
Workshop Editor[edit]


Creating a new level or editing an existing level opens the level editor, known as the Workshop Editor.[5] If the player creates a level from scratch, the Workshop Editor starts out with a Mini Mario, an M Coin, and a Goal Door lined above a plain ground floor, elements without which a level cannot be created. As with most other parts of the game, the Touch Screen must be used to perform any action within the editor, while the top screen is reserved to show the entirety of the level, with a frame highlighting the part of the level that is currently shown on the bottom screen. The editing space is navigated using the direction pad or the analog stick. It is grid-based, and its size can be increased by dragging a cursor located in the top-right corner.
There is a toolbar at the top of the Workshop Editor, which contains, in the following order:
- two buttons which open drop-down menus where the player can locate and select elements to use in the level;
- the first menu lists fixed objects (Cannons, Ladders, Color Switches etc.) and resource items (Red Girders, Purple Conveyors, Blue Lifts etc.);
- the second menu lists collectables, Minis, and enemies;
- a hand cursor which allows the player to place objects on the screen; it also works as a selection tool, which can be used to select multiple objects and move them together;
- a tool which is used to flip characters and enemies;
- an eraser tool which is used to remove elements on the screen with a single tap; multiple elements can be removed by dragging a selection rectangle around them while the eraser tool is active;
- two buttons that undo or redo the player's actions;
- a button which saves the level in its current state and allows the player to test it;
- a settings button which allows the player to set or change the level's name, background theme, and image icon.
Multimedia[edit]
Mario vs. Donkey Kong: Minis March Again![edit]
Mario vs. Donkey Kong: Mini-Land Mayhem![edit]
Names in other languages[edit]
| Language | Name | Meaning | Note(s) | Ref. |
|---|---|---|---|---|
| Japanese | エディタールーム Editā Rūmu |
Editor Room | [?] | |
| French | Mode construction | Construction mode | [?] | |
| Italian | Cantiere | Worksite | [?] |
References[edit]
- ^ a b c d e f 2006. Mario vs. Donkey Kong 2: March of the Minis North American instruction booklet (PDF). nintendo.com. Page 27. Archived May 22, 2008, 11:17:44 UTC from the original via Wayback Machine. Retrieved January 17, 2025.
- ^ 2010. Mario vs. Donkey Kong: Mini-Land Mayhem! instruction booklet. Nintendo of America. Page 28-31. Archived November 22, 2010, 21:38:48 UTC from the original via Wayback Machine.
- ^ Official Mario vs. Donkey Kong: Mini-Land Mayhem! English website "Share Levels!" section. Retrieved March 25, 2018.[dead link]
- ^ NintenDaanNC (February 25, 2011). [NC UK] Mario vs. Donkey Kong Mini-Land Mayhem - Enter Challenge Mode Contests! (0:47). YouTube. Retrieved March 30, 2018.
- ^ Mario vs. Donkey Kong: Tipping Stars electronic manual. Tab 11: "Objects" (PDF). nintendo.com. Archived July 25, 2018, 19:32:04 UTC from the original via Wayback Machine. Retrieved July 26, 2022.
| Mario vs. Donkey Kong: Minis March Again! | |
|---|---|
| Characters | Mario • Pauline • Donkey Kong • Toads |
| Minis | Mini Mario • Mini Toad • Mini Peach • Mini Donkey Kong |
| Floors | Mini Mayhem • Sandstone Stroll • Magnet Mania • Jungle Rumble • Rooftop • Basement |
| Items and objects | Blue Spring • Box Spring • Cannon • Clock • Coin (large) • Color Switch • Conveyor Belt • Door • Girder • Hammer • Key • Key Door • Ladder • M-Token • Magnet • Mini Mario Card • Pink Block • Pokey Block • Pop-up Gate • Rotate Pipe • Shy Guy Block • Spike • Spin-bar magnet • Warp Pipe • Yellow Spring |
| Enemies | Monkey robots (Capture Kong · Circus Kong) • Bird • Piranha Plant (fire) • Pokey • Polterguy • Snapjaw • Snifit • Spear Guy • Thwomp |
| Miscellaneous | Construction Zone • Mario and Donkey Kong: Minis on the Move + Mario vs. Donkey Kong: Minis March Again! • Multimedia • Plus Mode • Staff • Super Mini Mario World |
| Mario and Donkey Kong: Minis on the Move | |
|---|---|
| Hosts | Donkey Kong • Mario • Pauline |
| Minis | Mini Donkey Kong • Mini Mario • Mini Pauline • Mini Peach • Mini Toad |
| Enemies | Bullet Bill • Donkey Kong's robots (Capture Kong · Catapult Kong) • Fly Guy • Shy Guy |
| Items and objects | + Clock • Blue Spring • Bomb • Conveyor Belt • Key • M-Token • Spikes • Star • Tile • Warp Pipe |
| Worlds | Mario's Main Event • Puzzle Palace • Many Mini Mayhem • Giant Jungle |
| Minigames | Mini Target Smash • Fly Guy Grab • Cube Crash • Elevation Station |
| Miscellaneous | Create & Share • Gallery • Mario and Donkey Kong: Minis on the Move + Mario vs. Donkey Kong: Minis March Again! • Staff |