Slide Lift Tower: Difference between revisions
m (→Names in other languages: added Italian) |
Hi9HSc0rcH (talk | contribs) mNo edit summary |
||
| (47 intermediate revisions by 18 users not shown) | |||
| Line 1: | Line 1: | ||
{{about|Slide Lift Tower, a level in [[New Super Mario Bros. U]]|other uses|[[Meringue Clouds-Tower]]}} | {{about|Slide Lift Tower, a level in [[New Super Mario Bros. U]]|other uses|[[Meringue Clouds-Tower]]}} | ||
{{ | {{level infobox | ||
|title=Slide Lift Tower | |title=Slide Lift Tower | ||
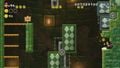
|image=[[File:NSMBU | |image=[[File:NSMBU Slide Lift Tower Screenshot.jpg|250px]] | ||
|code={{world|7|tower}} | |code={{world|7|tower}} | ||
|world=[[Meringue Clouds]] | |world=[[Meringue Clouds]] | ||
|game=''[[New Super Mario Bros. U]]'' | |game=''[[New Super Mario Bros. U]]'' | ||
|limit=500 seconds | |limit=500 seconds | ||
|boss=[[Kamek]] | |boss=[[Kamek|Magikoopa]] | ||
| | |before_alt= | ||
|before=[[Seesaw Shrooms (level)|<<]] [[Switchback Hill|<<]] | |||
|before=[[Seesaw Shrooms|<<]] [[Switchback Hill|<<]] | |||
|after=[[Spinning Spirit House|>>]] | |after=[[Spinning Spirit House|>>]] | ||
|secret= | |secret= | ||
}} | }} | ||
'''Slide Lift Tower''', or '''{{world|Clouds|tower}}''', is the [[ | '''Slide Lift Tower''', or '''{{world|Clouds|tower}}''', is the [[tower]] of [[Meringue Clouds]] in ''[[New Super Mario Bros. U]]''. The tower is unlocked via completion of [[Seesaw Shrooms (level)|Seesaw Shrooms]] or [[Switchback Hill]]. Defeating [[Kamek|Magikoopa]] in this course unlocks [[Spinning Spirit House]]. | ||
==Layout== | ==Layout== | ||
The tower is named for its numerous [[Slide Lift]]s, constantly-shifting sets of platforms that can help the player progress, but can also block and, in some cases, crush them if they are not careful. The level is also the one with the most [[Fire Bro]]s in the game (with a total of eight of them present), and is the first to feature a [[Huge Fire Bar]]. The tower is mostly comprised of white, gray, green, and brown stone slabs and tiles, metal braces and girders, and orange [[bridge]]s that not only serve as extra footholds, but also separate the tower's various floors. [[Bowser Jr.]]'s face is also emblazoned on a wall in the first secret room, above the [[Huge Fire Bar]] beneath the boss door, and to the right of the boss door. | |||
The player starts the level underneath six [[Brick Block|bricks]] with a Fire Bro on top of it, as well as a Slide Lift and two blocks (the right one holding a [[Super Acorn]]) found over the pit ahead. On the other end of the room is a [[Warp Pipe]] leading up to the level's second section, with a Fire Bro on the ground and four sets of Slide Lifts to help the player progress vertically. Another Fire Bro is found atop six bricks (the third of which holds a [[Super Star]]) on the right side of the area, while a [[? Block]] over a Slide Lift in the center holds a [[Super Acorn]]. After this, the player can pass to the next floor through an orange [[bridge]] that comprises a hallway with a Fire Bro and a Slide Lift on the other end. Above that are two [[Dry Bones]] and a [[Big Dry Bones]], which the player can bounce off of to hit a hidden block on the right wall with a [[1-Up Mushroom]]. Further up are three Slide Lifts, a Fire Bro on a row of four bricks on the right wall, and a ? Block holding a Super Acorn lodged in the ceiling above (this block will flip out for the player to access only if they go to the right wall, just under the Fire Bro). After that is another floor, with a Dry Bones, a Fire Bro, and, above the latter, a gap in the ceiling sealed off by three bricks, holding the level's first [[Star Coin]], followed by a Warp Pipe leading to the next section. | |||
After exiting the pipe, the player is faced by the level's [[Checkpoint Flag|checkpoint]], a [[Dry Bones]], three Slide Lifts, and two [[Fire Bars]] (the lower one consisting of a pair with four fireballs each, and the upper one consisting of a single bar with four fireballs), rotating counter-clockwise. On the next floor are several bridges (with the ones on the right wall leading up to a ? Block with a Super Acorn), a Dry Bones on the ground, a long Slide Lift in the center, and, on the left wall, a Fire Bro on four bricks. Further up are two Fire Bars rotating counter-clockwise (the lower one with four fireballs, the upper one with six fireballs), two Slide Lifts, a Dry Bones, and a gap in the right wall with a spinning circle of four coins, indicating the presence of a hidden Warp Pipe to a secret room with three Slide Lifts, the level's second Star Coin, and a Warp Pipe that leads to the next floor. | |||
The next floor is split into two vertical paths, divided by a Slide Lift, with the game's first [[Huge Fire Bar]], comprised of six fireballs, rotating counter-clockwise above it. The left path has the level's eighth and last Fire Bro, two bridges, and two Slide Lifts that can help the player get to the final floor with the boss door. The right path, which is narrower, has a hidden block with a [[Fire Flower]], another hidden block holding a coin, and, finally, in a hidden section of the ceiling, a bridge with a Warp Pipe above it, leading to another secret room with six Slide Lifts that can crush the player if they are not careful, the level's third [[Star Coin]], a ? Block with a Super Acorn on the right, and, on the left, a Warp Pipe that sends the player right next to the boss door, bypassing the Huge Fire Bar entirely. | |||
The boss door takes the player to a room with 30 blocks covered in geometric designs much like those seen in a Magikoopa's magic, providing a false floor over an abyss. [[Kamek|Magikoopa]], the boss of the tower, flies in, cackling and shaking his fist at the player (just as he did in ''[[New Super Mario Bros. Wii]]'') before filling the room with large, magical glass blocks distributed randomly, with some of the blocks containing enemies such as [[Goomba]]s, [[Koopa Troopa]]s, [[Koopa Paratroopa|Paratroopa]]s, [[Mini Goomba]]s, [[Monty Mole]]s, and [[Bob-omb]]s. Much like the battle against him in ''New Super Mario Bros. Wii'', Magikoopa would teleport around the room for a few times, then he would cast a spell that causes all of the floating glass blocks present to fall, releasing the enemies within them. He then fills the room with more glass blocks in a random configuration to repeat his attack cycle. When jumped on once, all the glass blocks still present would disappear, and Magikoopa, hovering on his broom, would teleport above the room three times, firing three magic fireballs (with each shot turning the solid blocks they hit into [[Donut Block]]s) at the player after every teleport, before filling the room with glass blocks to resume his normal attacks. When jumped on for a second time, Magikoopa would hover over the room on his broom again, firing four magic fireballs at the player, followed by another five, before he fills the room with glass blocks once more. After getting jumped on for a third time, Magikoopa falls off the stage, defeated, with all the Donut Blocks in the room turning back to standard blocks. | |||
==Star Coins== | ==Star Coins== | ||
*'''Star Coin 1''': | *'''Star Coin 1''': Just before the pipe leading out of the second area, a Star Coin is sealed in the ceiling by three [[Brick Block]]s. The player needs a [[Super Acorn]] or a [[Super Crown]] to break the bricks and reach the coin, though this can also be done by bouncing off of the [[Fire Bro]] positioned underneath the coin. | ||
*'''Star Coin 2''': | *'''Star Coin 2''': On the third floor of the section with the [[Checkpoint Flag|checkpoint]], the player should notice a gap in the right wall with a spinning circle of four coins. Behind those coins is a hidden [[Warp Pipe]] that leads to a secret room with three Slide Lifts. The player needs the Super Acorn or the Super Crown once again to climb the room's Slide Lifts and reach the Star Coin on the upper-right corner of the room. | ||
*'''Star Coin 3''': | *'''Star Coin 3''': Just under the level's only [[Huge Fire Bar]] are two vertical paths. The right path has a hidden block with a [[Fire Flower]], another hidden block on top of that, and, hidden in the ceiling, a bridge with a pipe above it. The pipe leads to a room with six Slide Lifts forming a hazardous maze that the player must make their way through to get to the third Star Coin, which is on the left side of the room, just below the area's exit pipe. | ||
== | ==Elements== | ||
===Items and gimmicks=== | |||
<gallery> | |||
New Super Mario Bros. U Deluxe Super Acorn.png|[[Super Acorn]]s: 5 | |||
NSMBU Super Star Artwork.png|[[Super Star]]: 1 | |||
NSMBU 1-Up Mushroom.png|[[1-Up Mushroom]]: 1 | |||
New Super Mario Bros U Deluxe 3-UP Moon.png|[[3-Up Moon]]s: 3 ([[Boost Mode]] only) | |||
NSMBU Fire Flower Artwork.png|[[Fire Flower]]: 1 | |||
NSMBU Slide Lift Tower Screenshot.jpg|[[Slide Lift]]s: 26 pairs | |||
SMM-NSMBU-DonutBlock.png|[[Donut Block]] (30 at most, transformed by Magikoopa) | |||
</gallery> | |||
==Appearance in ''Super Smash Bros. | ===Enemies and obstacles=== | ||
Slide Lift Tower appears as one of the variations on the stage [[Mushroom Kingdom U]] in ''[[Super Smash Bros. for Wii U]]''. It features a set of moving platforms, and icicles appear as obstacles. | <gallery> | ||
NSMBU Fire Bro Artwork.png|[[Fire Bro]]s: 8 | |||
MP8 DryBones.png|Dry Bones: 6 [[Dry Bones|normal]], 1 [[Big Dry Bones|big]] | |||
SMM3DS Art - Fire Bar.png|Fire Bars: 4 [[Fire Bar|normal]], 1 [[Huge Fire Bar|big]] | |||
NSMBU Goomba Artwork.png|[[Goomba]]s and [[Mini Goomba]]s (infinitely spawned by Magikoopa) | |||
KoopatroopaNSMBU.png|[[Koopa Troopa]]s (infinitely spawned by Magikoopa) | |||
ParatroopaNSMBU.png|[[Koopa Paratroopa]]s (infinitely spawned by Magikoopa) | |||
MontymolesNSMBU.png|[[Monty Mole]]s (infinitely spawned by Magikoopa) | |||
BobombNSMBU.png|[[Bob-omb]]s (infinitely spawned by Magikoopa) | |||
NSMBW Kamek Artwork.png|[[Kamek|Magikoopa]] (boss) | |||
</gallery> | |||
==Appearance in the ''Super Smash Bros.'' series== | |||
Slide Lift Tower appears as one of the variations on the stage [[Mushroom Kingdom U]] in ''[[Super Smash Bros. for Wii U]]'' and ''[[Super Smash Bros. Ultimate]]''. It features a set of moving platforms, and icicles appear as obstacles. | |||
==Names in other languages== | ==Names in other languages== | ||
| Line 44: | Line 63: | ||
|Jap=かいてん スライドリフトのとりで | |Jap=かいてん スライドリフトのとりで | ||
|JapR=Kaiten Suraido Rifuto no Toride | |JapR=Kaiten Suraido Rifuto no Toride | ||
|JapM=Rotation Slide Lift | |JapM=Rotation, Fortress of Slide Lift | ||
|SpaA=Torre de elevadores deslizantes | |SpaA=Torre de elevadores deslizantes | ||
|SpaAM=Sliding elevators' tower | |SpaAM=Sliding elevators' tower | ||
|SpaE=Torre Deslizadora | |SpaE=Torre Deslizadora | ||
|SpaEM=Slider Tower | |SpaEM=Slider Tower | ||
|Dut= | |Dut=Schuifplatformtoren | ||
|DutM= | |DutM=Slide lift tower | ||
|Ger= | |Ger=Schieb-Schieb-Turm | ||
|GerM= | |GerM=Turn-Turn-Tower | ||
|Ita=Torre degli ascensori a rotazione | |Ita=Torre degli ascensori a rotazione | ||
|ItaM=Tower of rotating lifts | |ItaM=Tower of rotating lifts | ||
| | |Por=Torre Deslizante | ||
| | |PorM=Sliding Tower | ||
|Rus=Башня скользящих лифтов | |Rus=Башня скользящих лифтов | ||
|RusR=Bashnya skol'zyashchikh liftov | |RusR=Bashnya skol'zyashchikh liftov | ||
|RusM=Sliding lift tower | |RusM=Sliding lift tower | ||
|Kor=회전! 슬라이드리프트 요새 | |||
|KorR=Hoejeon! Seullaideuripeuteu Yosae | |||
|KorM=Rotation! Slide Lift Fortress | |||
|Chi=旋转的平行移动台堡垒 (Simplified)<br>旋轉的平行移動台堡壘 (Traditional) | |||
|ChiR=Xuánzhuǎn de Píngxíng Yídòng Tái Bǎolěi | |||
|ChiM=Spinning Parallel Moving Platform Fortress | |||
}} | }} | ||
==Level map== | |||
[[ | [[File:NSMBU Slide Lift Tower Map.jpg|400px|thumb|left|]] | ||
{{NSMBU levels}} | |||
[[Category:Towers]] | [[Category:Towers]] | ||
[[Category:New Super Mario Bros. U levels]] | |||
[[de:Schieb-Schieb-Turm]] | [[de:Schieb-Schieb-Turm]] | ||
[[it:Torre degli ascensori a rotazione]] | |||
Latest revision as of 22:59, January 3, 2024
- This article is about Slide Lift Tower, a level in New Super Mario Bros. U. For other uses, see Meringue Clouds-Tower.
| Level | |
|---|---|
| Slide Lift Tower | |

| |
| Level code | World 7- |
| World | Meringue Clouds |
| Game | New Super Mario Bros. U |
| Time limit | 500 seconds |
| Boss | Magikoopa |
| << << Directory of levels >> | |
Slide Lift Tower, or Meringue Clouds-![]() Tower, is the tower of Meringue Clouds in New Super Mario Bros. U. The tower is unlocked via completion of Seesaw Shrooms or Switchback Hill. Defeating Magikoopa in this course unlocks Spinning Spirit House.
Tower, is the tower of Meringue Clouds in New Super Mario Bros. U. The tower is unlocked via completion of Seesaw Shrooms or Switchback Hill. Defeating Magikoopa in this course unlocks Spinning Spirit House.
Layout[edit]
The tower is named for its numerous Slide Lifts, constantly-shifting sets of platforms that can help the player progress, but can also block and, in some cases, crush them if they are not careful. The level is also the one with the most Fire Bros in the game (with a total of eight of them present), and is the first to feature a Huge Fire Bar. The tower is mostly comprised of white, gray, green, and brown stone slabs and tiles, metal braces and girders, and orange bridges that not only serve as extra footholds, but also separate the tower's various floors. Bowser Jr.'s face is also emblazoned on a wall in the first secret room, above the Huge Fire Bar beneath the boss door, and to the right of the boss door.
The player starts the level underneath six bricks with a Fire Bro on top of it, as well as a Slide Lift and two blocks (the right one holding a Super Acorn) found over the pit ahead. On the other end of the room is a Warp Pipe leading up to the level's second section, with a Fire Bro on the ground and four sets of Slide Lifts to help the player progress vertically. Another Fire Bro is found atop six bricks (the third of which holds a Super Star) on the right side of the area, while a ? Block over a Slide Lift in the center holds a Super Acorn. After this, the player can pass to the next floor through an orange bridge that comprises a hallway with a Fire Bro and a Slide Lift on the other end. Above that are two Dry Bones and a Big Dry Bones, which the player can bounce off of to hit a hidden block on the right wall with a 1-Up Mushroom. Further up are three Slide Lifts, a Fire Bro on a row of four bricks on the right wall, and a ? Block holding a Super Acorn lodged in the ceiling above (this block will flip out for the player to access only if they go to the right wall, just under the Fire Bro). After that is another floor, with a Dry Bones, a Fire Bro, and, above the latter, a gap in the ceiling sealed off by three bricks, holding the level's first Star Coin, followed by a Warp Pipe leading to the next section.
After exiting the pipe, the player is faced by the level's checkpoint, a Dry Bones, three Slide Lifts, and two Fire Bars (the lower one consisting of a pair with four fireballs each, and the upper one consisting of a single bar with four fireballs), rotating counter-clockwise. On the next floor are several bridges (with the ones on the right wall leading up to a ? Block with a Super Acorn), a Dry Bones on the ground, a long Slide Lift in the center, and, on the left wall, a Fire Bro on four bricks. Further up are two Fire Bars rotating counter-clockwise (the lower one with four fireballs, the upper one with six fireballs), two Slide Lifts, a Dry Bones, and a gap in the right wall with a spinning circle of four coins, indicating the presence of a hidden Warp Pipe to a secret room with three Slide Lifts, the level's second Star Coin, and a Warp Pipe that leads to the next floor.
The next floor is split into two vertical paths, divided by a Slide Lift, with the game's first Huge Fire Bar, comprised of six fireballs, rotating counter-clockwise above it. The left path has the level's eighth and last Fire Bro, two bridges, and two Slide Lifts that can help the player get to the final floor with the boss door. The right path, which is narrower, has a hidden block with a Fire Flower, another hidden block holding a coin, and, finally, in a hidden section of the ceiling, a bridge with a Warp Pipe above it, leading to another secret room with six Slide Lifts that can crush the player if they are not careful, the level's third Star Coin, a ? Block with a Super Acorn on the right, and, on the left, a Warp Pipe that sends the player right next to the boss door, bypassing the Huge Fire Bar entirely.
The boss door takes the player to a room with 30 blocks covered in geometric designs much like those seen in a Magikoopa's magic, providing a false floor over an abyss. Magikoopa, the boss of the tower, flies in, cackling and shaking his fist at the player (just as he did in New Super Mario Bros. Wii) before filling the room with large, magical glass blocks distributed randomly, with some of the blocks containing enemies such as Goombas, Koopa Troopas, Paratroopas, Mini Goombas, Monty Moles, and Bob-ombs. Much like the battle against him in New Super Mario Bros. Wii, Magikoopa would teleport around the room for a few times, then he would cast a spell that causes all of the floating glass blocks present to fall, releasing the enemies within them. He then fills the room with more glass blocks in a random configuration to repeat his attack cycle. When jumped on once, all the glass blocks still present would disappear, and Magikoopa, hovering on his broom, would teleport above the room three times, firing three magic fireballs (with each shot turning the solid blocks they hit into Donut Blocks) at the player after every teleport, before filling the room with glass blocks to resume his normal attacks. When jumped on for a second time, Magikoopa would hover over the room on his broom again, firing four magic fireballs at the player, followed by another five, before he fills the room with glass blocks once more. After getting jumped on for a third time, Magikoopa falls off the stage, defeated, with all the Donut Blocks in the room turning back to standard blocks.
Star Coins[edit]
- Star Coin 1: Just before the pipe leading out of the second area, a Star Coin is sealed in the ceiling by three Brick Blocks. The player needs a Super Acorn or a Super Crown to break the bricks and reach the coin, though this can also be done by bouncing off of the Fire Bro positioned underneath the coin.
- Star Coin 2: On the third floor of the section with the checkpoint, the player should notice a gap in the right wall with a spinning circle of four coins. Behind those coins is a hidden Warp Pipe that leads to a secret room with three Slide Lifts. The player needs the Super Acorn or the Super Crown once again to climb the room's Slide Lifts and reach the Star Coin on the upper-right corner of the room.
- Star Coin 3: Just under the level's only Huge Fire Bar are two vertical paths. The right path has a hidden block with a Fire Flower, another hidden block on top of that, and, hidden in the ceiling, a bridge with a pipe above it. The pipe leads to a room with six Slide Lifts forming a hazardous maze that the player must make their way through to get to the third Star Coin, which is on the left side of the room, just below the area's exit pipe.
Elements[edit]
Items and gimmicks[edit]
Super Acorns: 5

Super Star: 1

3-Up Moons: 3 (Boost Mode only)

Fire Flower: 1
Slide Lifts: 26 pairs

Donut Block (30 at most, transformed by Magikoopa)


Enemies and obstacles[edit]
Fire Bros: 8
Goombas and Mini Goombas (infinitely spawned by Magikoopa)

Koopa Troopas (infinitely spawned by Magikoopa)

Koopa Paratroopas (infinitely spawned by Magikoopa)

Monty Moles (infinitely spawned by Magikoopa)

Bob-ombs (infinitely spawned by Magikoopa)

Magikoopa (boss)


Appearance in the Super Smash Bros. series[edit]
Slide Lift Tower appears as one of the variations on the stage Mushroom Kingdom U in Super Smash Bros. for Wii U and Super Smash Bros. Ultimate. It features a set of moving platforms, and icicles appear as obstacles.
Names in other languages[edit]
| Language | Name | Meaning |
|---|---|---|
| Japanese | かいてん スライドリフトのとりで Kaiten Suraido Rifuto no Toride |
Rotation, Fortress of Slide Lift |
| Chinese | 旋转的平行移动台堡垒 (Simplified) 旋轉的平行移動台堡壘 (Traditional) Xuánzhuǎn de Píngxíng Yídòng Tái Bǎolěi |
Spinning Parallel Moving Platform Fortress |
| Dutch | Schuifplatformtoren |
Slide lift tower |
| German | Schieb-Schieb-Turm |
Turn-Turn-Tower |
| Italian | Torre degli ascensori a rotazione |
Tower of rotating lifts |
| Korean | 회전! 슬라이드리프트 요새 Hoejeon! Seullaideuripeuteu Yosae |
Rotation! Slide Lift Fortress |
| Portuguese | Torre Deslizante |
Sliding Tower |
| Russian | Башня скользящих лифтов Bashnya skol'zyashchikh liftov |
Sliding lift tower |
| Spanish (NOA) | Torre de elevadores deslizantes |
Sliding elevators' tower |
| Spanish (NOE) | Torre Deslizadora |
Slider Tower |
