Manic Mincers: Difference between revisions
Bro Hammer (talk | contribs) |
No edit summary |
||
| (45 intermediate revisions by 25 users not shown) | |||
| Line 1: | Line 1: | ||
{{level | {{level infobox | ||
|image=[[File:Manic Mincers SNES.png]] | |||
|image=[[File: | |||
|code=6 - 2 | |code=6 - 2 | ||
|game=''[[Donkey Kong Country]] | |game=''[[Donkey Kong Country]] | ||
|before=[[Tanked Up Trouble|<<]] | |before=[[Tanked Up Trouble|<<]] | ||
|after=[[Misty Mine|>>]] | |after=[[Misty Mine|>>]] | ||
}} | }} | ||
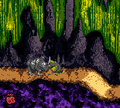
'''Manic Mincers''' is the thirtieth level in | '''Manic Mincers''' is the thirtieth level in ''[[Donkey Kong Country]]'' and the second level of [[Chimp Caverns]]. It is a cave level featuring several [[Mincer]]s as the main obstacle, and they move in different patterns, either horizontal, vertical, clockwise, as well as some not moving at all. Early in the level, [[Donkey Kong]] and [[Diddy Kong]] can release [[Rambi the Rhino]] from his [[animal crate]] to ride him for the rest of the level. Rambi cannot defeat the Mincers, because if he hits one, he runs away. Rambi can help the Kongs access a few [[Bonus Level]]s. A few [[Krusha]]s are in the level, and [[Gnawty|Gnawties]] are the most common enemy of the level. The lighting subtly changes at times; for instance, it gets slightly darker just before the Rambi Crate but lighter after the letter O. | ||
==Layout== | |||
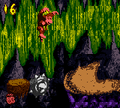
{{multiframe|[[File:ManicMincers-GBC-1.png]] [[File:ManicMincers-GBA-3.png|180px]]|Manic Mincers' appearance in the Game Boy Color version, top, and the Game Boy Advance version, bottom|align=left|size=200}} | |||
A Gnawty and a small pit containing a Mincer can be found at the level's entrance. Two more Mincers are ahead, moving in vertical paths. The level's first [[DK Barrel]] wobbles immediately before them, and a Gnawty walks between them. A small wall with the [[ | A Gnawty and a small pit containing a Mincer can be found at the level's entrance. Two more Mincers are ahead, moving in vertical paths. The level's first [[DK Barrel]] wobbles immediately before them, and a Gnawty walks between them. A small wall with the [[KONG Letters|letter K]] next to it is located near the second Mincer in this area, which has a small pit in it. A Mincer floats in and out of the abyss. An [[animal crate]] containing Rambi the Rhino sits near here by a pit consisting of two moving Mincers that are always parallel to each other. The primates can find a few Gnawties marching down the area after the abyss, being followed by two higher pieces of land with Mincers on the edge of them. Another Gnawty can be found before a pair of Mincers on the highest piece of land. In this Mincer group, one stationary Mincer sits on the ground with the letter O over it, while the other Mincer moves up and down above it. Another pair of Mincers are ahead that move in the same pattern, except this time the top Mincer is stationary while the other moves. Four more stationary Mincers grind against the ground after this, and a fifth Mincer travels between the last two of the obstacles. The level's [[Star Barrel|Continue Barrel]] can be found shortly after the last Mincer in this area. | ||
[[ | A [[TNT Barrel|TNT Drum]] can be found immediately after the barrel, along with two Mincers; one of these Mincers are stationary, while the other orbits around it at a quick pace. The heroes can find a DK Barrel on a raised piece of land after they pass a Krusha. Two additional Mincers moving in a circular path are ahead above an abyss that is followed by a [[barrel]] and an alcove containing a Krusha. Three more Mincers can be found ahead, each traveling in a circular patten around a [[Banana|Banana Bunch]]. The primates can find a wide abyss ahead of here with a Mincer grinding in the center of it. A small platform hovers across the whole pit to help the heroes cross it. A TNT Drum and another Krusha can be found on the opposite side of this pit, followed by a second wide abyss with another moving platform in it. As it pulls them over the abyss, they are taken past two Mincers and the letter N. | ||
A DK Barrel shakes on the other side of the pit, and it can be broken to free a lost partner. A Mincer orbits a small platform floating in an abyss nearby, which is followed by a lone piece of land with a pair of Krushas on it. Another abyss after this area contains a small platform used to cross it. Two sharp Mincers surround it. Once the heroes cross the pit, they come towards a few Gnawties and a sign indicating that the level is almost over on a straight pathway. A stationary Mincer with another Mincer speeding around it can be found nearby, being followed by a group of high ledges. Gnawties march along a pathway that leads farther into the level in front of the ledges. Using a small cave (leading to a [[Bonus Level]]) around this area, the primates can access the top of the high pieces of land, where a DK Barrel and a TNT Barrel wait. The primates' path is soon blocked by a wall created by two Mincers stacked on top of each other, which can be jumped over with the use of a tire sticking out of the ground next to them. An exit sign stands on the other side of the obstacles with a tunnel ahead of them that leads out of the level. | A DK Barrel shakes on the other side of the pit, and it can be broken to free a lost partner. A Mincer orbits a small platform floating in an abyss nearby, which is followed by a lone piece of land with a pair of Krushas on it. Another abyss after this area contains a small platform used to cross it. Two sharp Mincers surround it. Once the heroes cross the pit, they come towards a few Gnawties and a sign indicating that the level is almost over on a straight pathway. A stationary Mincer with another Mincer speeding around it can be found nearby, being followed by a group of high ledges. Gnawties march along a pathway that leads farther into the level in front of the ledges. Using a small cave (leading to a [[Bonus Level]]) around this area, the primates can access the top of the high pieces of land, where a DK Barrel and a TNT Barrel wait. The primates' path is soon blocked by a wall created by two Mincers stacked on top of each other, which can be jumped over with the use of a tire sticking out of the ground next to them. An exit sign stands on the other side of the obstacles with a tunnel ahead of them that leads out of the level. | ||
== | |||
==Enemies== | |||
The following enemies appear in the following quantities: | |||
<gallery> | |||
Gnawty.png|[[Gnawty]] (12) | |||
Klaptrap DKC.png|[[Klaptrap]] (3) | |||
Krusha DKC blue.png|[[Krusha]] (4) | |||
Mincer.png|[[Mincer]] (36) | |||
</gallery> | |||
==Items and objects== | |||
The following items and objects appear in the following quantities: | |||
<gallery> | |||
DK Barrel DKC.png|[[DK Barrel]] (3) | |||
Red Balloon DKC SNES.png|[[Red Balloon|Life Balloon]] (2) | |||
TNT Barrel DKC.png|[[TNT Barrel|TNT Drum]] (4) | |||
</gallery> | |||
===K-O-N-G Letters=== | ===K-O-N-G Letters=== | ||
[[File:ManicMincers-SNES-3.png|thumb|The location of the letter G, at the end of the second Bonus Level]] | |||
===Photograph (Game Boy Advance version only) | *'''K:''' The letter K is against a wall, which the third Mincer of the level moves over vertically. | ||
*'''O:''' Between two Mincers shortly after the Rambi Crate. | |||
==Names in other | *'''N:''' After crossing the first abyss with a moving platform, the Kongs pass the third Krusha from the Continue Barrel. From the next moving platform above an abyss, the Kongs must jump up to the letter N. | ||
{{ | *'''G:''' At the end of the second Bonus Level. | ||
===Key items=== | |||
*'''[[Photograph]]''' (Game Boy Advance version only): While the Kongs ride Rambi, they must use him to defeat a Krusha. By doing so, they earn a [[photograph]] for the ninth page of their [[Scrapbook (Donkey Kong Country series)|scrapbook]], which shows them riding Rambi in a jungle area. | |||
{{br}} | |||
==Bonus Levels== | |||
[[File:ManicMincersBonus1.png|thumb|The first Bonus Level]] | |||
Manic Mincers has three Bonus Levels, listed by their type in the Game Boy Advance version: | |||
*'''Bash the Baddies!''': Beyond the [[Star Barrel|Continue Barrel]] is a barrel next to a small alcove with the second Krusha. They can either defeat Krusha and then pick up the barrel to blast away the wall to the right of it, or they can break the right wall. The opening leads into the first [[Bonus Level]]. There, the Kongs must jump from three Klaptraps to earn many Banana Bunches. After jumping on each Klaptrap three times, the Kongs are rewarded a [[Red Balloon|Life Balloon]]. | |||
*'''Find the Exit!''': After the arrow sign indicating a nearby exit, the Kongs must pass two Mincers and then enter an opening from a small platform to access the [[Bonus Level]]. Inside, the Kongs must sneak under vertically-moving three Mincers (four in the Game Boy Advance remake). The letter G is at the end, followed by the exit. In the original version, unlike other Bonus Levels, this one does not have to be entered to complete the game, nor does the Bonus Room Blitz theme play in the area. | |||
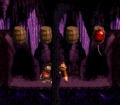
*'''Stop the Barrel!''': After exiting the second Bonus Level, the Kongs must pick up a [[TNT Barrel|TNT Drum]]. They must pick up the barrel and carry it down a ledge. They must avoid hitting the Gnawties and blast away a wall to the left of two vertical Mincers to enter the third and last Bonus Level. Alternatively, they can use Rambi to break down the wall. In the Bonus Level, the Kongs must observe a Life Balloon as it moves between four barrels before it stops and disappears. The Kongs must jump at the barrel that the Life Balloon stopped in to be awarded it. The Kongs return into the main level after either winning or losing. In the [[Game Boy Color]] remake, the third Bonus Level's entrance is entered from the wall after the Mincers rather than in front. | |||
==Gallery== | |||
<gallery> | |||
ManicMincers-SNES-1.png|The Kongs and Rambi jump between two Mincers | |||
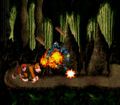
ManicMincers-SNES-2.png|Rambi defeats a Krusha | |||
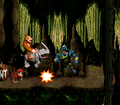
ManicMincers2.png|Donkey Kong defeats a Krusha with a TNT Drum | |||
ManicMincersBonus3.png|The third Bonus Level | |||
ManicMincers-GBC-2.png|Rambi facing a Gnawty in the Game Boy Color version | |||
ManicMincers-GBC-3.png|Donkey Kong jumping over a Mincer in the Game Boy Color version | |||
ManicMincers-GBA-1.png|The Kongs riding Rambi, after releasing him from his crate, in the Game Boy Advance version | |||
ManicMincers-GBA-2.png|The Kongs jumping over a Mincer in the Game Boy Advance version | |||
</gallery> | |||
==Names in other languages== | |||
{{foreign names | |||
|Jap=あばれスピナーのがけ | |Jap=あばれスピナーのがけ | ||
|JapR=Abare Supinā no | |JapR=Abare Supinā no gake | ||
|JapM=Cliff of the | |JapM=Cliff of the Rampaging Mincers | ||
| | |Spa=Picadora Maniaca | ||
| | |SpaM=Manic Mincers | ||
|Fre=Hachis Horrible | |||
|FreM=Minced Horror | |||
|Ger=Dyna-Grotten | |Ger=Dyna-Grotten | ||
|GerM=Dyna Grottos | |GerM=Dyna Grottos | ||
| | |Ita=Tritatutto | ||
| | |ItaM=Mincer | ||
}} | |||
{{DKC levels}} | |||
{{DKC | [[Category:Underground areas]] | ||
[[Category: | |||
[[Category:Donkey Kong Island]] | [[Category:Donkey Kong Island]] | ||
[[Category:Donkey Kong | [[Category:Donkey Kong Country levels]] | ||
Latest revision as of 14:43, January 20, 2024
| Level | |
|---|---|
| Manic Mincers | |

| |
| Level code | 6 - 2 |
| Game | Donkey Kong Country |
| << Directory of levels >> | |
Manic Mincers is the thirtieth level in Donkey Kong Country and the second level of Chimp Caverns. It is a cave level featuring several Mincers as the main obstacle, and they move in different patterns, either horizontal, vertical, clockwise, as well as some not moving at all. Early in the level, Donkey Kong and Diddy Kong can release Rambi the Rhino from his animal crate to ride him for the rest of the level. Rambi cannot defeat the Mincers, because if he hits one, he runs away. Rambi can help the Kongs access a few Bonus Levels. A few Krushas are in the level, and Gnawties are the most common enemy of the level. The lighting subtly changes at times; for instance, it gets slightly darker just before the Rambi Crate but lighter after the letter O.
Layout[edit]


A Gnawty and a small pit containing a Mincer can be found at the level's entrance. Two more Mincers are ahead, moving in vertical paths. The level's first DK Barrel wobbles immediately before them, and a Gnawty walks between them. A small wall with the letter K next to it is located near the second Mincer in this area, which has a small pit in it. A Mincer floats in and out of the abyss. An animal crate containing Rambi the Rhino sits near here by a pit consisting of two moving Mincers that are always parallel to each other. The primates can find a few Gnawties marching down the area after the abyss, being followed by two higher pieces of land with Mincers on the edge of them. Another Gnawty can be found before a pair of Mincers on the highest piece of land. In this Mincer group, one stationary Mincer sits on the ground with the letter O over it, while the other Mincer moves up and down above it. Another pair of Mincers are ahead that move in the same pattern, except this time the top Mincer is stationary while the other moves. Four more stationary Mincers grind against the ground after this, and a fifth Mincer travels between the last two of the obstacles. The level's Continue Barrel can be found shortly after the last Mincer in this area.
A TNT Drum can be found immediately after the barrel, along with two Mincers; one of these Mincers are stationary, while the other orbits around it at a quick pace. The heroes can find a DK Barrel on a raised piece of land after they pass a Krusha. Two additional Mincers moving in a circular path are ahead above an abyss that is followed by a barrel and an alcove containing a Krusha. Three more Mincers can be found ahead, each traveling in a circular patten around a Banana Bunch. The primates can find a wide abyss ahead of here with a Mincer grinding in the center of it. A small platform hovers across the whole pit to help the heroes cross it. A TNT Drum and another Krusha can be found on the opposite side of this pit, followed by a second wide abyss with another moving platform in it. As it pulls them over the abyss, they are taken past two Mincers and the letter N.
A DK Barrel shakes on the other side of the pit, and it can be broken to free a lost partner. A Mincer orbits a small platform floating in an abyss nearby, which is followed by a lone piece of land with a pair of Krushas on it. Another abyss after this area contains a small platform used to cross it. Two sharp Mincers surround it. Once the heroes cross the pit, they come towards a few Gnawties and a sign indicating that the level is almost over on a straight pathway. A stationary Mincer with another Mincer speeding around it can be found nearby, being followed by a group of high ledges. Gnawties march along a pathway that leads farther into the level in front of the ledges. Using a small cave (leading to a Bonus Level) around this area, the primates can access the top of the high pieces of land, where a DK Barrel and a TNT Barrel wait. The primates' path is soon blocked by a wall created by two Mincers stacked on top of each other, which can be jumped over with the use of a tire sticking out of the ground next to them. An exit sign stands on the other side of the obstacles with a tunnel ahead of them that leads out of the level.
Enemies[edit]
The following enemies appear in the following quantities:


Items and objects[edit]
The following items and objects appear in the following quantities:

DK Barrel (3)

Life Balloon (2)

TNT Drum (4)


K-O-N-G Letters[edit]

- K: The letter K is against a wall, which the third Mincer of the level moves over vertically.
- O: Between two Mincers shortly after the Rambi Crate.
- N: After crossing the first abyss with a moving platform, the Kongs pass the third Krusha from the Continue Barrel. From the next moving platform above an abyss, the Kongs must jump up to the letter N.
- G: At the end of the second Bonus Level.
Key items[edit]
- Photograph (Game Boy Advance version only): While the Kongs ride Rambi, they must use him to defeat a Krusha. By doing so, they earn a photograph for the ninth page of their scrapbook, which shows them riding Rambi in a jungle area.
Bonus Levels[edit]

Manic Mincers has three Bonus Levels, listed by their type in the Game Boy Advance version:
- Bash the Baddies!: Beyond the Continue Barrel is a barrel next to a small alcove with the second Krusha. They can either defeat Krusha and then pick up the barrel to blast away the wall to the right of it, or they can break the right wall. The opening leads into the first Bonus Level. There, the Kongs must jump from three Klaptraps to earn many Banana Bunches. After jumping on each Klaptrap three times, the Kongs are rewarded a Life Balloon.
- Find the Exit!: After the arrow sign indicating a nearby exit, the Kongs must pass two Mincers and then enter an opening from a small platform to access the Bonus Level. Inside, the Kongs must sneak under vertically-moving three Mincers (four in the Game Boy Advance remake). The letter G is at the end, followed by the exit. In the original version, unlike other Bonus Levels, this one does not have to be entered to complete the game, nor does the Bonus Room Blitz theme play in the area.
- Stop the Barrel!: After exiting the second Bonus Level, the Kongs must pick up a TNT Drum. They must pick up the barrel and carry it down a ledge. They must avoid hitting the Gnawties and blast away a wall to the left of two vertical Mincers to enter the third and last Bonus Level. Alternatively, they can use Rambi to break down the wall. In the Bonus Level, the Kongs must observe a Life Balloon as it moves between four barrels before it stops and disappears. The Kongs must jump at the barrel that the Life Balloon stopped in to be awarded it. The Kongs return into the main level after either winning or losing. In the Game Boy Color remake, the third Bonus Level's entrance is entered from the wall after the Mincers rather than in front.
Gallery[edit]
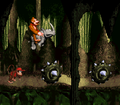
The Kongs and Rambi jump between two Mincers
Rambi defeats a Krusha
Donkey Kong defeats a Krusha with a TNT Drum
The third Bonus Level
Rambi facing a Gnawty in the Game Boy Color version
Donkey Kong jumping over a Mincer in the Game Boy Color version

The Kongs riding Rambi, after releasing him from his crate, in the Game Boy Advance version
The Kongs jumping over a Mincer in the Game Boy Advance version


Names in other languages[edit]
| Language | Name | Meaning |
|---|---|---|
| Japanese | あばれスピナーのがけ Abare Supinā no gake |
Cliff of the Rampaging Mincers |
| French | Hachis Horrible |
Minced Horror |
| German | Dyna-Grotten |
Dyna Grottos |
| Italian | Tritatutto |
Mincer |
| Spanish | Picadora Maniaca |
Manic Mincers |