Ancient Gardens: Difference between revisions
m (→Goomba Grove) |
Nintendo101 (talk | contribs) (small bird) |
||
| (31 intermediate revisions by 10 users not shown) | |||
| Line 1: | Line 1: | ||
{{ | {{world infobox | ||
|title=Ancient Gardens | |title=Ancient Gardens | ||
|image=[[File:AncientGardens.jpg|270px]] | |image=[[File:AncientGardens.jpg|270px]] | ||
| | |game=''[[Mario + Rabbids Kingdom Battle]]'' | ||
| | |levels=10 | ||
|before=<< | |before=<< | ||
|after=[[Sherbet Desert|>>]] | |after=[[Sherbet Desert|>>]] | ||
}} | }} | ||
'''Ancient Gardens''' is the first world in ''[[Mario + Rabbids Kingdom Battle]]''. It is a grassland and jungle area located to the east of [[Sherbet Desert]], consisting of many flowers, water streams, immobilized [[Goomba]]s, and a towering block structure. | '''Ancient Gardens''' is the first world in ''[[Mario + Rabbids Kingdom Battle]]''. It is a grassland and jungle area located to the east of [[Sherbet Desert]], consisting of many flowers, water streams, immobilized [[Goomba]]s, and a towering block structure. The instruments that move to the music are blue trumpet-like flowers. | ||
==History== | ==History== | ||
[[Mario]] and co. first land in Ancient Gardens just after the [[SupaMerge]] headset merges with [[Spawny]]. They venture through the grassland area and get past the [[Sunflower (Mario + Rabbids Kingdom Battle)|Sunflower]] before they reach [[Peach's Castle]]. After briefly reconciling with [[Princess Peach]], Mario and co. take a cannon to enter the jungle area of Ancient Gardens, where they find and defeat [[Pirabbid Plant]] and recruit [[Luigi]]. As Mario and co. exit the jungle area and enter the base of the block tower, they encounter [[Toad]], who warns them of [[Smasher|an enemy on the tower]]. Mario and co. manage to make it to the top of the tower, where they encounter [[Bowser Jr.]], who takes Spawny and uses him to create [[Rabbid Kong]]. After defeating Rabbid Kong, [[Beep-0]] reports that Bowser Jr. had fled to Sherbet Desert, thus revealing their next destination. | |||
[[Mario]] and co. first land in Ancient Gardens just after the [[SupaMerge]] headset merges with [[Spawny]]. They venture through the grassland area and get past the [[Sunflower (Mario + Rabbids Kingdom Battle)|Sunflower]] before they reach [[Peach's Castle]]. After briefly reconciling with [[Princess Peach]], Mario and co. take a cannon to enter the jungle area of Ancient Gardens, where they find and defeat [[Pirabbid Plant]] and recruit [[Luigi]]. As Mario and co. exit the jungle area and enter the base of the block tower, they encounter [[Toad]], who warns them of [[Smasher|an enemy on the tower]]. Mario and co. manage to make it to the top of the tower, where they | |||
{{br}} | {{br}} | ||
== | ==Overview== | ||
{{multiple image | |||
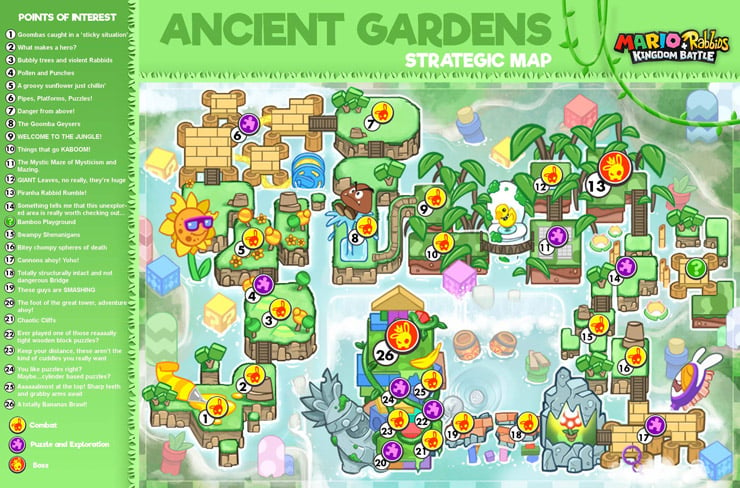
|footer=<center>Strategic map (left) and challenge map (right) of Ancient Gardens</center> | |||
|width=200 | |||
|image1=AG map.jpg|200px | |||
|caption1= | |||
|image2=AncientGardensMap.png|200px | |||
|caption2= | |||
}} | |||
The heroes follow a linear path through the Ancient Gardens as they approach [[Rabbid Kong]]'s tower. After defeating Rabbid Kong, the player can re-enter the Ancient Gardens from five different starting points. The path that the heroes follow is described below from each starting point onward. | The heroes follow a linear path through the Ancient Gardens as they approach [[Rabbid Kong]]'s tower. After defeating Rabbid Kong, the player can re-enter the Ancient Gardens from five different starting points. The path that the heroes follow is described below from each starting point onward. | ||
{{br}} | |||
===Goomba Grove=== | ===Goomba Grove=== | ||
[[File:MRKB-GoombaGrove.png|thumb|Goomba Grove]] | [[File:MRKB-GoombaGrove.png|thumb|Goomba Grove]] | ||
The first starting point is located in '''Goomba Grove''', a grassland area | The first starting point is located in '''Goomba Grove''', a grassland area. The heroes start out on a wide strip of land with cubical trees, [[Goomba]]s stuck in honey and flocks of [[small bird]]s. The area contains two small battlefields and is followed by a long grassy footpath that weaves between trees, colored pipes and flowers. | ||
The | |||
{{br}} | {{br}} | ||
===Pollen Plains=== | ===Pollen Plains=== | ||
[[File:MRKB-PollenPlains.png|thumb|Pollen Plains]] | [[File:MRKB-PollenPlains.png|thumb|Pollen Plains]] | ||
The second starting point is in '''Pollen Plains''', a broad park containing toy blocks | The second starting point is in '''Pollen Plains''', a broad park containing orange bubbly trees and toy blocks. The area can be explored for secrets, but the heroes can simply follow a snaking path that leads to a water basin with bridges, wooden piers and cannons. Beyond the piers, there are a series of snaking bridges which lead onto some plains with battlefields. Past a meandering walkway and another battlefield surrounded by '''Goomba Geysers''',<ref name="map">As marked in the "Points of Interest" list on the {{media link|AG map.jpg|strategic map}} released by Ubisoft on the Rabbids website</ref> there is a long wooden bridge that rises over a palm tree canopy, where another battlefield is located. | ||
{{br}} | {{br}} | ||
===Flushy Forest=== | ===Flushy Forest=== | ||
[[File:MRKB-FlushyForest.png|thumb|Flushy Forest]] | [[File:MRKB-FlushyForest.png|thumb|Flushy Forest]] | ||
The third starting point is in '''Flushy Forest''', | The third starting point is in '''Flushy Forest''', a highland with rich palm tree vegetation. Recurring elements in this area are [[Piranha Plant]]s with lamp-like fixtures, which lie on the sidetrack in dimly lit parts of the forest. | ||
The area begins with a long rope bridge that crosses a chasm, passing by a gigantic mossy toilet with a rubber duck floating inside it. At the end of the bridge, the heroes enter | The area begins with a long rope bridge that crosses over a chasm, passing by a gigantic mossy toilet with a rubber duck floating inside it. At the end of the bridge, the heroes enter a labyrinth called '''The Mystic Maze of Mysticism and Mazing'''<ref name="map"/>, which contains hidden stone walls that rise from the ground as they are approached. The heroes must find a path with no walls that obstruct their progress in order to escape the labyrinth. A short while afterwards, the heroes enter a forested area where several battles are hosted in [[Brother, Where Art Thou?|World 1-4]], including the [[Pirabbid Plant]] boss fight. Once the heroes beat the midboss, they can continue on to the Bamboo Islands. | ||
{{br}} | {{br}} | ||
===Bamboo Islands=== | ===Bamboo Islands=== | ||
[[File:MRKB-BambooIslands.png|thumb|Bamboo Islands]] | [[File:MRKB-BambooIslands.png|thumb|Bamboo Islands]] | ||
The fourth starting point is in '''Bamboo Islands''', a wetland region | The fourth starting point is in '''Bamboo Islands''', a wetland region. The beginning of the area is a long bridge that weaves between bamboos, water lilies and reed. The bridge leads to a series of islands that are connected via wooden footbridges. These islands contain toy block enclosures with [[coin]]s and chests, and can only be accessed by activating different switches throughout the area. | ||
Past the wetland, there is a series of grassy plateaus with two battlefields, after which there is a foamy lake with several tall piers built above it. On the piers, there are some switches that can be toggled to adjust the position of some footbridges and a Cannon that help the heroes advance to the next area. A bridge then cuts between two large waterfalls and over a river stream and leads into a small forested area preceding the Sunset Bridge. | |||
{{br}} | {{br}} | ||
===Sunset Bridge=== | ===Sunset Bridge=== | ||
[[File:MRKB-SunsetBridge.png|thumb|Sunset Bridge]] | [[File:MRKB-SunsetBridge.png|thumb|Sunset Bridge]] | ||
The | The fifth starting point is located at one end of '''Sunset Bridge''', a massive paved structure that leads to [[Rabbid Kong]]'s tower. The bridge has large gaps in it which can be overcome by blasting from cannons. There are two battlefields in this area, and from the second battlefield on there is a short pipe that leads to the base of the tower. | ||
The tower is a stack of massive toy blocks sustained by a large [[Smasher]] statue. | The tower is a stack of massive toy blocks sustained by a large [[Smasher]] statue. The heroes can use pipes to climb the tower and explore the grassy terraces that stick out of it. The first two battlefields on the tower are each followed by a puzzle where the heroes need to use switches in order to connect a pipe that leads them further up. In the first puzzle, activating a switch of a certain color causes the block of the same color to move gradually from side to side, bringing the part of the pipe that is adjoined to it in a certain position. The second puzzle contains a column of disc-shaped blocks that rotate around when their switches are flicked, moving the affixed pipes along with them. These are followed by the tower's rooftop, where the battle against [[Rabbid Kong]] takes place. | ||
The waters surrounding the Sunset Bridge and the tower are dotted with [[DK Barrel]]s | The waters surrounding the Sunset Bridge and the tower are dotted with [[DK Barrel]]s. The player can find giant [[banana]]s and banana peels lying around the base of the tower. As the heroes approach the top of the tower, building blocks can be seen falling. | ||
{{br}} | {{br}} | ||
==Levels== | ==Levels== | ||
{| style="text-align: center; width: 100%; margin: 0 auto 10px auto; border-collapse: collapse; font-family:Arial;" border="1" cellpadding="1" cellspacing="1" | {|style="text-align: center; width: 100%; margin: 0 auto 10px auto; border-collapse: collapse; font-family:Arial;"border="1"cellpadding="1"cellspacing="1" | ||
|-style="background: #ABC;" | |-style="background: #ABC;" | ||
!width="5%"|Level | !width="5%"|Level | ||
| Line 110: | Line 106: | ||
==Challenges== | ==Challenges== | ||
{| style="text-align: center; width: 100%; margin: 0 auto 10px auto; border-collapse: collapse; font-family:Arial;" border="1" cellpadding="1" cellspacing="1" | {|style="text-align: center; width: 100%; margin: 0 auto 10px auto; border-collapse: collapse; font-family:Arial;"border="1"cellpadding="1"cellspacing="1" | ||
|-style="background: #ABC;" | |-style="background: #ABC;" | ||
!width="1%"|# | !width="1%"|# | ||
| Line 202: | Line 198: | ||
===DLC Challenges=== | ===DLC Challenges=== | ||
{| style="text-align: center; width: 100%; margin: 0 auto 10px auto; border-collapse: collapse; font-family:Arial;" border="1" cellpadding="1" cellspacing="1" | {|style="text-align: center; width: 100%; margin: 0 auto 10px auto; border-collapse: collapse; font-family:Arial;"border="1"cellpadding="1"cellspacing="1" | ||
|-style="background: #ABC;" | |-style="background: #ABC;" | ||
!width="1%"|# | !width="1%"|# | ||
| Line 234: | Line 230: | ||
|JapR=Eijido Gāden | |JapR=Eijido Gāden | ||
|JapM=Aged Garden | |JapM=Aged Garden | ||
|Kor=고대 정원 | |||
|KorR=Godae Jeong-won | |||
|KorM=Ancient Garden | |||
|Spa=Jardines Antiguos | |||
|SpaM=Ancient Gardens | |||
|Ita=Giardini Ancestrali | |Ita=Giardini Ancestrali | ||
|ItaM=Ancestral Gardens | |ItaM=Ancestral Gardens | ||
|Rus=Древние сады | |||
|RusR=Drevniye sady | |||
|RusM=Ancient Gardens | |||
|Ger=Uralte Gärten | |||
|GerM=Ancient Gardens | |||
}} | }} | ||
==References== | ==References== | ||
<references/> | <references/> | ||
{{M+RKB}} | {{M+RKB}} | ||
[[Category:Grasslands]] | [[Category:Grasslands]] | ||
[[Category:Mario + Rabbids Kingdom Battle | [[Category:Mario + Rabbids Kingdom Battle worlds]] | ||
[[it:Giardini Ancestrali]] | [[it:Giardini Ancestrali]] | ||
Latest revision as of 14:13, April 19, 2024
| Ancient Gardens | |
|---|---|

| |
| Game | Mario + Rabbids Kingdom Battle |
| Level(s) | 10 |
| << List of worlds >> | |
Ancient Gardens is the first world in Mario + Rabbids Kingdom Battle. It is a grassland and jungle area located to the east of Sherbet Desert, consisting of many flowers, water streams, immobilized Goombas, and a towering block structure. The instruments that move to the music are blue trumpet-like flowers.
History[edit]
Mario and co. first land in Ancient Gardens just after the SupaMerge headset merges with Spawny. They venture through the grassland area and get past the Sunflower before they reach Peach's Castle. After briefly reconciling with Princess Peach, Mario and co. take a cannon to enter the jungle area of Ancient Gardens, where they find and defeat Pirabbid Plant and recruit Luigi. As Mario and co. exit the jungle area and enter the base of the block tower, they encounter Toad, who warns them of an enemy on the tower. Mario and co. manage to make it to the top of the tower, where they encounter Bowser Jr., who takes Spawny and uses him to create Rabbid Kong. After defeating Rabbid Kong, Beep-0 reports that Bowser Jr. had fled to Sherbet Desert, thus revealing their next destination.
Overview[edit]


The heroes follow a linear path through the Ancient Gardens as they approach Rabbid Kong's tower. After defeating Rabbid Kong, the player can re-enter the Ancient Gardens from five different starting points. The path that the heroes follow is described below from each starting point onward.
Goomba Grove[edit]

The first starting point is located in Goomba Grove, a grassland area. The heroes start out on a wide strip of land with cubical trees, Goombas stuck in honey and flocks of small birds. The area contains two small battlefields and is followed by a long grassy footpath that weaves between trees, colored pipes and flowers.
Pollen Plains[edit]

The second starting point is in Pollen Plains, a broad park containing orange bubbly trees and toy blocks. The area can be explored for secrets, but the heroes can simply follow a snaking path that leads to a water basin with bridges, wooden piers and cannons. Beyond the piers, there are a series of snaking bridges which lead onto some plains with battlefields. Past a meandering walkway and another battlefield surrounded by Goomba Geysers,[1] there is a long wooden bridge that rises over a palm tree canopy, where another battlefield is located.
Flushy Forest[edit]

The third starting point is in Flushy Forest, a highland with rich palm tree vegetation. Recurring elements in this area are Piranha Plants with lamp-like fixtures, which lie on the sidetrack in dimly lit parts of the forest.
The area begins with a long rope bridge that crosses over a chasm, passing by a gigantic mossy toilet with a rubber duck floating inside it. At the end of the bridge, the heroes enter a labyrinth called The Mystic Maze of Mysticism and Mazing[1], which contains hidden stone walls that rise from the ground as they are approached. The heroes must find a path with no walls that obstruct their progress in order to escape the labyrinth. A short while afterwards, the heroes enter a forested area where several battles are hosted in World 1-4, including the Pirabbid Plant boss fight. Once the heroes beat the midboss, they can continue on to the Bamboo Islands.
Bamboo Islands[edit]

The fourth starting point is in Bamboo Islands, a wetland region. The beginning of the area is a long bridge that weaves between bamboos, water lilies and reed. The bridge leads to a series of islands that are connected via wooden footbridges. These islands contain toy block enclosures with coins and chests, and can only be accessed by activating different switches throughout the area.
Past the wetland, there is a series of grassy plateaus with two battlefields, after which there is a foamy lake with several tall piers built above it. On the piers, there are some switches that can be toggled to adjust the position of some footbridges and a Cannon that help the heroes advance to the next area. A bridge then cuts between two large waterfalls and over a river stream and leads into a small forested area preceding the Sunset Bridge.
Sunset Bridge[edit]

The fifth starting point is located at one end of Sunset Bridge, a massive paved structure that leads to Rabbid Kong's tower. The bridge has large gaps in it which can be overcome by blasting from cannons. There are two battlefields in this area, and from the second battlefield on there is a short pipe that leads to the base of the tower.
The tower is a stack of massive toy blocks sustained by a large Smasher statue. The heroes can use pipes to climb the tower and explore the grassy terraces that stick out of it. The first two battlefields on the tower are each followed by a puzzle where the heroes need to use switches in order to connect a pipe that leads them further up. In the first puzzle, activating a switch of a certain color causes the block of the same color to move gradually from side to side, bringing the part of the pipe that is adjoined to it in a certain position. The second puzzle contains a column of disc-shaped blocks that rotate around when their switches are flicked, moving the affixed pipes along with them. These are followed by the tower's rooftop, where the battle against Rabbid Kong takes place.
The waters surrounding the Sunset Bridge and the tower are dotted with DK Barrels. The player can find giant bananas and banana peels lying around the base of the tower. As the heroes approach the top of the tower, building blocks can be seen falling.
Levels[edit]
| Level | Preview | Description |
|---|---|---|
| 1-1- Unlikely Heroes | 
|
A tutorial style level with many Ziggies. |
| 1-2- Flower 'Bud' | 
|
A level that features the Sunflower as a minor NPC. |
| 1-3- Danger From Above | 
|
A level that introduces Hoppers and the TactiCam. |
| 1-4- Welcome to the Jungle | 
|
A level where techniques and Super Effects are introduced. |
| 1-5- Brother, Where Art Thou? | 
|
A level where Pirabbid Plant is fought. |
| 1-6- On the Bubble | 
|
A level where the Chain Chomp as a stage hazard is introduced. |
| 1-7- Do U Stack Up? | 
|
A level where Smashers are introduced. |
| 1-8- Precarious Pillar | 
|
A level with several Ziggies and Smashers, as well as a Chain Chomp. |
| 1-BOSS- Top Banana | 
|
A level where Rabbid Kong is fought. |
| 1-S- The Hidden Bridge | 
|
A secret level featuring a rematch against Pirabbid Plant. |
Challenges[edit]
| # | Name | Preview | Location | To Clear | Turn Limit | Difficulty |
|---|---|---|---|---|---|---|
| 1 | Swarmed! | 
|
The second battleground of Chapter 1. | Defeat 14 Enemies | 3 | Very Easy |
| 2 | Fight-Seeing | 
|
The second battleground of Chapter 2. | Escort Toad | 6 | Easy |
| 3 | Quantum Leap | 
|
The second battleground of Chapter 3. | Reach Area | 1 | Medium |
| 4 | All-in-One | 
|
The first battleground of Chapter 4. | Defeat All | 1 | Easy |
| 5 | Surrounded! | 
|
Just after the second battleground of Chapter 4. | Defeat All | 4 | Easy |
| 6 | Ink Slingers | 
|
The upper portion of the first battleground of Chapter 6. | Defeat 6 Enemies | 3 | Easy |
| 7 | Once Bitten, Twice Shy | 
|
The second battleground of Chapter 6. | Defeat 5 Enemies | 10 | Medium |
| 8 | A Bridge Too Far? | 
|
Just before the first battleground of Chapter 7. | Escort Toad | 8 | Medium |
| 9 | Bounce Back! | 
|
The top of the first battleground of Chapter 8. | Defeat All | 3 | Medium |
| 10 | Right Hero for the Job | 
|
The second battleground of Chapter 8. | Reach Areas | 1 | Easy |
DLC Challenges[edit]
| # | Name | Preview | Location | To Clear | Turn Limit | Difficulty |
|---|---|---|---|---|---|---|
| S1 | Hurry-Up Offense | 
|
The beginning of the first battleground of the secret chapter. | Defeat All | 1 | Ultra Hard |
| S2 | The Toad Less Traveled | 
|
The beginning of the second battleground of the secret chapter. | Escort Toad | 8 | Ultra Hard |
Names in other languages[edit]
| Language | Name | Meaning |
|---|---|---|
| Japanese | エイジドガーデン Eijido Gāden |
Aged Garden |
| German | Uralte Gärten |
Ancient Gardens |
| Italian | Giardini Ancestrali |
Ancestral Gardens |
| Korean | 고대 정원 Godae Jeong-won |
Ancient Garden |
| Russian | Древние сады Drevniye sady |
Ancient Gardens |
| Spanish | Jardines Antiguos |
Ancient Gardens |
References[edit]
- ^ a b As marked in the "Points of Interest" list on the strategic map released by Ubisoft on the Rabbids website