King Kruizer IV (level)
| King Kruizer IV | |||||||
|---|---|---|---|---|---|---|---|

| |||||||
| Level code | 5-2 | ||||||
| Game | DK: Jungle Climber | ||||||
| |||||||
King Kruizer IV is the last main level of the world High-High Island in the game DK: Jungle Climber. It takes place inside the King Kruizer IV.
Layout[edit]
When the Kongs enter the level, a Kritter charges at them. Above the Kritter are several Peg Boards and a DK Barrel. The Kongs then need to jump between two moving saws to reach another Peg Board, then jump to a ledge on the left with some pegs and a Jack Peg above it. They need to pull the Jack Peg down and to the right so it moves along a track between two saws moving up and down. From the end of the track, the Kongs should then jump to a ledge on the right with another Jack Peg attached to a vertical track. They must pull it down and to the left to make the Jack Peg move upward past three saws moving on horizontal tracks. A single peg with the letter K below it is above the saws on tracks, with a Peg Board further up. To the left of the saws is a ledge with a Kritter walking on it; above it is a Jack Peg on a vertical track, with two saws moving in opposite-direction loops on either side of the Jack Peg. The Kongs need to pull the Jack Peg down and to the left to move it upward while avoiding the saws; the first Banana Coin is above and to the left of the top of the track, and it can be collected with a Diddy Attack. Both the route with the letter K and the route with the Banana Coin lead to the entrance to the second area.
Another DK Barrel is near the beginning of the second section, with a bed of spikes to its right. Several pegs moving on conveyors are above the spikes, and the Kongs can grab them to jump to a Peg Board above the first two conveyors. Some mines constantly move from right to left in two lines above this Peg board, so the Kongs must be careful to avoid them. A platform is to the right of the Peg Board; the Kongs can jump up from a Peg Board above the platform to access an optional Bonus Barrel. To the right of the platform are some more Peg Boards above another bed of spikes; the letter O is below the fourth of these Peg Boards. After crossing the Peg Boards above the pit of spikes, the Kongs will see a conveyor with moving pegs. They can drop down and ride the conveyor, then move to the left across some pegs and Peg Boards while avoiding some mines moving up and down. A Kritter spinning on a Handle Peg is to their left, with the second Banana Coin below it; the Kongs should defeat the Kritter and collect the Banana Coin, then jump off the Peg Board above to land in a Cannon Barrel and get shot back. The Kongs can then scale the Peg Boards near the end of this section and jump to the right to enter the third section.
The third section features multiple gear-shaped pegs on tracks; if Donkey Kong grabs the gears with the R button, the gears spin down and to the right, and if he grabs them with the L button, they spin up and to the left. The Kongs should spin the first gear to the right to cross a pit of spikes, using some nearby Peg Boards to prevent them from touching a mine moving up and down. When they reach the end of the track, they can jump up and to the right to land on a ledge with the letter N on it, after which the Kongs must roll a gear above the first one left to return to the main area, then turn a vertical gear upward to reach a static peg with a smaller gear above it. Turning the small gear to the right leads the Kongs to some pegs spinning in two circles, with two mines and some intermittent pegs in between; the third Banana Coin is above the peg to the right of the mine moving up and down. If the Kongs turn the gear left, they must use two small Peg Boards to avoid a mine floating up and down and reach a static peg and a gear on a vertical track. By spinning the gear upward, the Kongs can grab another gear on a diagonal track and spin it upward to arrive at a gear on a horizontal track, with a DK Barrel on the ledge below. They should spin the horizontal gear to the right to reach the upper circle of rotating pegs, then jump off them to land on the ledge above. If the Kongs spin the gear to the left on the track near the ledge, they must grab another Peg Board to avoid a mine floating side to side, then spin it to the end of the track and jump to collect the level's oil barrel. On the right side of the ledge is the exit into the fourth area.
Upon entering the fourth area, the Kongs will see a Kritter throwing bombs while spinning on a peg. The letter G is below the Kritter and can be collected simply by jumping into it. Some Peg Boards are also in the area, with three Kritters walking back and forth on the level above; the Kongs must climb on the Peg Boards, catch the bombs tossed by the Kremling, and toss them upwards so that their explosions defeat the three Kritters, causing two Peg Boards to appear between the top level and the three other boards. An Iron Barrel is also on the level, to the right of the Kritters; if the Kongs destroy it with a thrown bomb, they will obtain the fourth Banana Coin. The Kongs can then jump upward and advance past the Kritter to the fifth section.
At the beginning of the fifth area is a large Peg Board on a crane which tilts depending on where the Kongs grab it, like the one in Panic Factory. When first grabbed, the crane moves in a horizontal line below some spikes and behind some platforms, with a DK Barrel appearing on the second one. The crane then moves upward; the fifth Banana Coin can be found in the top-right corner of the crane's path, best reached with a Diddy Attack. After this, the crane moves to the left past the platform with the DK Barrel and upward past more platforms lined with spikes
The Kongs then enter the sixth area, which is filled with many mines moving in erratic paths. After following the many bananas scattered across the area, they will find the fifth Banana Coin near the middle of the section, with two static mines to its right and a banana above and to its left. As they continue flying upward and avoiding more mines, they eventually catch up with the King Kruizer IV, entering it from a hole on its underside. When the Peg Board on the crane nears the top of a spiky wall, it begins moving to the right past numerous mines; the level's DK Coin is near the bottom, surrounded by five of the mines. Above and to the right of the mines is a Switch Peg that the Kongs must pull down to open a gate, with the crane stopping soon after the gate. Another DK Barrel is above and to the right of where the crane stops, with the exit to the boss fight near the bottom right.
Upon entering the boss area, a cutscene plays in which the Kongs and Xananab confront King K. Rool again, to which K. Rool has one of his Kritters gain power from a Crystal Banana and enter the cockpit of the now complete Mega Amp. The boss fight plays largely like the first fight against the Mega Amp, with the Kongs needing to unscrew a metal plate on the boss's stomach and move a Jack Peg down near its chest to reveal two red buttons and attack them; they must also avoid energy balls shot from one of its arms. However, in addition to this, the Kongs also need to unscrew another bolt on the Mega Amp's right arm and attack a button hidden beneath it. The Mega Amp also utilizes the drill on its right arm to attack the Kongs; in addition, the boss now rains down mines instead of bombs. When all three buttons are attacked, the Mega Amp malfunctions, its right arm falls off, and the Kritter ejects from its cockpit, throwing mines down toward the battlefield. The Kongs must scale the Mega Amp and attack the Kritter to defeat it, allowing them to collect the fourth Crystal Banana.
After completing the level, K. Rool takes out a Spirowarp and escapes into a Wormhole, to the shock of the Kongs and Xananab. They then follow K. Rool into the Wormhole.
Gallery[edit]
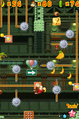
The saws in King Kruizer IV
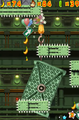
The crane in King Kruizer IV

