Fiery Volcano
| Fiery Volcano | |||||||
|---|---|---|---|---|---|---|---|

| |||||||
| Level code | 4-4 | ||||||
| Game | DK: Jungle Climber | ||||||
| |||||||
Fiery Volcano is a level in DK: Jungle Climber, and it is the fourth one of Chill 'n' Char Island. Taking place in a volcano, Donkey Kong has to climb through the volcano in order to avoid rising lava. In some parts, there are holes pouring out lava, and the player must throw rocks into them in order to get to certain areas. There are also large wheels with pegs on them that Donkey Kong must use in order to progress. Enemies here only include Mini-Neckys.
Layout[edit]
The Kongs begin in a jungle area, with three pegs and a Peg Board moving side to side above them. A flimsy peg is to the right of the moving Peg Board, and if the Kongs let it fall, they can collect the letter K below. Above the Peg Board and to its left is a Mini-Necky which spits out nuts. Some more Mini-Neckys and pegs are further up, with some of the pegs moving; the first Banana Coin is near an isolated peg on the right. A Cannon Barrel is on the left, which can shoot the Kongs to a peg near the top left, which they can jump off to reach the entrance to the second area.
Some Peg Boards are near the beginning of the second section, with a DK Barrel near their bottom left and a stone wheel covered in pegs below them. Some lava is near the bottom, which constantly rises and falls; the Kongs must grab the wheel to move across the room. Further to the right are some more pegs and Peg Boards, with the letter O above two Peg Boards at the top of an alcove. As the Kongs continue spinning the stone wheel, they come across several rocks that must be destroyed with an attack. The next alcove contains some Bananas, and the one to the right of this one has another DK Barrel. Further down near the end of the corridor is the second Banana Coin, which the Kongs can fall into while avoiding the lava tide. Some Peg Boards are above it, which lead to the entrance to the third section.
When the Kongs enter the third area, they will see a peg with a rock next to it, as well as three holes further to the right. The Kongs must toss the rocks into the holes to be able to swing to a Peg Board with another rock above it. Nearby is a hole which pours out lava; by throwing a rock into the hole, they are able to plug it up for a few seconds and cause the lava to recede, after which the rock breaks and the lava returns to its original level. During this time, the Kongs will be able to collect the third Banana Coin by swinging across three pegs to the left. They can also find the letter N near some Peg Boards directly above the hole. By continuing to the right, the Kongs will come across some rocks and another DK Barrel, followed by some moving Peg Boards and another hole pouring lava. The Kongs should throw a nearby rock into each of the three holes above them so they can swing to the entrance to the fourth section. If the Kongs plug the hole by throwing a rock into it while the other hole is also plugged up, then swing across a moving Peg Board that was blocked off by the lava to reach the bottom right, they will enter a secret room which contains many gems and Cannon Barrels. The Kongs must get in the Cannon Barrels to launch themselves up to the top of the room, where they will find the level's DK Coin.
Some Peg Boards are near the bottom of the fourth section, with a Switch Peg and two stone walls above them; if the Kongs pull down the Switch Peg, the walls open up and the lava below them begins rising. The Kongs must then climb up many pegs and Peg Boards to avoid the lava. After the first two flimsy Peg Boards, there is an alcove containing ten Bananas, followed by the letter G below a single peg. A group of several flimsy Peg Boards is above them; the Kongs should grab one of the two leftmost boards and allow it to fall to collect the level's oil barrel directly below them. Two more Peg Boards are above this group, with the fourth Banana Coin near a small flimsy Peg Board to their left. To the right of and above this Banana Coin are another Switch Peg and two more stone walls; by pulling down the Switch Peg, then jumping through the open walls and climbing over two more Peg Boards, the Kongs reach the fifth area.
The fifth section contains many streams of moving pegs. The Kongs must grab pegs in the first two streams to reach a static Peg Board above them and to their right, then grab another to reach a small flimsy Peg Board above a ledge on the left. By jumping to and riding two more streaming pegs, they can jump to a single flimsy peg with the fifth Banana Coin above it. After riding another stream of pegs, the Kongs should jump to the ledge on the upper right, where they will find the Goal Gate.
Gallery[edit]
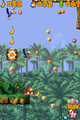
The jungle in Fiery Volcano
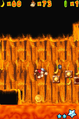
The stones in Fiery Volcano


Names in other languages[edit]
| Language | Name | Meaning | Note(s) | Ref. |
|---|---|---|---|---|
| Japanese | メラメラ火山 Meramera-kazan |
Fiery Volcano | [?] |