Little Chill 'n' Char Island
| Level | |||||||
|---|---|---|---|---|---|---|---|
| Little Chill 'n' Char Island | |||||||

| |||||||
| Level code | 4-6 | ||||||
| Game | DK: Jungle Climber | ||||||
| |||||||
Little Chill 'n' Char Island is the secret level of Chill 'n' Char Island in DK: Jungle Climber and the fourth "miniature island" in the game. While it is included among the other levels of Chill 'n' Char Island, Little Chill 'n' Char Island is a smaller, individual version of Chill 'n' Char Island with the same environments as its larger counterpart.
To unlock the level, the player must collect all of the oil barrels found on Chill 'n' Char Island to power Funky Kong's airplane. Like the other miniature islands seen in the game, Little Chill 'n' Char Island does not have KONG Panels or oil barrels to collect.
Layout[edit]
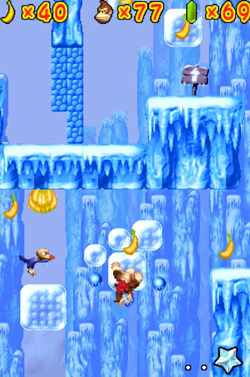
The Kongs start out on a snowy mountain, with two columns of flimsy pegs above them and to their right, the second of which has a DK Barrel at the top. After this is a group of three flimsy pegs; the first Banana Coin is in an alcove above the three pegs and can be collected with a Diddy Attack. Another column of flimsy pegs follows; once the Kongs jump to the right as the pegs fall, they reach some more flimsy pegs below multiple frozen Peg Boards that cause the Kongs to slide down when they grab them. The second Banana Coin is below the flimsy pegs near the left side of the Peg Boards; it can be collected by grabbing the pegs above the coin and letting them fall into it, then jumping back up. After the Kongs scale the slippery Peg Boards, they will reach the ledge that leads to the second section.
Some more frozen Peg Boards are near the beginning of the second section, which the Kongs should climb downward to find two Barrels containing Bananas and two flimsy pegs above some spikes, as well as some crates blocking off some rocks to the right of the spikes. If the Kongs proceed below and to the left of the spikes, they can find a DK Barrel and some more flimsy pegs and frozen Peg Boards as they jump across some small platforms near the bottom. After these platforms are two small set of Peg Boards with a Mini-Necky flying side-to-side between them; a frozen Peg Board is below the Mini-Necky, which the Kongs can slide down to collect the third Banana Coin directly below the Peg Board. A Cannon Barrel is to the right of the two Peg Board sets, which fires the Kongs to a ledge on the other side of the rocks behind the crates. Some more frozen Peg Boards are above this ledge; the Kongs must climb them while taking care not to bump into two nearby tires, one on each side. Above these Peg Boards is a large array of frozen Peg Boards extending above a large bed of spikes; as the Kongs climb across the Peg Boards, they will see the fourth Banana Coin between the spikes and the Peg Boards. They can collect it by grabbing a flimsy peg below the boards and letting it fall, then jumping back to safety. On the left side of the bed of spikes is the entrance to the third area.
If the Kongs climb down the frozen Peg Boards at the beginning of the third section, they will find a DK Barrel in an alcove to the right. By scaling the serpentine formation of Peg Boards, the Kongs will pass two Mini-Neckys before coming across the fifth Banana Coin near a single Peg Board above some spikes; they should grab the Peg Board and immediately jump up to collect the coin. Some tires are to the right, followed by some frozen Peg Boards scattered above another pit of spikes. The level's DK Coin is directly between the rightmost Peg Board and the spikes; the Kongs can collect it by sliding down the Peg Board and jumping back up. After climbing up and jumping between the Peg Boards, they will land on the ledge with the Goal Gate.