Fiery Blocks: Difference between revisions
LinkTheLefty (talk | contribs) m (→Layout) |
LinkTheLefty (talk | contribs) (→Layout) |
||
| Line 12: | Line 12: | ||
'''Mario Zone Area 1''' is the first level in the [[Mario Zone]] in ''[[Super Mario Land 2: 6 Golden Coins]]''. | '''Mario Zone Area 1''' is the first level in the [[Mario Zone]] in ''[[Super Mario Land 2: 6 Golden Coins]]''. | ||
==Layout== | ==Layout== | ||
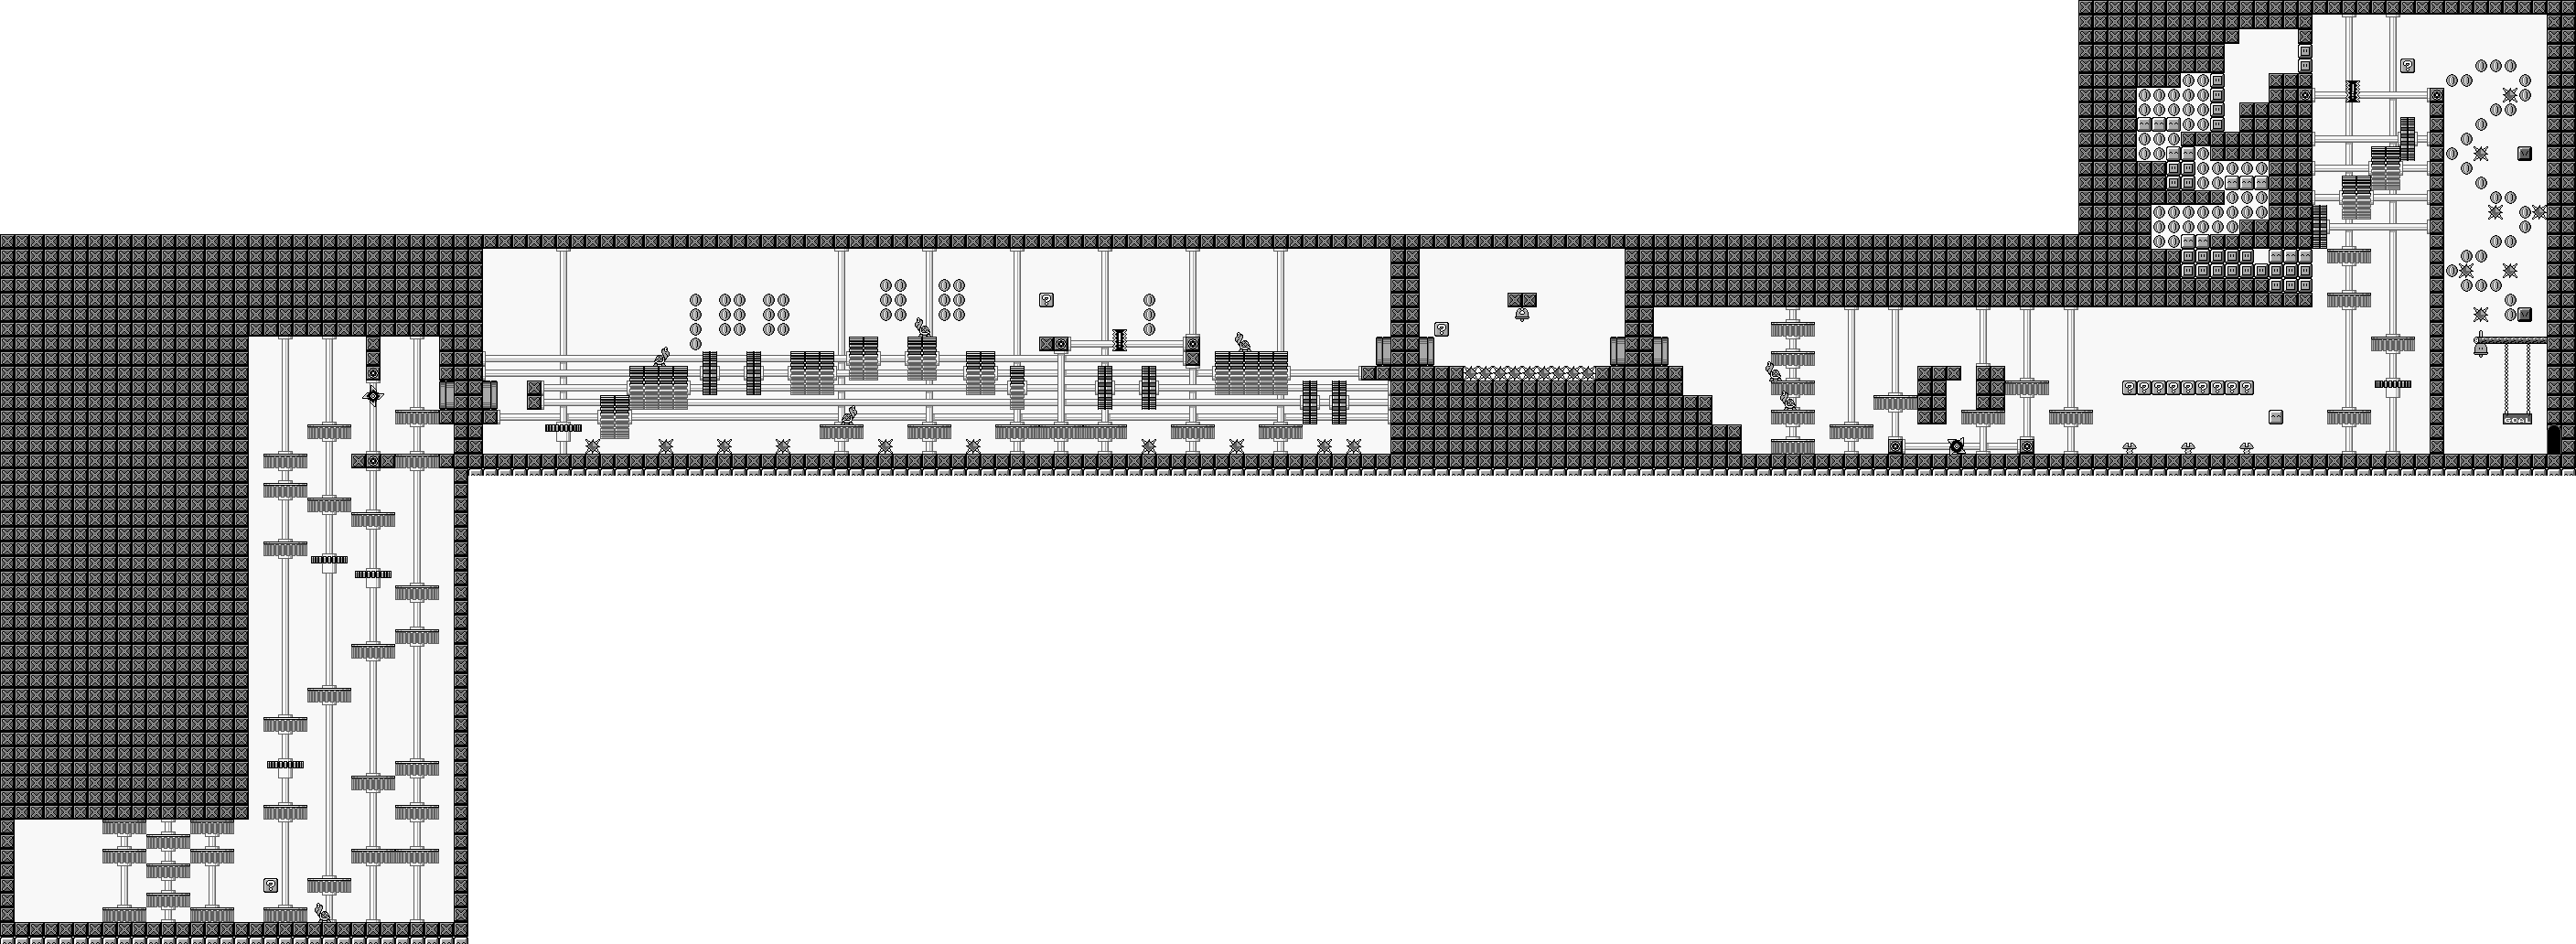
The level starts in a short corridor, with several semi-solid gear platforms. There is a single [[? Block]], containing a [[Super Mushroom|Mushroom]] or [[Fire Flower]], and a single [[Koopa Troopa]] blocking the path. The corridor quickly turns vertical, and the player must hop on gears upwards, to enter the [[Warp Pipe]] leading into the next room. A few of the gears are small and thin, and move Mario if he steps on them, and the Warp Pipe is guided by a [[Yashichi]]. The next room is primarily horizontal, with several gears now aligned vertically, with a few [[Koopa Troopa]]s guarding them as well. The bottom path contains several [[Spike Trap]]s, though the gaps are large enough to jump through safely. The upper path has several [[coin]]s, a ? Block containing a coin, and a [[Tatenoko]]. The next room is once again accessed through a Warp Pipe, where a ? Block containing a [[Carrot]] allows Mario to safely glide over the Spike Traps and hit the checkpoint [[Bell]]. Through the next Warp Pipe is the final room, which has the player platforming around gears and blocks, while dodging Koopa Troopas, a Yashichi, and three [[Neijī]]. A final vertical platforming challenge is at the end of the level, with a Tatenoko guarding the top. To the left is a bonus area only accessible as [[Fire Mario]], filled with many coins. On the right is a wall blocking the [[Goal (Super Mario Land 2: 6 Golden Coins)| | The level starts in a short corridor, with several semi-solid gear platforms. There is a single [[? Block]], containing a [[Super Mushroom|Mushroom]] or [[Fire Flower]], and a single [[Koopa Troopa]] blocking the path. The corridor quickly turns vertical, and the player must hop on gears upwards, to enter the [[Warp Pipe]] leading into the next room. A few of the gears are small and thin, and move Mario if he steps on them, and the Warp Pipe is guided by a [[Yashichi]]. The next room is primarily horizontal, with several gears now aligned vertically, with a few [[Koopa Troopa]]s guarding them as well. The bottom path contains several [[Spike Trap]]s, though the gaps are large enough to jump through safely. The upper path has several [[coin]]s, a ? Block containing a coin, and a [[Tatenoko]]. The next room is once again accessed through a Warp Pipe, where a ? Block containing a [[Carrot]] allows Mario to safely glide over the Spike Traps and hit the [[checkpoint|Mid-Point]] [[Bell (Super Mario Land 2: 6 Golden Coins|Bell]]. Through the next Warp Pipe is the final room, which has the player platforming around gears and blocks, while dodging Koopa Troopas, a Yashichi, and three [[Neijī]]. A final vertical platforming challenge is at the end of the level, with a Tatenoko guarding the top. To the left is a bonus area only accessible by destroying the [[fiery block]]s as [[Fire Mario]], filled with many coins. On the right is a wall blocking the [[Goal (Super Mario Land 2: 6 Golden Coins)|goal]]. After hopping over the wall, the player must dodge a few Spike Traps as they fall so they can finish the level. | ||
==Enemies== | ==Enemies== | ||
Revision as of 14:48, December 15, 2019
The title of this article is conjectural; an official name for the article's subject has not been found, so it has been given a fitting title by the editors. If an official name is found, then the article should be moved to its appropriate title.
Template:Levelbox Mario Zone Area 1 is the first level in the Mario Zone in Super Mario Land 2: 6 Golden Coins.
Layout
The level starts in a short corridor, with several semi-solid gear platforms. There is a single ? Block, containing a Mushroom or Fire Flower, and a single Koopa Troopa blocking the path. The corridor quickly turns vertical, and the player must hop on gears upwards, to enter the Warp Pipe leading into the next room. A few of the gears are small and thin, and move Mario if he steps on them, and the Warp Pipe is guided by a Yashichi. The next room is primarily horizontal, with several gears now aligned vertically, with a few Koopa Troopas guarding them as well. The bottom path contains several Spike Traps, though the gaps are large enough to jump through safely. The upper path has several coins, a ? Block containing a coin, and a Tatenoko. The next room is once again accessed through a Warp Pipe, where a ? Block containing a Carrot allows Mario to safely glide over the Spike Traps and hit the Mid-Point Bell. Through the next Warp Pipe is the final room, which has the player platforming around gears and blocks, while dodging Koopa Troopas, a Yashichi, and three Neijī. A final vertical platforming challenge is at the end of the level, with a Tatenoko guarding the top. To the left is a bonus area only accessible by destroying the fiery blocks as Fire Mario, filled with many coins. On the right is a wall blocking the goal. After hopping over the wall, the player must dodge a few Spike Traps as they fall so they can finish the level.
Enemies
| Sprite | Name | Count |
|---|---|---|
| File:SML2KoopaTroopa.PNG | Koopa Troopa | 7 |
| Yashichi | 2 | |
| Spike Trap | 24 | |
| Tatenoko | 2 | |
| Neijī | 3 |
