|
|
| (21 intermediate revisions by 8 users not shown) |
| Line 1: |
Line 1: |
| {{Location-infobox | | {{location infobox |
| |name=Sneezemore Cave | | |title=Sneezemore Cave |
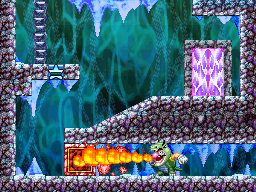
| |image=Sneezemore_Cave1.PNG | | |image=[[File:Sneezemore_Cave1.png|256px]]<br>[[Dragon Wario (Wario: Master of Disguise)|Dragon Wario]] destroying [[red block (Wario: Master of Disguise)|red block]]s in the cave. |
| |caption=[[Dragon Wario]] destroying fire blocks in the cave. | |
| |inhabitants=[[Mr. Cheeky]], [[Snow Globe (enemy)|Snow Globe]], [[Blow Globe]], [[Sir Lance-A-Lot]], [[Slithervine]], [[Treasure Pest]] | | |inhabitants=[[Mr. Cheeky]], [[Snow Globe (enemy)|Snow Globe]], [[Blow Globe]], [[Sir Lance-A-Lot]], [[Slithervine]], [[Treasure Pest]] |
| |first_appearance=''[[Wario: Master of Disguise]]'' (2007) | | |first_appearance=''[[Wario: Master of Disguise]]'' (2007) |
| Line 9: |
Line 8: |
| '''Sneezemore Cave''' is an icy cave that [[Wario]] and [[Goodstyle]] traveled to during the events of ''[[Wario: Master of Disguise]]''. After the [[Sphinx (character)|Sphinx]] from the [[Smithsnorian Museum]] sent them here, Wario came here hoping he would find a [[Wishstone]] piece. The inhabitants of the cave are primarily [[Mr. Cheeky]]s, [[Snow Globe (enemy)|Snow Globe]]s, and [[Blow Globe]]s, of which the latter two are used to make [[Sipping Stalk]]s grow. | | '''Sneezemore Cave''' is an icy cave that [[Wario]] and [[Goodstyle]] traveled to during the events of ''[[Wario: Master of Disguise]]''. After the [[Sphinx (character)|Sphinx]] from the [[Smithsnorian Museum]] sent them here, Wario came here hoping he would find a [[Wishstone]] piece. The inhabitants of the cave are primarily [[Mr. Cheeky]]s, [[Snow Globe (enemy)|Snow Globe]]s, and [[Blow Globe]]s, of which the latter two are used to make [[Sipping Stalk]]s grow. |
|
| |
|
| ==History== | | ==Episodes== |
| ===Episode 4: A Third Thief Brings Grief!=== | | {|class="wikitable" style="text-align: center" |
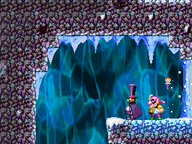
| When Wario arrives at the cave, he drops down a large pit. He begins his search for the "guy in a suit" the Sphinx mentioned in the previous episode, assuming that the person in question is [[Count Cannoli]]. However, once Wario is gone, a nearby snowman reveals itself to be Cannoli in disguise, who is also searching for the "guy in a suit" and by extension, the Wishstone piece.
| | !width="235px"|Title |
| | | !Image |
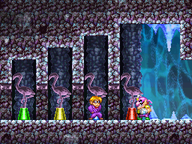
| Shortly after exploring the cave for a bit, Wario meets [[Carpaccio]]. He mistakes Wario for Cannoli, who is quick to correct him. Carpaccio apologizes for all the traps he set in the museum, which were intended for Cannoli. Wario then realizes that Carpaccio is the person Wario is looking for, not Cannoli. However, Carpaccio blocks the path to him with four stone doors, telling Wario to look him up when he's "tired of being a loser." Goodstyle notes the bird statues next to the doors, but this only angers and frustrates Wario. Cannoli appears and offers to tell him how to open the doors in exchange for Goodstyle, but Wario refuses.
| | !Summary |
| | | |- |
| Wario searches the cave for a method of opening the doors and finds four bird-shaped crystals. On the way, he acquires the [[Dragon Wario]] disguise, as well as an upgrade for [[Arty Wario]]. Wario uses the crystals to open the doors, and Cannoli shows up again, amazed that Wario was able to figure out how to open them. Wario then recloses the doors, leaving Cannoli behind.
| | !Episode 4:<br>[[A Third Thief Brings Grief!]] |
| | | |[[File:WMODE4.png|192px]] |
| Wario confronts Carpaccio, who has the next Wishstone tablet, in the next room. Carpaccio notices Goodstyle and once again mistakes him for Cannoli. He introduces himself as the head of [[Sigil Securities]], but Wario doesn't care and simply wants the Wishstone piece. Carpaccio transforms into [[Head Honcho Carpaccio]] and swallows Wario whole, however, Wario is able to defeat him from the inside. Carpaccio realizes that Wario is not Cannoli and leaves, allowing Wario to get his second Wishstone piece.
| | |Wario searches Sneezemore Cave looking for [[Count Cannoli]], who he believes to have stolen the Wishstone clues from the museum. However, the true culprit turns out to be [[Carpaccio]]. Wario must find four [[Crystal (Wario: Master of Disguise)|crystals]] in order to open the way to the second piece of the Wishstone. |
| | | |- |
| The text on the Wishstone piece was: ''...the wishes were...bargained for...the Pharaoh's dreams...made real...his dynasty preserved forever...the Pharaoh forever...in his palace...palace turned into a pyramid...pyramid buried under the sand...and one piece of the stone..buried alongside him...''
| | ![[Special Episode Part 2]] |
| | | |[[File:WMODSPE2.png|192px]] |
| Goodstyle uses this to deduce that the next Wishstone piece is likely buried alongside the [[Poobah the Pharaoh|Pharaoh]] in [[Poobah the Pharaoh's Pyramid|his pyramid]].
| | |Cannoli returns to the cave to search for ramen soup ingredients. However, Wario shows up and says he is going to find the ingredients himself, much to Cannoli's chagrin. Cannoli and Wario then race to find the ingredients. |
| | | |} |
| ===Special Episode: Part 2===
| |
| Later, Cannoli returns to the cave to search for ramen soup ingredients. However, Wario shows up and says he's going to find the ingredients himself, much to Cannoli's chagrin. Cannoli and Wario then race to find the ingredients. When Wario finds them first, he tells Goodstyle to turn him into Chef Wario, only for Goodstyle to inform him that he has no such transformation. Cannoli appears and informs them that he is considered a culinary master; he offers to cook the ramen and split it into equal portions. Wario reluctantly agrees.
| |
|
| |
|
| ==Enemies== | | ==Enemies== |
| Line 33: |
Line 30: |
| *[[Slithervine]] | | *[[Slithervine]] |
| *[[Treasure Pest]] | | *[[Treasure Pest]] |
| | *[[Seed Weed]] |
| *[[Head Honcho Carpaccio]] (boss) | | *[[Head Honcho Carpaccio]] (boss) |
|
| |
| ==[[Treasure chest#Wario: Master of Disguise|Treasure chest]] locations==
| |
| Note: A [[Treasure Pest]] will appear in place of one of the red chests, making it unobtainable on the first run.
| |
| ===Episode 4===
| |
| {|class="wikitable"
| |
| |-
| |
| !
| |
| !Treasure
| |
| !Worth
| |
| !Location
| |
| |-
| |
| |[[File:WMoDRedChest.png]]
| |
| |Majestic Heart-Shaped Straw
| |
| |$110
| |
| |Beyond a hidden passage right next to where Cannoli was disguised as a snowman, accessed using Arty Wario.
| |
| |-
| |
| |[[File:WMoDPurpleChest.png]]
| |
| |Sneezemore Cave Map
| |
| |
| |
| |In the large room to the right of where Carpaccio is first met.
| |
| |-
| |
| |[[File:WMoDGreenChest.png]]
| |
| |Dragon [[Guise Gem]]
| |
| |
| |
| |In the huge room with four doors.
| |
| |-
| |
| |[[File:WMoDRedChest.png]]
| |
| |Golden Throne
| |
| |$876
| |
| |Replaces the Dragon Guise Gem during subsequent runs of the episode.
| |
| |-
| |
| |[[File:WMoDPurpleChest.png]]
| |
| |[[Crystal (Wario: Master of Disguise)|Red Crystal]]
| |
| |
| |
| |At the top-left corner of the room beyond the door next to where the Dragon Guise Gem is obtained.
| |
| |-
| |
| |[[File:WMoDRedChest.png]]
| |
| |Jurassic Snot
| |
| |$14,783
| |
| |At the bottom left corner of the Red Crystal's room. Unobtainable on the first run due to requiring [[Captain Wario]]'s upgrade to break the blocks.
| |
| |-
| |
| |[[File:WMoDRedChest.png]]
| |
| |Paranoid Bear Carving
| |
| |$93
| |
| |In the bottom-left corner of the room beyond the uppermost door in the room where the Dragon Guise Gem is obtained.
| |
| |-
| |
| |[[File:WMoDRedChest.png]]
| |
| |Bath-Time Shampoo Hat
| |
| |$7,359
| |
| |In the area beyond the two blue fire blocks in the room where the Paranoid Bear Carving is obtained. Unobtainable on the first run due to requiring Dragon Wario's upgrade to break the blocks.
| |
| |-
| |
| |[[File:WMoDPurpleChest.png]]
| |
| |[[Crystal (Wario: Master of Disguise)|Yellow Crystal]]
| |
| |
| |
| |In the room above the one where the Paranoid Bear Carving is. Obtained by shooting down the ice cluster and riding the slippery floor to the right side.
| |
| |-
| |
| |[[File:WMoDRedChest.png]]
| |
| |Spoiled Child's Pacifier
| |
| |$6,501
| |
| |Obtained by dropping down the large hole from the Yellow Crystal's room.
| |
| |-
| |
| |[[File:WMoDRedChest.png]]
| |
| |Haunted Television
| |
| |$492
| |
| |In the room directly above where Carpaccio is first met, accessed from a high ledge in the room to the right.
| |
| |-
| |
| |[[File:WMoDRedChest.png]]
| |
| |Mustache Wax
| |
| |$373
| |
| |In the dark area above the tall room with the lone Slithervine.
| |
| |-
| |
| |[[File:WMoDRedChest.png]]
| |
| |Fancy Ramen Noodle Soup
| |
| |$6,409
| |
| |In an isolated cove in the tall room with the lone Slithervine, accessed from the room to the right.
| |
| |-
| |
| |[[File:WMoDPurpleChest.png]]
| |
| |[[Crystal (Wario: Master of Disguise)|Blue Crystal]]
| |
| |
| |
| |Next to the door in the room to the right of where with the Fancy Ramen Noodle Soup is, accessed by hopping across the "ice chandeliers".
| |
| |-
| |
| |[[File:WMoDRedChest.png]]
| |
| |Seductive Lipstick
| |
| |$89
| |
| |In the room beyond the door in the Blue Crystal's room, the chest is on a ledge.
| |
| |-
| |
| |[[File:WMoDRedChest.png]]
| |
| |Odd Lucky Thingie
| |
| |$234
| |
| |At the bottom left corner of the room with a Mr. Cheeky that runs over an ice bridge. Unobtainable on the first run due to requiring Captain Wario's upgrade to break the blocks.
| |
| |-
| |
| |[[File:WMoDGreenChest.png]]
| |
| |[[Vita Mighty]]
| |
| |
| |
| |Accessed via a hidden passage near a Sipping Stalk in the room with the Odd Lucky Thingie.
| |
| |-
| |
| |[[File:WMoDRedChest.png]]
| |
| |Gilded Ice Cream Sandwich
| |
| |$4,734
| |
| |Replaces the Vita Mighty during subsequent runs of the episode.
| |
| |-
| |
| |[[File:WMoDRedChest.png]]
| |
| |Friendly Clown Autograph
| |
| |$379
| |
| |At the bottom-left corner of the large room of the far left end of the cave, hidden behind fire blocks.
| |
| |-
| |
| |[[File:WMoDPurpleChest.png]]
| |
| |[[Crystal (Wario: Master of Disguise)|Green Crystal]]
| |
| |
| |
| |In the room to the right of the Friendly Clown Autograph's room, accessed by using Dragon Wario to break a fire block and drain the water so Captain Wario can reach it.
| |
| |-
| |
| |[[File:WMoDRedChest.png]]
| |
| |Really Boring Firework
| |
| |$270
| |
| |In the area below the room with the ice ball.
| |
| |-
| |
| |[[File:WMoDGreenChest.png]]
| |
| |Arty [[Mastery Gem]]
| |
| |
| |
| |Obtained by removing the ice chunk blocking the ice ball, looping around and pushing the ball from the left to create a hole in the ground, then dropping down.
| |
| |-
| |
| |[[File:WMoDRedChest.png]]
| |
| |Crop Circle Pendant
| |
| |$120
| |
| |Replaces the Arty Mastery Gem during subsequent runs of the episode.
| |
| |}
| |
|
| |
| ===Special Episode: Part 2===
| |
| {|class="wikitable"
| |
| |-
| |
| !
| |
| !Treasure
| |
| !Worth
| |
| !Location
| |
| |-
| |
| |[[File:WMoDRedChest.png]]
| |
| |Galactic Fishcake
| |
| |$71,940
| |
| |Same location as the Yellow Crystal.
| |
| |-
| |
| |[[File:WMoDRedChest.png]]
| |
| |String Theory Soup
| |
| |$30,000
| |
| |Same location as the Arty Mastery Gem/Crop Circle Pendant, though it's faster to reach it through strategic use of Arty Wario's blocks than the ice ball method.
| |
| |-
| |
| |[[File:WMoDRedChest.png]]
| |
| |Electric Pork Chop
| |
| |$9,600
| |
| |Same location as the Fancy Ramen Noodle Soup.
| |
| |}
| |
|
| |
|
| ==Names in other languages== | | ==Names in other languages== |
| {{foreign names| | | {{foreign names| |
| | |Jap=ふぶきのカベ |
| | |JapR=Fubuki no Kabe |
| | |JapM=Blizzard Wall |
| |Spa=Cueva Muchomoco | | |Spa=Cueva Muchomoco |
| |SpaM=''Cueva'' means "cave" and ''muchomoco'' means "much mucus" | | |SpaM=''Cueva'' means "cave" and ''muchomoco'' means "much mucus" |
| |Fra=Grotte Gouttonez | | |Fre=Grotte Gouttonez |
| |FraM=''Grotte'' is the french for Cave and Gouttonez Pun on ''Goutte au nez'' (Runny Nose) | | |FreM=''Grotte'' is the French for Cave and Gouttonez Pun on ''Goutte au nez'' (Runny Nose) |
| | |Ger=Tropfnasen-Höhlen |
| | |GerM=Dripping-nose caves |
| | |Ita=Spelonca Superdiaccia |
| | |ItaM=Superbad Cavern |
| }} | | }} |
|
| |
| ==Trivia==
| |
| *At the beginning of Special Episode: Part 2, Goodstyle misspells Cannoli's name as "Canolli".
| |
|
| |
|
| {{WMOD}} | | {{WMOD}} |
| [[Category:Snowscapes]] | | [[Category:Ice caves]] |
| [[Category:Subterranean Areas]]
| | [[Category:Wario: Master of Disguise locations]] |
| [[Category:Wario: Master of Disguise Places]] | |


