The Purple Wind Stinks Up the Ship!
| Wario: Master of Disguise episode | |||
|---|---|---|---|
| The Purple Wind Stinks Up the Ship! | |||

| |||
| Location | S.S. Caviar | ||
| Boss | Mad Hat Mk. II | ||
| Key items | |||
| Guise/Mastery Gems | |||
| |||
| << List of episodes >> | |||

- “Could it be?! That slate I came to steal... It's the Wishstone? That changes things... Our deal is off. Keep the wand. You're on your own. That Wishstone will be mine!”
- —Count Cannoli, Wario: Master of Disguise
The Purple Wind Stinks Up the Ship! is the second episode of Wario: Master of Disguise. It takes place on the S.S. Caviar, continuing exactly where the previous episode left off.
Plot[edit]
Count Cannoli informs Wario that he came to the ship to steal an ancient tablet, which is being stored in the cargo bay. Goodstyle reveals that the tablet is a piece of the Wishstone, an artifact that could supposedly grant any wish. Upon learning of this, Cannoli calls the deal off and attempts to find the Wishstone fragment himself. Once Wario reaches the cargo bay, Cannoli arrives in the Mad Hat Mk. II and fights Wario again. Once it's destroyed, Cannoli disappears, leaving Wario to claim the tablet. He attempts to make a wish, but nothing happens. Goodstyle reads the ancient writing on the Wishstone piece.
...Five made one...and one went before our Pharaoh... ...Our great leader...met the great stone and made...a pact... ...so Pharaoh made a wish...and the stone granted it...but then...a pact... ...We made one back into five...and we scattered them to the winds...
This reveals that the Wishstone was split into five fragments, meaning that Wario must find the other four pieces in order to assemble the Wishstone. Since the fragment on the ship was being sent to the Smithsnorian Museum, Wario heads there to search for clues to the other fragments' whereabouts.
Layout[edit]

Starting at the top of the ship, there is a door on the right which leads to a room with a ladder leading downward. Here, Count Cannoli is seen defeating a Munchelangelo, who drops a yellow gem. Wario unsuccessfully attempts to steal it from him, though Goodstyle uses this opportunity to explain how gems work. Ahead are several pistons with pipes between them that periodically shoot damaging smoke. Further to the left, Wario will find two Munchelangelos and a box. Wario can push the box to the left to enter the next room. The room above contains a red treasure chest holding the Royal Golden Tools, but it is unobtainable on the first run as Wicked Wario is necessary to reach it.
The room to the left has a vertical layout with numerous ledges and a chandelier platform in the middle which can be lowered by shooting it with Cosmic Wario's laser. The uppermost ledge has a purple chest, which contains the area's map. Immediately below it is a bag of money. Further down, there is a button that opens a door when pressed, but if Wario simply stands on it, the door will close as soon as he gets off. Instead, he must go through the regular door near it to find a green chest, which contains the Arty Guise Gem. This allows him to transform into Arty Wario and draw blocks, which can be used as platforms and weights. Wario must use this new power to get back out of the room and return to where the button is, then draw a block on top of the button to open the door on the right. In this room, Wario will notice the two Sapphire Stars above, prompting Goodstyle to explain that he can get coins and gems out of them by shooting them with Cosmic Wario. This room also contains two moneybags and a green chest, which contains the first Vita Mighty in the game. Arty Wario's blocks are needed to reach the chest, as well as escape the room.

Back in the vertical room, going downstairs leads to a large, multi-layered dining room with two Pushy Cats and many chandeliers. Some of the tables will spawn silverware enemies that will attempt to fling themselves at Wario. There is a narrow gap on the left side of the room which can be entered by drawing a block right next to it and crawling through. The gap leads to a room with four LEDs. Cosmic Wario can turn the LEDs on and off by shooting them. When an LED is shot, it and the two LEDs adjacent to it will change between on and off. Turning all four LEDs on will restore power to the elevator. The quickest way to do this is to shoot the lowest, second highest, and second lowest LEDs, in that order. The door in the room leads to an area below the staircase where Wario first boarded the ship in Episode 1. Here, Wario will find a Munchelangelo, a moneybag, a block, and a red chest containing the Turbo Chompers. By pushing the block to the right until it drops down, Wario can crawl through a narrow gap to find a DaVincheese and a laser switch. The switch is behind a wall, so Wario must draw a block and crawl through a gap to reach it. Hitting the switch makes a ladder appear, allowing Wario to proceed into the next room, which has a moneybag and a door. It leads to a tall room directly east of the dining room with nothing in it beyond Sapphire Stars and a moneybag. The path to the right leads to the elevator.

Inside the elevator room is a large heart and a locked door. The elevator is operated by shooting the switch with Cosmic Wario's laser. When going up, the switch will move left and right, and Wario must keep shooting it to keep moving up; if he fails, the elevator will drop back down to the nearest floor. To go down, Wario must simply shoot the bottom switch and the elevator will automatically go down one floor. The second floor contains a hat switch. The third floor has a moneybag and a path leading to the left. The room to the left is one that Wario had previously traveled through in Episode 1, which now has three Pushy Cats and a moneybag at the end. A door that was usable in the previous episode can be seen behind two blocks, which prevent Wario from going through the door in this episode. The left of this room also has a secret narrow passage which leads back to the room where the Vita Mighty was.
On the fourth floor, Wario will find a door, a locked door, and a path leading to the right. The path to the right leads to another set of four LEDs. Lighting them all will open the way to a purple chest. This can be done in two shots by shooting the LED on the far right, then the second one from the left. The chest contains the Master Key, which opens the locked doors on the first and fourth floors. The unlocked door leads to a room with multiple ledges, two moneybags, a large heart, and a red chest containing the Discarded Doctor Scrubs. One of Arty Wario's blocks is necessary to reach the ledge where the chest is. The Short Guy Boots are also in this room, but this treasure cannot be obtained on the first run since Dragon Wario is needed to drop below the Semisolid Platform at the bottom. The locked door leads to a small area on the right side of the beginning room with the pistons in it, where Wario can find a moneybag. There is also a secret passage that allows Wario to travel back to the beginning section.

The second floor of the elevator room has a path leading into a large outdoor area with a Pushy Cat, some chandeliers, and a pool of water at the bottom. The upper-right section of the area has a moneybag and a smaller pool with a red chest with the Superfantastical Money Tree in it; it can be reached by lowering the chandelier next to it. By lowering the chandelier even further, then lowering the one to the right, Wario can use the chandeliers to jump over the currents in the water and reach the green chest on the far right, but must not lower them too much, or they will fall in the water and break. The green chest contains the Genius Guise Gem, which gives Wario the ability to turn into Genius Wario and see hidden objects and passages. One such passage can be found on the left side of this outdoor area; a block must be drawn on the nearby ledge to crawl through it. Here, Wario will find a red block with a regular gray block stacked on top of it, a locked door to the left leading back to the first floor of the elevator room, and another door behind the gray block. Drawing a block on one side of the red block then pushing the gray block to the other side allows Wario to go through the door, which leads to a room with a moneybag and a hat switch. Up ahead are two lasers; touching the first one will open two gates that will slowly close, while the second one triggers a giant mallet, which can be avoided by ducking. By getting through the gates quickly, Wario can proceed to the next room, which has a hatch leading to the lower parts of the ship.

Cannoli appears and challenges Wario to a race for the Wishstone tablet, but this has no effect on the gameplay. Before going down the hatch, Wario can reach the ledge above by drawing a block and jumping from on top of it; going to the left yields a moneybag. Beneath the hatch, Wario will encounter four Pushy Cats. From here, there are two paths Wario can take. The short path involves drawing a block on the upper-left corner of the room and crawling through a hidden passage, which skips two rooms. The long path involves going down into a room with laser switches hidden behind moving pistons. Wario must shoot through the switches through the openings in the pistons to open the way forward. The next room has three Davincheeses, a large heart, and another laser-activated gate. Arty Wario can be used to get past the pistons faster. There is a ladder on the upper-right leading to the room above, where the two paths converge.
This room has more pistons and smoke pipes to jump past, as well as a Ratfael at the end. The next room has a switch that opens a vertical gate; Arty Wario must stand on the gate and draw a block on the switch to go down. Down below are two ladders leading further downward, a moneybag, four Ratfaels, a large heart, and a hat switch. Below this room is a dark area containing the Forever X-ray Glasses and the Stinky Blue Cheese, but these two treasures cannot be obtained on the first run due to Dragon Wario being necessary to access the area and Sparky Wario being necessary to open chests in the dark. The door to the left leads to the cargo bay, which is where the Wishstone piece is. Here, Wario must face Cannoli again, this time in the Mad Hat Mk. II. After defeating him, Wario can claim the Wishstone piece.
Enemies[edit]
| Sprite | Name | Count |
|---|---|---|
| Munchelangelo | 3 | |
| Pushy Cat | 10 | |
| Spoonatic | 1 | |
| Slaughterfork | 1 | |
| Jack the Knife | 1 | |
| DaVincheese | 4 | |
| Ratfael | 5 |
Treasure chest locations[edit]
| Chest color | Treasure | Description | Worth | Location |
|---|---|---|---|---|
Royal Golden Tools |
These golden tools were developed for a king. But since gold is one of the world's softest metals, they're pretty much useless. Fun to look at, though. | $20,076 | Obtained by flying up to the room above the left side of the first room with yellow pipes. Unobtainable on the first run due to requiring Wicked Wario. | |
| S.S. Caviar Map | N/A | N/A | Sitting on a ledge at the top-left of the tall room with the chandeliers. | |
| N/A | N/A | In the room on the other side of the door in the room with the map. | ||
Big Scoop Camera |
This camera takes shots of big news stories without any prompting from you. However, removing the lens cap is still your responsibility. | $290 | Replaces the Arty Guise Gem during subsequent runs of the episode. | |

|
N/A | N/A | In the room accessed by using Arty Wario to draw a block over the switch in the map room; obtained by drawing a block to get on the ledge the chest is on. | |
The Earwax Rifle |
Show your earwax no mercy with this tiny sniper rifle. Boo-ya, marine! Get on the ready line and smoke that wax! C'mon, you wanna live with waxy ears forever?! | $130 | Replaces the Vita Mighty during subsequent runs of the episode. | |
Turbo Chompers |
A small tooth-shaped device that accelerates the speed of chomping. For the love of all that is good and holy, don't leave it on overnight. | $207 | In the room past the one with the four switches that activate the elevator. | |
Superfantastical Money Tree |
Sure, it sounds fancy. But it's just a plant. A boring old potted plant. Slap anyone who tries to tell you otherwise. | $20 | On the upper-right corner of the room with water in it. | |
Genius Guise Gem |
N/A | N/A | On the bottom-right corner of the room with water in it. | |
Hairy Macho Bathrobe |
This robe looks smashing when paired with a fine dining-room set and chandelier. Sadly, the robe's machismo causes excess body hair. | $2,349 | Replaces the Genius Guise Gem during subsequent runs of the episode. | |
| "I got a big, gorgeous key. I bet it opens fancy doors." | N/A | Obtained by riding the elevator to the fourth floor and going to the room on the right and lighting up all four switches. | ||
Discarded Doctor Scrubs |
The garb of a true hero. Perhaps these scrubs were once used by a world-class heart surgeon! ...Or maybe it was just a cut-rate proctologist. | $280 | In the room beyond the door on the fourth floor in the elevator room; obtained by using Arty Wario to get on the top-right ledge. | |
Short Guy Boots |
These boots increase your height by almost two feet. You can keep an entire school of goldfish in the heels! ...Not that you would want to. | $778 | In the same room as the Discarded Doctor Scrubs. Unobtainable on the first run due to requiring Dragon Wario to pass through the platform and access the bottom section of the room. | |
Forever X-ray Glasses |
This amazing treasure lets you look through absolutely everything...which means that you end up seeing NOTHING AT ALL! Think about it. | $5,839 | In the dark room below the one to the right of where Cannoli is fought. Unobtainable on the first run due to requiring Dragon Wario to access the room. | |
Stinky Blue Cheese |
This mold-covered cheese is considered a delicacy among the rich, who pay plenty just to have it sprinkled on a salad. Little do they know it's really just been left in the sun too long. | $2,509 | In the same room as the Forever X-ray Glasses and unobtainable on the first run for the same reasons. |
Gallery[edit]
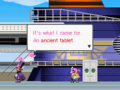
The opening cutscene
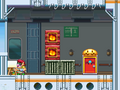
Arty Wario creating a warp door
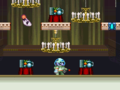
The dining room


Names in other languages[edit]
| Language | Name | Meaning | Note(s) | Ref. |
|---|---|---|---|---|
| Japanese | 追え!怪盗アルデンテ Oe! Kaitō Arudente |
Chase Him! Phantom Thief Count Cannoli | [?] | |
| French | Le Vent Pourpre quitte le navire! | The Purple Wind leaves the ship! | [?] | |
| German | Der Purpurwind weht übers Schiff! | The Purple Wind wafts over the ship! | [?] | |
| Italian | Brezza Olente all'arrembaggio! | Olente Breeze on board! | [?] | |
| Spanish | ¡Vendaval Malva arrasa por donde pasa! | The Purple Wind sweeps through! | [?] |