Poobah the Pharaoh's Pyramid: Difference between revisions
7feetunder (talk | contribs) No edit summary |
m (Text replacement - "Fra([AE]?M? *)=" to "Fre$1=") |
||
| (23 intermediate revisions by 7 users not shown) | |||
| Line 1: | Line 1: | ||
{{ | {{location infobox | ||
| | |title=Poobah the Pharaoh's Pyramid | ||
|image=Poobah_the_Pharaoh | |image=[[File:Poobah_the_Pharaoh%27s_Pyramid.png|256px]]<br>[[Genius Wario]] discovers a hidden door in the pyramid. | ||
| | |||
|ruler=[[Poobah the Pharaoh]] | |ruler=[[Poobah the Pharaoh]] | ||
|inhabitants=[[Bombat]], [[Sarcopha Guy]], [[K-9 Cannon]], [[Scare-Oh!]], [[Sphinx Jr.]], [[Blamses]], [[Treasure Pest]], [[royal gatekeeper]] | |inhabitants=[[Bombat]], [[Sarcopha Guy]], [[K-9 Cannon]], [[Scare-Oh!]], [[Sphinx Jr.]], [[Blamses]], [[Treasure Pest]], [[royal gatekeeper]] | ||
| Line 9: | Line 8: | ||
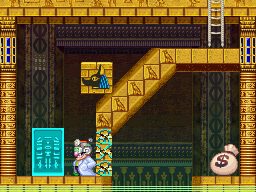
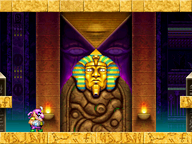
'''Poobah the Pharaoh's Pyramid''' is the setting of the fifth episode of ''[[Wario: Master of Disguise]]''; the spirit of [[Poobah the Pharaoh]] lives here. [[Wario]] and [[Goodstyle]] came here searching for a piece of the [[Wishstone]] after the writing on a different piece found in [[Sneezemore Cave]] seemed to imply that it was here. | '''Poobah the Pharaoh's Pyramid''' is the setting of the fifth episode of ''[[Wario: Master of Disguise]]''; the spirit of [[Poobah the Pharaoh]] lives here. [[Wario]] and [[Goodstyle]] came here searching for a piece of the [[Wishstone]] after the writing on a different piece found in [[Sneezemore Cave]] seemed to imply that it was here. | ||
This pyramid has many secrets. Prominent features include invisible doors that can only be seen and used [[Genius Wario]] and unlit torches that [[Dragon Wario]] can light to trigger the appearance of hidden doors, platforms, and passages that even Genius Wario cannot see. There are also many dark rooms in the pyramid, requiring [[Sparky Wario]] to see in them. | This pyramid has many secrets. Prominent features include invisible doors that can only be seen and used by [[Genius Wario]] and unlit torches that [[Dragon Wario (Wario: Master of Disguise)|Dragon Wario]] can light to trigger the appearance of hidden doors, platforms, and passages that even Genius Wario cannot see. There are also many dark rooms in the pyramid, requiring [[Sparky Wario]] to see in them. | ||
==Background== | |||
5,000 years ago, the Pharaoh called upon [[Terrormisu|a demon]] for a wish. However, the wish came at a cost: he had to starve his people. Poobah agreed, but the demon did not uphold her end of the bargain and instead stole everything from him, crumbled his kingdom to dust, transformed his palace into a pyramid, and buried the Pharaoh along with his pyramid under the desert sand. Poobah's spirit continued to live on inside his pyramid. | 5,000 years ago, the Pharaoh called upon [[Terrormisu|a demon]] for a wish. However, the wish came at a cost: he had to starve his people. Poobah agreed, but the demon did not uphold her end of the bargain and instead stole everything from him, crumbled his kingdom to dust, transformed his palace into a pyramid, and buried the Pharaoh along with his pyramid under the desert sand. Poobah's spirit continued to live on inside his pyramid. | ||
==Episode== | |||
{|class="wikitable" style="text-align: center" | |||
!width="235px"|Title | |||
!Image | |||
!Summary | |||
|- | |||
!Episode 5:<br>[[Picking the Pharaoh's Brains!]] | |||
|[[File:WMODE5.png|192px]] | |||
|Wario explores the pyramid looking for the Pharaoh and the third Wishstone piece. However, the [[royal gatekeeper]] will only let him see the Pharaoh after he finds two [[Royal Gold Medallion|royal]] [[Royal Silver Medallion|medallions]]. | |||
|} | |||
==Enemies== | ==Enemies== | ||
| Line 34: | Line 33: | ||
*[[Treasure Pest]] | *[[Treasure Pest]] | ||
*[[Poobah the Pharaoh]] (boss) | *[[Poobah the Pharaoh]] (boss) | ||
==Names in other languages== | ==Names in other languages== | ||
{{ | {{foreign names| | ||
|Jap=ちかピラミッド | |||
|JapR=Chika Piramiddo | |||
|JapM=Underground Pyramid | |||
|Spa=Pirámide de Puba | |Spa=Pirámide de Puba | ||
|SpaM=Poobah's Pyramid | |SpaM=Poobah's Pyramid | ||
| | |Fre=Pyramide de Derey le pharaon | ||
| | |FreM=''Pyramide'' is the French word for "pyramid" and ''Derey le Pharaon'' is the French name of Poobah the Pharaoh | ||
|Ita=Piramide di Blasone il Faraone | |||
|ItaM=Poobah the Pharaoh's Pyramid | |||
}} | |||
{{WMOD}} | {{WMOD}} | ||
[[Category: | [[Category:Temples]] | ||
[[Category:Wario | [[Category:Wario: Master of Disguise locations]] | ||
Latest revision as of 22:56, January 7, 2024
| Poobah the Pharaoh's Pyramid | |
|---|---|
 Genius Wario discovers a hidden door in the pyramid. | |
| First appearance | Wario: Master of Disguise (2007) |
| Ruler | Poobah the Pharaoh |
| Inhabitants | Bombat, Sarcopha Guy, K-9 Cannon, Scare-Oh!, Sphinx Jr., Blamses, Treasure Pest, royal gatekeeper |
Poobah the Pharaoh's Pyramid is the setting of the fifth episode of Wario: Master of Disguise; the spirit of Poobah the Pharaoh lives here. Wario and Goodstyle came here searching for a piece of the Wishstone after the writing on a different piece found in Sneezemore Cave seemed to imply that it was here.
This pyramid has many secrets. Prominent features include invisible doors that can only be seen and used by Genius Wario and unlit torches that Dragon Wario can light to trigger the appearance of hidden doors, platforms, and passages that even Genius Wario cannot see. There are also many dark rooms in the pyramid, requiring Sparky Wario to see in them.
Background[edit]
5,000 years ago, the Pharaoh called upon a demon for a wish. However, the wish came at a cost: he had to starve his people. Poobah agreed, but the demon did not uphold her end of the bargain and instead stole everything from him, crumbled his kingdom to dust, transformed his palace into a pyramid, and buried the Pharaoh along with his pyramid under the desert sand. Poobah's spirit continued to live on inside his pyramid.
Episode[edit]
| Title | Image | Summary |
|---|---|---|
| Episode 5: Picking the Pharaoh's Brains! |

|
Wario explores the pyramid looking for the Pharaoh and the third Wishstone piece. However, the royal gatekeeper will only let him see the Pharaoh after he finds two royal medallions. |
Enemies[edit]
Names in other languages[edit]
| Language | Name | Meaning |
|---|---|---|
| Japanese | ちかピラミッド Chika Piramiddo |
Underground Pyramid |
| French | Pyramide de Derey le pharaon |
Pyramide is the French word for "pyramid" and Derey le Pharaon is the French name of Poobah the Pharaoh |
| Italian | Piramide di Blasone il Faraone |
Poobah the Pharaoh's Pyramid |
| Spanish | Pirámide de Puba |
Poobah's Pyramid |