Make Eggs, Throw Eggs: Difference between revisions
No edit summary Tag: Mobile edit |
Tags: Mobile edit Advanced mobile edit |
||
| (18 intermediate revisions by 8 users not shown) | |||
| Line 2: | Line 2: | ||
|title=Make Eggs, Throw Eggs | |title=Make Eggs, Throw Eggs | ||
|code=1-1 | |code=1-1 | ||
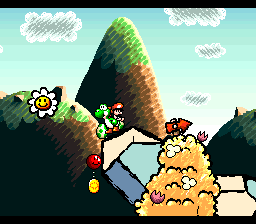
|image=[[File: | |image=[[File:SMW2YI Make Eggs Throw Eggs Screenshot.png]] | ||
|game=''[[Super Mario World 2: Yoshi's Island]]'', ''[[Yoshi's Island: Super Mario Advance 3]]'' | |game=''[[Super Mario World 2: Yoshi's Island]]'', ''[[Yoshi's Island: Super Mario Advance 3]]'' | ||
|before= [[Welcome To Yoshi's Island|<<]] | |before= [[Welcome To Yoshi's Island|<<]] | ||
|after= [[Watch Out Below!|>>]] | |after= [[Watch Out Below!|>>]] | ||
|track=The Flower Garden<br>[[File:SMW2YI Flower Garden.oga]] | |||
}} | }} | ||
'''Make Eggs, Throw Eggs''' is the first level of ''[[Super Mario World 2: Yoshi's Island]]'' and its remake, ''[[Yoshi's Island: Super Mario Advance 3]]''. It serves as the main tutorial of the game, featuring multiple [[Message Block]]s detailing many of [[Yoshi]]'s abilities and other game mechanics. [[Ba-dum BUM!]], the first | '''Make Eggs, Throw Eggs''' is the first level of ''[[Super Mario World 2: Yoshi's Island]]'' and its remake, ''[[Yoshi's Island: Super Mario Advance 3]]''. It serves as the main tutorial of the game, featuring multiple [[Message Block]]s detailing many of [[Yoshi]]'s abilities and other game mechanics. [[Ba-dum BUM!]] and [[Little Eggs, Big Eggs]], the first levels in ''[[Yoshi's Island DS]]'' and ''[[Yoshi's New Island]]'', respectively, bear a strong resemblance to this level. This level's playable [[Yoshi (species)|Yoshi]] is the green Yoshi. | ||
==Overview== | ==Overview== | ||
| Line 16: | Line 17: | ||
The exit to the underground section is not far from its entrance, under two rocks, with the third Special Flower being to the immediate left of it. The area to the right of it contains the fourth Special Flower underneath a Wild Piranha, as well as a rotating platform. Moving forward, there is a pipe which spawns an infinite number of Shy-Guys, with a Winged Cloud containing Stars above it. After going through a short tunnel, there is a Winged Cloud that must be hit, sprouting a beanstalk which allows access to the platforms above. Back to the left, past the edge of the upper platform, there is another Winged Cloud containing the final Special Flower for the level. Over to the right, there is another spinning platform that allows access to an even higher ledge. Upon it is a Message Block explaining the purpose of Red Coins, as well as another Chomp Rock. The rock can be rolled down the hill past more Shy-Guys and Wild Piranhas, leading to the [[Goal Ring]]. | The exit to the underground section is not far from its entrance, under two rocks, with the third Special Flower being to the immediate left of it. The area to the right of it contains the fourth Special Flower underneath a Wild Piranha, as well as a rotating platform. Moving forward, there is a pipe which spawns an infinite number of Shy-Guys, with a Winged Cloud containing Stars above it. After going through a short tunnel, there is a Winged Cloud that must be hit, sprouting a beanstalk which allows access to the platforms above. Back to the left, past the edge of the upper platform, there is another Winged Cloud containing the final Special Flower for the level. Over to the right, there is another spinning platform that allows access to an even higher ledge. Upon it is a Message Block explaining the purpose of Red Coins, as well as another Chomp Rock. The rock can be rolled down the hill past more Shy-Guys and Wild Piranhas, leading to the [[Goal Ring]]. | ||
== | ==Special Flowers== | ||
<gallery widths="256" heights="224"> | |||
1-1 MakeEggsThrowEggs SmileyFlower1.png|'''[[Smiley Flower|Flower 1]]:''' Right past the first [[Crazee Dayzee]], in plain sight. | |||
1-1 MakeEggsThrowEggs SmileyFlower2.png|'''Flower 2:''' On a platform in the air, access from the platforms created by the first [[Winged Cloud]]. | |||
1-1 MakeEggsThrowEggs SmileyFlower3.png|'''Flower 3:''' Under the rocks immediately to the left of the exit to the underground area. | |||
1-1 MakeEggsThrowEggs SmileyFlower4.png|'''Flower 4:''' Directly to the left of the first spinning platform, under a [[Piranha Plant|Wild Piranha]]. | |||
1-1 MakeEggsThrowEggs SmileyFlower5.png|'''Flower 5:''' In a [[Winged Cloud]] to the left of the beanstalk, slightly past the ledge. | |||
</gallery> | |||
==Enemies== | ==Enemies== | ||
{{number of enemies | |||
|image1=[[File:SMW2YI Purple Shy Guy.png]] | |||
|name1=[[Shy Guy|Shy-Guy]] (magenta) | |||
|count1=7 | |||
|image2=[[File:SMW2YI Red Shy Guy.png]] | |||
|name2=[[Shy Guy|Shy-Guy]] (red) | |||
|count2=3 | |||
|image3=[[File:SMW2YI Yellow Shy Guy.png]] | |||
|name3=[[Shy Guy|Shy-Guy]] (yellow) | |||
|count3=3 | |||
|image4=[[File:SMW2YI Green Shy Guy.png]] | |||
|name4=[[Shy Guy|Shy-Guy]] (green) | |||
|count4=4 | |||
|image5=[[File:CrazeeDayzee-SMW2.png]] | |||
|name5=[[Crazee Dayzee]] (white) | |||
|count5=3 | |||
|image6=[[File:SMW2 Crazee Dayzee yellow.png]] | |||
|name6=[[Crazee Dayzee]] (yellow) | |||
|count6=1 | |||
|image7=[[File:SMW2 Piranha Plant.png]] | |||
|name7=[[Piranha Plant|Wild Piranha]] | |||
|count7=9 | |||
|image8=[[File:SMW2 Fly Guy.png]] | |||
|name8=[[Fly Guy]] | |||
|count8=3 | |||
|image9=[[File:SMW2 Baron von Zeppelin R.png]] | |||
|name9=[[Item Balloon|Baron von Zeppelin]] (red) | |||
|count9=1 | |||
|image10=[[File:BaronVonZepplin.png]] | |||
|name10=[[Item Balloon|Baron von Zeppelin]] (green) | |||
|count10=1 | |||
|image11=[[File:SMW2 Baron von Zeppelin M.png]] | |||
|name11=[[Item Balloon|Baron von Zeppelin]] (magenta) | |||
|count11=1 | |||
|image12=[[File:SMW2 Woozy Guy magenta.png]] | |||
|name12=[[Woozy Guy]] (magenta) | |||
|count12=1 | |||
|image13=[[File:SMW2 Woozy Guy red.png]] | |||
|name13=[[Woozy Guy]] (red) | |||
|count13=1 | |||
}} | |||
{{br}} | |||
==In-game help instructions (SNES version)== | ==In-game help instructions (SNES version)== | ||
| Line 41: | Line 81: | ||
<gallery> | <gallery> | ||
Icon SMW2-YI - Make Eggs, Throw Eggs.png|Level icon from ''Super Mario World 2: Yoshi's Island'' | Icon SMW2-YI - Make Eggs, Throw Eggs.png|Level icon from ''Super Mario World 2: Yoshi's Island'' | ||
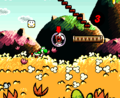
Yisland1.png | |||
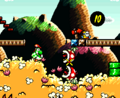
Yisland3.png | |||
SMW2 W1-1.ogv|Speedrun of the level | SMW2 W1-1.ogv|Speedrun of the level | ||
SMA3-MakeEggsThrowEggs-Icon.png|Level icon from ''Yoshi's Island: Super Mario Advance 3'' | SMA3-MakeEggsThrowEggs-Icon.png|Level icon from ''Yoshi's Island: Super Mario Advance 3'' | ||
SMA3 Make Eggs Throw Eggs Screenshot.png|Screenshot from ''Yoshi's Island: Super Mario Advance 3'' | |||
YoshisCookieCGN2.png|Round 1 of Action Mode, from ''Yoshi no Cookie'' in ''[[Nintendo Puzzle Collection]]''; using the background of Make Eggs, Throw Eggs | YoshisCookieCGN2.png|Round 1 of Action Mode, from ''Yoshi no Cookie'' in ''[[Nintendo Puzzle Collection]]''; using the background of Make Eggs, Throw Eggs | ||
</gallery> | </gallery> | ||
| Line 53: | Line 96: | ||
|Spa=Crea huevos, lanza huevos | |Spa=Crea huevos, lanza huevos | ||
|SpaM=Make Eggs, Throw Eggs | |SpaM=Make Eggs, Throw Eggs | ||
| | |Fre=Faire et lancer des oeufs. | ||
| | |FreM=Making and throwing eggs. | ||
|Ger=Schokohügel | |Ger=Schokohügel | ||
|GerM=Chocolate Hills | |GerM=Chocolate Hills | ||
| Line 65: | Line 108: | ||
==Trivia== | ==Trivia== | ||
*Aside from the Extra levels, this is the only level in the game without a [[Checkpoint Ring|Middle Ring]]. | *Aside from the Extra levels (as well as the Secret levels in the remake), this is the only level in the game without a [[Checkpoint Ring|Middle Ring]]. | ||
{{YI levels}} | {{YI levels}} | ||
[[it:Fai le uova, lancia le uova]] | [[it:Fai le uova, lancia le uova]] | ||
[[Category:Grasslands]] | [[Category:Grasslands]] | ||
[[Category:Super Mario World 2: Yoshi's Island levels]] | [[Category:Super Mario World 2: Yoshi's Island levels]] | ||
[[Category:Yoshi's Island: Super Mario Advance 3 levels]] | [[Category:Yoshi's Island: Super Mario Advance 3 levels]] | ||
Latest revision as of 21:24, April 18, 2024
| Level | |
|---|---|
| Make Eggs, Throw Eggs | |

| |
| Level code | 1-1 |
| Game | Super Mario World 2: Yoshi's Island, Yoshi's Island: Super Mario Advance 3 |
| Music track | The Flower Garden |
| << Directory of levels >> | |
Make Eggs, Throw Eggs is the first level of Super Mario World 2: Yoshi's Island and its remake, Yoshi's Island: Super Mario Advance 3. It serves as the main tutorial of the game, featuring multiple Message Blocks detailing many of Yoshi's abilities and other game mechanics. Ba-dum BUM! and Little Eggs, Big Eggs, the first levels in Yoshi's Island DS and Yoshi's New Island, respectively, bear a strong resemblance to this level. This level's playable Yoshi is the green Yoshi.
Overview[edit]
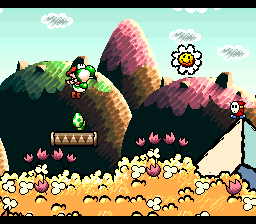
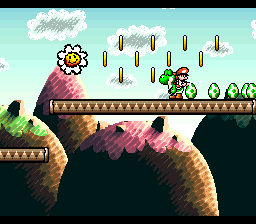
The level starts in a flat, flowery field with a nearby Message Block, telling the player how to make eggs. Slightly further along, there are a few Shy-Guys, one on a suspended platform, and a Crazee Dayzee walking around. It is followed by a small rock with the first Special Flower above it and a Wild Piranha in a small ditch next to it. After the rock, there is a Message Block explaining how to throw eggs, as well as a Winged Cloud in the air. Hitting the cloud with an egg will create a staircase leading to some coins, the first Red Coins, a Winged Cloud carried by a Fly Guy containing Stars, and a Special Flower.
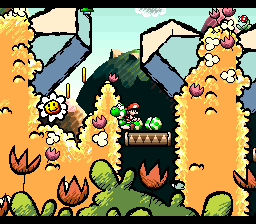
Back on the ground, two Wild Piranhas block access to a Warp Pipe, leading to an underground section. Within it is a Chomp Rock used to roll over a few Shy-Guys and access a high ledge with the exit pipe, a few Fly Guys carrying Red Coins, and a tulip.
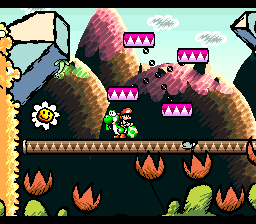
The exit to the underground section is not far from its entrance, under two rocks, with the third Special Flower being to the immediate left of it. The area to the right of it contains the fourth Special Flower underneath a Wild Piranha, as well as a rotating platform. Moving forward, there is a pipe which spawns an infinite number of Shy-Guys, with a Winged Cloud containing Stars above it. After going through a short tunnel, there is a Winged Cloud that must be hit, sprouting a beanstalk which allows access to the platforms above. Back to the left, past the edge of the upper platform, there is another Winged Cloud containing the final Special Flower for the level. Over to the right, there is another spinning platform that allows access to an even higher ledge. Upon it is a Message Block explaining the purpose of Red Coins, as well as another Chomp Rock. The rock can be rolled down the hill past more Shy-Guys and Wild Piranhas, leading to the Goal Ring.
Special Flowers[edit]
Flower 1: Right past the first Crazee Dayzee, in plain sight.
Flower 2: On a platform in the air, access from the platforms created by the first Winged Cloud.
Flower 3: Under the rocks immediately to the left of the exit to the underground area.
Flower 4: Directly to the left of the first spinning platform, under a Wild Piranha.
Flower 5: In a Winged Cloud to the left of the beanstalk, slightly past the ledge.


Enemies[edit]
| Image | Name | Count |
|---|---|---|
| Shy-Guy (magenta) | 7 | |
| Shy-Guy (red) | 3 | |
| Shy-Guy (yellow) | 3 | |
| Shy-Guy (green) | 4 | |
| Crazee Dayzee (white) | 3 | |
| Crazee Dayzee (yellow) | 1 | |
| Wild Piranha | 9 | |
| Fly Guy | 3 | |
| Baron von Zeppelin (red) | 1 | |
| Baron von Zeppelin (green) | 1 | |
| Baron von Zeppelin (magenta) | 1 | |
| Woozy Guy (magenta) | 1 | |
| Woozy Guy (red) | 1 |
In-game help instructions (SNES version)[edit]
- Grab an enemy with
 , then press down on
  to make an egg. Now try throwing the egg. Press
  !
! - (After grabbing first flower) Special Flower. Gather 5 for a 1-UP! They add to your point total.
- (With the Controller Type set to Patient) Press
 once, and the aiming cursor will begin to move. Press again to throw the egg! When you find a cloud with a question mark on it, hit it with an egg. Cool stuff will happen! To cancel the throw, press down on .
 - (With the Controller Type set to Hasty) Press and hold and the aiming cursor will begin to move. Release to throw the egg! When you find a cloud with a question mark on it, hit it with an egg. Cool stuff will happen! To cancel the throw, press down on .
- A Chomp Rock is a useful thing... Push it to make it roll, bowling over your enemies. If it gets stuck, stand on one edge to make it roll again.
- In each level, 20 red coins are hidden among the yellow ones. They each add 1 point to your total points.
Gallery[edit]

Level icon from Super Mario World 2: Yoshi's Island
Speedrun of the level

Level icon from Yoshi's Island: Super Mario Advance 3
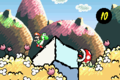
Screenshot from Yoshi's Island: Super Mario Advance 3
Round 1 of Action Mode, from Yoshi no Cookie in Nintendo Puzzle Collection; using the background of Make Eggs, Throw Eggs


Names in other languages[edit]
| Language | Name | Meaning |
|---|---|---|
| Japanese | タマゴをつくって なげろ Tamago o tsukutte nagero |
Make eggs and throw them |
| Chinese | 下蛋,掷蛋 Xiàdàn, zhì dàn |
Lay eggs, throw eggs |
| French | Faire et lancer des oeufs. |
Making and throwing eggs. |
| German | Schokohügel |
Chocolate Hills |
| Italian | Fai le uova, lancia le uova |
Make the eggs, throw the eggs |
| Spanish | Crea huevos, lanza huevos |
Make Eggs, Throw Eggs |
Trivia[edit]
- Aside from the Extra levels (as well as the Secret levels in the remake), this is the only level in the game without a Middle Ring.