Burt The Bashful's Fort: Difference between revisions
LinkTheLefty (talk | contribs) mNo edit summary |
Doomdorm64 (talk | contribs) No edit summary |
||
| (47 intermediate revisions by 18 users not shown) | |||
| Line 1: | Line 1: | ||
{{distinguish|Burt the Bashful's Castle}} | {{distinguish|Burt the Bashful's Castle}} | ||
{{ | {{level infobox | ||
|image=[[File: | |image=[[File:SMW2YI Burt the Bashfuls Fort Screenshot.png]] | ||
|code=1-4 | |code=1-4 | ||
|game=''[[Super Mario World 2: Yoshi's Island]]'', ''[[Yoshi's Island: Super Mario Advance 3]]'' | |game=''[[Super Mario World 2: Yoshi's Island]]'', ''[[Yoshi's Island: Super Mario Advance 3]]'' | ||
|boss=[[Burt the Bashful]] | |boss=[[Burt the Bashful]] | ||
|before=[[The Cave Of Chomp Rock|<<]] | |before=[[The Cave Of Chomp Rock|<<]] | ||
|after= [[Hop! Hop! Donut Lifts|>>]] | |after=[[Hop! Hop! Donut Lifts|>>]] | ||
|track=Castle & Fortress<br>[[File:SMW2YI Castle and Fortress.oga]] | |||
}} | }} | ||
'''Burt The Bashful's Fort''' | '''Burt The Bashful's Fort''' is the first [[fort]] [[level]], the fourth level of [[World 1 (Super Mario World 2: Yoshi's Island)|World 1]], and the fourth level overall of both ''[[Super Mario World 2: Yoshi's Island]]'' and ''[[Yoshi's Island: Super Mario Advance 3]]''. This level introduces several new enemies, with its boss, [[Burt the Bashful]], being fought at the end. This level's playable [[Yoshi (species)|Yoshi]] is the yellow Yoshi. | ||
==Overview== | ==Overview== | ||
As the level begins, [[Yoshi]] finds himself | As the level begins, [[Yoshi (species)|Yellow Yoshi]] finds himself at the beginning of the fort. Near the beginning, there are a few yellow [[Egg Block]]s Yoshi may hit to collect yellow [[Yoshi Egg|egg]]s from. He may then hit a few buckets for several [[coin]]s. Certain walls in this area without blocks in front of them may fall onto Yoshi, damaging him and giving him little time to rescue [[Baby Mario]] if he is hit. | ||
[[ | Immediately following this, there are [[Boo Guy]]s operating spike traps. There is then a [[Spring Ball]] Yoshi must use to reach a higher platform. There are visible cracks in one part of the ceiling Yoshi may hit to create an opening. Jumping through it and heading left simply takes Yoshi back to the beginning, while heading right allows Yoshi to bypass certain obstacles (as well as items) due to there being other soft spots in the ceiling Yoshi may [[Ground Pound]] through. Below this are two [[Burt]]s in a small area with a lift and a [[Smiley Flower|Special Flower]]. There is another Special Flower just to the right, though Yoshi must avoid another sudden falling wall to collect it. Just after this is another pair of Burts and an Egg Block. There is then a lava section, where Yoshi must use the horizontal lifts to make it across a long pit of lava to reach a [[Checkpoint Ring|Middle Ring]] and a [[Warp Pipe]] leading to the next area. | ||
[[File:SMW2YI GargantuaBlargg.png|frame|left|250px|The lone [[Gargantua Blargg]] is encountered]] | |||
The section Yoshi finds himself in is similar to the beginning of the level, featuring both a falling wall and a spike contraption operated by a pair of Boo Guys. There is an Egg Block between two [[Winged Cloud]]s. The one on the left contains [[Star (Yoshi's Island series)|Star]]s, while the one on the right activates a bridge across the pool of lava when hit. After this is another pit of lava with a seesaw tilting slowly. There is a Special Flower close to the lava Yoshi may collect if he can avoid the [[Blargg (small)|Red Blargg]] in the lava. However, there is another Special Flower Yoshi may collect by tilting the seesaw all the way to the right, then jumping on the left side to find the flower on a higher ledge. | |||
Proceeding to the right, there is a circle of moving platforms with a Red Blargg in a pit of lava below. Next up is a pipe dispensing [[Shy Guy|Shy-Guy]]s and a locked door. After this is another lava section, in which Yoshi must traverse several vertical lifts and a [[Gargantua Blargg]]. On the other side of the pit is an Egg Block and a [[vase]]. Yoshi must break the vase to reveal a [[key]]. Yoshi must collect the key and return to the locked door to continue. | |||
Beyond the locked door is a room with a few doors and Burts, as well as an Egg Block. The door in the middle of this room takes Yoshi to a small room with four [[Piranha Plant|Wild Piranha]]s. A Smiley Flower appears in one of the corners when all of them are defeated. After this, Yoshi may touch a Middle Ring and hit a Winged Cloud for Stars before entering the door to the boss room. | |||
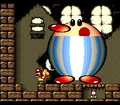
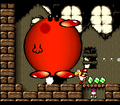
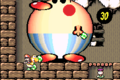
When Yoshi drops into the boss room, a Burt hops toward him. [[Kamek]] flies in and uses his magic to enlarge the Burt, turning him into [[Burt the Bashful]], who attacks by simply hopping around the room, damaging Yoshi if touched. To defeat him, Yoshi must throw eggs at him, causing him to become faster. After he is hit six times, Burt the Bashful is defeated as his pants fall off completely. He becomes red and bounces around the screen, decreasing in size before disappearing, this completing the level. | |||
==Enemies== | ==Enemies== | ||
<gallery> | |||
SMW2 Drawbridge.png|Drawbridge | |||
SMW2 Ball 'N' Chain.png|[[Spinner|Ball 'N' Chain]] (single) | |||
SMW2 Ball 'N' Chain double.png|Ball 'N' Chain (double) | |||
SMW2 Burt Bros.png|[[Burt]] (pair) | |||
Burt SMW2YI sprite.png|Burt (single) | |||
SMW2YI - Lava Bubble.png|[[Lava Bubble]] (vertical) | |||
CoBlargg.png|[[Blargg (small)|Red Blargg]] | |||
SMW2YI Green Shy Guy.png|[[Shy Guy|Shy-Guy]] (green) | |||
PiroDanglesSMW2.png|[[Spark|Piro Dangle]] | |||
GargantuaBlargg-SMW2.png|[[Gargantua Blargg]] | |||
SMW2 Piranha Plant.png|[[Piranha Plant|Wild Piranha]] | |||
SMW2 Burt the Bashful.png|[[Burt the Bashful]] (Boss) | |||
</gallery> | |||
==Gallery== | |||
<gallery> | |||
SMW2YI Burt the Bashfuls Fort Boss Fight.png|Boss fight from ''Super Mario World 2: Yoshi's Island'' | |||
Burt the Bashful dies.png|Burt the Bashful is defeated (''Super Mario World 2: Yoshi's Island'') | |||
Icon SMW2-YI - Burt The Bashful's Fort.png|Level icon from ''Super Mario World 2: Yoshi's Island'' | |||
SMA3-BurtTheBashfulsFort-Icon.png|Level icon from ''Yoshi's Island: Super Mario Advance 3'' | |||
SMA3-BurtTheBashfulsFortMap.png|Icon from World 1 map from ''Yoshi's Island: Super Mario Advance 3'' | |||
SMW2_GargantuaBlargg.png|Screenshot from ''Yoshi's Island: Super Mario Advance 3'' | |||
SMA3 Burt the Bashfuls Fort Screenshot.png|Boss fight from ''Yoshi's Island: Super Mario Advance 3'' | |||
</gallery> | |||
==Names in other languages== | ==Names in other languages== | ||
{{foreign names | {{foreign names | ||
|Jap=ビッグドンブリの とりで | |Jap=ビッグドンブリの とりで | ||
|JapR=Biggu Donburi no Toride | |JapR=Biggu Donburi no Toride | ||
|JapM=Big | |JapM=Big Burt's Fort | ||
|Spa=Fortaleza de Inflón | |Spa=Fortaleza de Inflón | ||
|SpaM= | |SpaM=Burt the Bashful's Fortress | ||
| | |Fre=Antre du Gros Bélixo | ||
| | |FreM=Den of Burt the Bashful | ||
|Ger=Xilebos Festung | |Ger=Xilebos Festung | ||
|GerM= | |GerM=Burt the Bashful’s Fortress | ||
|Ita=La fortezza di Goffry Pallone Gonfiato | |Ita=La fortezza di Goffry Pallone Gonfiato | ||
|ItaM= | |ItaM=Burt the Bashful’s Fortress | ||
|Chi= | |Chi=大海碗堡垒 | ||
|ChiR=Dàhǎiwǎn bǎolěi | |ChiR=Dàhǎiwǎn bǎolěi | ||
|ChiM= | |ChiM=Burt the Bashful's Fortress | ||
{{YI | }} | ||
{{YI levels}} | |||
[[Category:Fortresses]] | [[Category:Fortresses]] | ||
[[Category:Volcanic | [[Category:Volcanic areas]] | ||
[[Category:Super Mario World 2: Yoshi's Island | [[Category:Super Mario World 2: Yoshi's Island levels]] | ||
[[Category:Yoshi's Island: Super Mario Advance 3 | [[Category:Yoshi's Island: Super Mario Advance 3 levels]] | ||
Latest revision as of 16:03, March 25, 2024
- Not to be confused with Burt the Bashful's Castle.
| Level | |
|---|---|
| Burt The Bashful's Fort | |

| |
| Level code | 1-4 |
| Game | Super Mario World 2: Yoshi's Island, Yoshi's Island: Super Mario Advance 3 |
| Boss | Burt the Bashful |
| Music track | Castle & Fortress |
| << Directory of levels >> | |
Burt The Bashful's Fort is the first fort level, the fourth level of World 1, and the fourth level overall of both Super Mario World 2: Yoshi's Island and Yoshi's Island: Super Mario Advance 3. This level introduces several new enemies, with its boss, Burt the Bashful, being fought at the end. This level's playable Yoshi is the yellow Yoshi.
Overview[edit]
As the level begins, Yellow Yoshi finds himself at the beginning of the fort. Near the beginning, there are a few yellow Egg Blocks Yoshi may hit to collect yellow eggs from. He may then hit a few buckets for several coins. Certain walls in this area without blocks in front of them may fall onto Yoshi, damaging him and giving him little time to rescue Baby Mario if he is hit.
Immediately following this, there are Boo Guys operating spike traps. There is then a Spring Ball Yoshi must use to reach a higher platform. There are visible cracks in one part of the ceiling Yoshi may hit to create an opening. Jumping through it and heading left simply takes Yoshi back to the beginning, while heading right allows Yoshi to bypass certain obstacles (as well as items) due to there being other soft spots in the ceiling Yoshi may Ground Pound through. Below this are two Burts in a small area with a lift and a Special Flower. There is another Special Flower just to the right, though Yoshi must avoid another sudden falling wall to collect it. Just after this is another pair of Burts and an Egg Block. There is then a lava section, where Yoshi must use the horizontal lifts to make it across a long pit of lava to reach a Middle Ring and a Warp Pipe leading to the next area.

The section Yoshi finds himself in is similar to the beginning of the level, featuring both a falling wall and a spike contraption operated by a pair of Boo Guys. There is an Egg Block between two Winged Clouds. The one on the left contains Stars, while the one on the right activates a bridge across the pool of lava when hit. After this is another pit of lava with a seesaw tilting slowly. There is a Special Flower close to the lava Yoshi may collect if he can avoid the Red Blargg in the lava. However, there is another Special Flower Yoshi may collect by tilting the seesaw all the way to the right, then jumping on the left side to find the flower on a higher ledge.
Proceeding to the right, there is a circle of moving platforms with a Red Blargg in a pit of lava below. Next up is a pipe dispensing Shy-Guys and a locked door. After this is another lava section, in which Yoshi must traverse several vertical lifts and a Gargantua Blargg. On the other side of the pit is an Egg Block and a vase. Yoshi must break the vase to reveal a key. Yoshi must collect the key and return to the locked door to continue.
Beyond the locked door is a room with a few doors and Burts, as well as an Egg Block. The door in the middle of this room takes Yoshi to a small room with four Wild Piranhas. A Smiley Flower appears in one of the corners when all of them are defeated. After this, Yoshi may touch a Middle Ring and hit a Winged Cloud for Stars before entering the door to the boss room.
When Yoshi drops into the boss room, a Burt hops toward him. Kamek flies in and uses his magic to enlarge the Burt, turning him into Burt the Bashful, who attacks by simply hopping around the room, damaging Yoshi if touched. To defeat him, Yoshi must throw eggs at him, causing him to become faster. After he is hit six times, Burt the Bashful is defeated as his pants fall off completely. He becomes red and bounces around the screen, decreasing in size before disappearing, this completing the level.
Enemies[edit]

Drawbridge

Ball 'N' Chain (single)

Ball 'N' Chain (double)

Burt (pair)

Burt (single)

Lava Bubble (vertical)

Shy-Guy (green)

Burt the Bashful (Boss)


Gallery[edit]
Boss fight from Super Mario World 2: Yoshi's Island
Burt the Bashful is defeated (Super Mario World 2: Yoshi's Island)

Level icon from Super Mario World 2: Yoshi's Island

Level icon from Yoshi's Island: Super Mario Advance 3

Icon from World 1 map from Yoshi's Island: Super Mario Advance 3

Screenshot from Yoshi's Island: Super Mario Advance 3
Boss fight from Yoshi's Island: Super Mario Advance 3


Names in other languages[edit]
| Language | Name | Meaning |
|---|---|---|
| Japanese | ビッグドンブリの とりで Biggu Donburi no Toride |
Big Burt's Fort |
| Chinese | 大海碗堡垒 Dàhǎiwǎn bǎolěi |
Burt the Bashful's Fortress |
| French | Antre du Gros Bélixo |
Den of Burt the Bashful |
| German | Xilebos Festung |
Burt the Bashful’s Fortress |
| Italian | La fortezza di Goffry Pallone Gonfiato |
Burt the Bashful’s Fortress |
| Spanish | Fortaleza de Inflón |
Burt the Bashful's Fortress |