The 'Shroom:Issue 133/Strategy Wing: Difference between revisions
Meta Knight (talk | contribs) |
m (Text replacement - "<polldaddy pollid="([0-9]{6,9})"><\/polldaddy>" to "{{#widget:Crowdsignal|id=$1}}") |
||
| Line 637: | Line 637: | ||
</div> | </div> | ||
<center> | <center>{{#widget:Crowdsignal|id=9986428}} | ||
{{Shroomnav2017|133|spring|S1=The 'Shroom Spotlight|G1=Super Mario Odyssey Photo Contest}}</center> | {{Shroomnav2017|133|spring|S1=The 'Shroom Spotlight|G1=Super Mario Odyssey Photo Contest}}</center> | ||
{{shroomfooter}} | {{shroomfooter}} | ||
Revision as of 04:32, January 24, 2019
Director Notes
Written by: Meta Knight (talk)
Hey there everyone and welcome to Strategy Wing! I start off with some news of course. I'm here to report that Chester Alan Arthur (talk) has decided that Observing a New Sole was a one-off section, and he won't be continuing with that anymore. That being said, if anyone wants to pick up his idea of comparing sequels and join us I'd very much appreciate it. Additionally, DragonFreak (talk) and Roserade (talk) have officially resigned from their sections. YoshiFlutterJump (talk) has been caught up with school so he's absent this month, but I wish him well with his studies. There's still good news though, GPM1000 (talk) is back with some more Mario Calendar, and there's plenty of other sections for reading as well. I've submitted a guest section as well because of plans I have regarding Galactic Expedition. Finally, and I know this is a lot of information, but next month Superchao (talk) is gonna sub in here for me. I'm sure he knows what it's like subbing for people, but literally, the only reason is so that Strategy Wing can look nice and wide in the Staff History. Phew, that was a mouthful, but please enjoy this edition of Strategy Wing!
Section of the Month
Congratulations to Yoshi876 (talk) for winning this month! Thanks to Chester Alan Arthur (talk) for his sections!
| STRATEGY WING SECTION OF THE MONTH | ||||
|---|---|---|---|---|
| Place | Section | Votes | % | Writer |
| 1st | Pokédex Power | 13 | 56.52% | Yoshi876 |
| 2nd | Galactic Expedition | 4 | 17.39% | Meta Knight |
| 3rd | So You Want to Conquer Japan? | 3 | 13.04% | Chester Alan Arthur |
| 3rd | Observing a New Sole | 3 | 13.04% | Chester Alan Arthur |
Chester Alan Arthur's fiefdom expands and he's willing to share his secrets!
[read more]
So You Want to Conquer Japan?
Written By: Chester Alan Arthur (talk)
Hello, Shoguns in training, and welcome to another issue of So you wanna conquer Japan?! In this month's issue, we’re going to begin building our fief into a regional powerhouse while also warding off our ambitious neighbors.
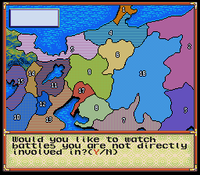
Nobunaga’s Ambition is a historical simulator, so this game begins in the extremely accurate year of 1560. Each turn represents one season, and there are four seasons in one year (obviously). Now, this is important; you can only do one thing each season, so if you want to train your troops, that’s going to take up the whole season, and if you want to try to assassinate a rival leader, that will take up another season. Now, there are some exceptions; for example, viewing an enemy fief (so you can see how many troops they have) does not take up a whole turn (but it does cost a small amount of gold). Likewise, failing to see the merchant does not take up a whole turn. Because you are only given 4 turns per year, it's important that you think out your moves and plan carefully.
Now on our first turn, we’re going to recruit as many troops as possible (probably about 39), because more than likely you will be invaded by those rats in fief 3. And, speak of the devil, here comes those bastards attempting to conquer our beautiful homeland.
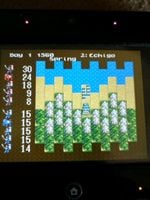
As you can see, each side has 5 units, with 3 of those being infantry, one being calvary (the pony), and one being a rifle unit. Now, the big golden circle on the first unit means that that’s the unit with the commanding officer; it can either be you if you chose to lead the troops personally, or some random general if you don't. This is very important, because if that unit falls, the battle ends and you lose. The Cavalry unit is probably the most useful unit, because it hits for 2x and it doesn’t require any special conditions like rifle units. Rifle units hit for 3x, though you have to have enough rifles to cover that unit (rifles can be bought from the merchant), so if you don’t have enough rifles, you won't be able to change the % of troops on the field that are riflemen. The other 2 units are simple infantry; they don’t have any special powers, and we’ll be cutting their numbers eventually.
Now, our job is to eliminate our enemies while also minimizing our losses. At this stage, your enemy will probably have more troops, but fear not because we have an advantage over them. See, an enemy can only place its units in the direction they attacked from, so since we know fief 3 is below us, we know that they’ll only be able to place their units on the bottom of the map. Meanwhile, we can place our units anywhere on the map, so we can actually box our opponent in depending on where he places his troops. At this point there isn’t a whole lot I can tell you; ya move your troops and take out his units. But here are some general tips; you always want to target his general because if you destroy the enemy general unit the battle ends automatically and you get a portion of his troops. If that general has a filled-in golden circle and you kill him, you get all his territory (so when you go on the offensive it can be beneficial to split a daimyo from the rest of his territory so you can kill him and win a bunch of land without a lot of fights). However, a daimyo will often times flee if he’s about to be eliminated (it’s important here to note that these battles take place on turns, so you get to move all your units before the enemy gets to respond). If the daimyo flees it’s basically the same thing as if you kill him, you’ll still get a portion (or sometimes all) of his troops, but you won't get his territory. In this specific case I think it’s better to just allow him to flee, because he usually sends the bulk of his troops on the first offensive so you probably wont be able to defend the territory you gain cause you'll have basically no troops.
Now that we’ve defeated those fucks at 3 and won the loyalty of his troops, it’s time to actually govern our little fief. And what does a government need to function you may ask? Why, cash money. So, the very next turn we’re going to raise the tax rate to 50%. Now be warned, this is gonna piss off your subjects, so on the next turn we’re going to going to give them some rice. It’s important to keep your peasants happy, because the happier they are, the more money they give you come tax season (which is in the fall), and because if they’re too pissed off, they’ll rebel against you. I usually give my subjects rice in the spring; it doesn’t really matter which season you do, but I personally find something special about giving them rice right after the harvest. For the first summer I suggest training your men so that they fight better.
Alright so the first year has ended and it’s time to collect our tax dividends. Now that we’ve got some money in the coffers, we can start investing in our little fief. Now they’re are 3 things we can invest in; farm, dam, and town.
Farm: Pretty self explanatory. Your farm is what grows the rice you use to feed the troops and buy loyalty. This one is probably the second most valuable thing to invest in earlygame, because you can sell rice to the merchant, give it to the peasants to increase loyalty/happiness, and feed the troops when you go to war.
Dam: This game has typhoons that appear at random that can cause your fief (and other peoples') to flood. A flood causes damage to your farm, dam, and town so they can cause quite the setback early on. In theory, the dam is supposed to help prevent that, but I’ll be honest I’ve never really seen the use of investing in a dam. Once you get a few fiefs under your belt, a flood can barely touch you in a significant way, and early on your money can be better spent elsewhere. In my opinion, the dam is the least important of the three and should never really be invested in.
Town: Ah city management, what a wonderful thing. Investing in your town causes you to gain more money when tax season comes around, so if you wanna make the big bucks you gotta invest heavily in the property market. However, city building does lower the peasants approval rating of you, but hey that’s nothing that a few hundred barrels of rice can’t solve! A high town rating might also help prevent plague outbreaks, but don’t quote me on that one. Town is probably the most important thing to invest in because it helps control how much money you get in the fall, and baby, money basically controls everything.
It’s better to just use all the money you get during the fall on one thing rather than trying to spread it out, because you’ll get the biggest return possible with one big investment rather then several small ones. Also, since you can only do one thing per turn, it makes sense to take care of your investments early on so you can still have time to train soldiers and feed the poor.
I think now is a good time to go over some of the things that can happen in between your turns. Probably the most important thing that can happen is war being declared. It’s fairly common (especially in early game) to see your fellow daimyos declare war on each other in an attempt to claim new land. This can force you to change your plans if a fief you were planning on taking suddenly gets conquered by a much stronger neighbor. However, this can all help you if the war wipes out both sides' troops, allowing you to conquer a weakened fief (honor is for the weak). Basically, after a war between fiefs, if you were planning war against one of them it’s always good to view them so you can see how many troops they have.
Another thing that can happen is some sort of rebellion in either an enemy's or your own fief. Rebellions can have any sort or reason behind them such as cultists rising up, peasants rising up, or some sort of military coup. Rebellions can honestly suck, because if they happen to you you’ll usually be far outnumbered and eliminated. Now with some rebellions you can bribe the rebels with gold to stop rebelling, but sometimes they won't accept your money. If you choose to fight against the rebellion, it basically plays out like any other defensive battle. A rebellion in an enemy fief can be useful because it usually leaves the enemies weak and prime for the taking.
If a neighboring fief considers you a threat or is in a weak state, they may offer you an alliance. These usually lasts durations of between 2-3 years, and you cannot (as in the game wont let you) attack that fief or any territory it has. Now the good news is that usually the fief offering the alliance is also offering up a large amount of gold in return for the alliance. So if you don’t really have any plans to manifest destiny them at that moment, it can be quite profitable to accept the alliance. Plus it takes out a potential enemy for a little bit if you decide to invade a fief they are adjacent to. Another form of diplomacy that can happen is a daimyo offering to pay you for your daughter's hand in marriage. This can actually be quite funny, because you can offer your daughter to any daimyo and you can basically do this forever without ever running out of daughters. This option is better than a formal alliance because it gets you the gold without having to promise not to attack them. Sadly, you’ll rarely see this in game, but it’s neat when it happens.
Something that can happen but rarely does is that a daimyo can die during the game. If this happens to you, well, better luck next time because your game is over. But if this happens to another leader, that can lead to something interesting. Usually they’re just replaced by their successor, but sometimes the territory is put up for auction and you’ll get the chance to purchase it for cash money. This can be a good investment if you have a lot of cash and don’t want to fight another war. Or, you know, you can say "fuck it" and just take the new owners by force if you want.
Alright, I think that’s good for this issue. We’ve covered a lot of important topics and some of the basics. Join me next month when we begin building our forces and start planning for success!
Card Games on Pokéballs
Written by: ![]() Meta Knight (talk)
Meta Knight (talk)
Well I didn't see this one coming. This is just a filler section due to plans I have with Galactic Expedition. For now, here's a guest section about Pokémon! This time, I'm gonna walk you through the Pokémon Trading Card Game (TCG) so that you know can learn how to play. If you don't have a physical deck or people to play with, you can either play the Pokémon Trading Card Game cartridge released on Game Boy Color and available on 3DS Virtual Console, or play for free with the Trading Card Game Online (TCGO). For this walkthrough I'm gonna explain using the TCGO, but the same rules apply for the game everywhere. Let's get started!
What is the Pokémon TCG?
The Pokémon TCG is simple to learn in my opinion, as once you learn the basics, you're free to experiment how you wish to customize your deck and be the very best like no one ever was. Something to mention right off the bat is that this game can be a bit too luck-oriented. Some attacks and events are determined with a coin, and sometimes you just get a terrible hand. Other times, you get an amazing hand. Even your deck may be at a complete disadvantage because your opponent has a deck centered around a type that your team is weak against, and vice versa.
Part 1: Knowing Your Cards
It's important to know what your cards are, and what information is on them, as well as the different kinds of cards. For this part, we'll be dividing it into three different kinds: Pokémon, Trainer, and Energy. Most of the information is self-explanatory, but hey, I like to be thorough with my guides.
| Pokémon | ||
|---|---|---|
|
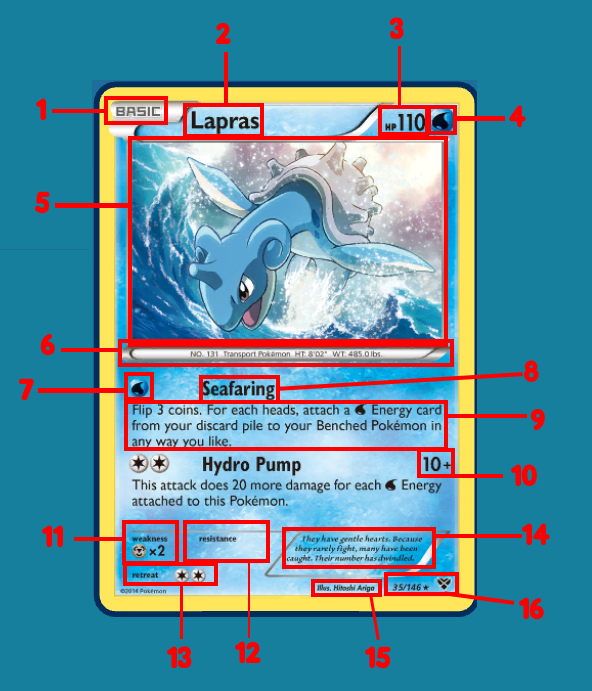
1) Stage: This is a Pokémon's stage. In this case, Lapras is a Basic Pokémon. Basic Pokémon are important because they are the only Pokémon that you can put into play. When you have a Basic Pokémon down, you can then evolve it, but you can't just play a Blastoise for example. You'd have to first play a Squirtle (Basic), then a Wartortle (Stage 1), and then you can play Blastoise (Stage 2). Of course, evolving Pokémon has its own rules, but we'll get to that. 2) Name: The name of your Pokémon. This Pokémon is a Lapras. Not much else to say about that. 3) Hit Points (HP): This is the amount of health that your Pokémon has. Damage is kept track of with damage counters. A damage counter is just a token that has a number on it (usually 10 or 50) that you place on your Pokémon so that you know how much health your Pokémon is lost. In this case, Lapras has 110 Hit Points. When the damage counters placed on Lapras add up to 110, Lapras will be knocked out. Of course, the TCGO and the GBC game keep track of damage for you, but if you ever want to use a physical deck damage counters are convenient. 4) Type: This is your Pokémon's type. In this case, Lapras is a Water type. There are currently 11 different types, each with a corresponding symbol. The types as seen in the image to the right in order are: Colorless, Fire, Water, Grass, Electric, Fighting, Psychic, Dark, Steel, Dragon, and Fairy. You might notice that the TCG only has 11 types whereas the game has 18. While this is true, some Pokémon types get lumped together (i.e an Ice Pokémon in the games will be a Water type in the TCG). Some Pokémon have more than one type, but this was only a thing in a few sets. 5) Picture: A picture of the Pokémon. That's all there is to say here. 6) Pokédex Info: Information about the Pokémon that you would find in the Pokédex. Lapras is No. 131 in the Pokédex, is classified as the Transport Pokémon, and is listed with a height of 8 feet and 02 inches, with a weight of 485 pounds. 7) Energy Cost: In the Pokémon TCG, to use an attack your Pokémon has to have the required number of Energy attached to it in order to use an attack. The symbol is the type of energy required, and the amount of symbols is the amount needed. For this attack, Lapras needs 1 Water type energy. In the attack below, it has two Colorless icons. Colorless is a special case, and is, well, Colorless. Any Energy can be attached to Lapras for Hydro Pump, as long as there's 2 Energy attached. 8) Attack Name: The name of the attack. This attack is Seafaring. 9) Attack Description: This area describes what to do for this attack. For Seafaring, you flip 3 coins and grab Water Energy from your discard pile onto your Benched Pokémon. 10) Attack Power: How much damage an attack does. In this case, Hydro Pump does 10 damage, plus 10 damage for each Water Energy as the card describes. 11) Weakness: The type that your Pokémon is weak to, and the damage modifier. In this case, Lapras is weak to Steel, and any Steel Pokémon will do twice as much damage. 12) Resistance: The type that your Pokémon is resist to, and the damage modifier. In this case, Lapras does not have any types that it is resistant to. 13) Retreat Cost: Let's say your Pokémon is in danger and you want to swap it out do do so. Well, you have to discard the amount of Energy labeled on the Retreat cost. So if I wanted to switch Lapras for another Pokémon, I have to discard 2 Energy of any kind that is attached. 14) Misc. Info Some information that serves as backstory or lore for the Pokémon. Similar to what you'd find in the Pokédex as part of a description. 15) Illustrator: The person that illustrated the picture on the card. If you pay attention to this enough on various cards, you'll be able to see their style, and eventually know who made the picture without looking at this part. 16) Set Info: This is where you look for to know about where this card fits in terms of a set. The first number in the fraction is what number the card is in the set, and the second number is how many cards are in the set. The symbol next to the fraction is the rarity of the card. If the symbol is a circle, the card is a common. If the symbol is a diamond, then it is uncommon. If it is a star, then it is rare. There's also Ultra Rares and Secret Rares. An Ultra Rare is generally anything that is an EX (or ex, Lv. X, GX, Mega, Break, etc.), or a Full-Art card. They are also holographic, and are pretty sweet pulls that you should put in a sleeve if you get one in person. A Secret Rare is a card where the set number is higher than the number of cards in the set (i.e 147/146). For Lapras, it is the 35th card in the set out of 146, and is a rare because it has a star. Finally, the icon in the bottom right corner is a symbol that represents the set that it the card is from. This Lapras is in the XY Base Set. | ||
| Trainer | ||
|---|---|---|
|
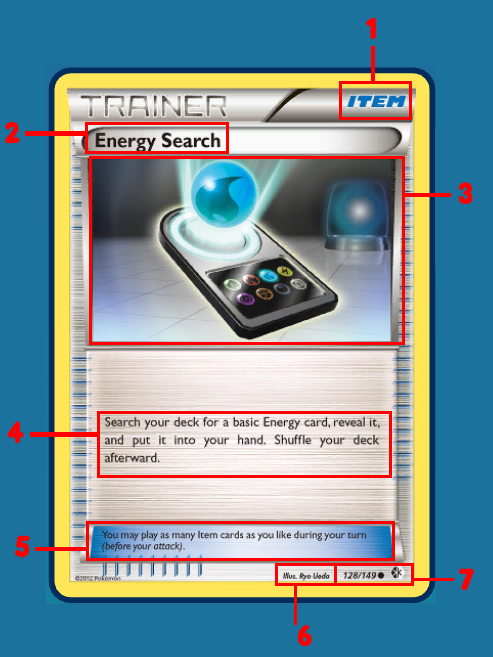
1) Trainer Type: There are 3 different Trainer types: Item, Supporter, and Stadium. You can play as many Item cards on your turn, but you can only play one Supporter card per turn. You can play a Supporter and Item cards on the same turn though. Stadium cards affect the match in a more long-term sense, and impacts the board. Some trainer cards are in a subset called Pokémon Tools, which are Item Trainer cards that you attach to your Pokémon for various effects. This card is an Item Trainer card. 2) Name: The name of the card. This card is an Energy Search. 3) Picture: The picture on the card. 4) Description: What the Trainer card allows you to do. This card lets you grab a basic Energy card from your deck. 5) Type Info: Tells you about what the Trainer type can do. This is an Item card, so it tells you that you can play as many Item cards during your turn, like I said in the first point. 6) Illustrator: There's people that illustrate the Trainer cards too! Like with Pokémon, this tells you the person that made the picture. 7) Set Info: This is exactly the same as it is for Pokémon. For a quick recap, from left to right, the information is as follows: No. in set / Amount in set, Rarity, set that it's in. This trainer card is the 128th in a set of 149, and is a common, and is in the Black & White: Boundaries Crossed expansion. | ||
| Energy | ||
|---|---|---|
|
No labels on this one, this is the most basic Energy as they come. The symbol represents the type of Energy that it is, and you attach Energy to your Pokémon so that they can use their attacks. This is a Water Type. There's different styles of basic Energy with subtle details, and some have set numbers while others don't. Special Energy does exist, but they have descriptions telling you what to do with them. One of the more popular Special Energy is a Double Colorless Energy, which is exactly what it sounds like, two Colorless Energy. | ||
Part 2: Knowing the Field
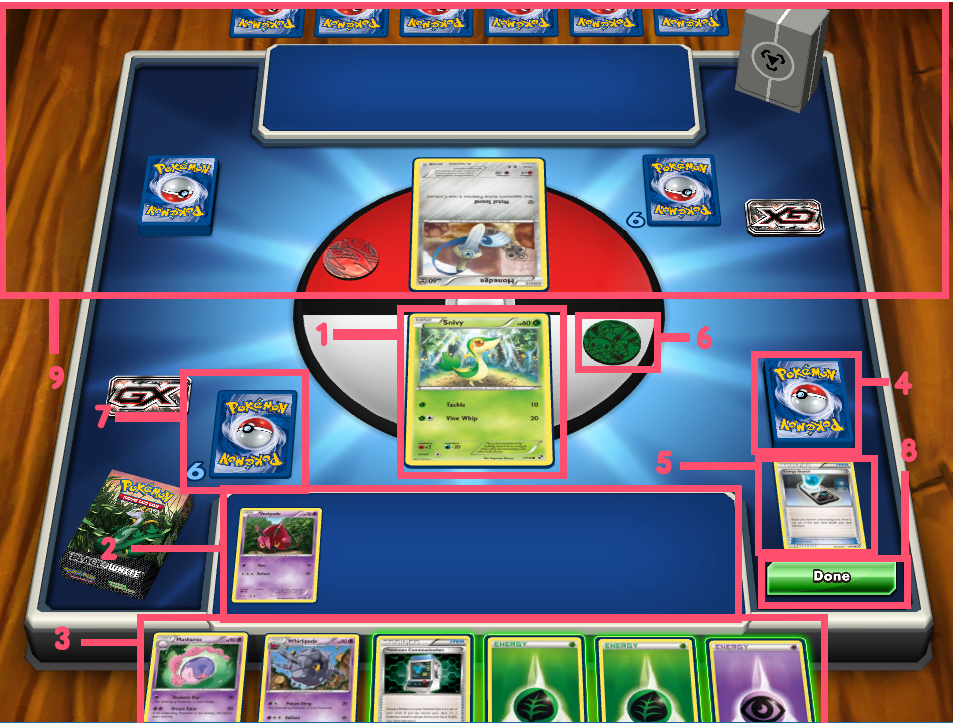
Now that you're able to analyze Pokémon cards, its time to be introduced to the board. You can use a playmat that comes with decks/trainer kits in any standard retail store, or just set a layout on any table. Of course, playing the game virtually already has everything set up for you.
| Field | ||
|---|---|---|
|
1) Active Pokémon: Your Active Pokémon is the Pokémon that is currently fighting. Think of it like the Pokémon at the front of your party in a Pokémon game. It is the Pokémon that attacks, gets attacked, etc. Currently the Active Pokémon is Snivy. 2) Benched Pokémon: This is the space for your Benched Pokémon. You can have up to 5 Pokémon placed on the Bench. Imagine this as the other 5 slots in your party in the games. In this example, Venipede is a Benched Pokémon, with 4 other slots available. You cannot place a Pokémon on the Bench if it is already full. If your Active Pokémon is defeated and you don't have any Benched Pokémon, you lose. 3) Hand: These are the cards currently in your hand. 4) Deck: This is your Deck. You draw cards from it. Some Trainer cards let you draw from the Deck, and you draw at the start of every turn. A deck is 60 cards, but keep in mind that if you run out of cards in the deck, you lose. 5) Discard Pile: This is your Discard Pile. It's the pile for cards that get discarded. When you use a Trainer card, it gets put in the Discard Pile. If your Active Pokémon is defeated, then your Pokémon and all cards attached to it also go in the Discard Pile. Some Trainer cards allow you to take cards from your Discard Pile though, such as Revive and Energy Retrieval. 6) Coin: This is your coin. The purpose of a coin is to flip it. Certain attacks and Trainer cards require flipping the coin. Heads is a colorful picture of Pokémon, and Tails is a plain black Pokéball. In the picture the coin is on heads. 7) Prize Cards: These are your Prize Cards. Standard games start out with 6. When you KO an opposing Pokémon, you take one of your Prize Cards. If you take all of your Prize Cards, you win. 8) End Turn: This is just a button to end your turn. Your turn ends by default when you use an attack, but this is how to end it otherwise. 9) Opposing Field: This is your opponent's side of the board. It has all the same characteristics your side does. | ||
Part 3: Let's Play!
With all that terminology out of the way, let's play the game! There's several rules for various tasks but generally, on your turn, you can do a bunch of different things to how you wish, and then you attack (although apparently recently in TCGO they made a rule where the first player's first turn cant attack). There are three ways to win the Pokémon TCG: Draw all of your prize cards, KO all of your opponent's Pokémon (meaning they have no Benched Pokémon to play, or have your opponent run out of cards in their deck.
| Setup | ||
|---|---|---|
|
Both players start with a 60 card deck, no more, no less. You shuffle the deck and then put it face down in the deck spot. Then, both players draw 7 cards. Players then pick a Basic Pokémon to place face down in their Active Pokémon slot. If you have additional Basic Pokémon, you may play them face down on your Bench. If you have no Basic Pokémon in your hand, you show your opponent, put your hand back in your deck, reshuffle and try again. Your opponent then gets to draw an additional card if they wish. When you've got your Bench and Active Pokémon set up the way you want, and your opponent is ready, both players draw 6 cards and place them in the Prize Card section. If you're playing on a physical playmat (or anywhere in real life), Prize cards are set up a 2-3 array of 6 cards that you can choose at your will when you get the opportunity to do so. | ||
| Your Turn | ||
|---|---|---|
|
There are a variety of things you can do when its your turn. At the start of your turn, you draw a card from your deck. That's just something you have to do. After that you can do the following in any order you want. 1) Place a Basic Pokémon on your Bench: You can put a Basic Pokémon on your Bench. You can place as many as you like so long as you have space on your Bench. 2) Play Trainer Cards: If you have any Trainer cards, you can play them. Just a reminder, you can play as many Item cards as you wish, but only one Supporter card. You can play both a Supporter card and Item cards though. 3) Attach Energy: You can attach an Energy card to one of your Pokémon. You can attach it to your Active or Benched Pokémon, but you can only attach one Energy card per turn. 4) Evolve Pokémon: You can evolve a Pokémon if you desire. However, there's some rules about it. You can evolve as many different Pokémon as you like, but you can only evolve the same Pokémon once per turn. For example, say I have a Snivy on my Active Pokémon slot, and a Venipede in my Bench. I can't evolve either on the first turn, because they have to have been on the field for one turn before they can evolve. On the second turn, I can evolve both Snivy into Servine and Venipede into Whirlipede on the same turn, but I can't evolve Snivy into Servine and then into Serperior on one turn. I'd have to evolve Snivy into Servine, wait a turn, and then evolve Servine into Serperior. Similarly, if I play a Deerling, I have to wait a turn before I can evolve that as well. 5) Retreat Pokémon: You can retreat your Active Pokémon if you want. To recap, in order to retreat your Pokémon has to have enough Energy attached to satisfy the Retreat Cost, and when you retreat those Energy get discarded. 6) Use Abilities: An Ability is not an attack. It's usually marked in red (sometimes it's called a Poké-Power or Poké-Body), and you're able to use these before you attack if you want. Finally, the last thing you should do is attack. Once you attack you can't do anything else, because when you attack your turn ends. You can also end your turn without attacking if you really want to, but unless you can't attack, you probably should. When you attack, damage counters get placed on the Pokémon. Keep in mind Weaknesses and Resistances when calculating damage. | ||
| Status Conditions | ||
|---|---|---|
|
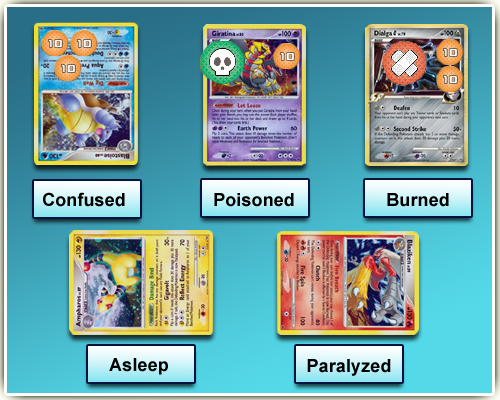
Just like in the games, there are plenty of Status Conditions that can affect your Pokémon. If your Pokémon is afflicted with a Status Condition, general ways to get rid of them is to get your Pokémon to the Bench (via retreating, ability, etc.), or evolve it. Here's how they work: 1) Confusion: When your Pokémon is confused, you have to turn your card upside down. Then, before you attack, flip a coin. If heads, the attack works normally. If tails, the attack fails and your Active Pokémon does 30 damage to itself. 2) Poison: When your Pokémon is poisoned, you use a special green damage counter to indicate Poisoned. Your Pokémon takes 10 points of damage in-between turns (after you attack and after your opponent attacks). Your Pokémon can't be Poisoned multiple times to increase the damage (basically Poison can't be stacked). 3) Burn: When your Pokémon is burned, you place a special red damage counter to indicate that your Pokémon is Burned. In-between turns, your Pokémon takes 20 points of damage. Then, you flip a coin. If heads, the burn goes away. If tails, the burn stays. Like Poison, Burn can't be stacked. 4) Asleep: If your Pokémon is Asleep, you turn the card so that the picture is facing the left. While your Pokémon is asleep, it cannot attack or retreat. In-between turns, you flip a coin. If heads, your Pokémon wakes up. If tails, your Pokémon stays asleep. 5) Paralysis: If your Pokémon is Paralyzed, you turn the card so that the picture is facing to the right. While your Pokémon is paralyzed, it can't attack or retreat. Paralysis goes away on its own after your turn. For instance, if Person A paralyzes Pokémon B, then Pokémon B can't attack, but after Pokémon B's turn, the paralysis goes away. | ||
Conclusion
Whether you're collecting Pokémon cards in real-life to catch them all, complete sets, or want to get into the game, hopefully you can see that it is fairly simple. There's so many different house rules and whatnot that individuals are free to make as well. It's free on Pokémon TCGO and cheap on the 3DS Virtual Console, but you can always use a real deck as well. If there's enough interest, perhaps a Pokémon TCGO Tournament can be prepared for the Awards this year. If you want to chat with me about Pokémon or whatever else you can send me a message on my talk page or message me on the forums. Thanks for reading this and I wish you all the best!
Mario Calendar
First of all, sorry for missing February and March, school keeps piling on homework, so yeah. Anyways, I'll start doing this again now, so yeah. This section lists all the games that have come out in history during the month of publication. This means that today, I'll be listing the Mario games that have come out in April. Also, this time I didn't list Virtual Console games. Let's just get into it!
Region Abbreviations
| Abb. | Region |
|---|---|
| ALL | All Regions |
| JP | Japan |
| NA | North America |
| EU | Europe |
| AU | Oceania/Australia |
| SK | South Korea |
Console Abbreviations
| Abb. | Console |
|---|---|
| NES | Nintendo Entertainment System |
| Famicom | Nintendo Family Computer |
| SNES | Super Nintendo Entertainment System |
| N64 | Nintendo 64 |
| GC | Nintendo GameCube |
| Wii | Nintendo Wii |
| Wii U | Nintendo Wii U |
| GB | Game Boy |
| GBC | Game Boy Color |
| GBA | Game Boy Advance |
| DS | Nintendo DS |
| 3DS | Nintendo 3DS |
| Switch | Nintendo Switch |
| Wii VC | Nintendo Wii Virtual Console |
| 3DS VC | Nintendo 3DS Virtual Console |
| Wii U VC | Nintendo Wii U Virtual Console |
| Wii U eShop | Nintendo Wii U eShop |
| DSiWare | Nintendo DSiWare |
| VB | Virtual Boy |
| G&W | Game and Watch |
| 64DD | Nintendo 64 Disk Drive |
| MS-DOS | Microsoft Disk Operating System |
| Satellaview | Satellaview |
| CD-i | Philips CD-i |
| e-Reader | e-Reader |
- April 1
- 2009 (JP): Mario Clock (DSiWare)
- April 2
- 2004 (AU): Mario Golf: Toadstool Tour (GC)
- 2009 (AU):
- Bird & Beans (DSiWare)
- Paper Airplane Chase (DSiWare)
- WarioWare: Snapped! (DSiWare)
- April 3
- 2009 (EU):
- Paper Airplane Chase (DSiWare)
- WarioWare: Snapped! (DSiWare)
- 2009 (EU):
- April 5
- 2004 (NA): WarioWare, Inc.: Mega Party Game$! (GC)
- 2009 (NA):
- Bird & Beans (DSiWare)
- WarioWare: Snapped! (DSiWare)
- 2010 (NA):
- Game & Watch: Vermin (DSiWare)
- Game & Watch: Helmet (DSiWare)
- Game & Watch: Manhole (DSiWare)
- April 6
- 2006 (AU): Super Mario Strikers (GC)
- 2009 (EU): Bird & Beans (DSiWare)
- April 8
- 1988 (JP): Donkey Kong (Famicom)
- 1999 (JP): Game & Watch Gallery 3 (GBC)
- 2016 (EU): Mario & Sonic at the Rio 2016 Olympic Games (3DS)
- April 9
- 2001 (NA): Dr. Mario 64 (N64)
- 2007 (NA): Super Paper Mario (Wii)
- 2010
- (EU):
- Game & Watch: Vermin (DSiWare)
- Game & Watch: Helmet (DSiWare)
- (EU/AU): Game & Watch: Manhole (DSiWare)
- (EU):
- 2016 (AU): Mario & Sonic at the Rio 2016 Olympic Games (3DS)
- April 10
- 2008 (JP): Mario Kart Wii (Wii)
- April 11
- 1992 (EU): Super Mario World (SNES)
- 2008 (EU): Mario Kart Wii (Wii)
- April 12
- 2002 (EU/AU): Super Mario World: Super Mario Advance 2 (GBA)
- 2007 (JP): Mario vs. Donkey Kong 2: March of the Minis (DS)
- April 14
- 1988 (JP): Famicom Grand Prix II: 3D Hot Rally (Famicom)
- 2000 (EU): Wario Land 3 (GBC)
- April 19
- 2007
- (JP): Super Paper Mario (Wii)
- (AU): Diddy Kong Racing DS (DS)
- 2009 (NA):
- Game & Watch: Ball (DSiWare)
- Game & Watch: Flagman (DSiWare)
- Game & Watch: Donkey Kong Jr. (DSiWare)
- 2007
- April 20
- 2007 (EU): Diddy Kong Racing DS (DS)
- 2009 (NA): Dr. Mario Express (DSiWare)
- April 21
- 1989 (JP):
- Alleyway (GB)
- Super Mario Land (GB)
- 2003 (NA):
- Donkey Kong 3-e (e-Reader)
- Golf-e (e-Reader)
- 2006 (EU/AU): Tetris DS (DS)
- 1989 (JP):
- April 22
- 2004 (JP): Mario Golf: Advance Tour (GBA)
- 2005 (EU/AU): Yoshi Topsy-Turvy (GBA)
- April 23
- 2010 (EU/AU):
- Game & Watch: Ball (DSiWare)
- Game & Watch: Flagman (DSiWare)
- Game & Watch: Donkey Kong Jr. (DSiWare)
- 2013 (JP): Photos with Mario (3DS eShop)
- 2010 (EU/AU):
- April 24
- 2008 (AU): Mario Kart Wii (Wii)
- 2014 (JP):
- NES Remix Pack (Wii U)
- NES Remix 2 (Wii U eShop)
- April 25
- 2014 (NA/EU/AU): NES Remix 2 (Wii U eShop)
- April 26
- 1999 (NA): Super Smash Bros. (N64)
- 2012 (JP): Mario Party 9 (Wii)
- April 27
- 2008 (NA): Mario Kart Wii (Wii)
- 2006 (JP): Tetris DS (DS)
- 2009 (NA): Paper Airplane Chase (DSiWare)
- April 28
- 1980 (NA): Ball (G&W)
- 1983 (NA): Mario's Cement Factory (G&W)
- 1989 (EU): Super Mario Bros. 2 (NES)
- 1994 (EU): Yoshi's Cookie (NES)
- 2016 (NA/EU):
- Mini Mario & Friends: amiibo Challenge (Wii U eShop)
- Mini Mario & Friends: amiibo Challenge (3DS eShop)
- 2017 (ALL): Mario Kart 8 Deluxe (Switch)
- April 29
- 1981 (NA): Lion (G&W)
- 2009 (JP):
- WarioWare: D.I.Y. Showcase (WiiWare)
- WarioWare: D.I.Y. (DS)
- 2015 (JP): Puzzle & Dragons: Super Mario Bros. Edition (3DS)
- 2016 (AU):
- Mini Mario & Friends: amiibo Challenge (Wii U eShop)
- Mini Mario & Friends: amiibo Challenge (3DS eShop)
- April 30
- 1991 (EU): Dr. Mario (GB)
- 1999 (NA): Super Mario Bros. Deluxe (GBC)
- 2010 (EU):
- WarioWare: D.I.Y. Showcase (WiiWare)
- WarioWare: D.I.Y. (DS)
Pokédex Power
Hello everyone, it's me, Yoshi876 again with a new edition of Pokédex Power, the section written by the person who is currently watching the Generation II Johto anime series, although granted I'm not that far into it. Currently, I'm at the episode where Snubbull is first introduced, but I'll be watching a decent amount of episodes in the coming days.
However, despite my mentioning of Snubbull, we're not actually looking at it, nor are we going to be looking at a Generation II Pokémon, instead we're going to be looking at a Generation III Pokémon, and one of my favourite ones to boot. Obviously, with Duskull being my favourite Pokémon overall, there's no prizes for guessing who my favourite Gen III Pokémon actually is, but this one is potentially my second-favourite. I haven't properly thought about it to be honest.
Yes, we're going to be looking at Absol, and like I said it's one of my favourite Generation III Pokémon, although I don't have many memories of actually using it. I guess I don't particularly use many Dark-type Pokémon, the only ones I can think of using recently are Zoroark and Krookodile. But, Absol has one of the best designs of any Pokémon out there, and its Mega Evolution doesn't look too bad either. But as we more than aware, just because I like the Pokémon, doesn't mean I'll like their Pokédex entries, so let's see if I like Absol and Mega Absol's entries, and then see which is better.
Generation III
| Pokémon Ruby | Every time Absol appears before people, it is followed by a disaster such as an earthquake or a tidal wave. As a result, it came to be known as the disaster Pokémon. |
| Pokémon Sapphire | Absol has the ability to foretell the coming of natural disasters. It lives in a harsh, rugged mountain environment. This Pokémon very rarely ventures down from the mountains. |
| Pokémon Emerald | It sharply senses even subtle changes in the sky and the land to predict natural disasters. It is a long-lived Pokémon that has a life-span of 100 years. |
| Pokémon FireRed | It appears when it senses an impending natural disaster. As a result, it was mistaken as a doom-bringer. |
| Pokémon LeafGreen | It appears when it senses an impending natural disaster. As a result, it was mistaken as a doom-bringer. |
Generation III introduces us to Absol pretty well. All of its Pokédex entries mention its main ability, that of sensing disasters, and Emerald even partially explains how it senses the changes in the sea and sky, although future generations explain how it actually sense these. And because of how it predicts disasters, for once we actually find out why a Pokémon has its typing. I don't think there are any other Pokédex entries out there that explain this. We also get a couple of nice little facts, those being that Absol live for roughly a century and whereabouts they actually live. However, it does leave one question, why does Absol feel the need to warn humans about impending disasters?
Generation IV
| Pokémon Diamond | It senses coming disasters and appears before people only to warn them of impending danger. |
| Pokémon Pearl | It senses coming disasters and appears before people only to warn them of impending danger. |
| Pokémon Platinum | Rumored to sense danger with its horn, it became a target. It fled deep into the mountains. |
| Pokémon HeartGold | It has the ability to foretell natural disasters. Its life span is over a hundred years. |
| Pokémon SoulSilver | It has the ability to foretell natural disasters. Its life span is over a hundred years. |
Generation IV is quite disappointing with its Pokedex entries, as it doesn't really give us anything new. The only new piece of information that we get is that the mountains weren't originally Absol's habitat, and that they fled there after they became a target. But who did it become a target to? Was it poachers or shady salespeople seeking to profit off its horn? Or perhaps researchers seeking to understand it? Or even the ire of normal people, considering how the previous generation told us of how it got its typing. Platinum explains how it senses the subtle changes, through its horn, but it says that this ability was simply rumoured, which contradicts what every other entry say, as they firmly state this this is an ability that it has. So why is Platinum bulking from this trend?
Generation V
| Pokémon Black | Rumored to sense danger with its horn, it became a target. It fled deep into the mountains. |
| Pokémon White | Rumored to sense danger with its horn, it became a target. It fled deep into the mountains. |
| Pokémon Black 2 | It appears from deep in the mountains to warn people about upcoming disasters it has sensed with its horn. |
| Pokémon White 2 | It appears from deep in the mountains to warn people about upcoming disasters it has sensed with its horn. |
All Generation V does this time around is conform that Absol uses its horn to predict natural disasters.
Generation VI
| Pokémon X | It senses coming disasters and appears before people only to warn them of impending danger. |
| Pokémon Y | It appears when it senses an impending natural disaster. As a result, it was mistaken as a doom bringer. |
| Pokémon Omega Ruby | Every time Absol appears before people, it is followed by a disaster such as an earthquake or a tidal wave. As a result, it came to be known as the disaster Pokémon. |
| Pokémon Alpha Sapphire | Absol has the ability to foretell the coming of natural disasters. It lives in a harsh, rugged mountain environment. This Pokémon very rarely ventures down from the mountains. |
Sadly, Generation VI does not offer us any new insights into Absol.
Generation VII
| Pokémon Sun | Long ago, superstitions were spread about it, saying it brought disaster. This fed a hatred of it, and it was driven deep into the mountains. |
| Pokémon Moon | Although it's said to bring disaster, in actuality, this Pokémon possesses a calm disposition and warns people of any crisis that loom. |
| Pokémon Ultra Sun | The only unlucky thing about Absol is its appearance. It protects fields and warns people of disaster, so one ought to be grateful for it. |
| Pokémon Ultra Moon | The elderly call it the disaster Pokémon and detest it, but interest in its power to predict disasters is on the rise. |
Sun gives us a much more believable reason for why Absol fled into the mountains, although it does obviously contradict the previous entry that states it was because of the horn. And the entry for Sun is backed up even further by the entry for Ultra Moon, saying how the elderly detest. Perhaps, they are the same generation that made Absol flee into the mountains. Both Moon and Ultra Sun bring up how Absol protects humans and fields, by warning people of impending disasters, but the question as to why Absol feels the need to do so is still unanswered. Moon tries to give a reason by saying it's down to a calm disposition, but surely caring would be the way to describe it if this was the case?
Conclusion Despite Absol's Pokédex entries mainly focusing on the same fact, I still actually like its entries. It's interesting to see the progression from Absol being feared and loathed to eventually people starting to come around to actually try and understand it. That said, other than the mountainous habitat and its hundred-year lifespan, we really don't get to know a lot about the Pokémon itself. But perhaps this is down to the fact that we haven't had many chances to actually research it, considering how it was caused to flee away from humans. Either way, hopefully future Pokédex entries will shed some more light on Absol, rather than just focusing on its ability to predict disasters.
Mega Absol Generation VII
| Pokémon Sun | When this Pokémon whips the winglike fur on its back as though beating its wings, it sends an intimidating aura flying at its opponents. |
| Pokémon Moon | As the energy of Mega Evolution fills it, its fur bristles. What you see on its back are not true wings, and this Pokémon isn't able to fly. |
| Pokémon Ultra Sun | Normally, it dislikes fighting, so it really hates changing to this form for battles. |
| Pokémon Ultra Moon | It converts the energy from Mega Evolution into an intimidating aura. Fainthearted people expire from shock at the sight of it. |
The entries for Sun and Moon for Mega Absol are fairly decent, but the entries for Ultra Sun and Ultra Moon are disappointing. The entries for Sun and Moon both focus on Mega Absol's appearance, specifically its “wings”. Moon makes the point that these aren't actually real wings, and don't give it the ability to fly, which is quite nice to know. Sun focuses on a mysterious aura that Mega Absol is able to create, and although it doesn't go far into this, seeing as Mega Evolution isn't fully understood, it's understandable to not have all of the answers. As for the latter games, Mega Sun seems to completely contradict the concept of Mega Evolution. Mega Evolution can only happen if the bond between Pokémon and Trainer is strong, and surely if Mega Absol hates transforming, then it will start to resent the Trainer, thus disrupting the special bond. Meanwhile, Ultra Moon tries to put a dark spin on the Mega Evolution, by saying that its very appearance can kill those who are faint of heart. I'm sorry, but its angelic appearance is unlikely to do that, especially since its meant to be shock that kills them, and Mega Absol just doesn't look that shocking, an entry like that might have worked better for a Ghost-type Pokémon.
Conclusion Like I said in the paragraph above, the first two entries are pretty good, but it's the latter two that let the whole side down. And because of this, I think Absol's Pokédex entries are better than its Mega counterpart. So, if we can use this to conclude on both Pokémon, always use a non-Mega evolved Absol, and considering that we know it hates transforming into its Mega form, it might be best to keep it that way anyway..
| The 'Shroom: Issue 133 | |
|---|---|
| Staff sections | Staff Notes • The 'Shroom Spotlight |
| Features | Fake News • Fun Stuff • Palette Swap • Pipe Plaza • Critic Corner • Strategy Wing |
| Specials | Super Mario Odyssey Photo Contest |

