Level 5-4 (Mario vs. Donkey Kong): Difference between revisions
m (Text replacement - "{{(I|i)talic title\|[^(}\n]+ \(''[^)}\n]+''\)}}" to "{{italic title|id=yes}}") |
LinkTheLefty (talk | contribs) mNo edit summary |
||
| (7 intermediate revisions by 3 users not shown) | |||
| Line 1: | Line 1: | ||
{{italic title|id=yes}} | {{italic title|id=yes}} | ||
{{ | {{level infobox | ||
|image=[[File:MVDK_5-4_Part_1_(1).png]] | |||
|image = [[File:MVDK_5-4_Part_1_(1).png]] | |code=Level 5-4 (GBA)<br>Level 7-4 (Switch) | ||
|code= Level 5-4 | |world=[[Mystic Forest]] | ||
|world= [[Mystic Forest]] | |game=''[[Mario vs. Donkey Kong]]'' | ||
|game= ''[[Mario vs. Donkey Kong]]'' | |limit=120 (first area)<br>150 (second area) | ||
|limit= 120 (first area)<br>150 (second area) | |before_alt= | ||
| | |before=[[Level 5-3 (Mario vs. Donkey Kong)|<<]] | ||
|before= [[Level 5-3 (Mario vs. Donkey Kong)|<<]] | |after=[[Level 5-5 (Mario vs. Donkey Kong)|>>]] | ||
|after= [[Level 5-5 (Mario vs. Donkey Kong)|>>]] | |||
}} | }} | ||
'''Level 5-4''' is the fourth level of [[Mystic Forest]] in ''[[Mario vs. Donkey Kong]]''. The high score for this level is 26000. | '''Level 5-4''' is the fourth level of [[Mystic Forest]] in ''[[Mario vs. Donkey Kong]]''. The high score for this level is 26000. | ||
==Overview== | ==Overview== | ||
[[File:MVDK_5-4_Part_2_(2).png|frame|left|The second area]] | [[File:MVDK_5-4_Part_2_(2).png|frame|left|The second area]] | ||
The level opens with a cinematic showing [[Mario]] climbing up [[rope]]s, getting attacked by a [[ | The level opens with a cinematic showing [[Mario]] climbing up [[rope]]s, getting attacked by a [[Bat (Mario vs. Donkey Kong)|Bat]], and falling. | ||
In the first area, the player has to use a [[Springboard]] to get up onto a platform above, and then ride the upward moving [[lift]] that will disappear once it reaches the end of its rail. The player then has to use another Springboard to reach the ropes above, and climb and jump across them to the right side of the area while avoiding the | In the first area, the player has to use a [[Springboard]] to get up onto a platform above, and then ride the upward moving [[lift]] that will disappear once it reaches the end of its rail. The player then has to use another Springboard to reach the ropes above, and climb and jump across them to the right side of the area while avoiding the Bat. Once the player reaches the locked door, they need to use the lifts to progress downward and press the blue [[Color Switch]] at the bottom. The player now needs to return to the start of the level by [[crouch]]ing on the [[Conveyor Belt|conveyor belt]] to move under the wall, and use the Springboard to reach a [[Direction Switch]] they need to press. Now the player needs to grab the [[key]], throw it onto the conveyor and follow it, then grab it again and use the lifts to reach the locked door. | ||
In the second area, there are several rotating [[Cannon]]s that fire [[Cannonball]]s at set intervals. The player needs to climb and jump up several ropes while avoiding these Cannonballs; on the left of the area is a [[1-Up Mushroom]] and the path to continue is on the right. In the top half of the area, there are also | In the second area, there are several rotating [[Cannon]]s that fire [[Cannonball]]s at set intervals. The player needs to climb and jump up several ropes while avoiding these Cannonballs; on the left of the area is a [[1-Up Mushroom]] and the path to continue is on the right. In the top half of the area, there are also Bats that the player needs to avoid as they progress to the [[Mini Mario (toy)|Mini-Mario]] on the left. | ||
{{br|left}} | {{br|left}} | ||
==Enemies== | ==Enemies== | ||
*[[ | *[[Bat (Mario vs. Donkey Kong)|Bat]]s | ||
*[[Cannon]]s and [[Cannonball]]s | *[[Cannon]]s and [[Cannonball]]s | ||
==Present locations== | ==Present locations== | ||
*'''Red:''' In the first area, between ropes located above the locked door. | *'''Red:''' In the first area, between ropes located above the locked door. | ||
*'''Yellow:''' In the second area, next to the highest | *'''Yellow:''' In the second area, next to the highest [[Bird Nest|Bat Nest]] on the right. | ||
*'''Blue:''' In the second area, above the first Cannon on the left. | *'''Blue:''' In the second area, above the first Cannon on the left. | ||
{{MVDK levels}} | |||
{{MVDK | [[Category:Mario vs. Donkey Kong levels]] | ||
[[Category:Mario vs. Donkey Kong | |||
Latest revision as of 19:55, March 7, 2024
| Level | |
|---|---|
| Level 5-4 | |

| |
| Level code | Level 5-4 (GBA) Level 7-4 (Switch) |
| World | Mystic Forest |
| Game | Mario vs. Donkey Kong |
| Time limit | 120 (first area) 150 (second area) |
| << Directory of levels >> | |
Level 5-4 is the fourth level of Mystic Forest in Mario vs. Donkey Kong. The high score for this level is 26000.
Overview[edit]
The level opens with a cinematic showing Mario climbing up ropes, getting attacked by a Bat, and falling.
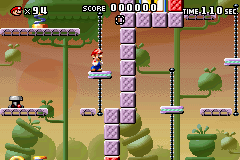
In the first area, the player has to use a Springboard to get up onto a platform above, and then ride the upward moving lift that will disappear once it reaches the end of its rail. The player then has to use another Springboard to reach the ropes above, and climb and jump across them to the right side of the area while avoiding the Bat. Once the player reaches the locked door, they need to use the lifts to progress downward and press the blue Color Switch at the bottom. The player now needs to return to the start of the level by crouching on the conveyor belt to move under the wall, and use the Springboard to reach a Direction Switch they need to press. Now the player needs to grab the key, throw it onto the conveyor and follow it, then grab it again and use the lifts to reach the locked door.
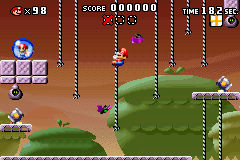
In the second area, there are several rotating Cannons that fire Cannonballs at set intervals. The player needs to climb and jump up several ropes while avoiding these Cannonballs; on the left of the area is a 1-Up Mushroom and the path to continue is on the right. In the top half of the area, there are also Bats that the player needs to avoid as they progress to the Mini-Mario on the left.
Enemies[edit]
- Bats
- Cannons and Cannonballs
Present locations[edit]
- Red: In the first area, between ropes located above the locked door.
- Yellow: In the second area, next to the highest Bat Nest on the right.
- Blue: In the second area, above the first Cannon on the left.
