User:Tails777/Work: Difference between revisions
m (→Mario Kart 7 Obstacles and Hazards Table: More work, will be gone over the weekend so I'll likely continue this on Monday.) |
(→Mario Kart 7 Obstacles and Hazards Table: Bit of work on this, nearing completion, but if the wording is off and not article worthy, please let me know so I can try to fix it.) |
||
| Line 229: | Line 229: | ||
|align=center|[[File:MK7 Bouncing Note.jpg|100px]]<br>[[Bouncing Note]] | |align=center|[[File:MK7 Bouncing Note.jpg|100px]]<br>[[Bouncing Note]] | ||
|align=center|[[Music Park]] | |align=center|[[Music Park]] | ||
|Bouncing Notes jump at regular intervals near the end of the track. Players can do tricks off the ground when the Bouncing Notes land, however players can also be flattened if a Bouncing Note lands on them. | |Bouncing Notes jump at regular intervals near the end of the track. Players can do tricks off the ground when the Bouncing Notes land, however players can also be flattened if a Bouncing Note lands on them. During the final lap, their bouncing is faster. | ||
|- | |- | ||
|align=center|[[File:MK7 Bumper.jpg|100px]]<br>Bumper | |align=center|[[File:MK7 Bumper.jpg|100px]]<br>Bumper | ||
| Line 245: | Line 245: | ||
|align=center|[[File:MK7 Chomp.jpg|100px]]<br>[[Chomp]] | |align=center|[[File:MK7 Chomp.jpg|100px]]<br>[[Chomp]] | ||
|align=center|[[Rainbow Road (3DS)|Rainbow Road]] | |align=center|[[Rainbow Road (3DS)|Rainbow Road]] | ||
| | |Chomps appear on the moon segment of the track, rolling around in circles. Two Chomps also roll off of the craters on the surface, causing them to jump off of them and float in the air for a short time. Colliding with one will flip a racer over. | ||
|- | |- | ||
|align=center|[[File:MK7 Clampy.jpg|100px]]<br>[[Clampy]] | |align=center|[[File:MK7 Clampy.jpg|100px]]<br>[[Clampy]] | ||
|align=center|[[Cheep Cheep Lagoon]]<br>[[Daisy Cruiser|<small>GCN</small> Daisy Cruiser]] | |align=center|[[Cheep Cheep Lagoon]]<br>[[Daisy Cruiser|<small>GCN</small> Daisy Cruiser]] | ||
| | |Clampies appear in the first underwater segment of the track, opening and closing their mouths at regular intervals. Coins and Item Boxes can appear in an open Clampy, but if a racer is caught when a Clampy is closing its mouth, they will spin out. | ||
|- | |- | ||
|align=center|[[File:MK7 Crate.jpg|100px]]<br>[[Crate]] | |align=center|[[File:MK7 Crate.jpg|100px]]<br>[[Crate]] | ||
|align=center|[[Airship Fortress|<small>DS</small> Airship Fortress]] | |align=center|[[Airship Fortress|<small>DS</small> Airship Fortress]] | ||
| | |Crates are scattered inside the airship of the track and act identically to Barrels. Items may fly out when broken, but will stop a racer in the process. Crates cannot be broken in Time Trial mode. | ||
|- | |- | ||
|align=center|[[File:MK7 Dinosaur.jpg|100px]]<br>[[Dinosaur]] | |align=center|[[File:MK7 Dinosaur.jpg|100px]]<br>[[Dinosaur]] | ||
|align=center|[[Dino Dino Jungle|<small>GCN</small> Dino Dino Jungle]] | |align=center|[[Dino Dino Jungle|<small>GCN</small> Dino Dino Jungle]] | ||
| | |The dinosaur appears near the track's center, occupying the bridge section after the cave and the ground below the bridge. The dinosaur's feet stomp the lower section, flattening racers in a similar manner to a Thwomp. The dinosaur's head does not spin a racer out, rather blocks their path. | ||
|- | |- | ||
|align=center|[[File:MK7 Fish Bone.jpg|80px]]<br>[[Fish Bone]] | |align=center|[[File:MK7 Fish Bone.jpg|80px]]<br>[[Fish Bone]] | ||
|align=center|[[Wario Shipyard]] | |align=center|[[Wario Shipyard]] | ||
| | |Fish Bone appear near the track's beginning and swim through the first tunnel. Hitting one will simply bounce a racer back. | ||
|- | |- | ||
|align=center|[[File:MK7 Flipper.jpg|100px]]<br>Flipper | |align=center|[[File:MK7 Flipper.jpg|100px]]<br>Flipper | ||
|align=center|[[Waluigi Pinball (course)|<small>DS</small> Waluigi Pinball]] | |align=center|[[Waluigi Pinball (course)|<small>DS</small> Waluigi Pinball]] | ||
| | |Flippers appear at the pinball table section of the track, specifically at the bottom of the table. They hit any pinball back across the table and will hit racers if they get too close. | ||
|- | |- | ||
|align=center|[[File:MK7 Frogoon.jpg|100px]]<br>[[Frogoon]] | |align=center|[[File:MK7 Frogoon.jpg|100px]]<br>[[Frogoon]] | ||
|align=center|[[DK Jungle (Mario Kart)|DK Jungle]] | |align=center|[[DK Jungle (Mario Kart)|DK Jungle]] | ||
| | |Frogoons hop across the track in the jungle section before the giant temple. Colliding with one will cause the racer to spin out. | ||
|- | |- | ||
|align=center|[[File:MK7 Goat.jpg|100px]]<br>[[Goat]] | |align=center|[[File:MK7 Goat.jpg|100px]]<br>[[Goat]] | ||
|align=center|[[Daisy Hills]] | |align=center|[[Daisy Hills]] | ||
| | |Goats roam around the mountainous areas of the track, wiping out racers who collide with them. | ||
|- | |- | ||
|align=center|[[File:MK7 Grand Goomba.jpg|100px]]<br>[[Grand Goomba]] | |align=center|[[File:MK7 Grand Goomba.jpg|100px]]<br>[[Grand Goomba]] | ||
|align=center|[[Mario Circuit (3DS)|Mario Circuit]]<br>[[Piranha Plant Slide]]<br>[[Mushroom Gorge|<small>Wii</small> Mushroom Gorge]]<br>[[Koopa Cape|<small>Wii</small> Koopa Cape]] | |align=center|[[Mario Circuit (3DS)|Mario Circuit]]<br>[[Piranha Plant Slide]]<br>[[Mushroom Gorge|<small>Wii</small> Mushroom Gorge]]<br>[[Koopa Cape|<small>Wii</small> Koopa Cape]] | ||
| | |Grand Goombas appear on various tracks, replacing regular Goombas on Retro Tracks. They act in the same way they did in past installments, slowly waddling back and forth on certain parts of the track. | ||
|- | |- | ||
|align=center|[[File:MK7 Icicle.jpg|60px]]<br>Icicle | |align=center|[[File:MK7 Icicle.jpg|60px]]<br>Icicle | ||
|align=center|[[Rosalina's Ice World]] | |align=center|[[Rosalina's Ice World]] | ||
| | |Icicles behave in an identical way to crates and barrels, slowing the player's vehicle speed upon impact. Items do not fly out of icicles when they break and icicles cannot be broken in Time Trial mode. | ||
|- | |- | ||
|align=center|[[File:MK7 Lava Bubble.jpg |80px]]<br>[[Lava Bubble]] | |align=center|[[File:MK7 Lava Bubble.jpg |80px]]<br>[[Lava Bubble]] | ||
|align=center|[[Bowser Castle 1|<small>GBA</small> Bowser Castle 1]] | |align=center|[[Bowser Castle 1|<small>GBA</small> Bowser Castle 1]] | ||
| | |Lava Bubbles jump out of the lava between the ramps near the end of the track, causing players who hit them to spin out. | ||
|- | |- | ||
|align=center|[[File:MK7 Oil Slick.jpg|100px]]<br>[[Oil Slick]] | |align=center|[[File:MK7 Oil Slick.jpg|100px]]<br>[[Oil Slick]] | ||
|align=center|[[Mario Circuit 2|<small>SNES</small> Mario Circuit 2]] | |align=center|[[Mario Circuit 2|<small>SNES</small> Mario Circuit 2]] | ||
| | |Oil Slicks appear on various parts of the track, causing racers to spin out if they race over them. | ||
|- | |- | ||
|align=center|[[File:MK7 Penguin.jpg|100px]]<br>[[Penguin]] | |align=center|[[File:MK7 Penguin.jpg|100px]]<br>[[Penguin]] | ||
|align=center|[[Rosalina's Ice World]]<br>[[Sherbet Rink]] | |align=center|[[Rosalina's Ice World]]<br>[[Sherbet Rink]] | ||
| | |Penguins appear around the icy pond section of Rosalina's Ice World, on both the land and in the water. In both instances, players will simply bounce off of them if they collide with them. On Sherbet Rink, Penguins roam around the track as a whole. | ||
|- | |- | ||
|align=center|[[File:MK7 Pinball.jpg|100px]]<br>Pinball | |align=center|[[File:MK7 Pinball.jpg|100px]]<br>Pinball | ||
|align=center|[[Waluigi Pinball|<small>DS</small> Waluigi Pinball]] | |align=center|[[Waluigi Pinball|<small>DS</small> Waluigi Pinball]] | ||
| | |Pinballs roll across various sections of the track, causing racers to flip over when hit. On the pinball table, pinballs can be hit by flippers and bounce of the bumpers scattered across the table. | ||
|- | |- | ||
|align=center|[[File:MK7 Pipe.jpg|100px]]<br>[[Pipe]] | |align=center|[[File:MK7 Pipe.jpg|100px]]<br>[[Pipe]] | ||
|align=center|[[Toad Circuit]]<br>[[Mario Circuit 2|<small>SNES</small> Mario Circuit 2]] | |align=center|[[Toad Circuit]]<br>[[Mario Circuit 2|<small>SNES</small> Mario Circuit 2]] | ||
| | |Pipes appear as stationary obstacles and are usually scattered on off road sections. Players will come to a complete stop if they collide with them. | ||
|- | |- | ||
|align=center|[[File:MK7 Piranha Plant.jpg|100px]]<br>[[Piranha Plant]] | |align=center|[[File:MK7 Piranha Plant.jpg|100px]]<br>[[Piranha Plant]] | ||
Revision as of 21:04, October 10, 2017
Image Rearranging for Galaxy Articles
Planets
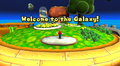
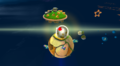
Starting planet
The starting planet is multi-sided; there is a light side and a dark side. On the light side there is grass and bushes with Star Bits and Coins hidden in them. There is also an house with a tree on the right and two Octoombas guarding the front. There are two bridges, one on each side, that lead to the dark side of the planet. Inside the house there is a ? Coin which releases several Rainbow Notes that will play the underground theme from Super Mario Bros. while Mario collects them. After getting them all, a 1-Up Mushroom will appear.
The darker side of the planet has many dead trees with Star Bits on their branches and a constant rain of them coming down from above which makes it, arguably, the best location to get Star Bits in the galaxy. In the center of the planet there is a giant tower with a special side that bends the laws of Gravity and allows Mario to walk up. There is an Octoomba guarding that side.
In the levels there will be Launch Stars placed in three different locations; where the launch star is depends on the level. In the missions "Dino Piranha", "Dino Piranha Speed Run" and "Luigi on the Roof" it can be found at the top of the tower and leads to the Boulder planet, though in "Luigi on the Roof", Luigi is located on top of the house, so there is no point in taking the Launch Star. In "A Snack of Cosmic Proportions" and "Purple Coin Omelet", the Launch Star is located at the top of a set of three Pull Stars at the end of a stone walkway next to the tower and leads to a maze of three planets; the Tropic planets and the Egg planet. Finally, in "King Kaliente's Battle Fleet", the Launch Star is on top of the house and leads to the Tropic planets.
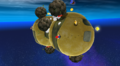
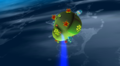
Boulder planet
The Boulder planet is a Peanut shaped planet with lots of mud and Boulders in "Dino Piranha" and "Luigi on the Roof". However, in "Dino Piranha Speed Run", they are replaced by Chomps. Mario can either dodge or destroy the Boulders with his Star Spin, but he cannot hurt the Chomps.
To get here, Mario must take a launch star from the starting planet and the only way to leave is to get the five Star Chips and create a Launch Star that takes Mario to the Bean planet. This planet has a different color appearance when it is first seen, but it ends up appearing with a recolor in the final version of the game. It was originally supposed to be blue.
Bean planet
This is a small, grassy planet with one Piranha Plant and a few Slurples as its only dangers because it is impossible to fall off this planet due to the gravity. On the bottom side of the planet there is a ? Coin which creates many Star Bits leading back to the Piranha Plant.
Mario will get here via a Launch Star from the Boulder planet and then, to leave, he will have to stomp or spin the Piranha Plant to defeat it. After being defeated, the Piranha Plant will release a Sproutle Vine for Mario to climb to get to the Bitten Apple planet.
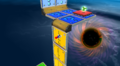
Bitten Apple planet
The Bitten Apple planet, as its name states, resembles a green bitten apple. There are Boulders rolling all over the planet, and a large purple Piranha Plant on the top. There is a black hole in the middle of this planet which will make Mario lose a life if he falls in. Also, if Mario stands on one of the bridges on the starting planet on the light side, he can see the Bitten Apple Planet and the Flipswitch Planet. If Mario turns to a certain angle he can see a pipe but oddly, if he turns the other way, it disappears.
On this planet Mario has two choices as to where he wants to go. The first choice is to advance to the very end of the planet and battle a giant purple Piranha Plant which will release a Sproutle Vine to the Block-Climb planet. The other choice is to go across a shrinking platform and using the Warp Pipe with the Piranha Plant in it to get to the Flipswitch planet.
Flipswitch planet
The Flipswitch planet is a planet covered in Flipswitch Panels. It also has a few red platforms with spikes on the sides that can hurt Mario, but that he can also use to carry him across the planet. It can be accessed via a semi-hidden Warp Pipe from the Bitten Apple planet. In order for the player to continue, he must press all the Flipswitch Panels in the first area before the ones in the second area will appear. After activating all of them, a Launch Star leading to the Block-Climb planet will appear. It also plays the Space Fantasy music when Mario is here.
Block-Climb planet
The Block-Climb planet is a planet accessed by either launching off of the Flipswitch planet and landing here or taking the Sproutle Vine that comes out of the purple Piranha Plant on the Bitten Apple planet. This planet is a grassy oval with three stone blocks on it and Octoombas guarding them. There are some coins on them which serve as steps to the very top where a Launch Star is waiting to take Mario to the Dino-Geo planet. Behind the set of three stone steps, there is a 1-Up Mushroom to give Mario an extra life. Also on the planet are a Luma and several Starbags.
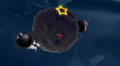
Dino Geo planet
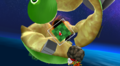
The Dino Geo planet is a small round planet that is the last planet visited in the levels "Dino Piranha" and "Dino Piranha Speed Run" as it is the location of the bosses in those levels; Dino Piranha.
The planet is basically a large brown oval with several yellow objects on the ground that, when shot with a star bit, will release a coin, and several Item Crystals with coins and star bits in them. On top of the planet is a giant egg that Mario will automatically crack open when he lands. Dino Piranha hatches, and the Boss Battle starts. After defeating Dino Piranha, the Power Star appears here. A similar planet appears in Super Mario Galaxy 2, in the Boss Blitz Galaxy. On that planet, Dino Piranha is fought once again as a returning boss.
Super Mario Galaxy trading card description
Landing on this planet seems unevental. That is, until Mario makes his way to the other side. He spies a giant walking egg with a tail sticking out-definitely something to be investigated. Spin Mario against the large ball on the end of the tail to crack open the shell. Out bursts Dino Piranha - the boss of this world, who Mario must battle to gain the first Power Star in the Good Egg Galaxy.
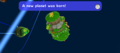
Pear planet
The Pear planet is a pear-shaped planet covered in grass that appears in "A Snack of Cosmic Proportions" and "Purple Coin Omelet". There are several Star Bits in the Item Crystals all over the planet along with a few Goombas and thorny flowers. There is also a Launch Star to the Rock planet here.
Rock planet
The Rock planet is a giant red rock with Boulders rolling all over it. It is accessible via the Pear planet. The Launch Star on this planet takes Mario to the Egg planet. The Rock planet also has some Item Crystals and a ? Block. There is also a Sling Star that can launch Mario into a coin.
Egg planet
The Egg planet is a planet that resembles a giant Yoshi Egg with many Goombas wandering all over. Also, there are several Item Crystals. It is part of the three-planet maze involving the Rock planet and Pear planet. The Launch Star on this planet leads to the Pear planet and it is accessible from the Launch Star on the Rock planet.
The main attraction of this planet is the Hungry Luma that must be fed 100 Star Bits to transform into the new planet that is needed to complete the level; the Tower planet.
Tower planet
The Tower planet is a planet made by a Hungry Luma on the Egg planet and is shaped like a giant mountain with many stone platforms on the other side that can help Mario jump up to get to the top. Enemies found here are mostly thorny flowers and Goombas. The flowers can be defeated by the rubbery, green Stretch Plants. At the very top of the many stone platforms is a Launch Star to the Pill planet.
An almost identical planet with the same name appears in the Yoshi Star Galaxy in Super Mario Galaxy 2, the only difference being that the planet in that galaxy is already present, while the planet in the Good Egg Galaxy is formed by a Hungry Luma.
Pill planet
The Pill planet is the biggest planet in the Good Egg Galaxy save for, maybe, the Magma planet where King Kaliente is fought. It is shaped like a giant transparent pill with many enemies and obstacles on the inside including different sections where the gravity is shifted around; red means it goes away from the core, blue means it goes towards it. It resembles a Megavitamin.
When he first arrives here, Mario will be on the transparent coating of the planet from the Launch Star on the Tower planet and he will have to destroy the Item Crystal to get inside. After making his way through all the obstacles, another Launch Star will blast him right through the glass and to the final planet of the mission; the Star planet. Again it plays the Space Fantasy music when Mario is on it.
Star planet
The last planet of the second mission, which resembles a Sling Star. To get to the star, the player must collect Blue Star Chips to create some Pull Stars. Mario must then use the Pull Stars to get to the Power Star in the center of the Planet or he can simply Long Jump and Spin to get to the Star.
Tropic planets
The Tropic planets are a pair of planets with thorny flowers and Coconuts that can be put to different uses depending on which planet Mario is on. The planets are made up of a combination of sand and grass with scattered palm trees and crates everywhere. On the first planet there are multiple thorny flowers which Mario can destroy with a coconut, but to access the next planet, he must destroy the extremely large thorny flower at the top to make a Sling Star appear. The second Tropic planet has several Goombas and a Big Pokey. When the Big Pokey comes to the surface, Mario must hit its head with a coconut or hit its body, which will destroy a body segment and lower its head closer to the ground. After doing this a Launch Star will appear to send Mario off to the Chomp Saucer planet. The first Tropic planet is accessed by blasting off the Starting Planet in "King Kaliente's Battle Fleet".
Water planets
The water planets are small rocks in the sky surrounded by water which float all around the Tropic planets. They are inaccessible during the regular levels, but, through hacking, Mario can visit them as they have their own gravity field. Other than that they are mostly for ambience while Mario soars past them on his way to the Chomp Saucer planet.
Asteroid planet
The Asteroid planet is a small, optional, planet accessible from the Chomp Saucer planet with two Chain Chomps rolling around it. The only thing here is a warp pipe which leads to the inside; a room with many Goombas and a Rainbow Star to help Mario defeat them and receive many Star Bits. In the beta version of the game, there were several planets like this one.
Chomp Saucer planet
The Chomp Saucer planet is a large grass-covered planet that is accessed from the Tropic planets and has an Item Crystal containing a Launch Star at the very end of it that leads to the airships. Enemies on this planet include Octoombas, Bill Blasters, Chomps, Amps and Rocket Engines who make the planet much more difficult to cross. Probably the most notable difficulties on the planet are the electric barriers placed throughout that Mario has to cross. Once Mario finally reaches the end the Launch Star will take him to King Kaliente's fleet.
Super Mario Galaxy trading card description
Once Mario gets to the top of this planet in the Good Egg Galaxy, he finds it is littered with half-buried blocks. It's tempting to climb up to grab all the coins, but if he does, he becomes visible to his enemies. Mario needs to focus on the Launch Star, which is located on top of the Bullet Bill cannons and protected by Electrogoombas. Mario must spin them away to claim the prize.
Octopus airships
There are two airships floating in space which are both commanded by King Kaliente and have many enemies on them. The first airship is able to be accessed from the Launch Star on the Chomp Saucer planet and has two Octopuses firing coconuts at it from the second ship. If Mario defeats them both, the the bridge is opened.
At the end of the bridge there is a Sling Star that leads up into the main section of the ship where several Octoombas will attack. If Mario takes the Launch Star located on this ship he will travel to the Octo Magma planet where he will battle the commander of both airships; King Kaliente.
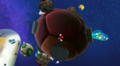
Octo Magma planet
The Octo Magma planet is an extremely large stone planet with a pool of lava in the middle which is home to the boss of the level "King Kaliente's Battle Fleet", King Kaliente. This is the location of the King's boss battle as he emerges from the lava and fires coconuts and fireballs at Mario.
The planet is mostly made up of black tar and rock mixed together by the gigantic pool of hot lava in the middle. The rest of the planet is just simple hot rock. This planet is quite big compared to others like the Tropic planets, since it needs to have a decently large size for the fight to be held. Underneath the Magma planet is a rocky area with yellow rings on it like a target which resembles a chocolate donut. During missions in which the planet isn't normally visited, it is drained of its lava.
Planet Gallery
- Cosmic Blooper.PNG
The starting planet
Mario beginning the mission
- MarioPeachSMG.jpg
Mario and Princess Peach relaxing here
The Boulder planet
- Flatland Planet.png
The bean-like planet
The Bitten Apple planet
The Flipswitch planet
- Block-Climb Planet.png
The Block-Climb planet
Mario about to initiate hatching of Dino Piranha
- Home2DinoTradingCard.PNG
The Geo Planet's Super Mario Galaxy trading card
A pear-looking planetoid
The Rock planet
- Egg planet.PNG
The Egg planet from a bird's eye view
The Tower planet
An obstacle-filled section of the Pill planet

The Star planet
- Tropic Planets.PNG
The Tropic planets.
- Water Planets.PNG
The seven inaccessible water planets with the Tropic planets in the background.
The Asteroid Planet
The Chomp Saucer planet.
- BattleFleetTradingCard.PNG
The Chomp Saucer planet's Super Mario Galaxy trading card.
- SMG Airship.png
The Airships
- Magmaplanet.PNG
Mario on the Octo Magma planet


Mario Kart 8 Deluxe Rivals
Let's see who's got who as rivals this time around.
The testing I've done seems to show the following: the characters who had rivals in MK8 retain said rivals. For characters who didn't have rivals in MK8, it works slightly differently and rather inconsistantly. For starters, most seem to have only one rival, like the male Koopalings or Shy Guy. Several, however, have two, such as Dry Bones, Wendy and all the babies except Baby Rosalina. Secondly, some of the rivals seems to be based on relations that character has with their rival; Shy Guy having Yoshi as a rival relates to Shy Guys being common Yoshi series enemies. Dry Bowser having Dry Bones as a rival relates because they are both skeletal versions of Bowser and Koopa Troopa respectively. However, several characters don't have rivals at all; Lakitu, Link and the Mii not having a rival is possibly because they share no notable relations with anyone else, though it doesn't explain why King Boo doesn't have a rival, as he could've had one in Luigi. This is all speculation and will not be on the actual article if I get this table done, this is just tidbits of knowledge for anyone interested in reading this.
| Rival Order | |||||||
|---|---|---|---|---|---|---|---|
| Player | Opponent(s) | Player | Opponent(s) | Player | Opponent(s) | ||
| None | |||||||
| None | |||||||
| None | None | ||||||
Mario Kart 7 Obstacles and Hazards Table
| Characters and elements | ||
|---|---|---|
| Character/element | Location | Description |
 Banzai Bill |
DS Airship Fortress | Banzai Bills are fired from a cannon near the starting straightaway of the track. They fly along the straight path in different positions based on where they were fired. They disappear once they hit the road where the starting line is located. |
 Barrel |
Wario Shipyard DK Jungle |
Barrels are scattered around the track and can be broken by players. Once broken, items may fly out. In Time Trials, the barrels cannot be broken. |
 Big Wiggler |
Wii Maple Treeway | Two Big Wigglers walk around the top of the tree section of the track. Racers simple bounce off of them rather than wiping out. |
 Board |
Piranha Plant Slide | Boards can be broken by players by racing into them. There are two board shapes; Goomba shaped boards and bush shaped boards. Two bush shaped boards are located in off-road sections near the end of the track. |
 Boulder |
Rock Rock Mountain Maka Wuhu |
Boulders fall from mountain tops and roll down the track, flipping over any racer that hits them. They are destroyed upon hitting walls. |
 Bouncing Note |
Music Park | Bouncing Notes jump at regular intervals near the end of the track. Players can do tricks off the ground when the Bouncing Notes land, however players can also be flattened if a Bouncing Note lands on them. During the final lap, their bouncing is faster. |
 Bumper |
DS Waluigi Pinball | Bumpers are located on the pinball table section of the track and will bump racers back when they collide with them. Pinballs will also ricochet off of bumpers. |
 Car |
Wuhu Loop Wii Coconut Mall |
Cars travel across the road of the entire track, causing players to flip over if hit. In Coconut Mall, cars are located in the parking lot and drive back and forth along the area. |
 Cheep Cheep |
Cheep Cheep Lagoon Wii Koopa Cape |
Cheep Cheeps swim in various water sections of the track, lightly bouncing back racers who hit them. |
 Chomp |
Rainbow Road | Chomps appear on the moon segment of the track, rolling around in circles. Two Chomps also roll off of the craters on the surface, causing them to jump off of them and float in the air for a short time. Colliding with one will flip a racer over. |
 Clampy |
Cheep Cheep Lagoon GCN Daisy Cruiser |
Clampies appear in the first underwater segment of the track, opening and closing their mouths at regular intervals. Coins and Item Boxes can appear in an open Clampy, but if a racer is caught when a Clampy is closing its mouth, they will spin out. |
 Crate |
DS Airship Fortress | Crates are scattered inside the airship of the track and act identically to Barrels. Items may fly out when broken, but will stop a racer in the process. Crates cannot be broken in Time Trial mode. |
 Dinosaur |
GCN Dino Dino Jungle | The dinosaur appears near the track's center, occupying the bridge section after the cave and the ground below the bridge. The dinosaur's feet stomp the lower section, flattening racers in a similar manner to a Thwomp. The dinosaur's head does not spin a racer out, rather blocks their path. |
 Fish Bone |
Wario Shipyard | Fish Bone appear near the track's beginning and swim through the first tunnel. Hitting one will simply bounce a racer back. |
Flipper |
DS Waluigi Pinball | Flippers appear at the pinball table section of the track, specifically at the bottom of the table. They hit any pinball back across the table and will hit racers if they get too close. |
 Frogoon |
DK Jungle | Frogoons hop across the track in the jungle section before the giant temple. Colliding with one will cause the racer to spin out. |
| File:MK7 Goat.jpg Goat |
Daisy Hills | Goats roam around the mountainous areas of the track, wiping out racers who collide with them. |
 Grand Goomba |
Mario Circuit Piranha Plant Slide Wii Mushroom Gorge Wii Koopa Cape |
Grand Goombas appear on various tracks, replacing regular Goombas on Retro Tracks. They act in the same way they did in past installments, slowly waddling back and forth on certain parts of the track. |
 Icicle |
Rosalina's Ice World | Icicles behave in an identical way to crates and barrels, slowing the player's vehicle speed upon impact. Items do not fly out of icicles when they break and icicles cannot be broken in Time Trial mode. |
 Lava Bubble |
GBA Bowser Castle 1 | Lava Bubbles jump out of the lava between the ramps near the end of the track, causing players who hit them to spin out. |
Oil Slick |
SNES Mario Circuit 2 | Oil Slicks appear on various parts of the track, causing racers to spin out if they race over them. |
 Penguin |
Rosalina's Ice World Sherbet Rink |
Penguins appear around the icy pond section of Rosalina's Ice World, on both the land and in the water. In both instances, players will simply bounce off of them if they collide with them. On Sherbet Rink, Penguins roam around the track as a whole. |
 Pinball |
DS Waluigi Pinball | Pinballs roll across various sections of the track, causing racers to flip over when hit. On the pinball table, pinballs can be hit by flippers and bounce of the bumpers scattered across the table. |
 Pipe |
Toad Circuit SNES Mario Circuit 2 |
Pipes appear as stationary obstacles and are usually scattered on off road sections. Players will come to a complete stop if they collide with them. |
 Piranha Plant |
Music Park Piranha Plant Slide |
|
Puddle |
Neo Bowser City | |
 Rocket Engine |
DS Airship Fortress | |
 Rocky Wrench |
DS Airship Fortress GBA Battle Course 1 |
|
 Screaming Pillar |
DK Jungle | |
 Shy Guy |
Shy Guy Bazaar | |
 Sidestepper |
Cheep Cheep Lagoon N64 Koopa Beach DS Palm Shore |
|
 Snowball |
DS DK Pass | |
 Snowman |
DS DK Pass | |
 Stingby |
Honeybee Hive | |
 Super Thwomp |
SNES Rainbow Road | |
 Swoop |
Rock Rock Mountain | |
 Thwomp |
Bowser's Castle GBA Bowser Castle 1 |
|
 Tiki Goon |
DK Jungle | |
 Train |
N64 Kalimari Desert | |
 Vase |
Shy Guy Bazaar | |
 Walking Tree |
DS Luigi's Mansion | |
 Water Geyser |
GCN Dino Dino Jungle | |