Mt. Teapot: Difference between revisions

From the Super Mario Wiki, the Mario encyclopedia
Jump to navigationJump to search
(Lake Asparagus)
 
(47 intermediate revisions by 14 users not shown)
Line 1: Line 1:
{{FA}}
{{world infobox
{{worldbox
|image=[[File:MtTeapot.png|160px]]
|image=[[File:MtTeapot.png]]
|game=''[[Wario Land: Super Mario Land 3]]'' ([[List of games by date#1994|1994]])
|app=''[[Wario Land: Super Mario Land 3]]'' ([[List of games by date#1994|1994]])
|levels=7
|lev=7
|before=[[Rice Beach|<<]]
|before=[[Rice Beach|<<]]
|after=[[Stove Canyon|>>]]
|after=[[Stove Canyon|>>]]
|secret=[[Sherbet Land (world)|**]]
|secret=[[Sherbet Land (world)|**]]
}}
}}
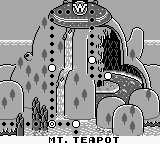
'''Mt. Teapot''' is a large, teapot-shaped mountain that can be seen in [[Kitchen Island]]. It is the second area that [[Wario]] visits in ''[[Wario Land: Super Mario Land 3]]'' on his adventure to steal the giant, golden [[Princess Peach|Princess Toadstool]] statue rumored to be under the control of [[Captain Syrup]] and her [[Black Sugar Gang]]. Mt. Teapot's secret exit Course No. 8 is the only way one can enter [[Sherbet Land (world)|Sherbet Land]]. On the outside, Mt. Teapot appears as a grassy, smooth, tree-covered hill surrounded Lake Asparagus.<ref>''Wario Land: Super Mario Land 3'' English manual, page 17.</ref> However, many caves can be found that lead straight to the center of the mountain, which is a rugged, dank cavern. [[Lava]] and bridges also appear in the mountain, making it a quite diverse area for many different creatures. Only [[Pinwheel (Wario Land)|Pinwheels]], [[Yadorā]] and [[Watch]]es appear on the outside of the level, while [[Pirate Goom]]s, [[Konotako]], [[Pecan]]s, [[Penkoon]]s and others appear on the inside.
'''Mt. Teapot''' is a large, teapot-shaped mountain that can be seen in [[Kitchen Island]]. It is the second area that [[Wario]] visits in ''[[Wario Land: Super Mario Land 3]]'' on his adventure to steal the giant, golden [[Princess Peach|Princess Toadstool]] statue rumored to be under the control of [[Captain Syrup]] and her [[Black Sugar Gang|Brown Sugar Pirates]]. Mt. Teapot's secret exit in [[Course No.08]] is the only way one can enter [[Sherbet Land (world)|Sherbet Land]]. On the outside, Mt. Teapot appears as a grassy, smooth, tree-covered hill surrounded by Lake Asparagus.<ref>''Wario Land: Super Mario Land 3'' English instruction booklet, page 17.</ref> However, many caves can be found that lead straight to the center of the mountain, which is a rugged, dank cavern. [[Lava]] and bridges also appear in the mountain, making it a quite diverse area for many different creatures. Only [[Pinwheel (Wario Land: Super Mario Land 3)|Pinwheel]]s, [[Yadorā]] and [[Watch]]es appear on the outside of the level, while [[Pirate Goom]]s, [[Konotako]], [[Pecan]]s, [[Penkoon]]s and others appear on the inside.


One notable landmark of Mt. Teapot is the "lid" of the teapot; at first, it is seen floating up and down above the summit. However, once Wario completes Course No. 12, the lid crashes down into the mountain, transforming Course No. 10 into Course No. 13, a more rough and blocked off area. The changed level allows the boss, [[Beefne]], to be fought.
One notable landmark of Mt. Teapot is the "lid" of the teapot; at first, it is seen floating up and down above the summit. However, once Wario completes [[Course No.12]], the lid crashes down into the mountain, transforming [[Course No.10]] into [[Course No.13]], a more rough and blocked off area. The changed level allows the [[Minotaur]] boss to be fought.


==Courses==
==Courses==
===Course No. 7===
{|style="text-align: center; margin: 0 auto 10px auto; border-collapse: collapse; font-family:Arial;"border="1"cellpadding="2"cellspacing="1"
[[File:MtTeapotCourse7.png|frame|Course No. 7's half-submerged, half-above landscape.]]
|-style="background: #ABC;"
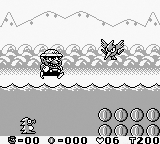
Course No. 7 is a water-filled area. Throughout the entire level, only two enemies appear: [[Watch]]es and [[Pinwheel (Wario Land)|Pinwheels]]. Also, the level is the first that includes small mines that explode a couple seconds after Wario touches them. The first part of the level is a long stretch of water with Watches attacking from the air and Pinwheels from the water. Mines are scattered throughout the level. About one-third of the way through the level is a door in the water hidden by blocks. Since the blocks are in the water, they can only be destroyed when Wario has a [[Jet Pot]]. Inside the door is a large block with a huge [[Heart]] in it that gives Wario three extra lives. Later in the level is another door hidden by blocks, which holds a save point. Unlike the first door (containing the large heart), which has no Jet Pot anywhere near it, the second door has a pot almost directly above it. At the end of the long, watery area is a door to the final room. In this room, there are many currents in the water that attempt to pull Wario to the depths and make him lose a life. Another Watch attacks from right above the water, as well. At the end, there is a door that requires a [[10 Gold Coin|ten gold coin]] to open.
!width="5%"|Level
 
!width="1%"|Image
===Course No. 8===
!width="20%"|Description
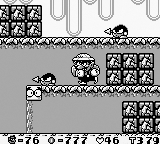
[[File:MtTeapotCourse8.png|frame|left|Wario tossing a [[coin]] into the save point in Course No. 8.]]
|-
Course 8 starts out as a lengthy, horizontal cave that has water that flows against Wario's desired direction. In the water are some [[Yadorā]] and mines that will attack Wario. Also in the water is some coins and blocks that hold items. The door to the next room is underneath a platform; Wario must ride the current backwards to get to it. The next area is a long, vertical room that is split in half by a large, indestructible wall. Wario must avoid the handheld mines in the area as they can easily defeat him with an explosion. There is a save point in this tall area. The next cave has multiple watery "rooms" that hold [[Pecan]]s, [[Helmut]]s, and many breakable and unbreakable blocks. Wario must avoid the enemies while getting the power-ups. The next room holds only water with many currents in it. Wario must avoid the Helmuts in the area and reach the next door. The final area contains no water. Two [[Gaugau]] greet Wario as he enters the area, and the level's exit is just beyond them. If Wario has the [[Jet Pot]], however, he can reach the secret exit in this level by using the more lengthy body slams that the cap allows. The secret exit leads to [[Sherbet Land (world)|Sherbet Land]].
|[[Course No.07]]
 
|[[File:MtTeapotCourse7.png|160px]]
===Course No. 9===
|A level that mainly takes place in water at Mt. Teapot's base. [[Watch]]es occupy the surface, while the water is filled with [[Pinwheel (Wario Land: Super Mario Land 3)|Pinwheel]]s and [[mine]]s.
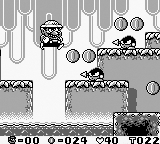
[[File:Mt. Teapot.PNG|thumb|160px|One of the Course No. 9's two vertical halls.]]
|-
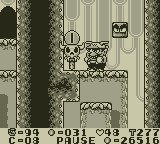
Course No. 9 is full of waterfalls. The first cave is a horizontal, watery course where Wario must dodge the Helmuts and get the power-ups in the blocks. In the second, vertical room, Wario must dodge many Yadorā as he climbs upwards towards the door. After the Yadorā, Wario must face [[Pirate Goom]]s in the next waterfall-filled, horizontal cave. This area also has a door to a save point on one of its platforms. The fourth room is also vertical, but instead of Yadorā, this area features [[Penkoon]]s, whose spiked boulders slow Wario's climb to the summit. The next waterfall-covered cave has a secret door hidden behind its one cracked block. If Wario goes through this well-hidden door, he can find a huge block that holds an equally [[100 Gold Coin|huge coin]] worth 100 regular coins. Also in this hidden cave is a Skull Door that holds one of the [[Brown Sugar Pirates]]' treasures. The key to the treasure room is near the invisible door. When Wario returns to the main waterfall-ridden area, he must cross the rest of it to find a door to the last area. In the final area, there are two [[Konotako]] and the course's exit.
|[[Course No.08]]
 
|[[File:MtTeapotCourse8.png|160px]]
===Course No. 10===
|Many water currents are found in this level. This level holds a secret exit leading to [[Sherbet Land (world)|Sherbet Land]].
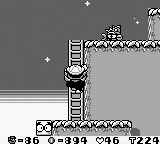
[[File:MtTeapotCourse10.png|frame|left|Wario climbs to the summit of Course No. 10.]]
|-
In the world map, this level appears on the summit of the Mount; likewise, the inside of the course is quite similarly based. Course 10 has one very long area that Wario must traverse. The area contains both water and land at first, where Wario can collect many power-ups, coins, and hearts while avoiding the Watches in the air and the Pinwheels in the water. A Jet Pot helps Wario tremendously in this area. About halfway through the level, a large mountain juts up out of the ground; Wario must climb ladders to scale it. Once at the peak, Wario must descend the other side of the mountain. At the peak, however, Wario may go down another ladder to collect coins and hearts. Also at the peak is a door to a very tall save room. On the other side of the mountain is another water and land area with many Watches. When Wario progresses through the door to the next room, he must navigate past a [[Pouncer]] and attach himself to a ladder. He must switch ladders multiple times before he reaches the level's exit, where he must put in a gold coin to open.
|[[Course No.09]]
 
|[[File:MtTeapotCourse9.png|160px]]
===Course No. 11===
|In this level, Wario must go through a short vertically aligned series of waterfall-filled rooms to reach the end.
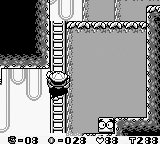
[[File:MtTeapotCourse11.png|frame|Wario charges through the twisted, first cave in Course No. 11.]]
|-
Course 11 takes place in a cave. The first room curves downward; Wario must break multiple blocks in his travel down. In the next room is a small underground lake with a [[Watch]] and a [[Pinwheel (Wario Land)|Pinwheel]]. Wario must dodge them both and progress to the next area. Upon reaching the next door, Wario will find a long ladder. Wario must climb down this ladder while avoiding the [[Pirate Goom]]s that try to poke from the sides. At the bottom of the ladder is a tall cave that Wario must scale with a nearby [[Jet Pot]]; when Wario takes the [[key]] to the top, he can get one of the [[Brown Sugar Pirates]]' treasures. When he does get the treasure, he can proceed to the next room: a sandy, beach-like cave that has a save point and a bouncing, spiky fish. When Wario takes out the fish who blocks the way, he can move on to the next area. In it, there is a [[Floater]] and many coins that Wario can obtain. However, if Wario falls off the machine-like creature or jumps too high, he could fall into a bottomless pit or jump into spikes, respectively. Halfway through the area, Wario must switch to a different Floater. In the next room, Wario can obtain a [[Starman]] and plow through a cluster of [[Pirate Goom]]s. If Wario shoots past the door to the next room, however, he will fall into lava and lose a life, even if he is still under the effects of the Starman. In the seventh and final area, Wario must quickly run across collapsing bridges while avoiding Pirate Gooms that block the way.
|[[Course No.10]]
 
|[[File:MtTeapotCourse10.png|160px]]
===Course No. 12===
|The summit of Mt. Teapot. This level becomes inaccessible after completing Course No.12 and gets replaced by Course No.13.
[[File:MtTeapotCourse12.png|frame|left|Wario jumps precariously over the dangerous lava in Course No. 12.]]
|-
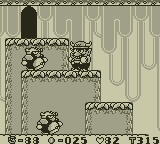
Course No. 12 includes only four somewhat short rooms. The first one features many [[Pirate Goom]]s and [[Flying Chicken]]s, along with [[lava]] lining the entire bottom of the course. Wario must avoid the enemies and lava to complete the room. The second room highlights conveyor belts and has one [[Yarikuri Obake]] that floats around the area. If Wario comes in contact with the Yarikuri Obake, the antihero will be damaged. If Wario has the [[Bull Pot]] when he goes through this room, he can use his horns to attach to the bottom of some of the conveyor belts and collect the otherwise unreachable [[Coins]] underneath. In the third, vertical room, Wario must face multiple [[Dangerous Duck]]s to reach the top, where the door is located. In the third and final room, there is a large [[! Block]], which Wario must hit to make the lid of the teapot crash down and change Course 10 into Course 13.
|[[Course No.11]]
 
|[[File:MtTeapotCourse11.png|160px]]
===Course No. 13===
|A level set within the mountain's caves. Many [[Pirate Goom]]s are found in this level.
[[File:MtTeapotCourse13.png|frame|right|Wario climbs a ladder to the summit of Mt. Teapot after its lid has fallen.]]
|-
Course 13 can only be played when the player hits the giant [[! Switch]] in Course 12. When the switch is hit, the giant "lid" of Mt. Teapot rams into the top of the mountain, making many drastic changes to Course 10 and transforming it into Course 13.  
|[[Course No.12]]
 
|[[File:MtTeapotCourse12.png|160px]]
The basic layout of the first area in the course is almost exactly the same as Course 10's; it is a long, somewhat watery area with many outcroppings and small platforms. However, the water level has been lowered and the [[Watch]]es have been replaced with [[Konotako]]. Also, since the water level is only one tile high, the [[Pinwheel (Wario Land)|Pinwheels]] in the area can move twice as fast as before, since they are unable to move one tile up. Another major change is that there are very long walls that come directly from the ceiling and large boulders that are strewn about the course. This signifies the crashing of the lid, as the new obstacles appeared from the force of the crash.
|A level set in a lava pit inside the mountain. Wario activates a switch at the end of the level that causes the lid to fall onto Mt. Teapot.
[[File:MtTeapotCourse13Boss.png|frame|left|Wario fights the mighty Beefne in Course 13.]]
|-
After the long flat area, Wario must once again scale the "peak" of Mt. Teapot. Like last time, there are many [[Yadorā]] on the way up; this time, however, the top of the peak is blocked off and if Wario attempts to climb down the east side, he will be stopped by a large, impassable wall. Once climbing back to the peak of the Mountain, Wario can go into the exact same save area as in Course 10. It remains unchanged. After saving, Wario must climb down a ladder to find a new door that was opened by the crash. Through the door, a [[Pouncer]] begins to pursue Wario through a series of caverns. If Wario fails to block the bricks directly in his way, the Pouncer will continue to travel upwards; Wario must use this chance to obtain even more coins. If he does break the blocks, Wario can still progress to the end of the cave, where a door can be found. Mt. Teapot's boss, [[Beefne]], can be found through the door. Wario must pick up the giant bull and throw it into the lava before his adversary can do likewise to Wario. Upon winning, Wario gains a multitude of coins and is able to advance to [[Stove Canyon]].
|[[Course No.13]]
<br clear=all>
|[[File:MtTeapotCourse13.png|160px]]
|The boss level of Mt. Teapot, replacing Course No.10 and set on the summit after the lid falls on top of it. The [[Minotaur]] is fought at the end of the level.
|}


==Names in other languages==
{{Foreignname|
{{foreign names
|Jap=ポット<span class="explain" title="やま"></span><br>''Potto Yama''<br>アスパラ<span class="explain" title="こ"></span><ref>''Super Mario Land 3: Wario Land'' Japanese manual, page 18.</ref><br>''Asupara-ko''
|Jap=ポット{{hover|山|やま}}<ref name=enclosed>''Super Mario Land 3: Wario Land'' Japanese instruction booklet, page 16.</ref><br>''Potto yama''<br>アスパラ{{hover|湖|こ}}<ref name=enclosed/><br>''Asupara ko''
|JapM=Mt. Pot<br><br>Asparagus Lake}}
|JapM=Mt. Pot<br>(''Mt. Teapot'' in-game)<br>Asparagus Lake<br>(waterbody)
|Ita=Monte Teiera<ref>''Super Mario Land 3: Wario Land'' European instruction booklen, pag. 115</ref><br>Lago Asparagio
|ItaM=Mount Teapot<br>Asparagus Lake
}}


==References==
==References==
<references/>
<references/>
{{BoxTop}}
 
{{WL}}
{{WL}}
[[Category:Wario Places]]
[[Category:Mountains|Teapot]]
[[Category:Mountains|Teapot]]
[[Category:Wario Land: Super Mario Land 3]]
[[Category:Volcanic areas]]
[[Category:Worlds]]
[[Category:Wario Land: Super Mario Land 3 worlds]]

Latest revision as of 17:23, April 22, 2023

Mt. Teapot
Mt. Teapot
Game Wario Land: Super Mario Land 3 (1994)
Level(s) 7
<< List of worlds >> **

Mt. Teapot is a large, teapot-shaped mountain that can be seen in Kitchen Island. It is the second area that Wario visits in Wario Land: Super Mario Land 3 on his adventure to steal the giant, golden Princess Toadstool statue rumored to be under the control of Captain Syrup and her Brown Sugar Pirates. Mt. Teapot's secret exit in Course No.08 is the only way one can enter Sherbet Land. On the outside, Mt. Teapot appears as a grassy, smooth, tree-covered hill surrounded by Lake Asparagus.[1] However, many caves can be found that lead straight to the center of the mountain, which is a rugged, dank cavern. Lava and bridges also appear in the mountain, making it a quite diverse area for many different creatures. Only Pinwheels, Yadorā and Watches appear on the outside of the level, while Pirate Gooms, Konotako, Pecans, Penkoons and others appear on the inside.

One notable landmark of Mt. Teapot is the "lid" of the teapot; at first, it is seen floating up and down above the summit. However, once Wario completes Course No.12, the lid crashes down into the mountain, transforming Course No.10 into Course No.13, a more rough and blocked off area. The changed level allows the Minotaur boss to be fought.

Courses[edit]

Level Image Description
Course No.07 Mt. Teapot, Course 7 A level that mainly takes place in water at Mt. Teapot's base. Watches occupy the surface, while the water is filled with Pinwheels and mines.
Course No.08 Mt. Teapot, Course 8 Many water currents are found in this level. This level holds a secret exit leading to Sherbet Land.
Course No.09 Mt. Teapot In this level, Wario must go through a short vertically aligned series of waterfall-filled rooms to reach the end.
Course No.10 Mt. Teapot, Course 10 The summit of Mt. Teapot. This level becomes inaccessible after completing Course No.12 and gets replaced by Course No.13.
Course No.11 Mt. Teapot, Course 11 A level set within the mountain's caves. Many Pirate Gooms are found in this level.
Course No.12 Mt. Teapot, Course 12 A level set in a lava pit inside the mountain. Wario activates a switch at the end of the level that causes the lid to fall onto Mt. Teapot.
Course No.13 Mt. Teapot, Course No.13. Shows Wario fighting the Minotaur The boss level of Mt. Teapot, replacing Course No.10 and set on the summit after the lid falls on top of it. The Minotaur is fought at the end of the level.

Names in other languages[edit]

Language Name Meaning
Japanese ポット[2]
Potto yama
アスパラ[2]
Asupara ko

Mt. Pot
(Mt. Teapot in-game)
Asparagus Lake
(waterbody)

Italian Monte Teiera[3]
Lago Asparagio
Mount Teapot
Asparagus Lake

References[edit]

  1. ^ Wario Land: Super Mario Land 3 English instruction booklet, page 17.
  2. ^ a b Super Mario Land 3: Wario Land Japanese instruction booklet, page 16.
  3. ^ Super Mario Land 3: Wario Land European instruction booklen, pag. 115