Fiery Stage: Difference between revisions
m (→Boss room) Tag: Mobile edit |
Derekblue1 (talk | contribs) m (→Golden room: Added br) |
||
| (10 intermediate revisions by 3 users not shown) | |||
| Line 1: | Line 1: | ||
{{level infobox | {{level infobox | ||
|image=[[File:MPL FS.png]] | |image=[[File:MPL FS.png]] | ||
|game=''[[Mario Pinball Land]]'' | |game=''[[Mario Pinball Land]]'' | ||
|before=[[ | |before=[[Shifting Sands Stage|<<]] | ||
|after=[[The Fun Fair|>>]] | |after=[[The Fun Fair|>>]] | ||
|track=Fiery | |||
|sample=[[File:Mario Pinball Land 31 Fiery.mp3]] | |||
}} | }} | ||
{{quote2|This stage fills everyone with a nameless dread.|''Mario Pinball Land'' instruction manual}} | {{quote2|This stage fills everyone with a nameless dread.|''Mario Pinball Land'' instruction manual}} | ||
The '''Fiery Stage''',<ref>''Mario Pinball Land'' instruction manual, | The '''Fiery Stage''',<ref>''Mario Pinball Land'' instruction manual, pg. 21</ref> also known as '''[[Bowser's Castle|Bowser's castle]]'''<ref>''Mario Pinball Land'' instruction manual, pgs. 6 and 21</ref> or the '''castle''',<ref>''[[Nintendo Power]]'' issue 185 (November 2004), pg. 117</ref> is the final [[level]] in ''[[Mario Pinball Land]]''. It can be accessed only while [[Mario]] is in possession of a [[Star Key (Mario Pinball Land)|Star Key]], which can be used to unlock one of the four [[boss statue]]s, or after all Star Keys are collected, which unlocks the rest of the stage. [[Fly Guy|Flying Shy Guys]] and [[Koopatrol|Armored Koopas]] are found defending the castle, as well as each of the previous bosses fought. [[Bowser]] is the boss of the stage and the final boss of the game. | ||
{{br}} | |||
==Areas== | ==Areas== | ||
'''NOTE:''' Unless otherwise marked, all names are unofficial. | '''NOTE:''' Unless otherwise marked, all names are unofficial. | ||
| Line 26: | Line 27: | ||
===Boss room=== | ===Boss room=== | ||
[[File:Mario vs Bowser.png|frame|left|The battle against Bowser]] | [[File:Mario vs Bowser.png|frame|left|The battle against Bowser]] | ||
The boss room is accessible via the 15-[[★ door]] in the main area. In it, Bowser is fought, alongside two [[Thwomp]]s, each chained to a cog. Bowser wanders around the room until he finds a spot to jump on. His landing | The boss room is accessible via the 15-[[★ door]] in the main area. In it, Bowser is fought, alongside two [[Thwomp]]s, each chained to a cog. Bowser wanders around the room until he finds a spot to jump on. His landing disables the [[flipper (Pinball)|flipper]]s for a few seconds, possibly causing Mario to be sent out. If he exits the room, he is forced back to the starting area. Every time Mario hits Bowser while he walks causes him to rebound to another part of the room. Hitting Bowser while he stands stops him from doing his jump. By hitting each cog multiple times, Mario is able to lift the Thwomps. Activating the [[! Switch|Blue Switch]] at the center of the room causes the Thwomps to hit the ground, stunning Bowser temporarily and allowing Mario to hit him. After Bowser is hit like so three times, he rolls into a ball, and the player must use the flippers to knock him around the room while making sure Mario also stays in the room. The player must hit Bowser toward the wall on either side enough times to launch him out of his castle. Afterwards, Mario saves [[Princess Peach]], and they go back to [[the Fun Fair]] to ride the roller coaster. | ||
{{br}} | {{br}} | ||
===First Armored Koopa room=== | ===First Armored Koopa room=== | ||
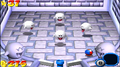
The first Armored Koopa room is accessible via the 17-★ door in the main room. It features a [[Monty Mole]] in the upper center, as well as two Armored Koopas that can be defeated by being knocked into a wall. Defeating both Armored Koopas yields the player a Star. | [[File:MPL FS Armored Koopa Room.png|frame|left|The first Armored Koopa room]] | ||
The first Armored Koopa room is accessible via the 17-★ door in the main room. It features a helmet-wearing [[Monty Mole]] in the upper center, as well as two Armored Koopas that can be defeated by being knocked into a wall. Defeating both Armored Koopas yields the player a Star. | |||
{{br}} | |||
===Goomba room=== | ===Goomba room=== | ||
The [[Goomba]] room is accessible via the 19-★ door in the first Armored Koopa room. It features six Goombas moving in a circle, and defeating them all triggers a rematch with [[Petey Piranha]]. Defeating him again yields the player a Star. | [[File:MPL FS Goomba Room.png|frame|left|The Goomba room]] | ||
[[File:MPL FS Petey Piranha.png|frame|right|Mario battles Petey Piranha once more.]] | |||
The [[Goomba]] room is accessible via the 19-★ door in the first Armored Koopa room. It features six Goombas moving in a circle, and defeating them all triggers a rematch with [[Petey Piranha]]. Defeating him again yields the player a Star. Afterwards, a [[? Block]] with two [[Mega Mushroom]]s appears in the room. | |||
{{br}} | |||
===Boo room=== | ===Boo room=== | ||
The [[Boo]] room is accessible via the 25-★ door in the first Armored Koopa room. It features four Boos, and defeating them all triggers a rematch with [[Big Boo]]. Defeating the boss again yields the player a Star. | The [[Boo]] room is accessible via the 25-★ door in the first Armored Koopa room. It features four Boos, and defeating them all triggers a rematch with [[Big Boo]]. Defeating the boss again yields the player a Star. Afterwards, a ? Block with two [[Warp Pipe|Pipes]] appears in the room. | ||
<gallery> | |||
MPL Fiery Stage Boo Room1.png|The Boo room | |||
MPL Fiery Stage Boo Room2.png|Mario battles Big Boo once more. | |||
</gallery> | |||
{{br}} | |||
===Second Armored Koopa room=== | ===Second Armored Koopa room=== | ||
| Line 46: | Line 57: | ||
[[File:MPL FS Pokey Room.png|frame|left|The Pokey room]] | [[File:MPL FS Pokey Room.png|frame|left|The Pokey room]] | ||
[[File:MPL FS Egyptian Koopa.png|frame|right|Mario battles the Egyptian Koopa once more.]] | [[File:MPL FS Egyptian Koopa.png|frame|right|Mario battles the Egyptian Koopa once more.]] | ||
The [[Pokey]] room is accessible via the 23-★ door in the second Armored Koopa room. It features two [[enchanted obelisk]]s and four four-segment-tall Pokeys. Defeating all four Pokeys triggers a rematch with the [[Egyptian Koopa]]. Defeating the boss again yields the player a Star. | The [[Pokey]] room is accessible via the 23-★ door in the second Armored Koopa room. It features two [[enchanted obelisk]]s and four four-segment-tall Pokeys. Defeating all four Pokeys triggers a rematch with the [[Egyptian Koopa]]. Defeating the boss again yields the player a Star. Afterwards, a ? Block with two bolts of [[Lightning]] appears in the room. | ||
{{br}} | {{br}} | ||
| Line 52: | Line 63: | ||
[[File:MPL FS Cheep Cheep Room.png|frame|left|The Cheep Cheep room]] | [[File:MPL FS Cheep Cheep Room.png|frame|left|The Cheep Cheep room]] | ||
[[File:MPL FS Porcupuffer.png|frame|right|Mario battles Porcupuffer once more.]] | [[File:MPL FS Porcupuffer.png|frame|right|Mario battles Porcupuffer once more.]] | ||
The [[Cheep Cheep]] room is accessible via the hole in the second Armored Koopa room. It features six Cheep Cheeps swimming in a circle, as well as two [[trapdoor (Mario Pinball Land)|trapdoor]]s. Defeating all Cheep Cheeps triggers a rematch with [[Porcupuffer (boss)|Porcupuffer]]. Defeating the boss again yields the player a Star. | The [[Cheep Cheep]] room is accessible via the hole in the second Armored Koopa room. It features six Cheep Cheeps swimming in a circle, as well as two [[trapdoor (Mario Pinball Land)|trapdoor]]s. Defeating all Cheep Cheeps triggers a rematch with [[Porcupuffer (boss)|Porcupuffer]]. Defeating the boss again yields the player a Star. Afterwards, a ? Block with two [[Super Star|Invincibility Stars]] appears in the room. | ||
{{br}} | {{br}} | ||
===Golden room=== | ===Golden room=== | ||
[[File:MPL Fiery Stage Golden Room.png|thumb|left|260px|The golden room]] | |||
The golden room is accessible via the 35-★ door in the second Armored Koopa room. It features four enchanted obelisk-like objects and a [[? Block]] with two [[Yoshi's Egg|Yoshi Eggs]]. The [[Egg Mark]] is also found in this room. This room's Bonus Tower and golden egg reward Mario with more [[point]]s and [[coin]]s than any of the other ones. | The golden room is accessible via the 35-★ door in the second Armored Koopa room. It features four enchanted obelisk-like objects and a [[? Block]] with two [[Yoshi's Egg|Yoshi Eggs]]. The [[Egg Mark]] is also found in this room. This room's Bonus Tower and golden egg reward Mario with more [[point]]s and [[coin]]s than any of the other ones. | ||
{{br}} | |||
==Names in other languages== | ==Names in other languages== | ||
{{foreign names | {{foreign names | ||
|Ita=Livello ardente<ref>''Super Mario Ball'' European instruction manual, | |Ita=Livello ardente<ref>''Super Mario Ball'' European instruction manual, pg. 119</ref> | ||
|ItaM=Fiery level | |ItaM=Fiery level | ||
}} | }} | ||
Revision as of 09:26, December 20, 2023
| Level | |||
|---|---|---|---|
| Fiery Stage | |||

| |||
| Game | Mario Pinball Land | ||
| Music track | Fiery | ||
| |||
| << Directory of levels >> | |||
- “This stage fills everyone with a nameless dread.”
- —Mario Pinball Land instruction manual
The Fiery Stage,[1] also known as Bowser's castle[2] or the castle,[3] is the final level in Mario Pinball Land. It can be accessed only while Mario is in possession of a Star Key, which can be used to unlock one of the four boss statues, or after all Star Keys are collected, which unlocks the rest of the stage. Flying Shy Guys and Armored Koopas are found defending the castle, as well as each of the previous bosses fought. Bowser is the boss of the stage and the final boss of the game.
Areas
NOTE: Unless otherwise marked, all names are unofficial.
Starting area


The starting area features four boss statues depicting Petey Piranha, the Egyptian Koopa, Porcupuffer, and Big Boo. After each Star Key is brought to its statue, the door to the next areas is opened. Afterwards, three Flying Shy Guys can be found in the area, and defeating all of them yields the player a Star.
Main room

The main area of the Fiery Stage is accessible via the gate in the starting area. The room features a Sky Cannon and Toad's tent, as well as five Flying Shy Guys. Defeating all of them yields the player a Star.
Boss room

The boss room is accessible via the 15-★ door in the main area. In it, Bowser is fought, alongside two Thwomps, each chained to a cog. Bowser wanders around the room until he finds a spot to jump on. His landing disables the flippers for a few seconds, possibly causing Mario to be sent out. If he exits the room, he is forced back to the starting area. Every time Mario hits Bowser while he walks causes him to rebound to another part of the room. Hitting Bowser while he stands stops him from doing his jump. By hitting each cog multiple times, Mario is able to lift the Thwomps. Activating the Blue Switch at the center of the room causes the Thwomps to hit the ground, stunning Bowser temporarily and allowing Mario to hit him. After Bowser is hit like so three times, he rolls into a ball, and the player must use the flippers to knock him around the room while making sure Mario also stays in the room. The player must hit Bowser toward the wall on either side enough times to launch him out of his castle. Afterwards, Mario saves Princess Peach, and they go back to the Fun Fair to ride the roller coaster.
First Armored Koopa room

The first Armored Koopa room is accessible via the 17-★ door in the main room. It features a helmet-wearing Monty Mole in the upper center, as well as two Armored Koopas that can be defeated by being knocked into a wall. Defeating both Armored Koopas yields the player a Star.
Goomba room


The Goomba room is accessible via the 19-★ door in the first Armored Koopa room. It features six Goombas moving in a circle, and defeating them all triggers a rematch with Petey Piranha. Defeating him again yields the player a Star. Afterwards, a ? Block with two Mega Mushrooms appears in the room.
Boo room
The Boo room is accessible via the 25-★ door in the first Armored Koopa room. It features four Boos, and defeating them all triggers a rematch with Big Boo. Defeating the boss again yields the player a Star. Afterwards, a ? Block with two Pipes appears in the room.
The Boo room

Mario battles Big Boo once more.


Second Armored Koopa room

The second Armored Koopa room is accessible via the 21-★ door in the main room. It features a hole located at the upper center of the room, as well as three Armored Koopas. Defeating all enemies yields the player a Star.
Pokey room


The Pokey room is accessible via the 23-★ door in the second Armored Koopa room. It features two enchanted obelisks and four four-segment-tall Pokeys. Defeating all four Pokeys triggers a rematch with the Egyptian Koopa. Defeating the boss again yields the player a Star. Afterwards, a ? Block with two bolts of Lightning appears in the room.
Cheep Cheep room


The Cheep Cheep room is accessible via the hole in the second Armored Koopa room. It features six Cheep Cheeps swimming in a circle, as well as two trapdoors. Defeating all Cheep Cheeps triggers a rematch with Porcupuffer. Defeating the boss again yields the player a Star. Afterwards, a ? Block with two Invincibility Stars appears in the room.
Golden room

The golden room is accessible via the 35-★ door in the second Armored Koopa room. It features four enchanted obelisk-like objects and a ? Block with two Yoshi Eggs. The Egg Mark is also found in this room. This room's Bonus Tower and golden egg reward Mario with more points and coins than any of the other ones.
Names in other languages
| Language | Name | Meaning |
|---|---|---|
| Italian | Livello ardente[4] |
Fiery level |
References
- ^ Mario Pinball Land instruction manual, pg. 21
- ^ Mario Pinball Land instruction manual, pgs. 6 and 21
- ^ Nintendo Power issue 185 (November 2004), pg. 117
- ^ Super Mario Ball European instruction manual, pg. 119