Room 1-4+: Difference between revisions
(Created page with "{{image}} {{about|the level listed as "Room 1-4+" in the North American version|the level titled "Room 1-4+" in the PAL version|Room 2-4+}} {{Levelbox |title=Room 1-4+ |im...") |
m (Text replacement - "{{MVDKMMA Levels}}" to "{{MVDKMMA levels}}") |
||
| (9 intermediate revisions by 4 users not shown) | |||
| Line 1: | Line 1: | ||
{{about|the level designated "1-4+" in American and Japanese regions|the level designated "1-4+" in other regions|[[Room 2-4+]]}} | |||
{{about|the level | {{level infobox | ||
{{ | |||
|title=Room 1-4+ | |title=Room 1-4+ | ||
|image= | |image=[[File:Room1-4+ MvsDK MMA.png|256px]] | ||
|code=1-4+ | |code=1-4+ | ||
|world=[[Mini Mayhem]] (Plus Mode) | |world=[[Mini Mayhem]] (Plus Mode) | ||
| Line 11: | Line 10: | ||
|after=[[Room 1-5+|>>]] | |after=[[Room 1-5+|>>]] | ||
}} | }} | ||
'''Room 1-4+''' ( | '''Room 1-4+''' (titled '''Room G-4+''' in the British English version) is the fourth Plus Mode course of [[Mini Mayhem]] in ''[[Mario vs. Donkey Kong: Minis March Again!]]''. | ||
The course features two [[mini]]s. | The course features two [[mini]]s. | ||
==Overview== | ==Overview== | ||
Both minis start in the right portion of the course, facing right. The [[Goal Door (Mario vs. Donkey Kong series)|Goal Door]] is in the top left of the course. Upon entering the [[Warp Pipe|Pipe]] on the right, the minis will be transported to the top level, where a [[Conveyor]] should be configured with a | Both minis start in the right portion of the course, facing right. The [[Goal Door (Mario vs. Donkey Kong series)|Goal Door]] is in the top left of the course. Upon entering the [[Warp Pipe|Pipe]] on the right, the minis will be transported to the top level, where a [[Conveyor Belt|conveyor]] should be configured with a conveyor switch to carry the minis to the left. At the end of the conveyor, the player should place several [[Pink Block]]s to lead the minis to the Goal Door. | ||
===Mini Mario Card=== | ===Mini Mario Card=== | ||
The [[Mini Mario Card]] is under the top | The [[Mini Mario Card]] is under the top conveyor, on the same platform where the starting position of one of the minis is. To reach and collect the card, the minis must first warp to the top level and be carried by the conveyor in the left direction. They will soon fall off the conveyor and must land on some Pink Blocks, positioned so they lead to the Mini Mario Card. | ||
===M-Token=== | ===M-Token=== | ||
The [[M-Token]] is on the edge of the bottom | The [[M-Token]] is on the left edge of the bottom conveyor. The minis must first go to the top level and glide on the top conveyor. They must then fall off and drop onto the bottom conveyor, which, while still set to move left, will soon lead the minis to the M-Token. The conveyor's direction should be switched to right immediately after collecting the token so that the minis are not led into some [[Spike Trap|spikes]]. | ||
==Statistics== | ==Statistics== | ||
| Line 28: | Line 27: | ||
*Pink Block spaces: 20 | *Pink Block spaces: 20 | ||
*[[Warp Pipe|Pipes]]: 1 | *[[Warp Pipe|Pipes]]: 1 | ||
*[[Conveyor]]s: 2 | *[[Conveyor Belt|Conveyor]]s: 2 | ||
*Conveyor | *Conveyor switches: 1 | ||
*[[Coin]]s: 8 | *[[Coin]]s: 8 | ||
*[[10 | *[[10-Coin|Large Coins]]: 2 | ||
{{MVDKMMA | {{MVDKMMA levels}} | ||
[[Category:Mario vs. Donkey Kong: Minis March Again! | [[Category:Mario vs. Donkey Kong: Minis March Again! levels]] | ||
Latest revision as of 07:17, May 10, 2022
- This article is about the level designated "1-4+" in American and Japanese regions. For the level designated "1-4+" in other regions, see Room 2-4+.
| Level | |
|---|---|
| Room 1-4+ | |

| |
| Level code | 1-4+ |
| World | Mini Mayhem (Plus Mode) |
| Game | Mario vs. Donkey Kong: Minis March Again! |
| Time limit | 300 seconds |
| << Directory of levels >> | |
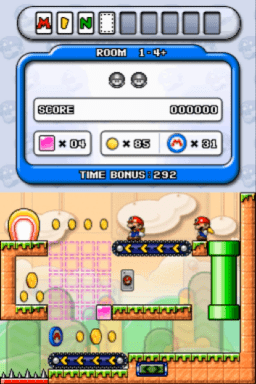
Room 1-4+ (titled Room G-4+ in the British English version) is the fourth Plus Mode course of Mini Mayhem in Mario vs. Donkey Kong: Minis March Again!.
The course features two minis.
Overview[edit]
Both minis start in the right portion of the course, facing right. The Goal Door is in the top left of the course. Upon entering the Pipe on the right, the minis will be transported to the top level, where a conveyor should be configured with a conveyor switch to carry the minis to the left. At the end of the conveyor, the player should place several Pink Blocks to lead the minis to the Goal Door.
Mini Mario Card[edit]
The Mini Mario Card is under the top conveyor, on the same platform where the starting position of one of the minis is. To reach and collect the card, the minis must first warp to the top level and be carried by the conveyor in the left direction. They will soon fall off the conveyor and must land on some Pink Blocks, positioned so they lead to the Mini Mario Card.
M-Token[edit]
The M-Token is on the left edge of the bottom conveyor. The minis must first go to the top level and glide on the top conveyor. They must then fall off and drop onto the bottom conveyor, which, while still set to move left, will soon lead the minis to the M-Token. The conveyor's direction should be switched to right immediately after collecting the token so that the minis are not led into some spikes.
Statistics[edit]
- Pink Blocks: 5
- Pink Block spaces: 20
- Pipes: 1
- Conveyors: 2
- Conveyor switches: 1
- Coins: 8
- Large Coins: 2