The 'Shroom:Issue 226/Strategy Wing

Director's Notes
Written by: Hooded Pitohui (talk)

Hello, all you readers of The 'Shroom, and welcome to the new year! I know you've been in the new year for half a month already, but, look, I'm bound to publication schedules. Anyhoo, I have exciting news to kick off the year. We have two guest sections this month. Maybe you've already read about them in the Sub-Director's notes? In case you haven't, firstly we have a fresh edition of Rising From Obscurity from Waluigi Time (talk). If you're a fan of classic Mario enemies returning, or recently got into the series and want to know the origins of some of the Mushroom World's resident species, you won't want to miss it. Secondly, we have the first-ever Strategy Wing appearance of hit indie game Deltarune, with Sparks (talk) covering a battle with a [Specil Appearance] by a [Celebrity Guest Star]. Whether you want to complete the battle [[playing on peaceful mode]] or [[violence is the answer]], BE A BIG SHOT! will point you in the right direction!
Aside from those, many of our regular features have some fresh coats of paint. You'll find a tweak to how counterattack methods are indicated in Brothership Boss Battle Guide, expanded details in the moveset tables of Pokémon Academy, and a new subsection for this edition of Killing the Killing Game Roles. Of course, with Mega Man 4 finished, your usual walkthroughs are now covering Mega Man 5, and with Yuan Shao in retreat, Lord Kong Rong is expanding his officer corps and territory this month.
That's all I have as news goes, but I'll have more for you as the year continues on! If you'd like to join our team this year, well, let me be the first to say we'd be thrilled. From hugely popular games like Super Mario and Deltarune to more niche titles like Romance of the Three Kingdoms, we cover all kinds of games. Have an obscure childhood favorite you want to write about? You'll fit right in! Give us your read on a character's history like Rising From/Fading Into Obscurity, give us a walkthrough covering multiple stages or even a single battle if you're more comfortable with a limited scope, give us short-and-sweet tips and tricks like in The Tattle Log, or break down and analyze a game mechanic or design choice. Your options are broad! If you're interested, take a peek at the red box on the sign-up page for instructions and send an application to MightyMario. I'd be happy to give you advice or input if you have questions, too!
Section of the Month
SPARKS (talk), YOU [[NUMBER 1 RATED WRITER2025]], YOU [[TWO FOR THE PRICE OF ONE]]'D FIRST PLACE! Congratulations on taking the gold for your quest to battle the Wily Capsule and for guiding everyone through the trials of the Great Conductor. Fittingly for a stage with four different game titles ending in "2", Zange (talk) takes a solid second for guiding us through tempo changes and devious rhythm-disrupting electric fish. Congratulations to Sparks and Zange alike for finishing off 2025 strong! I hope all of you readers will continue to support our writers with your votes throughout 2026!
| STRATEGY WING SECTION OF THE MONTH | ||||
|---|---|---|---|---|
| Place | Section | Votes | % | Writer |
| 1st | Brothership Boss Battle Guide | 3 | 23.08% | Sparks (talk) |
| 1st | An Overly Detailed and Funny Walkthrough of Mega Man 4 | 3 | 23.08% | Sparks (talk) |
| 2nd | Rhythm Review | 2 | 15.38% | Zange (talk) |
| 2nd | Pitohui's Pokémon Academy | 2 | 15.38% | Hooded Pitohui (talk) |
BE A BIG SHOT!

Hey there! Sparks here with a [[unique]] Strategy Wing section! If you haven't read Staff Notes, I mentioned that I recently played Deltarune and loved it very much. I'm currently in the midst of excitement, so I thought of making a short section about something from the game. Sadly, it's not a section about Ralsei (my favorite character, by the way), but ONE DAY! One day I'll write a history section about him in Pipe Plaza. That won't be for a while though... gotta wait until all the chapters release!
Instead, I'm writing a section about an encounter with a [[miniboss]]. If you haven't guessed by the few instances of bracketed text, it's about Spamton G. Spamton! A fan favorite character and one of the most interesting and funniest characters in the game, let alone chapter 2.
While progressing through chapter 2, Kris, Queen, and Noelle all enter a car to travel through Cyber City. They encounter a traffic jam that hinders progression, so Kris alone exits the car to find a solution. They enter a back alley with a dumpster. As Kris approaches, the dumpster opens up and reveals Spamton G. Spamton, everybody's favorite [[Number 1 Rated Salesman1997]]! He offers Kris a deal to become a [[BIG SHOT]], and all he needs is to see Kris's [[HeartShapedObject]]. That means a battle ensues!
Thankfully, you don't need [[Hyperlink Blocked]] to win this battle! I'll provide you with everything you need to know for the price of [[free]]!
The battle!
Time to battle against Spamton! He has three attacks at his disposal, all of which involve [[ENL4RGING]] his head:
- Deals: Spamton moves up and down outside of the box your SOUL is in, spewing out random deals out of his mouth. The deals travel in curved trajectories, some moving more along the y-axis (that's vertically!) and faster than others. The best way to avoid this attack is to stay on the left side of the screen, but make sure you don't get trapped in a corner. You may have to move to the middle of the screen to avoid such a scenario, but stay away from the right because that's where Spamton is!
- Vacuuming KROMER: Spamton begins to inhale, stretching out the box your SOUL is in a little to the right and deforming it into a trapezoid shape for the attack's duration. Like his first attack, Spamton moves up and down along the right side of the box - er, trapezoid, as he vacuums. Your SOUL also gets drawn towards the right as a result, so you have less control than you typically have. Dollar signs (KROMER) float in from the left side of the screen, all of them being drawn to Spamton. These are the obstacles you must avoid! All KROMER move slow initially, but speed up the closer they get to Spamton. You'll want to stay in the middle/right section of the trapezoid to have enough time to avoid the KROMER.
- Mini Spamtons: Spamton's toughest attack in my opinion. He sends out mini versions of himself that walk on the floor and ceiling of the box. Some of them crouch and flash white before jumping high into the air. Upside-down ones have reversed gravity. Staying in the middle will help you to avoid most of the mini Spamtons, but you'll have to move along the x-axis (horizontally) to dodge the jumping ones. I noticed the ones that leap won't do so until they get close to you, so it may help to be at the middle so that you won't get cornered by surprise. It's a tricky attack!
Here are images of all three of Spamton's attacks, in the same order I went over them in!
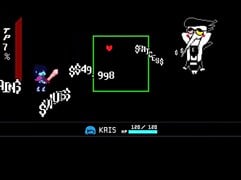
Deals so good, they hurt!
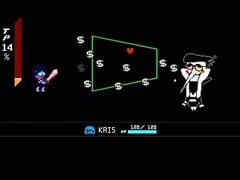
Eating all that KROMER can't be good for you.
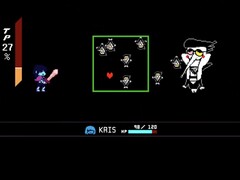
The world isn't ready for more Spamtons.


This is not an attack, but before Spamton's turn, he might say "[Press F1 For] HELP". If you do press F1 on the keyboard, an angel Spamton will fly down and heal you! This secret is also available in the console versions of the game! On Nintendo Switch and Nintendo Switch 2, press the right stick. For the PlayStation 4 and PlayStation 5 versions, press R3.
You can go about this battle two ways: by fighting, or showing mercy.
The quicker (and morally wrong) option is to battle Spamton. If you choose this route, make sure to equip your strongest weapon before entering this battle, but even if you don't, Spamton isn't much of a threat. He'll go down in about five turns. Just make sure to time your attacks well!
But if you're a pacifist like me, then you'll instead have to make choices to win this fight! Your ACT menu has three options: CHECK, DEAL, and HEALDEAL.
- CHECK involves just checking Spamton's stats. That'll all!
- DEAL allows you to make a deal with Spamton, where you'll have to select from two choices given to you. More on that later.
- HEALDEAL heals you 60 HP and has the same effects as DEAL, so it's very helpful if your HP is low. This move costs 50% TP, so you'll have to graze Spamton's attacks to get some. His deal and vacuum attacks are great ways to grind TP thanks to their many projectiles. The deal attack is especially helpful as the deals count as several projectiles, all of which are close to each other.
Correct Choices

If you want to be a [[nice guy]], you'll have to make deals with Spamton to make it through this battle. There are five main deals you must get through, and each one (except the last one) provides 20% mercy if answered correctly. Choosing the incorrect option will do nothing... and maybe cause a loss of cash.
- First deal: Spamton tells Kris about a special deal. The options are "TELL ME MORE" and "NOT INTERESTED". TELL ME MORE is the correct option here!
- Second deal: Spamton asks for a little bit of [[Generosity]]. Your two options are "GIVE MONEY" and "DON'T GIVE". DON'T GIVE is the correct option. Choosing "GIVE MONEY" will result in some of your [[KROMER]] being drained (you lose money)!
- Third deal: Spamton asks if Kris wants to be just like him and encourages Kris to take the deal. The choices are "DON'T TAKE DEAL" and "TAKE DEAL". TAKE DEAL is the correct option.
- Fourth deal: Spamton offers deal insurance for the low, low price of 1000 KROMER. The options are "BUY INSURANCE" and "DON'T BUY". DON'T BUY is the correct choice. Choosing "BUY INSURANCE" will result in a loss of KROMER.
- Fifth deal: Spamton offers 1000 Fr3e KROmer, but first he needs to see your [Account Details] and the [[Number on theB4ck]]. Your two choices here are "GIVE ACCOUNT ACCESS" and "REFUSE". REFUSE is the correct option. Choosing "GIVE ACCOUNT ACCESS" will - you guessed it - drain KROMER!
The fifth deal only adds 19% more mercy instead of the usual 20%, so Spamton will be left at 99% mercy. He then offers one last deal: the options here are "NO DEAL" and "YES DEAL". YES DEAL is the correct option. Choosing "NO DEAL" will cause Spamton to say "WRONG" before giving you a choice again. After accepting this final deal, Spamton will reach maximum mercy, and the fight ends.

Regardless of how you fought him, Spamton doesn't die. He leaves the scene in a short cutscene afterwards; however his dialogue varies depending on how you fought him. If you actively attacked him, Spamton criticizes your actions. If you spared him, Spamton instead encourages Kris to visit his [[Home-made Storefront Site]] in the [[Trash Area Closed For Repairs]].
That was goofy, wasn't it? Nothin' wrong with a funny section from time to time. Thanks for reading, and always remember to be a [[BIG SHOT]]! HAEAHAEAHAEAHAEAH!!
Brothership Boss Battle Guide
Welcome back to Brothership Boss Battle Guide, a recurring Strategy Wing section where you can learn all the tips and tricks you need to defeat the bosses of Mario & Luigi: Brothership! To start off 2026, I'll be looking at the second optional Glohm boss - Glohm Sharpcask! Because it's a tougher version of a boss we already fought against, this will be on the shorter side.
To make this boss available to fight, you must defeat Glohm Gobblick and retrieve the Ampberries from Wayaway Island. Dewey Fightem will then inform you about Glohm Sharpcask at the Color-Full Sea, Great Lighthouse Island. You don't have to fight it, but you'll get a powerful hammer if you win!
Here are Glohm Sharpcask's stats!
Glohm Sharpcask's stats
| Image | Level | Location | HP | POW | DEF | SPD | Type | EXP | Coins | Item(s) |
|---|---|---|---|---|---|---|---|---|---|---|

|
39 | Color-Full Sea, Great Lighthouse Island | 7000 | 235 | 294 | 585 | Glohm | 4000 | 1400 | Platinum Medallion |
Glohm Sharpcask's abilities
Glohm Sharpcask uses the same moves as his normal counterpart, so I'll only list the changes from the original attacks. From here on out, I'll give each attack a name instead of "Jump/Hammer Defense"! That's what the icons are for.
 Barrel toss: Glohm Sharpcask throws barrels at a faster speed. He also might delay throwing them to mess up your timing. The charge at the end is also quicker.
 Crate slam: Glohm Sharpcask's motions are much faster, so it's more difficult to strike him when he leans back.
- Barrel roll: Glohm Sharpcask rolls around more quickly.
- Barrel crush: This mighty attack is also faster, leaving a smaller opportunity to counterattack. The boss only does this attack when at low HP.
It goes without saying, but these attacks are much stronger and may inflict the Glohm status effect, as well as other status effects from the original versions. Also, Glohm Sharpcask may gain a two-hit spiky Glohm barrier after any attack ends.
After dealing enough damage to the boss, Glohm Sharpcask will protect himself, greatly reducing all damage taken and healing by 210 HP whenever it's his turn. The only way to get him out of this stance is to perform a successful Luigi Logic.
Unlike the original Sharpcask, Ecks doesn't show up to increase the boss's POW and DEF. That's good! He still gets angry at low HP though...
 Luigi Logic
The Luigi Logic is - for the most part - identical to the original Sharpcask's. The main difference is that bombs drop starting from the first use! The boss can't be too easy to defeat, no? Stack six crates on top of Glohm Sharpcask to dizzy him, allowing for all attacks against him to be critical hits temporarily. Like the original, the first successful Luigi Logic will cause the boss to tumble down conveyor belts, dealing many hits of damage and changing the battlefield.
Tips and tricks
Recommended gear
Get ready, because there's A LOT of new gear to cover!
I fought this boss after retrieving the engine part for Shipshape Island. So, I'm listing the gear you can find at the Jellyfish Island gear shop:
- Boots: Astonishing Boots/Supersonic Boots
- Hammer: Astonishing Hammer/Steel Hammer
- Wear: Astonishing Wear/Hex Wear
Supersonic Boots is four points stronger than Astonishing Boots, and also has the bonus of increasing your damage depending on how much SPEED you have. Mario typically has lots of SPEED, so they're great for him! Conversely, Steel Hammer also has four more points than Astonishing Hammer, but the damage is increasing depending on DEF instead! That means Luigi will benefit more, as he usually has more DEF. Hex Wear is two points stronger than Astonishing Wear, and also has the bonus of reducing the POW and DEF of attacked foes by 10%. Nice!
I do not recommend the Double-Edged stuff anymore. The damage is similar to what the shops have to offer, and taking damage just by attacking is not fun.
However, Conductor Island has some new gear after the Great Conductor fight:
- Great Conductor Boots: Is 16 points stronger than Astonishing Boots, and also increases SPEED by 8 and STACHE by 5!
- Great Conductor Hammer: Is 16 points stronger in POW compared to Astonishing Hammer, and also grants 7 points to DEF and 5 points to STACHE as a bonus!
- Great Conductor Wear: Is 9 points stronger than Astonishing Wear, and increases STACHE by 12!
Of course, there are other cool items to find out there of similar strength:
- Gobblick Boots DX: Still viable at this part of the game! 4 points stronger than Astonishing Boots and increases STACHE by 5. Also allows its wearer to heal 10% of all damage dealt!
- Forge Boots DX: Awarded for clearing the Jellyfish Pizza minigame on hard mode. It is 23 points stronger than Astonishing Boots, and also has the passive ability of increasing damage dealt by 30% when the wearer's HP is low.
- Adaphnikki Boots and Adaphne Boots: They have the same POW as Great Conductor Boots, but both have unique properties. Adaphnikki Boots increases damage dealt with Jump-attack combos by 30%, while Adaphne Boots increases the strength of single Jump attacks by 30%. You likely won't use normal attacks against Glohm Sharpcask, so either are fine. You can only get one of these Boots, and they're both from the Dueling Geniuses side quest. If you let both Adaphne and Technikki work together, you'll get the Adaphnikki Boots. If Adaphne worked on her own, then you'll receive Adaphne Boots instead.
- Full-Belly Hammer DX: Is stronger than Astonishing Hammer by 4 points, and also increases damage dealt by 30% when HP is full! Found inside a ? Block on Conductor Island.
- Dodgy Jump Wear DX: Found inside a ? Block in the back door of Bowser's Castle on Wayaway Island. It's the same strength as Hex Wear (two points stronger than Astonishing Wear) but also reduces damage taken by 20% if you fail to dodge an attack.
- Repel Wear DX: Found after clearing a puzzle on Morsel Islet. It's 21 points stronger than Astonishing Wear. It also has the bonus of reducing damage taken. The more enemies there are, the less damage you'll take!
- Blocky Hammer Wear DX: Found inside a ? Block on Dropplet Islet, but you'll have to take down three Glohm Shower Fish to get it. It is 9 points stronger than Astonishing Wear, but it also increases SPEED by 4 and decreases damage taken by 20% if you miss countering an attack.
Use whatever gloves and accessories you wish! Bring ones that fit your playstyle.
 Recommended Battle Plugs
So many Battle Plugs, but which ones are great for this battle?
 Anti-Glohm Specialist: The boss is Glohmed, so why not have a Battle Plug that makes all normal attacks + counterattacks stronger? Admittedly not as effective as it was for the Glohm Bowser fight, as it doesn't affect Bros. Attacks.
 Easy-Peasy Counters: Dodging these fast and powerful attacks isn't easy. Let's make them easier with this Battle Plug!
 Notdroppin: Most attacks from Glohm Sharpcask are big, single hits of damage. No matter how strong they are, you'll still be standing!
 Protectus: Has only 3 uses before it has to recharge, but completely nullifies all damage taken, no matter how many hits there are in a single attack! Only one charge goes down per enemy turn (if you get hit).
 Auto Ampberry: Glohm attacks, huh? With this Battle Plug, you won't need to worry about using up turns to cure yourself!
 Boomerang Items: Use your best items to recover your stats!


 Auto Mushroom, Auto Syrup Jar, and Deluxe Auto: Any of the first two combined with Deluxe Auto ensures top notch recovery while not using up turns!
 Auto 1-Up: If a brother was to get KO'd in the battle, this Battle Plug will get them back in the fight without delay!
 Waitaminnit: This Battle Plug isn't available until the end of the game, but if you're past Jellyfish Island, then you might have this awesome Battle Plug. It allows an additional turn! However, it only has three uses. Make them count by equipping this when the boss is dizzy!

 Bros. Boost and Performance Bonus: Make your Bros. Attacks stronger while using the same BP price! As long as you get "EXCELLENTS!" that is. Combine them with Waitaminnit and unleash mayhem!
Other things
I recommend fighting this boss before you storm Fortress Zokket the second time. You'll be at the recommended level (39) and have stronger gear, so this fight will be a little easier, but still tough.
If you're feeling brave, you can test your might while you're in the middle of the Gulchrock Sea. If that's the case, use the recommended gear I provided for the Glohm Bowser fight:
- Boots: Masterpiece Boots, and Double-Edged Boots from the shop, but High-Heal Boots DX and Gobblick Boots DX are better
- Hammers: Masterpiece Hammer, Double-Edged Hammer from the shop, but Bros. Hammer DX is better
- Wear: Masterpiece Wear from the shops, but Full-Belly Wear is better

If Glohm Sharpcask has a spiky Glohm Barrier, you won't be able to jump on him until it's rid of. If he performs his barrel roll attack while he has one, you won't be able to counterattack him to end the attack early. You'll have to get through the entire attack without landing on him. Due to the boss's high damage and multiple hits, Notdroppin won't reliably save you from demise. I recommend equipping Easy-Peasy Counters just in case this scenario occurs, just to be safe.
Glohm Sharpcask's barrel crush attack (with the bomb) is by far his strongest attack; I've seen it deal 351 damage to Luigi! LUIGI! It's definitely wise to have Notdroppin equipped, especially if you're fighting this boss as soon as it's available to battle against.
Use Bros. Attacks with many hits to remove Glohm Sharpcask's shield and also deal lots of damage to the boss at the same time!
Out of Ampberries? Use Refreshing Herbs instead! They won't always work, but they're better than nothing.
You don't have to fight this boss! If you can't win, just continue the story. No big deal! If you ever do want to win this battle easily, just wait until the end of the game.
Another Glohm Boss down! I'll continue this section with the boss in February's issue. The Extension Corps will be next in line! Thank for reading, and have a great day!
Killing the Killing Game Roles
Welcome back, readers, to another edition of Killing the Killing Game Roles, the section where we analyze various player roles from past Mario Boards Killing Games in hope of answering the question, what makes for a good role? By analyzing what's come before, we can discover some tricks and tips that could even help you design your own roles!
Early last month, Hooded Pitohui (talk)'s Randomizer Killing Game 2 saw its conclusion, and it was a phenomenal, bombastic finale at that. RKG2 is a very commendable game from all angles, including its case design, introductory nature for new players, and stellar playerbase that collaborated to make a cast of stand-out characters. With its recent completion and this extensive praise, you might assume my next step would be to pick one of the player roles from the game to analyze. After all, this section's already covered two roles from Awards Randomizer Killing Game, so what's another randomized role for the docket?
Well, we won't be quite covering a role from RKG2 today, although it might crop up with some surprising relevance later. Instead, for this month, we'll be lending our analytical eyes to yet another role from the Awards Killing Game 3 lineup - one that I have gone on record to say was one of the strongest roles in the entire game. Does this scrutiny hold up today? What can we learn about design tenets for KG roles through it?
Try not to get too scared, dear readers, as this month's section becomes a little more... ghastly.
AKG3 - Ultimate Ghost
- You're Spooky, the young ghost girl from the mansion at the top of the hill. Tired of waiting for brave, curious, or stupid souls to wander into your mansion, you've come out to New Wikisville in hopes of convincing someone to come and explore your home. In a turn of events, you're the one who's been trapped, and now you need to put your otherworldly skills towards escaping.
- If there's one thing you excel at, it's manipulation of the geometric space behind doors. Each night, you can specify one doorway between two rooms to alter with your ghostly powers. You'll be able to specify another door on the map which your altered door will connect to. Anyone who passes through the altered door (yourself included) will step through it into the location you linked it to, rather than their intended destination.
- As if you weren't already able to cause enough chaos, while moving around the map, you aren't limited to taking stairs and elevators when moving between floors. As a ghost, you can simply ascend or descend at will and phase through the floor. There are certain areas you won't be able to enter with this ability, such as locked rooms requiring special keys, and you won't be able to take any physical objects with you.
- Finally, with the special talent you possess, you can proceed to an altar and select one player to curse. Your curse will reduce their stamina and speed stats by two points each for a night. Since you only use this power when you're desperate though, you'll have to survive two nights before you can use this power.
- As a ghost who excels in scaring people, you're exceptionally stealthy. As a child who's been shut away in an isolated house for years, though, you're neither very strong nor social.
- FA: You're scary, most definitely not cute, and it's important that people know that. Be sure to explicitly attempt to scare someone every night.
Stats
- Strength - 1
- Stealth - 5
- Stamina - 3
- Speed - 3
- Social - 2
The Ultimate Ghost is blatantly pulled from Spooky, the titular character from Spooky's Jump Scare Mansion. If you're unfamiliar, I'm sure you can guess the premise just from the title. Like last month's Memory Manipulation Specialist, this role was another one to see prominence in the Peach's Castle game; unlike last month's, it survived to the merge map, Eternal Star, though its owner died at the very start of the Eternal Star game. The Ultimate Ghost was possessed (haha) by Dupe Face, a user who's no longer around but is most recognizable for his portrayal of Skullgirls's Beowulf in Awards Killing Game 2. Given that he was routinely partnering with the guy who had the Baba is You role, it's probably a blessing he died during that first night of merge.
That's enough preamble! Let's hop in and discuss what made this role so strong at the time.
General Overview
Unlike a few other roles we've looked at over the course of this section's life, I'd argue that the Ultimate Ghost doesn't neatly fit into a particular niche seen in Killing Game role design. There isn't one exact strength or aim to the role; instead, it incorporates multiple separate design concepts into one: map manipulation, movement possibilities, and debuffing. All three areas of design are pretty standard KG staples at this point, but are rarely mashed together in such a way. This kind of versatility inherently makes for a fairly powerful role, especially when many other AKG3 roles were designed with a singular niche in mind.
Now, there is something that needs to be discussed about how the Ultimate Ghost ended up functioning in practice. What made the role so extremely powerful to rank among Baba? Over time, with host leniency, some aspects of the role abilities ended up... changing. Rather than phasing up and down through the floor, eventually the Ultimate Ghost was able to move through any wall on the map. This made even having a map layout with walls a moot point. I identify this without any pointed commentary at my cohost; on-the-spot calls need to be made about role abilities for any host, and especially for a first timer, the call may end up erring in a more disruptive direction. Still, this was a notable aspect of the Ultimate Ghost by the time the game had wrapped up, and this requires some discussion.
Because the power leniency happened separately from the rolecard's written language, I won't be treating the role that way in the ability application portion; as always, we'll discuss the role purely as written. However, this gives me the chance to highlight the importance of pathing in KG.
Pathing is how a player identifiably moves around the map at night. When a player goes from point A to point B, another player might spot them, or they might leave some evidence behind, such as a specific smell or footprints. These markers are vital to the construction of a case, because you need to know vaguely where your other players were and when to ultimately build out a timeline. With how the Ultimate Ghost eventually turned out, they were able to move seamlessly between rooms, without concerns about doors, and without leaving any visible evidence behind. In essence, pathing them became much, much harder. They could still leave evidence somewhere or have an eyewitness spot them, but the standard hallway pathing no longer applied, nor did the timelining that typically comes with it.
Ultimately, when constructing a potent role ability, an important question is this: does this role ability act in such a way that it disrupts my hosting responsibility to build a solvable case? To be clear, this doesn't mean a player's role can't throw a large wrench into the solving efforts; rather, it's worth saying that KG case balancing between culprit and investigators is a tricky one, and a role that completely negates a key case component like pathing can cause that balanced scale to become unevenly weighted.
Are there ways to rebalance this kind of role ability overall? Absolutely, which will be discussed later on.
Ability Application
Right, yes, onto the rolecard proper. Firstly, we have the ability to swap two doorways on the map, causing one room to lead to another unexpectedly. There's quite a good number of use cases for this ability. For instance, if you want someone to walk into a surprise trap kill you've set, you could link one door to that trapped room. Or if you feel compelled to disrupt the nights of several players, you could intentionally guide people away from a room where an event was set to take place. My favorite utilization of this I can think of is purely benefitting yourself; let's say a magic MacGuffin was found in a room all the way in the basement, and you want to get there first. Just turn the nearest door into a warp down there, and the item's all yours. There's a ton of versatility with how to handle this.
The one aspect I would say needs better clarity is how the door works as a two-way entrance point. If you step back out that door, do you find yourself back where you started, in front of the false door? Or do you enter the hallway outside of the new room? The answer would change your strategy for interacting with the door. Minus World's Killing Game 9 actually had a role with a very similar ability, and the door warp worked in both directions, alongside some extra time consumption. That's not really important, other than to say that I should pull in a KG9 role eventually.
Next up, there's the ability to move between floors seamlessly. With this being an unlimited resource during the night, this grants the Ultimate Ghost the boon of very expedient map travel. While some other players might have to go through the hall, go down the stairs, and then go through the hall again to get to a room, the Ultimate Ghost can just drop right in! This also comes with the element of surprise; if you'd prepped a kill attempt in one room, you could phase in whenever you wanted to enact it, and then dip just as quickly. Even with the intended limitations of just being between floors, this is still a markedly potent trait.
Lastly, there's the ability to curse a player at an altar, thereby lowering their speed and stamina. This is probably the weakest component of the Ultimate Ghost's toolkit, for a few reasons. The power itself isn't instantaneous like the rather two; instead, you need to "proceed to an altar" first. What an altar is isn't really specified by the rolecard. Is it something found on the map, or something the player needs to build themselves? Or is it just in there for flavor, which would honestly be more confusing? Then there's the fact that it impacts speed and stamina stats specifically. As I've mentioned briefly before, stats have always sat in an odd place in KG, where they can be critical for some interactions if the host really cares, but more often than not they're a nonfactor. In KG3 specifically, the speed debuff would cause someone to start their night later, which I guess is a fair enough debuff? If the curse more explicitly made the player sluggish or weak, though, I think this role ability would see more purpose.
Environmental Functionality
What environmental considerations are there for the Ultimate Ghost? For this role to function as intended, the map absolutely needs two things: floors and doorways. This might seem like a "well duh", but some KG maps have been flatter and much more open in their design. For instance, Awards Killing Game Odyssey's Circitus Island was primarily played on level ground, with plenty of areas near the shore and jungle that weren't technically rooms with doorways. The Ultimate Ghost would struggle with its key strengths there, compared to a map like, say, Awards Killing Game 4's Deimos Matrix Corp, which had multiple floors and was more densely packed with rooms.
The other aspect is the altars, which again, go without clarification on the rolecard. I think it'd be cool if your map had an altar hidden somewhere though, or some clear components stashed somewhere to make an altar yourself. Make something more diegetic that way.
Drawbacks & Balances
What is there to keep the Ultimate Ghost in check for some of these more powerful traits? When it comes to the door swapping, there is the natural limitation of one door per night, but there is also the fact that it impacts the Ultimate Ghost themself. This isn't inherently a drawback, as I mentioned in its practicality previously - but it could still bar the Ghost from wanting to get to a room of interest to them, and they might have to bite that bullet for the sake of laying a good trap.
The movement between floors has some more inherent limitations to it. Not being able to get into special areas or specific locked rooms is for sure significant. Really, this caveat was added to dissuade a player from accessing something narratively important ahead of time, or otherwise cheesing their way into a room with an important item. I'd be curious to know if this applied to any locked room on the map, or just the ones the host deemed too important to give access to early.
There's also not being able to take physical objects between floors. Now, I would assume this to mean items such as weapons or large pieces of furniture cannot be smuggled between floors, which is a very important balancing tool. Imagine if someone could instantaneously phase in and out of the Gun Room to get as many guns as they wanted, whenever they wanted, with bizarre pathing. This limitation is vital in ensuring this role isn't already more busted than it is. I do wonder what else counts as physical items, though. What about clothes? Lore notes? Smaller, "insignificant" items like jewelry? There isn't an obvious exact line, though the intentionally still remains clear.
The altar ability has the unique edge of only being accessible from Night 3 onwards. Do I think the power is strong enough on its own to justify this? Likely not, but it does mean an already-stacked role needs to wait a little longer to have additional benefits, so I won't complain too much.
Lastly, there's the Forbidden Action, and it's... I mean, it's not really a factor at all. Once upon a time, there used to be many more "you must do [x] thing once per night" FA's, and they've honestly fallen out of favor for me. Many of them are tacked onto the role to give the player something extra to think about, as opposed to something that tactfully restricts the role abilities themselves. This FA of "you must scare someone once per night" is hardly anything. Just yell "BOO" at some point to finish your chore and move along.
Player Responsibility
For a player's responsibility with this role, there isn't a ton of intricacy that they need to navigate. They'll have to keep their FA in mind, and they should reasonably remember the restrictions on their floor-to-floor movement, unless they want to be disappointed when their newly-acquired knife doesn't come with them. If the altars mentioned by the third power are meant to be created by the player, they'll also have to navigate setting up an altar of some kind on the map. This responsibility could be heightened if the altar was intentionally hidden and needed to be found, or if making an altar had specific qualifications that needed to be upheld. Still, there are not any resources to keep track of, or any other obligation to play the game in a particular way.
Host Responsibility
The host does have a bit more responsibility with this role, but honestly, not too much more than the player has. The host will need to make sure that the restrictions on the floor movement are being honored, and will have to ensure that the warp door functions correctly for all players who attempt to access the room. Arguably, the greatest responsibility for a host managing the Ultimate Ghost is ensuring that the case is still solvable if they end up landing a kill - which is certainly easier as-written, rather than how the role ultimately played out.
Future Iteration
Appearing for the first time in Killing the Killing Game Roles, we'll be looking at a different role from later on that essentially reiterated this role's core concepts, in a way that feels helpful for discussion. You'll remember paragraphs ago when I mentioned that Randomizer Killing Game 2 would have shocking relevancy to our analysis today. As it turns out, both myself and Cloudwalker (talk) started out the game with the following role trait:
- +You can freely pass through walls. This will leave ectoplasm on the wall where you passed through, though it will not discernibly be yours specifically.
What's this? Passing through walls with a ghostly flair? Why, that sounds awfully familiar!
In sincerity, I doubt this specific submission was made in memory of the Ultimate Ghost, a role that is, by this point, six years old. The parallels still remain, though, and I want to highlight this new iteration on the role concept because of an issue it helps to correct. See, this trait allows its user to move through any wall they encounter, without limitations on even locked rooms - a truly powerful ability, if earlier discussion is to be believed. So what makes this role much more reasonable balancing-wise?
Simply put, it's the visibility of the role. The Ultimate Ghost's wall slipping was invisible, leaving no trace that the movement ever happened. With this role trait, though, ectoplasm is left behind, allowing for somebody to investigate the role use during the day. Even if a player encounters ectoplasm on the wall and has no idea what it could be about, they might investigate the next room over, discover matching ectoplasm on the opposite wall, and then deduce what the nature of the ectoplasm was. Additionally, though the tell is there, a clever ghost might find a way to disguise the ectoplasm after moving through the wall, or warp from an unexpected nook or cranny where the ectoplasm isn't easily seen. The nature of this rolepower can be obscured with the right actions. Still, the evidence left behind allows for more certainty when trying to path the player who used it.
I would argue this is altogether an improvement on what the Ultimate Ghost's movement between rooms came to be in AKG3. This certainly isn't the only way to recalibrate the role, but for my money, this is one of the best ways to go about it. KG is, first and foremost, a game about solving murder mysteries. An adjustment like this allows you to incorporate satisfying, tangible clues into your case writing.
Overall Thoughts
In conclusion, the Ultimate Ghost is a role with a myriad of different strengths, though its legacy remains mostly for what the role became through circumstance. As RKG2 demonstrates, oftentimes these big ideas just need a little tweak to make them stand out as well-crafted and balanced while still retaining their uniqueness. If you're looking to create a role with special mobility traits, remember that a restriction or a tell are a surefire way to maintain a sturdier role balance overall - and that a KG player will almost always enjoy a little challenge in how to use their roles in clever ways.
That’s all for this month. Tune in next month for more Killing Game goodness!
Rhythm Review
Hello and welcome back to Rhythm Review! This is Zange, and I am eagerly awaiting the announcement of a release date for Rhythm Heaven Groove!! Very thrilled for the new game, y’all. Anyways, last month we covered Stage 7 of the original Rhythm Tengoku for the GBA and all of its tricky sequel glory. This month we are putting a nice little bow on this chapter of Rhythm Review with Stage 8, which happens to be the final stage of the game! I’m a little sad that we’re already here but that means we’re about to move to rhythm minigames that all have official English titles so I can’t complain too much.
As a reminder: In most Rhythm Heaven games, a stage consists of four rhythm minigames, followed by one remix, in which all the other minigames in the stage are put together in a new way to new music. However, Rhythm Tengoku is weird and has five minigames in each stage instead of four, and there is still a remix. Let’s jump in!
Bouncy Road 2

We’re starting off the set with Bouncy Road 2! Those balls just keep bouncing, dang it! Much like the original Bouncy Road, you hit the D-pad and A buttons to help balls complete their travels down a path once the balls get to the respective poles.
Gimmicks
In the original, there were only two speeds a ball could travel: fast and medium. This sequel adds the very slow balls in, meaning you really have to pay attention to the speeds at which they’re travelling down the path. Additionally, there are now more clusters of two and three balls travelling down at a time.
How to Get That Superb
The criteria for getting a Superb here is pretty similar to the original: You need to have good timing when it comes to the clusters of multiple balls, and just have good timing overall so that a majority of the balls make it to the end of the path. The clusters might throw you off your timing a little bit, so getting the Superb might take a bit here.
Difficulty Rating
Hooo boy I forgot how tricky this one is… We’ll call this one a 3/5.
Toss Boys 2

Up next, we have Toss Boys 2! Those cute, color-coded tossers are back and ready to train for the Toss Championship! Like in the original Toss Boys, you’ll hit either the A button, the B button, or the D-pad to toss the ball between these three friends depending on whose name is called out. Train your way to tossing excellence!!
Gimmicks
Nothing new is introduced gameplay-wise, however, the toss patterns are a bit more complicated here than they were in the original, with the toss techniques appearing more frequently. Stay sharp out there!
How to Get That Superb
The Superb criteria here is exactly the same as it is in the original: have good timing on the normal tosses, as well as all of the toss techniques. If the toss techniques were giving you trouble in the original, it may take you a few extra tries to get the Superb here, but otherwise this one is fairly simple.
Difficulty Rating
This really isn’t that much harder than the original, so we’ll give it a 1.8/5.
Polyrhythm 2

Moving on, we have Polyrhythm 2! We’re back in the Widget factory, and there’s more objects that need to be transported! Like in the original, you’ll hit either the A button of the D-pad to repeat the rhythm presented to you to help these red rods get to their destination. This one starts out easy, but very quickly devolves into rhythmic madness!
Gimmicks
You will immediately notice that the song tempo is considerably faster in this sequel. Additionally, there is much more of an emphasis on hitting the offbeats here. This is also one of the few rhythm minigames that builds on itself: in the beginning, you are making inputs only with the A button. By the end, you will be required to hit different rhythms with the A button and the D-pad.
How to Get That Superb
Full disclosure: unless you either: a. Have an EXTREMELY good sense of rhythm, or b. Have prior experience as a drummer, pianist, or something else that requires you to do different things with both hands at once, you are nooooot getting the Superb on this for a while. One of the criteria is literally that both of your hands need to be able to work independently of each other when it comes to the different rhythms. (The other is that you need to be consistent in hitting the offbeats.) It may take you a lot of practice, but getting a Superb here is doable.
Difficulty Rating
This one’s definitely a doozy… Dare I say, it’s worthy of a 3.7/5.
Spaceball 2

We now go to Spaceball 2! We’re back out in space hitting baseballs for funsies! Like in the original, you’ll hit the A button to hit baseballs in rhythm, while paying mind to the highballs. Steel drums and baseball have never been cooler…
Gimmicks
Remember how in the original the camera would zoom in and out at various points? Well now the camera is zoomed out for a majority of the time! Additionally, the second part of this rhythm minigame involves you constantly hitting balls at high speed, as the tempo changes to be very fast and only continues to get faster until the end.
How to Get That Superb
Okay, pretty straightforward Superb criteria this time as well: You need to have good timing on your hits during the zoomed out portions, as well as during the second half when it’s extremely fast. It might take a few tries, especially because the speed in the second half is likely to throw people off, but getting the Superb is very doable here.
Difficulty Rating
This is a really weird one to rank because on one hand, it is quite a bit harder than the original but on the other, the grading for a Superb feels really lenient… We’ll give this one a 2.8/5.
Sneaky Spirits 2

The last normal rhythm minigame in the set is Sneaky Spirits 2! Time to go ghost hunting again! Like in the original, you will hit the A button on the 8th beat of a set in order to shoot an arrow at a ghost to capture it. However, beware of tempo shenanigans and ghosts who like to hide!!
Gimmicks
Ooo boy, things really get fun here. So, there are ghosts that won’t show up until the last few beats, as well as ghosts who will disappear for the last few beats before you need to shoot them. The tempo changes also get real fun, as there are a few rounds of reeeealllyy slow ghosts as well as some really speedy ghosts. Having a good internal sense of rhythm has never been more important.
How to Get That Superb
So, fairly straightforward Superb criteria: You need to be able to have a good sense of internal rhythm, which includes being able to accurately hit the ghosts that disappear in the last few beats before you’re supposed to hit them. You also need to be able to adapt to the tempo changes, especially the very slow parts. It might take some practice, but getting a Superb here is very doable.
Difficulty Rating
Another weird one to rank because it doesn’t feel all that different from the original… We’ll give it a 2.3/5 because some of those fade-outs are on the tricky side.
Remix 8

At last, we’ve reached the final remix in Rhythm Tengoku! This is meant to be a true test of your rhythmic skills, and it really does feel like it from the moment you start playing. In a way, everything up until now has been leading up to this!
Gimmicks
For once, there’s gimmicks here that weren’t previously featured in a rhythm minigame! Two very important things to go over here. So you remember the Flow gauge from Karate Man? At one point during this remix, it goes away entirely, and there’s a visual change with the rest of the screen as well, and you’re able to hit anything at any time from that point forward! Additionally there’s a few segments of Rhythm Tweezers where the hairs are covered up by a special sign, and you have to rely on your own memory in order to repeat the rhythm back. Why they didn’t just put that gimmick in Rhythm Tweezers 2 and then bring it back for this remix, I couldn’t tell you…
How to Get That Superb
Saying the same thing I always say, every time a remix shows up: Because this is a remix, it’s a lot harder to determine where the line lies between a Superb and an OK rating. I will not sugarcoat this: Remix 8 is a very difficult remix, and it took me many tries to be able to get a Superb on it myself. The best thing I can say here is practice this remix, as well as the rhythm minigames and their sequels that appear here, and you will get the Superb with enough time.
Difficulty Rating
Woof. Certainly a doozy of a final remix we have on our hands here… I believe this challenge is worthy of a 4/5. Pretty sure there’s triplet beats in some of those Rhythm Tweezers sections and honestly, the Rhythm Tweezers segments alone justify the score here.
Final Remarks
Man, Nintendo and Tsunku really gave us a challenge of a final set in the game, huh… But, we did it! It’s over! We’ve gone through an entire game in the Rhythm Heaven series, and that’s something to celebrate in and of itself. If you’ve been playing along with this guide, give yourself a pat on the back! If you’ve just been reading along, give yourself a pat on the back too because that means you read through all my yapping which is its own achievement!
This section will be taking a break next month in order to give myself time to adjust to new hardware and mechanics for the next game, but we’ll be back in March for Stage 1 of Rhythm Heaven for the Nintendo DS!
Rising From Obscurity
Written by: Waluigi Time (talk)
Hello there 'Shroom readers, and welcome to Rising From Obscurity, the section where I very occasionally look at Mario characters that disappeared and then came back. The Super Bowl is coming up in a few weeks for those of you are interested in that, so I was inspired to take a look at one of my favorite Mario enemies, Chargin' Chuck!

Chargin' Chuck was introduced in Super Mario World in 1990 as a pretty prominent enemy, appearing in 23 of the game's 70ish levels (there's a whole thing on the wiki's page with different numbers depending on what you actually count and I'm not going to go into all that). They're pretty interesting there as more durable enemies than what had appeared in the platformers to date, and with a number of different behaviors throughout the game. With the 90s arguably being the peak of other forms of Mario media, Chargin' Chuck made a number of appearances outside the games in Super Mario-kun, the Nintendo Adventure Books, Super Mario Adventures, and of course the Super Mario World cartoon. Inside the games, though? Aside from showing up as a boss in Yoshi's Safari, not really anything! They later appeared in a single level in World-e of Super Mario Advance 4: Super Mario Bros. 3 in 2003, one which actually did manage to make it out of Japan, but after that, they faded into obscurity like so many of the other enemies introduced in World...

Until ten years later, when they went from a 2D world to a 3D world - Super Mario 3D World, that is! Chargin' Chuck's transition to 3D was pretty smooth, only losing a little bit of durability (going down in two hits rather than three). The various behaviors they had in their debut game disappeared, leaving them only to charge at the player, per their namesake. I'm assuming Nintendo didn't want to potentially confuse players by having one enemy design behave differently in different levels. Also, we got to see what they look like without their helmet on! They returned as enemies in Captain Toad: Treasure Tracker, and jumping ahead a little bit, Super Mario Odyssey, but we like variation in this section so how about getting into other roles?
Chargin' Chuck made the jump to spinoffs fairly quick from there, following up their Treasure Tracker appearance with a boss role in Mario & Luigi: Paper Jam in 2015, going on to appear in both of the AlphaDream remakes. They also got a couple of Mario Party appearances up their sleeves, primarily as obstacles in minigames in Super Mario Party and Jamboree. And not content to just show up in Mario & Luigi, they were also enemies in Paper Mario: The Origami King, although sadly they only appeared as Folded Soldiers, so we don't know what paper Chucks look like yet. You know, if they wanted to bring back partners in the next game, a Chargin' Chuck partner would be really cool... Just saying...

And that's all well and good, but in 2021, Chargin' Chuck became playable for the first time (unless you count Odyssey's capture) in Mario Golf: Super Rush! You know, the sport that Chargin' Chuck is famous for playing! It's such a weird pick but I'm not complaining at all, it's funny. If they can throw baseballs in 1990 they can play golf in 2021. The Chargin' Chuck quest to dominate all Mario sports continued with being added as a driver in a 2022 update to Mario Kart Tour, and returning in Mario Kart World as well! Aside from a playable role, Chargin' Chucks are also obstacles in the latter game, bringing back some of the alternate behaviors from Super Mario World which is pretty cool. As far as I can tell, that's the first reference to any of them since Advance 4.
And that brings us to today, because there haven't really been any brand new Mario games since then (what, did you expect Chargin' Chucks in Bananza?). I'd say going from being a pretty forgotten enemy to being playable multiple times in recent years is pretty good, wouldn't you? And who knows, maybe Chargin' Chuck's quest to play all the sports will continue with Mario Tennis Fever in about a month! They still haven't revealed all the playable characters yet, it could happen! (P.S. Nintendo, please don't embarrass me by releasing a Direct with the rest of the roster between the time that I wrote this and the release of this issue, thanks.) [EDIT: Dang it.] I don't expect Chargin' Chuck to be a constant roster mainstay, but hopefully the funny football guys continue to stick around.
Pitohui's Pokémon Academy
Written by: Hooded Pitohui (talk)
Welcome, welcome. I trust you've kept well over the turning of the year? Consider this your reminder to check any dates you write today. Don't allow the lingering specter of 2025 to haunt you throughout 2026! It is best that you dispense with your day-to-day grudges and regrets from last year, lest you attract spirits other than those lingering in your cabinets after those New Year's Eve celebrations. You see where this is leading, yes? For this session, the subject of our discussions shall be a Ghost-type. As suggested to me by an octopus of some sort I met at the seaside, I have brought a Cursola, the freed spirit of a deceased Corsola.

|
The following information applies specifically to Pokémon Sword and Pokémon Shield V 1.3.0+, the latest games in which Cursola is available. | 
|
The standard glossary follows below, should you need to consult it. If you are familiar with our terminology, please do skip it and we will get on with the lecture promptly!
Base Stats: Base stats are the values associated with a particular Pokémon species, and are the same across every individual Pokémon of a given species. You have no influence on them. You can think of them as traits tied to a species. A chimp isn't ever going to be able to get as good as digging as a mole will be, and, likewise, an Abra is never going to have the defensive prowess a Shuckle has.
Individual Values (IVs): Individual values, as their name implies, are associated with individual Pokémon. They range from 0 to 31 in each stat, with 31 being considered a "perfect" IV and higher numbers corresponding to different stats. Magikarp A and Magikarp B will have the same base stats, but they may very well have different IVs. To stick with the animal analogy, one mole may be born with larger claws than another mole, and that first mole is probably going to have an easier time digging through dirt than the latter. Individual values are set in stone, strictly speaking, but you can use Hyper Training (from Generation VII onwards) to functionally get a perfect IV in a stat.
Effort Values (EVs): Effort values are the one thing you can easily change. A Pokémon can earn, primarily through battling, but also through means like the use of certain items or mechanics like Super Training, up to a total of 510 effort values, with up to 252 in any given stat. To finish off the animal analogy, no matter what kind of claws a mole is born with, moles who have more experience digging are probably going to be better at digging than moles which have never dug.
Nature: A Pokémon's nature is, more or a less, a stat modifier with a name meant to make it sound like a Pokémon has some personality. Natures will raise one stat by ten percent and lower another stat by ten percent. Some natures raise and lower the same stat, canceling out the effect and leaving stats unchanged. Natures can be functionally changed with the use of special mint items from Generation VIII onwards.
STAB: STAB stands for Same-Type Attack Bonus, and refers to the boosted power of moves that match the type of the move's user. To illustrate this, consider the case of a Lombre, a dual-type Pokémon which is both a Water-type and a Grass-type. Any Water-type moves Lombre uses will have their power boosted by 1.5x, and any Grass-type moves Lombre uses will, likewise, have their power boosted by 1.5x. (There are circumstances where this does not apply, and, while the 1.5x multiplier is typical, some games use other multipliers.)
Bulbagarden Archives: Not a term to be defined, but the source of many of the images used in this section. I thank those who maintain it as a resource.
For more information on the terms defined here and how you can raise Pokémon, feel free to consult this guide. It is written with Pokémon Scarlet and Violet in mind, but its broad principles are applicable through many of the main series games beginning with Ruby and Sapphire.
Beginning with Cursola's base stats, you'll immediately note its massive special attack. To put into perspective how high it is, Cursola ties Legendary Pokémon such as Eternatus and Therian Thundurus, as well as Mega Evolved Pokémon such as Mega Camerupt and Mega Sceptile. To go along with this striking special attack, Cursola's special defense is only 15 points lower, at 130. Taken together, these give Cursola the option of avoiding physically-oriented foes and emerging only to break through foes who rely on their special attack, but let's not get ahead of ourselves. Cursola's next-highest stat is its attack stat, and that presents... an issue. It would be unwise to invest in both special and physical attack while neglecting Cursola's defenses, and the case for using physical attacks when Cursola can deal much more damage with special attacks is... situational at best. A high attack stat also leaves Cursola vulnerable to Foul Play, a Dark-type move (one of Cursola's weaknesses!) with power scaling to the target's attack stat. Unless you plan to raise a very unorthodox Cursola, that high attack is not only useless but detrimental.

Cursola's remaining base stats are all quite poor. Its speed and physical defense are so low that it's vulnerable to being taken out by a physical attacker before it can make use of its great special attack. Clearly, we need to address this vulnerability, as well!
Cursola's slowness is easiest to address, so let's begin there. Cursola is, mercifully, slow enough that it can take advantage of Trick Room, a move which allows slower Pokémon to move before faster Pokémon. Few Pokémon will be slower than Cursola, so by putting it on a team with a Trick Room user, we can allow it to strike before its opponents to, ideally, knock them out before they can act. Trick Room isn't foolproof, however. Beyond the issue of needing to set it up and maintain it, priority moves such as Shadow Sneak and Sucker Punch can bypass its effect, which, given those are both physical moves of types supereffective against Ghost-types, particularly threaten Cursola! There is no way around it. We need to increase Cursola's bulk and find a way to deter physical attackers.
In order to do so, we'll invest a full 252 EVs into Cursola's HP to aid it in withstanding all attacks and into Cursola's special defense to make it extra difficult for special attackers to scratch it. Invest the leftover EVs into defense. At this stage, you might be wondering we aren't investing more into defense when it's the stat most in need of improvement. Unfortunately, Cursola's defense is too low for investment to make much of a difference. Even with a maximum IV and maximum EVs in defense, Cursola will still crumple like a paper fan when hit by any physical attack. It's better to reinforce its other defensive stats, and to seek out an alternative method of protecting it from physical attacks. On the other hand, Cursola's special attack is already high enough that we can make do without EV investment. It would improve its damage output, yes, but that improvement would mean little if Cursola can't take at least one hit in the event if fails to KO a foe with one attack.
Circling back briefly to the problem of Cursola's high attack, we can partially address the issue by ensuring Cursola has a zero IV in attack. This will drop its attack (nearly) as low as it can go, somewhat mitigating the risks of Foul Play. Ideally, you should aim for a zero IV in speed to make the most effective use of Trick Room, as well. It can be difficult to breed two zero IVs onto a Pokémon, and there is no Hyper Training equivalent to lower IVs, so if you must choose between one, get the zero IV in speed. Foul Play is common, but still restricted to certain opponents. Trick Room and Cursola's speed stat will affect all of its battles!
Carrying on with the importance of lowering Cursola's speed, I suggest a Quiet nature. This will drop Cursola's speed, again netting the maximum benefit it can gain from Trick Room, while giving its special attack a slight boost to offset the lack of EV investment.

|
Name: | Cursola | Base HP: | 60 | |
| Category: | Coral | Base Attack: | 95 | ||
| Type: | Ghost | Base Defense: | 50 | ||
| Abilities: | Weak Armor | Base Special Attack: | 145 | ||
| Perish Body | Base Special Defense: | 130 | |||

|
Base Speed: | 30 | |||
Now, Cursola has access to two abilities. Weak Armor is easier for Cursola to access, but it's terrible for Cursola. Weak Armor causes Cursola's defense, already poor enough as-is, to drop when Cursola is struck with a physical move. To compensate, Cursola's speed rises... which is counterproductive for our purposes, as it renders Cursola less able to reliably move before its opponents in Trick Room conditions. Needless to say, we'll be discarding Weak Armor as an option.
That leaves us with the difficult-to-obtain Perish Body ability. To acquire a Cursed Body Cursola, you'll need to search out a 4★ or 5★ Cursola Max Raid Den. Check the dens in South Lake Miloch, the Watchtower Ruins, and the Stony Wilderness in the Wild Area, as well as Challenge Beach and the Courageous Cavern on the Isle of Armor. This may not be an exhaustive list, but those are areas yin which you can begin your search... assuming you are in Shield, to which Galarian Corsola and Cursola are exclusive. Once successful, you can breed the captured Cursola with a Ditto for IVs, with the offspring having a 60% chance of inheriting its Perish Body. You can skip the breeding if you have enough Bottle Caps to make use of Hyper Training, of course. If you're unable to obtain Perish Body by catching a Cursola with it, either because you have Sword or you have poor luck with the Max Raid Dens, you might consider searching for one in a trade or using an Ability Patch to change Weak Armor into Perish Body.
For all of that effort, you may suspect Perish Body is an outstanding ability. To that I say... tamp down your expectations. It's a fun ability, and a unique one which is worth using, but it is not spectacular. When an opponent hits Cursola with a contact-making move (which includes most, but not all, physical moves), both Cursola and its opponent will be given a Perish Count. This count begins at three and decreases by one each turn, with the afflicted Pokémon fainting immediately when its count reaches zero. The count can be removed by switching out a Pokémon. The limiting factor here is that Cursola itself must switch out after being struck. Still, this ability will force physical attackers to carefully consider whether it's worth striking Cursola when Perish Body will, at some point, force them into a switch out. In that sense, it at least mitigates Cursola's poor physical defense. Additionally, for you mischievous Ghost-type specialists, you can cook up some devious strategies with Perish Body. Try, for instance, giving Cursola an Eject Button and baiting a physical attacker into hitting it! Cursola will switch out automatically, negating the downside of Perish Body. Switch in a Pokémon with a trapping move or a trapping ability like Arena Trap, and your opponent will be unable to switch out to negate the Perish Count!
| Level: 100 | HP IV | 31 | HP EVs: | 252 | HP: | 324 | ||

|
Attack IV | 8 | Attack EVs: | 0 | Attack: | 203 | ||
| Defense IV | 31 | Defense EVs: | 6 | Defense: | 137 | |||
| Special Attack IV | 31 | Special Attack EVs: | 0 | Special Attack: | 358 | |||
| Special Defense IV | 31 | Special Defense EVs: | 252 | Special Defense: | 359 | |||
| Nature: Quiet | Speed IV | 0 | Speed EVs: | 0 | Speed: | 58 | ||
Moving on to a moveset for Cursola, I would typically suggest a trickier set for a Ghost Pokémon, but Cursola benefits from a more straightforward approach. Cursola's overall poor bulk makes it ill-suited for clever tricks, aside from the passive tricks enabled by Perish Body like the previously mentioned Eject Button strategy. Cursola is better served by learning a few powerful special moves that can cover a wide range of types so that it can take all but the bulkiest of opponents out quickly. That said, Cursola isn't entirely bereft of tricks; we'll aim to give it a few extra advantages as we curate its moveset!
Before we can seek out advantages and options, we still need to address Cursola's poor defense. While Perish Body mitigates that defensive gap, it will not discourage every physically-oriented foe, especially if they believe they can knock Cursola out in one hit. To this end, I suggest beginning by teaching Cursola Will-O-Wisp. Capitalizing on Trick Room, Cursola can use Will-O-Wisp as soon as it enters battle to inflict opponents with a Burn. The Burn will reduce their HP each turn, but, crucially, it will reduce the power of their physical attacks by half. This allows Cursola to at least have a smidgen of a chance of surviving a physical strike, which makes Perish Body slightly more threatening and gives Cursola a bit more of a cushion.
With Cursola's defense finally addressed, we ought to choose a STAB move. Our options here are Shadow Ball, with a base power of 85 and a chance to drop the opponent's special defense, or Hex, with a base power of 65 which doubles if the opponent has a status condition. A powered-up Hex is more powerful than Shadow Ball, and this Cursola is burning its opponents, so I say we select Hex! Now, if you fail to burn the opponent, either due to Will-O-Wisp missing, the opponent being immune to Burn, or the opponent already having a status condition, then Hex is inferior to Shadow Ball. If this concerns you (because, say, you plan to make extensive use of Paralysis or Poison), then consider switching to Shadow Ball.
| Name | Category | Power | Accuracy | Description | Base PP | Learns |
|---|---|---|---|---|---|---|
| Will-O-Wisp | - | 85% | The user shoots a sinister flame at the target to inflict a burn. | 15 | TM38 | |
| Hex | 65 | 100% | This relentless attack does massive damage to a target affected by status conditions. | 10 | Lv. 25 | |
| Giga Drain | 75 | 100% | A nutrient-draining attack. The user's HP is restored by half the damage taken by the target. | 10 | TM28 | |
| Earth Power | 90 | 100% | The user makes the ground under the target erupt with power. This may also lower the target's Sp. Def stat. | 10 | TR67 |
One benefit that Cursola has that many of its offensively-oriented peers lack is the capability to heal itself. Now, if you have any background knowledge on Cursola, you may have seen Strength Sap recommended for it. I admit, Strength Sap is an enticing move. It sidesteps type matchups, and further blunts physical threats by lowering the opponent's attack stat while healing the user. Additionally, it's just the fun kind of unique move one expects from a Ghost type. I am typically an advocate of choosing unique moves or those tied closely to a Pokémon over competitively-superior options, but, in this case, I won't advocate for Strength Sap. We will find a use for it... in next month's session. I have a plan for our next session together, and the Pokémon we examine then will be better able to leverage Strength Sap.

For Cursola, however, I suggest Giga Drain. It does struggle somewhat due to seven types resisting its Grass typing, but so long as it's used against a Pokémon that's not resistant to it, Cursola's high special attack should make it viable. With judicious use, it can deal great damage to foes and help Cursola to patch up any damage it has endured, stretching Cursola's impressive special defense. It might also assist Cursola in bouncing back from a physical strike from a burnt foe. I consider this better than Strength Sap because it allows Cursola to remain focused on dealing damage rather than needing to take a turn healing. Additionally, even with the attack drop from Strength Sap added to the Burn, it's risky to rely on Cursola's paltry defense holding up, and Strength Sap will weaken with each use.
Because Grass is poor offensively and Ghost only has an advantage over two types, the fourth move in our set needs to offer good type coverage. Just consider, against a Normal and Dragon-typed Pokémon such as Drampa, Cursola would currently struggle to deal decent damage! Grass is resisted by Flying, Poison, Bug, Fire, Grass, Dragon, and Steel, while Ghost is resisted by (or ineffective against) Dark and Normal types, so we should seek out a type capable of covering as many of these types as possible. Fortunately, Ground fits the bill and Cursola gets access to Earth Power. Earth Power does exactly what we need and boasts a dependable 90 base power with reliable accuracy. Earth Power hits Dragon and Normal types for neutral damage, and is supereffective against Fire, Poison, and Steel. While Bug and Grass resist Ground, Hex can be used against Pokémon of these types (save the Deerling and Smoliv lines, but they aren't present in Sword and Shield). The only typing of concern left is Flying/Normal, which is immune to Earth Power and Hex while resisting Giga Drain. It's unfortunately a common type combination, though it's not as common in competitive circles. If you encounter it outside of those circles... well, you have other Pokémon on your team, so you may simply have to switch out.
With that, we have a template for raising a Cursola. It is not the only method for raising Cursola, and many sources would recommend a completely different approach. As always, I encourage you to experiment and to devise your own movesets and stat spreads, using our discussions only as starting points! Now, I would invite you to come and greet a Cursola for yourselves, but... I fear the administration would have my head if any of you were to succumb to Perish Body. The risk of accidental contact is too great. Instead, I will end today with a question for you to ponder. Bear in mind that Cursola, unlike Galarian Corsola and even the living Johtonian Corsola, does not distribute its defenses equally. Considering this, do you believe that an evolved Pokémon is always "better" than its pre-evolved forms? Consider your answers, and what "better" even means, and bring them with you when we reconvene.
So You Want to Romance the Three Kingdoms?
Hello, and welcome back to So You Want to Romance the Three Kingdoms?, The 'Shroom's largest and only Romance of the Three Kingdoms Part IV: Wall of Fire strategy guide! Last month, we engaged in our first bit of warfare, crushing Yuan Shao's depleted forces at the battle of Bei Ping. Sadly, Yuan Shao himself managed to escape. This month, we engage with the aftermath of our conquest and hopefully bring an end to Yuan Shao once and for all.
Step 18: The Spoils of War
The first thing we need to do following our victory at Bei Ping is decide what do with all our captured officers. After our crushing victory over Yuan Shao's forces, we managed to capture six officers. Now, as for the soldiers under their command – they're all put to the sword! That does of course exclude those soldiers who managed to escape with the retreating Yuan Shao.
Circling back to the officers, since none of these officers are considered Ruler class officers, we have the full set of options at our disposal. We can choose between: Recruit, Free, Prison, and Execute. The options are pretty self-explanatory. "Recruit" brings them under your command. "Free" makes them wandering officers, although I believe freeing an officer whose original ruler is still on the board will just send them back to that ruler. "Prison" puts them in chains, allowing you to attempt to recruit them later as well as allowing you to move them from city to city. Finally, "Execute" sees you chop off their heads, removing them from the game completely.

Now, just because you attempt to recruit them doesn't mean it will work. I'm not 100% sure what determines whether or not they'll join you; it's probably based entirely on loyalty. A lot of the times the officers will either beg you to free them or dare you to execute them. When that happens, your options are reduced to Free, Prison, and Execute. Right off the bat, we're not going to be freeing anybody because that's stupid. Maybe once we have way more cities and way more officers under our command, we'll free them, but for now that's not an option. We're also not going to be executing anybody that we don't have to execute right now, because we need officers to bolster our ranks. So, for right now, anybody who refuses to join the ranks of Kong Rong will be thrown in a cell.
Once inside a cell, we can send anybody with the "Recruit" stat to visit them once a month, offering them freedom in exchange for agreeing to work under Lord Kong Rong. Now, you might be saying it's not very ethical to imprison people to the point where their spirits are broken and then force them to work unwillingly under somebody they don't wanna work for. To which I say, shut up, liberal! Thoughts like that are why you're never going to claim the Mandate of Heaven!
Most of the officers you'll capture are just filler officers to fill our numbers. They're people you move to cities to work on developing the cities you don't care the most about. But there are some standouts among the officers we've captured, mainly Marshal Zhang He, with a Power of 93 and a Lead of 88, and Marshal Yan Liang, with a Lead of 86 and a Power of 93. Both of them will make excellent commanders of our armed forces.

For now though, we're focused on just recruiting as many of them as possible. Sadly, you'll often fail to recruit the majority of captured officers, which can become a real annoyance when you capture like twelve officers and only one of them agrees to join your army. Afterwards, every turn you have to send officer after officer to visit the captured officers, trying and failing to get them to join the ranks. As for this crop, it's a bit of a mixed bag. The very first officer, Guo Tu, agrees very quickly to join our forces. As a reward for being for cooperative, Lord Kong Rong has decided that he will be appointed Governor of Bei Ping once Zhao Yun marches on Yuan Shao's last remaining stronghold in Dai Xian. On the other hand, Shen Pei, Yuan Xi, and Zhang He defiantly refuse, with Zhang He even claiming he wouldn't surrender to Lord Kong Rong if he was on his deathbed, so, you know, extra chains for that guy. But in good news, Yan Liang laid down his sword and agreed to join Lord Kong Rong's army on the sole condition that he not be forced to march against his former Lord Yuan Shao (that didn't really happen in-game; that's just a little flavor I like to think up). Finally, Yuan Shang refuses to surrender, saying he won't let things end like this, but, spoiler alert, it will! So, all in all, a bit of a mixed bag. We managed to get one of the big fish but had to imprison four others, meaning that we're quite stretched for officers.
Step 19: The Fall of Yuan Shao
With the spoils of war taken, it's time to complete our November actions. Unfortunately we are very low on officers who can recruit, which is a problem because of our new prisons and the ones we're sure to take. With that, we have two options. We could move the prisoners to where Xin Pi is, or we could move Xin Pi to where the prisons are. We're going to do the former and the reason for that is, when you move prisoners, you have a chance of them escaping, whereas there's no chance of officers getting captured on their way to cities. So unfortunately for Xin Pi, he must again move, this time to Bei Ping.
Turning our attention back to our home city of Bei Hai, we have 108,000 soldiers under the personal command of Lord Kong Rong. Our wise Lord Kong Rong worries that the soldiers will get soft, so he has decided to personally implement a six-month training regimen with them alongside Wu Anguo to better prepare them to defend Bei Hai. In Nan Pi, Zhang Yan will give 1,000 provisions to the peasants to help them survive the coming winter months. Finally, for commanding the forces that crushed Yuan Shao and for agreeing to surrender, Zhao Yun, Yan Liang, and Guo Tu will each be given 100 gold as a reward! This will bring an end to November.
In the cold month of December, two guests have arrived in Bei Hai seeking an audience with Lord Kong Rong. These guests are the young wanders Niou Jin and Zhang Hong. While neither one of them are particularly impressive, with Niou Jin being an above average warrior and Zhang Hong being an all-around terrible officer, I'd still usually attempt to recruit them. Unfortunately, Lord Kong Rong has seen to personally attend to the troops, making him unable to see either one of these officers. So this is probably going to be a missed opportunity but, eh, we can live without both of these.

Turning our attention back to our new city of Bei Ping, we fulfill our promise to Yan Liang by sending him to Nan Pi. Then turning our attention to the prisoners, Xin Pi meets with Zhang He, attempting to get the veteran marshal to see the foolishness of his actions. Unfortunately, the imprisoned marshal instead throws insults at Xin Pi, who leaves the meeting in disgust. Now, while Marshal Zhao Yun offers to speak to Zhang He soldier-to-soldier, Xin Pi informs him that Lord Kong Rong has different orders. He, along with Taishi Ci, are to invade Dai Xian at once while Yuan Shao's forces are still weakened. Before they can leave, however, Guo Tu attempts to intercede, arguing that we shouldn't go in blind and we should instead send in a spy to learn about the comings and goings of the city. A wise idea in most circumstances, but we can't allow Yuan Shao to make it to the new year where he could levy taxes to raise a new host, so Guo Tu's idea is politely denied.
Once again, Zhao Yun will serve as commanding general of the forces, with 110,000 infantry under his command, while Taishi Ci will command a cavalry some 60,000 strong! They take only 1,000 barrels of provisions with them because they won't be conducting a long battle. Meanwhile, we fulfill another promise by appointing Guo Tu as Governor of Bei Ping while Zhao Yun and Taishi Ci march towards what should be a fateful battle. Despite only having a short time to prepare, Yuan Shao decides to defend his position from the top of his castle, which should have served to screw me by taking Taishi Ci out of the battle, but I actually forgot to switch him to cavalry, so he's instead commanding infantry! Go me!

Now, the hardest part of this battle is going to be simply getting to the top of the castle, because with four units Yuan Shao will have an easy time blocking me. My first attempt was to send both Zhao Yun and Taishi Ci to the right of the castle, but this just resulted in both being blocked by Yuan Shao and Tian Feng, which actually sort of worked out because Yuan Shao took the lead and boxed himself in. Here's the thing. While on the ladder, you can still attack, but you can only do ground attacks and I think you take more damage while doing damage. But I've got 110,000 troops at my disposal and he only has like 60k under his command!

So even though he was doing slightly more (literally 2 vs 1) damage, I was still winning just through sheer attrition. While doing that, I moved Taishi Ci around and managed to evade Wen Chou's attempts to block him in. As this happened, a slug fight was going on between Zhao Yun and Yuan Shao and Tian Feng. I attempted to move Taishi Ci to where he'd block in Yuan Shao, but I miscalculated how much damage I'd do to Tian Feng on one turn, allowing Yuan Tan to fill in the gap and blocking Taishi Ci from getting at Yuan Shao. But it didn't matter! Yuan Tan and Wen Chou both foolishly blocked Yuan Shao from attempting to retreat, allowing the still-trapped-on-a-ladder Zhao Yun to finally crush him after twenty-one intense turns! With Yuan Shao captured, his entire force surrenders, destroying the Yuan Shao dynasty and putting the city of Dia Xian under our control!
In the process we captured his entire officer corps of ten officers plus Yuan Shao himself! Right off the bat, the first officer captured, Chun Yuqiong, agrees to join our ranks. Oher than that, we get a pretty unsuccessful recruitment run, sadly. Of the eleven total officers, only three of them agreed to join Lord Kong Rong, because of course not. Now, I actually had a pretty good little run for one of the test ones I did, where six of the minor filler officers submitted to me, but I didn't accept this one. The reason I didn't was because of Yuan Shao. Here's the thing about Rulers; not all of them are recruitable. I believe it's based on the hostility meter, but some of them are so hostile that you have no choice but to either free or execute them, and I was fully expecting Yuan Shao to be on that list. After all, we've been sniping at each other for the better part of a year. But surprisingly, Yuan Shao was recruitable, so I decided to test if he could actually be recruited or if it was just a theoretical thing that would never really happen.

Surprisingly enough, on my third attempt, he decided to accept the amnesty offered by the wise Lord Kong Rong, who hopes that this show of generosity will show the other "claimants" that it's safe to surrender to Lord Kong Rong and that hopefully Yuan Shao will be able to convince his former commanders of the wisdom of submitting. If he wouldn't have agreed to submit, his neck would have stretched, because freed Rulers can claim unoccupied cities, and then that's just one more thing I have to deal with. I do find it funny that every other member of the Yuan clan, including his heirs Yuan Tan and Yuan Shang, rot in a cell on principle while Yuan Shao submitted to save his own neck! As part of Yuan Shao's pardon, Lord Kong Rong has declared that, once his generals have been brought into the fold, Yuan Shao and the entire Yuan Clan will be exiled away from the lands Yuan Shao once ruled as his own to prevent them from gaining any sort of following that might threaten his hold on the lands. Finally, as a reward for their services as well as a show of good faith to those who surrendered, all those in Dai Xian have been given 1,000 gold, and Gu Yong and Chun Yuqiong will be put in charge of the farmlands with a budget of 1,000 gold.
Step 20: Claiming the Unclaimed
As the year winds down following a string of successes by Lord Kong Rong which have greatly strengthened our position, a messenger from Lord Dong Zhuo has arrived to discuss a potential alliance. That messenger is Jia Xue, who extends an offer from the Grand Preceptor himself, Dong Zhuo, on behalf of Emperor Xian for a one-year alliance between our two forces. Lord Kong Rong is of course beyond disgusted that anybody would dare serve under that despicable tyrant Dong Zhuo, who, if even half the rumors are true, boils people alive, burned down the capitol Luoyang, and even murdered the poor young Emperor Liu Bian! Though appalled someone would serve a man whose cruel and selfish actions have plunged China into this chaos thanks to his wicked ways, Lord Kong Rong is still a gracious host and listens cooly to his offer before curtly rejecting it.

Not looking to lose favor with the tyrant Dong Zhuo, Jia Xue offers 824 gold pieces if we accept this alliance. But Lord Kong Rong won't sell out the principles of Han for a mere 824 gold and again rejects the alliance. Again looking to avoid losing face (and maybe his neck), Jia Xue offers this time 1,123 gold pieces. Finally Lord Kong Rong can take no more and flatly refuses the alliance, ending the discussion and telling Jia Xue that he may stay in Bei Hai as a guest under his protection but that there will be no alliance formed, much to the displeasure of Jia Xue.
With that, the new year comes and it's clear that conflict with Dong Zhuo could be on the horizon. So with that, it's time to start the bolstering the defenses of Dai Xian to ward off threats from Dong Zhuo. The first thing we will do is have Guo Tu in Bei Ping send 2,000 gold and 30,000 soldiers to bolster the coffers and forces in Dai Xian. Then Xin Pi will again implore Zhang He to join the ranks, pointing out that even Yuan Shao has laid down his sword and now serves Lord Kong Rong. These words (as well as desire to get out of a cold winter cell) move Zhang He, who agrees to submit to Lord Kong Rong. For their services, all three will be reward with 100 gold, and Xin Pi and will also be put in charge of furthering economic development in Bei Ping. Back in Dai Xian, an officer has been commanded to raise conscripts for the army, returning with 33,000 fresh recruits. These greenhorns are immediately placed in an eight-month training program alongside the rest of the force under the direction of Zhao Yun and Taishi Ci. Meanwhile, Gu Yong has been tasked with convincing Wen Chou of the foolishness of refusing to submit, telling him he can win great glories under the command of Lord Kong Rong. Inspired by the military might of Lord Kong Rong as well as the submission of his former lord Yuan Shao, Wen Chou submits. At the same time, Yuan Shao is sent to convince his former city official Ju Shou to submit, who refuses saying he won't be a dog for Lord Kong Rong like Yuan Shao is. Perhaps a few more months in a cell will change his mind!

Once again, everyone is rewarded with gold, especially Wen Chou who only has a loyalty of 56! Yuan Shao, who is apparently just super grateful to be alive, has a loyalty of 96 (it was 91 before the first 100 gold.) Yuan Shao, alongside Zhao Yun, are also being put in charge of economic development, with Zhao Yun doing double duty so he can keep an eye on Yuan Shao!
In Nan Pi, Zhang Yan is put in charge of a fresh round of conscription, successfully raising 59,000 troops (I actually meant to have Gao Lan do that but I accidentally hit Zhang Yan). Next month Zhang Yan and Gao Lan will begin a six-month training program. Finally, in Bei Hai, Gongsun Du will be bringing 500 barrels of provisions and 2,000 gold with him to Nan Pi while Yan Liang is sent to purchase 7,000 barrels of provisions from the market to tide Nan Pi over during the winter months. As you can see, there's a lot to take in when you have multiple cities under your command

As January comes to a close, the deposed Gongsun Zan comes to Bei Ping to seek aid from Guo Tu. I don't know how this works or what the benefit is, but I swear they always come to the one city that doesn't have the resources to help them. Because of Bei Ping's lack of resources, we are unfortunately forced to turn him away. In the month of February, concerned over the development of Bei Hai, Lord Kong Rong decides that his self and Wu Anguo will pull double duty by both training the soldiers and by taking charge of the city's development. Before taking charge of this, he pens a message to Gongsun Du in Nan Pi, ordering him to march to Bei Ping. In the city of Bei Ping, Xin Pi unfortunately fails to convince Yuan Xi to submit to Lord Kong Rong, while Zhang He is ordered to enter Nan Pi with the intent that he will eventually take charge of the forces of Bei Hai.
Over in Dai Xian, Wen Chou is sent on the move to bolster the forces in Nan Pi, while Gu Yong manages to convince Ju Shou to stop his resistance and join the administration of Lord Kong Rong. In the process, Governor Zhao Yun decides to appoint the well-respected Ju Shou to economic development alongside his self, and, after being impressed with his intellect and ideas, reappoints him to the position of civil officer, a role which he has previously held under Yuan Shao. So civil officers are actually a pretty neat little mechanic the game has. Under the Ruler tab, there's a little "assign" option. In there, there are a number of things you can assign your officers and generals to be. The options are: Advisor, City Official, Marshal, Gov'nor (because the game is British, apparently???), and Chief (either advisor or city official).
"Gov'nor" is pretty self-explanatory. You use it if you want to reassign the ruler of a city for some reason. Selecting "Marshal" promotes generals to the marshal rank. I don't know what it does exactly. Not every general can be a marshal. Maybe it increases loyalty if you do it? I'm not really sure. I think they appear in war councils and maybe give the advice for alliances but I'm not 100% sure.

The most important assignments are "Advisor" and "Civil Officer", which are only available to officers with high enough intelligence or politics stats (my guess is it takes over 80 intelligence). Likewise, I'm guessing marshals need high enough lead or power stats. So, when you appoint someone as a civil official or advisor, you actually use the little "advise" tab at the end of the tabs to get advice from them. It's usually pretty basic stuff, but still I think it's cute and fun that your officers who are smart enough can actually give you their opinions on what you should do, and they do provide little tips.
With that, we end February and enter what should be a calmer March. In Bei Ping, Xin Pi decides to focus his attention on recruiting Shen Pei after learning that he can recruit people, and while he fails this month, we'll get him next time! In Dai Xian, both Ju Shou and Gu Yong manage to recruit Tian Feng and Chen Lin (who both have the ability to recruit!). At the same time, Yuan Shao manages to convince his son Yuan Tan to accept his exile and end his imprisonment. That's all we do in March, with everybody else working on training (besides rewards and giving to peasants of course)
As March turns to April and spring officially begins, our holdings are spared the rebellions that plague lesser lords thanks to the leadership of Lord Kong Rong. Unfortunately, speaking of plagues, the city of Nan Pi is hit by a plague. But thanks to the governance of Gao Lan, it is quickly quarantined, causing only limited casualties. Perhaps even worse than the plague, Lord Kong Rong is visited yet again by Jia Xue, who this time offers a gift of 256 gold on behalf of Lord Dong Zhuo as a sign of friendship. What a stupid offer! 256 gold isn't even a lot of gold! What are we even supposed to do with that?

Lord Kong Rong is sympathetic to Jia Xue, who appears to be so terrified of disappointing Dong Zhuo he can't even spell his own name (his name is Jia Xu, not Jia Xue! Get your story straight, Koei!) But not wanting to find himself in debt to Dong Zhuo, Lord Kong Rong wisely rejects the gift, again telling Jia Xue he can stay in Bei Hai as an honored guest but that he has no intention of allying with Dong Zhuo. In better news, in the city of Dai Xian we've managed to recruit every prisoner except one, with the lone holdout surprisingly enough being an officer named Chen Zhen. Because of this, it has been decided that both Yuan Shao and Yuan Tan will be evacuated from the city to Bei Ping, beginning their march to exile. Chen Lin and Feng Ji have also been instructed to begin developing new war technologies in Dai Xian and have been given an initial budget of 1000 gold to aid their efforts.
In Bei Ping, sadly Xin Pi has once again failed to recruit Shen Pei, who is just being really stubborn about this. Finally, Lord Kong Rong has decided it's time to do something about the Xiang Ping situation. An isolated city connected to the rest of China by a single bridge and harboring a low population of only 69,000, until now Xiang Ping had been completely isolated from the Three Kingdoms Period, having fallen through the cracks of the various warlords attempting to carve up China.
Because of this, while the city itself has been able to avoid the chaos of the period, it has also fallen into disrepair thanks to a lack of civil authority. Its citizens eke out meager livings and its agriculture yields are close to nil. Not only that, but because no ruler has claimed it, that means any wandering ruler like that hobo Gongsun Zan could claim the city as their own. This would force us to waste resources and lose good men dislodging them from the city. Because of this, with Yuan Shao finally defeated, it's time to bring Xiang Ping into the fold. The cool thing about unclaimed cities is that you don't really have to do anything to conquer them. You just send in an officer with the smallest number of troops possible and, well, take them! The downside is they often have bad stats and low spirit due to the whole "you conquering them even though they just want to be left alone" thing. And just for completion's sake, you can always distinguish an unclaimed city because they appear as white squares on the main city map and they don't have flags hanging from them on the individual city map. One last thing on unclaimed cities! If you go to war with somebody near an unclaimed city, they can and will flee to those unclaimed cities, claiming them for their own and making you go through the hassle of invading those cities, so watch out for that.

Like, I'm sorry Xiang Ping, but if you didn't want to be conquered, maybe you should have tried having the Mandate of Heaven! Given all the hassle an unclaimed city can bring we're going in, meaning the only thing to decide is who we shall make Governor of Xiang Ping. Both myself and Lord Kong Rong feel there is only one choice – Lord Kong Rong's oldest and most loyal general, Gongsun Du. As a reward for his services, we order Gongsun Du to march with a small force of 1,000 soldiers to claim Xiang Ping in the name of Lord Kong Rong, decreeing him to be Governor of Xiang Ping to rule as he sees fit. A fitting reward for a most loyal of servants!
Upon hearing reports that Gongsun Du has successfully claimed Xiang Ping for Lord Kong Rong, the jubilant lord has decided to throw a series of banquets not only celebrating the appointment of his loyal friend but also our successes throughout the last six months. So I must be going now. I must not displease Lord Kong Rong by being late.

An Overly Detailed and Funny Walkthrough of Mega Man 5
Played by Sparks through the Mega Man Legacy Collection for the Nintendo Switch. Why not the Nintendo Switch 2? That's because I have to figure out how to transfer my data safely... nothing wrong with the first Nintendo Switch, right?


With a new year comes a brand new Mega Man game! To start off 2026, I'm bringing you all a 4-part walkthrough on Mega Man 5, the next game in the series! The game was released in December 1992 in Japan and the United States, and Europe in 1993.
Before I get into the walkthrough itself, there's a short intro cutscene to watch, just like Mega Man 4.
In the year 20XX AD...

A vicious army of robots is bent on destroying the world!!
And behind this destruction is...

Protoman!?

Protoman, why?
Keiji Inafune did not want Mega Man 5 to be an unreasonable game. As a result, the difficulty is lower than the previous games, and enemies drop 1-Ups more often than usual. As for gameplay changes, Mega Man's Power Shots are larger than they were in the previous game, allowing for enemies to be hit more easily by them. I think I read somewhere that Dr. Cossack upgraded Mega Man's Mega Buster, but I can't confirm this. Rush Coil has also been altered a little bit; instead of Rush launching Mega Man into the air with a spring, Rush instead jumps up into the air when Mega Man sets foot on his back, allowing the blue bomber to jump off him when the maximum height is reached. If I recall, it also uses more weapon energy than usual. It's a weird change only made for this game, and honestly I prefer the normal Rush Coil.
Mega Man 5 also introduces the M Tank, a very rare item that fully restores all HP and weapon energy when consumed! You can only have one at a time however, so it must be used wisely.
The biggest change however is the inclusion of a new character - Beat. He is a robotic bird created by Dr. Light to help Mega Man, but he isn't always available to use. To unlock Beat, you must collect all of the symbols in "MEGA MAN V" scattered throughout the Robot Master stages. There is one symbol in each of the stages, some being more difficult to obtain than others. If you do happen to miss one, you can always replay the stage to get it, so don't worry about permanently missing out on Beat! I highly recommend unlocking Beat as he'll make the final boss much easier to defeat.
Mega Man 5 is another NES game, so the password system is still here. Let's take a look at the Robot Masters!

From top left to bottom right (going left to right): Stone Man, Gravity Man, Crystal Man, Charge Man, Napalm Man, Wave Man, Star Man, Gyro Man.
- Stone Man is weak to Napalm Man's weapon.
- Gravity Man is weak to Star Man's weapon.
- Crystal Man is weak to Gyro Man's weapon.
- Charge Man is weak to Stone Man's weapon.
- Napalm Man is weak to Crystal Man's weapon.
- Wave Man is weak to Charge Man's weapon.
- Star Man is weak to Wave Man's weapon.
- Gyro Man is weak to Gravity Man's weapon.
If you're looking to start out with an easy boss, then Stone Man and Star Man are your best bets. I'm going to start with Star Man first!
Star Man stage


Star Man's stage takes place in outer space. Because of this, there is less gravity than usual! Mega Man will be able to jump super high and fall slower than usual, like he's underwater.
The first area of this room has Mega Man getting to a hole on the right side. Sounds easy, but after reaching a certain point, meteors start to fall down from above! Sliding will help you reach the hole faster, but be careful not to take damage! After falling down the hole, we enter a room and encounter two strange new foes: one of them is a red enemy on the ceiling. If Mega Man shoots or approaches it, it will bounce up and down at a fast speed while occasionally firing two bullets that travel diagonally. It's tough to hit, but a fully-charged Mega Buster will dispatch this enemy in one shot. The other enemy is a cannon that emerges from the ground to shoot at Mega Man if he's near. They can barely be seen poking out of the ground otherwise, and a fully-charged Mega Buster shot can hit them while they're low. There are several of these enemies to battle as you get to the right side of this room, but they're easy and if you take your time, they won't pose a threat. Just be aware of spikes to avoid!
After falling down another hole, we reach a small room with two propeller enemies. These foes slightly move to the left and right, occasionally firing two bullets that travel diagonally towards Mega Man. If you stay still, you won't get hit. One shot will get rid of them! Descend further but watch out for more spikes.

In this next room, we must proceed to the right once more. Now we must navigate through a spike-filled corridor while avoiding Space Mettaurs that chase Mega Man down! One shot will get rid of them too. The end of the room has two more cannons, and another propeller enemy is at the start of the corridor. We also find our first letter: the second "M" in "MEGAMANV"! It's high up, right underneath spikes. Jump high enough to reach the letter but don't touch the spikes and lose a life! Even if you do, you'll still have the letter, so that's great! There are some scary jumps to make, so use the Mettaurs to your advantage! After taking damage, you'll be temporarily invincible to everything, spikes included! A ladder at the end leads upward to the next room.
After climbing up, we enter a small area where three green rockets zoom from the left towards the right. If shot at, they will explode and release debris across the diagonals, but if they crash into a wall, then there will only be three debris, but it's all fired at Mega Man in a spread formation. You'll have to be fast to avoid taking damage here, so shoot at the bottom rocket and slide to the ladder on the left! Down jump because the ceiling is covered in spikes. After climbing up once again, we enter another small room with four cannons and ceiling spikes. The farther two cannons can be knocked out with fully-charged Mega Buster attacks, but you'll have to jump to reach the first two as they're both on stairs. Don't jump too high however! Get to the right side to progress.

The next area has no ceiling, and two platforms separated by spikes. On the other platform is a bipedal mech that shoots four lasers, one at a time, in multiple directions. The first laser goes straight ahead, while the following ones are aimed at lower angles, going further downward with each shot. After a few seconds, the mech will restart its attack pattern. You must attack this thing in the "head", as shooting its legs will not harm it. Shooting once will cause the mech to move left and right, but it can't get across the spikes. Time your shots and don't get hit by the lasers! The next area has many Space Mettaurs and a few jumps over spikes, but because of there not being a ceiling, this is easier to get past.

Almost there! The next room has long floating platforms that move up and down. Occupying said platforms are red catapult enemies that lob bullets at Mega Man in a curved trajectory. They aren't difficult to take down, and can be avoided if you want to ignore them. I should also mention that these platforms are above spikes, so you'll have to jump across them. Between the jumps are these rocket enemies that rise up out of nowhere, but because they can only go so high, you can just ignore them. They'll be a problem in later stages because they're meant to rise out of pits to intercept your jumps and cause you to lose a life, but they aren't a threat for now. The final room before the boss gate has another mech guarding it. Just stay on your own little platform and take down the mech before reaching the gate. Watch out for those ceiling spikes!
Star Man fight

For most of the battle, Star Man has his Star Barrier around him, making him immune to damage. He will also constantly jump towards your location until you shoot at him, which will cause him to jump high and send out his Star Barrier at you, either in the air or upon landing. The barrier travels slowly, and should be easy to dodge as long as you aren't cornered. Star Man is briefly vulnerable when he sends out the Star Barrier, so charge up and fire a powerful Mega Buster shot before he regains it! If he jumps towards you, simply slide under him. Yeah, it's an easy fight, but I wouldn't say it's the easiest in the game.

After defeating Star Man, we get Star Crash! It allows Mega Man to create a Star Barrier that protects him for a single hit, but it can also be sent out as an attack! When equipped, Mega Man turns orange/yellow. In the pause menu, this weapon is labeled as "S. CRASH".
But wait, we also get Super Arrow! This is probably the only instance of obtaining another weapon from a Robot Master. Anyway, it allows Mega Man to shoot arrows that fly straight ahead after a second, and stick to walls if they collide with any. Mega Man can also use them as platforms or as a mini Rush Jet! Mega Man does not change colors when Super Arrow is equipped, and it is labeled as "S. ARROW" in the pause menu.
One down, seven to go. Gravity Man is next!
Gravity Man stage

Gravity Man's stage takes place in some sort of high-tech location with constantly changing gravity.
In this first room, we must make it to the right, as with most rooms. Along the way are two eye enemies attached to the ground. They can shoot two bullets that travel straight ahead and behind them. A few shots will defeat them. There's also another enemy in the shape of a capsule that constantly drops red pellets. These pellets can be destroyed, and can be great for farming life/weapon energy. We must go down a pit to move on, but first we must get rid of that capsule enemy that's above it.

This next room is quite interesting; we get a taste of reversed gravity! Many areas of this stage have arrows in the background. If we move past them, gravity will be reversed! Mega Man (and some enemies) will become affected by the gravity change. Mega Man will be able to walk on ceilings! Moving past more arrows will reset the gravity to normal. Still, that's so cool!
This room has two more of those eye enemies, both of which are also affected by the gravity. We also have two red enemies that walk back and forth and occasionally stop to extend their heads before retracting and walking some more. These foes are not affected by gravity changes. We must briefly alter gravity to avoid spikes and reach the bottom side of the room, and then continue onward, where gravity is flipped again. Another eye enemy stands in our way, but there's a ladder leading to a red enemy and a 1-Up! You want that 1-Up, right? One of those eye enemies gave me a bonus one too. How generous! We must "fall" upwards to move to the next area.
The next room is entirely upside-down, and there are no enemies. However, there are two obstacles - both of them being spiky chains that "flip" sides every few seconds. Only the spiky part hurts, so touching the chain is fine! After getting past them, we fall upwards once more to another room. This time, there are no chains, but more walking red enemies plus an eye with opposite gravity compared to Mega Man. That's right, some eye enemies don't follow the correct gravity! Near the end of the room are arrows that change gravity back to normal, followed by a long fall. Stay to the right, as spikes are on the left side!

This next area is short and has a few cannon enemies from Star Man's stage. After climbing up some stairs, there's another hole for us to descend into. A large weapon energy capsule is on a small platform to the right of the pit, so if you're low on weapon energy go get it! Simply slide and you'll reach it.
Now we're in a long hallway leading to the right, but there's a large health powerup across spikes to the left, but you don't need it if you're healthy. There are several cannon enemies throughout the hallway, but there's also a large purple brute that serves as the game's giant enemy. His main mobility is by jumping far, so if you don't want to defeat him, you can just slide under him while he jumps. But watch out - if you're directly under him mid-jump, he will stop and slam down to the ground! You could do this to bait him so you'll have more time to defeat him, but you have to be quick! Walk under him and then slide away if you want to use this strategy. You could also slide past him while he's at the peak of his jump to ignore him. Your choice!

Now for the complicated stuff. This next hallway has multiple instances of gravity changing, some of which are in the middle of jumps! You'll have to jump to the arrows so that gravity will be changed and save you from disaster. More eye enemies, capsules, and cannons are found along the way. Oh, and those capsules are affected by gravity too, because the pellets go upside down! The first "M" in "MEGAMANV" is also found in this section. To get it, you'll have to jump across a gap while upside down before gravity get reverted. It's honestly an easy letter to grab. If you fail to get it, use Rush Coil! The rest of the room is straightforward with more gravity changes. It's fun! A ladder leads towards the next room.
You're still upside down, but you can do this! This next room has two enemies that hover in place before showing their eyes and moving towards Mega Man. After about a second of moving, they stop for a second before moving again. These enemies are annoying if you don't get rid of them in time, but they aren't the worst ever. They're also difficult to hit, but fully-charged Mega Busters make everything easier! You'll have to get past them, jump over spikes, and fall upwards to reach the final room. This last room has a nasty spike surprise, so immediately move to the right to avoid death! Stairs lead to arrows, resetting the gravity. There's also a cannon enemy, but you can ignore it, as it's not directly in front of the boss gate. In the hallway before Gravity Man, those arrows appear yet again, so you'll be upside down at the start of this fight...
Gravity Man fight

Describing Gravity Man is tough. For the entire fight, he is on the opposite side as Mega Man, so if you're upside down, he's normal. Every few moments, gravity is reversed for both characters, but this also allows a brief opportunity to attack the boss. Gravity Man himself walks a short distance in a specific direction before gravity is changed, but sometimes he can shoot a bullet directly at Mega Man, perform a long jump, and then fire another bullet before reversing gravity. Sometimes he can shoot in the middle of a gravity change.
Needless to say, you'll have to be pretty active in this battle. You will find yourself constantly sliding to avoiding contact with Gravity Man. Star Crash is this guy's weakness, so have a barrier ready and fire it at the boss when gravity changes. Because of the slow speed of the barrier, you may have to get close to Gravity Man so you can get a surefire shot and deal good damage. Be careful of his shots, because one bullet will remove Star Crash, wasting energy. He is a little bit annoying, but this fight isn't too bad. You just need good timing and reflexes to win.
We beat Gravity Man! We acquired his weapon, Gravity Hold. This is a screen-wide attack that reverses the gravity of all foes hit, removing them completely! It only has so many uses though, so don't use it all the time! I believe some enemies won't be affected by it, but I've only used it in boss fights so... anyway, Mega Man becomes purple/white while Gravity Hold is equipped, and it is labeled as "G. Hold" on the pause menu.
Let's keep this going... Gyro Man is next!
Gyro Man stage

Gyro Man's stage takes place in the sky.

At the beginning of this stage, we simply have to walk to the right and enter a new "room". This room is actually an elevator that takes us upward. When it stops, we can move on some more. Afterwards, we enter a section with some pits to jump over. There are enemies in our way; one of which being a flying enemy from Gravity Man's stage that stops from time to time. The other is an entirely new enemy that has a shield in front of it, protecting it from damage. Every few seconds, it raises its shield to fire a single bullet straight ahead before protecting itself again. This enemy is vulnerable while it's shooting, and one fully-charged Mega Buster attack will get rid of it for good. You can also attack them from behind, but you'll likely take them out head on instead of sneaking around them. There are many of each enemy in this section, with more flying enemies than stationary shield ones. A ladder takes us upward to the next area.

This next area is a small one with more platforming. Two indestructible saws revolve around two of the platforms, so all we can do is avoid them and proceed upwards some more. There's a large weapon energy capsule on a floating platform, but I don't need it. The area after it is a "hallway" that stretches towards the right. We're introduced to two new enemy types here as well! One of them is a cylinder enemy that always slowly homes in towards Mega Man's position. They only have one HP, but if left unattended they can be very annoying. The other is a stationary chicken enemy that attacks by sending out eggs that walk along the ground. These eggs have one HP, and can be used to farm items. The summoner chicken must be attacked in the head, as attacking anywhere else will do nothing. A high-up platform has a large health powerup, and there is a low gap that leads to a 1-Up. Near the end of the hallway are three small red platforms. After landing on one, it'll move in a set direction before plummeting. The first two go straight up, but the last one goes diagonally downwards. Be sure to jump before they fall off the screen! Be sure to take out those cylinder enemies so your jumps won't be ruined. A ladder takes us even higher! The following room is another small one, with three flying enemies and a slow-moving saw on one platform. Dispatch the enemies before climbing once more.
We then enter a short hallway with three levels of elevation, making for three "paths". A few cylinder enemies inhabit this area, but there are also these new cannon enemies that act differently than the ones that hide. They fire bullets every so often, but if Mega Man shoots, they shoot out a fast-moving pellet to cancel out the Mega Buster. If you shoot often, their defense shots won't matter. Another ladder goes - you guessed it - up! We then enter another small room, where a large purple brute from Gravity Man's stage blocks the way. Lure him to the right and then slide under him to reach the ladder. If you do this, he won't reach you in time as you climb to victory.

We've reached a checkpoint! This new area leads to the right, but along the way are the flying spike enemies that fall down when close enough to Mega Man's y-axis position (that means vertically). They wouldn't be difficult to avoid, but this room also has unstable block platforms that fall down about a second after being stood on. The letter for this stage - the first "A" in "MEGAMANV" - is found directly below a block. I'll safely say this is the hardest letter to get. You have to let the block above it fall, and then IMMEDIATELY jump after retrieving the letter. Easier said than done! I happened to lose a life while trying to get it... haven't lost a life since the first game! That's OK. Thankfully, you only have to get it once, so it's alright if you die.

The room after it also isn't easy. It's an elevator room similar to the one from earlier, but it's much slower, and now we have to avoid spikes as we ascend. At some points, we must jump to the next ledge because the spaces are very small. Don't jump too high! After avoiding several sets of spikes, the elevator stops, and we can move on.
We're getting there! The area afterwards is another "hallway" with many jumps to make, but the platforms are small... it doesn't help that there are propeller enemies from Star Man's stage. Take your time, stay calm, and get rid of them before making the jumps. A hole at the end leads to the final room before the boss gate. Another cannon enemy from earlier (with the defensive projectiles) guards the boss gate.
Gyro Man fight

Gyro Man is super easy. While on the ground, he throws a Gyro towards Mega Man. When the Gyro is at Mega Man's position, it will go upwards, so you'll have to move left/right as you leap. Gyro Man can also take flight and hide behind the clouds; if he does so, he will send out a Gyro from above that moves towards Mega Man. This Gyro you can simply jump over. Afterwards, Gyro Man will attempt to slam down on Mega Man's position, so slide out of the way!
Gravity Hold makes this fight a joke. Because it covers the whole screen, you don't even need to aim. It can even damage Gyro Man while he's hiding! You'll have just enough weapon energy to defeat him with the weapon.
Defeating Gyro Man awards us Gyro Attack and Rush Jet! For Gyro Attack, it allows Mega Man to shoot out a gyro that goes straight ahead. If you press up or down on your control stick while a gyro is out, you can change its direction, allowing you to hit things above or below! However, each gyro's direction can only be changed once. Mega Man becomes bright green/white when the weapon is equipped, and it's labeled "G. ATTACK" on the pause menu.
Rush Jet is the same as it was in Mega Man 4, so I won't reexplain it.
Now for the final Robot Master for now - Crystal Man!
Crystal Man stage

Crystal Man's stage seems to take place in a crystal cavern.
There's no way to go except forward! We encounter an odd new enemy that has a head separated from its body. It walks left and right, but if we destroy the body, then the head will release and bounce towards the direction the enemy was moving last. If we attack the head while the body is around, both the head and body will be rid of, so try to aim for the head. There are four total in the first room, and we must descend down a hole.

We now enter a mine, and immediately run into two of these small engine enemies coming down stairs. They're weak and only have one HP, so defeat them before they reach you! After falling some more, we enter a hallway leading to the right. Two more of those bizarre separated enemies stand in our way, but past them is a series of jumps to make. Each jump has a pipe that periodically drops crystals with random breaks. It's impossible to tell when the breaks are, but thankfully they don't drop crystals rapidly. With good timing, you can get through without issue. Get hit, and you're a goner! I hated this stage when I was younger, but now I don't mind it. A ladder at the end leads upwards.
After climbing up, we enter a small room that has Eddie! Eddie returns from Mega Man 4 to help us once more. This time, he gives me... a large health powerup. I'm already at full health, but I appreciate the thought, Eddie. Time to climb some more!

We reach another hallway with more crystal pipes... aw man. But hey, we get a new enemy at least! This enemy looks a lot like a Sniper Joe (enemy with a helmet and shield), but this one lacks a shield. Instead, they use magic to create a crystal before sending it forward. While they are forming a crystal, they are invincible. The crystal itself also serves as a shield. This means we can only attack after the enemy sends out a crystal. Get it before they charge another one! A fully-charged Mega Buster shot will do the trick. Yeah, we have to make more crystal jumps while these new foes stand in our way. Patience is a virtue, and you're sure gonna need it! A ladder takes us upwards once more.
What's next is a small room with a small platform from Gyro Man's stage. This one goes diagonally towards a ladder hanging above a row of spikes on the ground. There is a new enemy on the spikes - a cleanerbot-like robot that moves left and right and occasionally fires off three fast projectiles upwards in a spread formation. Defeat it, and use the platform to reach the ladder. Remember to jump before it falls!
After climbing up, three more engine enemies descend down stairs to attack! Simply perform the same method you used for the previous ones - take them out quickly! Two more follow as you proceed. Past the engines are these orange flying shield enemies with high HP. Remember those ones from Mega Man 4? These ones are very similar. Due to their high HP, jump over them and ignore them. There are only three in the game, and this is the only stage to have them. A pit at the end of the room leads downwards.
Time to descend! The first room we come across has two flying basket enemies that drop a skull if they reach Mega Man's y-axis position, even if they're under him. Afterwards they'll just fly off the screen. You can get rid of them before they reach you, or ignore them. An E Tank is on a ledge; get it before falling down some more! The next room has three basket enemies, so just ignore them and fall down again.

Now for another hallway! Along the way are more cleanerbots along the ground, but there is also a floating platform that has an M Tank in a small gap! There are these mice enemies guarding it however; they're too small to hit with normal Mega Buster shots, so you'll have to use charged up ones to get rid of them! They scurry along the ground, stopping when they reach a wall/edge, so they aren't hyperactive. A pit at the end of the hallway leads downwards.

What follows is a simple spike fall. Stay in the middle, but after the first room of spikes, move to the left to collect the "V" in "MEGAMANV"! Afterwards, we enter yet another hallway, this time with a completely new enemy, and multiple of them! These enemies are initially inactive, but when approached, they retract to a small disc on the ground and slide along the ground quickly, falling off ledges and bouncing off walls. They can be hit with the normal Mega Buster while they're still, but you'll need the fully-charged Mega Buster to vanquish them while they're moving. Another pit at the end of the room leads downwards... to a small room with two more! To avoid taking damage, you'll need lightning-fast reflexes, which I didn't have because I didn't expect them! After falling down once again, we arrive at the final room before the boss gate. A large purple brute guards it, but he's easy to deal with because we're at a high platform he can't reach! We can just blast at him while he jumps. Get rid of him before entering the boss gate.
Crystal Man fight

Crystal Man is one of the tougher Robot Masters to fight against in the game. To start the battle, he jumps high into the air and unleashes four crystals along the diagonals that bounce around the room. They are very, very difficult to avoid, but thankfully they deal low damage. Crystal Man can also jump in the air and fire a single bullet directly at Mega Man's location. His mobility is only through jumping; he cannot walk on the ground, and sometimes he jumps without attacking. He can only perform his crystal attack when there aren't any on the screen. If you get cornered, be sure to slide out into the open.
Gyro Attack will end this fight quickly. You can aim it at him while he's in the air! Not much to say about this battle.
Crystal Man gives us Crystal Eye! It allows Mega Man to shoot a large crystal that breaks apart upon hitting a solid surface, causing it to split into three smaller crystals that ricochet off of terrain for several seconds. I could be wrong, but I think only one Crystal Eye can be shot at a time, even if there are smaller crystals on the screen. Anyway, Mega Man becomes bright blue (cyan)/white while it is equipped, and the weapon is labeled as "C. EYE" on the pause menu.
Alrighty! We're halfway there. Tune in next month for Napalm Man, Stone Man, Charge Man, and Wave Man in that order! See you next time!
| The 'Shroom: Issue 226 | |
|---|---|
| Staff sections | Staff Notes • The 'Shroom Spotlight • Poochy's Picks • Directorial Address • Credits |
| Features | Fake News • Fun Stuff • Palette Swap • Pipe Plaza • Critic Corner • Strategy Wing |