The 'Shroom:Issue 225/Strategy Wing

Director's Notes
Written by: Hooded Pitohui (talk)

Hello, all you readers of The 'Shroom! Finally true to that banner up above these notes, Strategy Wing has set off into space with the rest of The 'Shroom to mark the end of the year. Unfortunately, space is rather crowded thanks to all of us launching off at once, and the radio reception's a bit lousy. I suppose one can't escape the holiday traffic anywhere, not even outside the atmosphere... Well, at least we have plenty of good reading material!
We have our full suite of regular sections for you this month, including plenty with extraterrestrial inspirations. From Killing the Killing Game Roles covering a powerset fit for a mind-altering alien to Four Steps for a 3D World drifting through cosmic debris, we have gifts for you straight from the stars. If you're looking to get back down to earth, though, we also have a puzzling boss battle in Brothership Boss Battle Guide, another final confrontation with Dr. Wily, and the very first war conducted by a burgeoning empire in So You Want to Romance the Three Kingdoms?. Whether your feet are firmly on the ground or your eyes are heaven-bound, Strategy Wing has you covered!
Welp, some kind of sensor's going off in the back of the shuttle, so I need to go investigate the issue. I'll leave you in the care of our wonderful team of writers. Until January, have a joyous and relaxing end of the year and enjoy the holidays!
Section of the Month
Just as suspected, the Coup of Gao Lan is already recognized by the public as a classic tale from the annals of history! Congratulations go to Lord Kong Rong's advisor Shoey (talk) on this stunning strategic victory and a Section of the Month victory. Tying this historical tale for first place, Sparks (talk) claims his own victories with his guide to triumphing over Wall Walkers, a Square, and Dr. Cossack himself. Rounding out our top three, Zange (talk) shows that sequels aren't always worse than the original with last month's collection of Rhythm Heaven minigame sequels. Congratulations to you three! Excellent work all around!
| STRATEGY WING SECTION OF THE MONTH | ||||
|---|---|---|---|---|
| Place | Section | Votes | % | Writer |
| 1st | So You Want to Romance the Three Kingdoms? | 5 | 27.78% | Shoey (talk) |
| 1st | An Overly Detailed and Funny Walkthrough of Mega Man 4 | 5 | 27.78% | Sparks (talk) |
| 2nd | Rhythm Review | 4 | 22.22% | Zange (talk) |
Brothership Boss Battle Guide
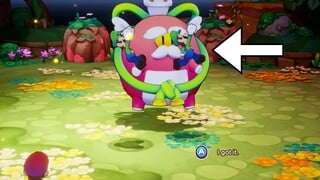
'Tis the season for a brand new Brothership Boss Battle Guide! There's no better place to learn how to beat the bosses of Mario & Luigi: Brothership than right here in this Strategy Wing section. Just in time for Christmas, our next "boss" is the big and jolly Great Conductor, AKA the one who brought Mario and Luigi into Concordia! Why did I put "boss" in quotation marks? That's because this guy isn't really a boss, but the boss music still plays in his fight, so that's why he's here.
After defeating Glohm Bowser, Mario and Luigi flee from Fortress Zokket to avoid the Glohmatic Quad-Ray. The brothers jump off the fortress and wind up on Conductor Island. They encounter the Great Conductor as well, who tells them that it was he who brought them here, and that Snoutlet is his assistant! Most important of all is him revealing the identity of Zokket to be Cozette, Connie's mentor. Oh, and he's super proud of Luigi too! Anyways, he challenges the brothers' bonds to test if they're strong enough to defeat Zokket.
These are the stats of the Great Conductor!
Great Conductor's stats
| Image | Level | Location | HP | POW | DEF | SPD | Type | EXP | Coins | Item(s) |
|---|---|---|---|---|---|---|---|---|---|---|

|
36 | Conductor Island | 3600 | 173 | 138 | 133 | Normal | 9500 | 996 | 1-Up DX |
Great Conductor's abilities
First things first: The Great Conductor disables Battle Plugs for this battle. That makes this the only battle since Ten to not feature them. Less writing for me at least! There is not a Luigi Logic either.
This battle is played in two parts.
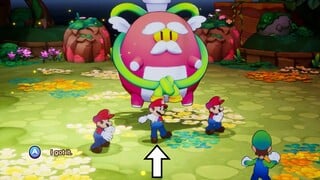
Part 1: Finding the real brother
The Great Conductor uses his powers to levitate a character (starting with Luigi) and cause them to disappear. He then brings cups containing the captured character and fake copies of them. The Great Conductor then tasks the free character to destroy the cup containing the real brother.
These are the stats of the Conductor Cups!
| Image | Level | Location | HP | POW | DEF | SPD | Type | EXP | Coins | Item(s) |
|---|---|---|---|---|---|---|---|---|---|---|

|
36 | Conductor Island | 366 | 173 | 138 | 133 | Normal | 0 | 0 | None |
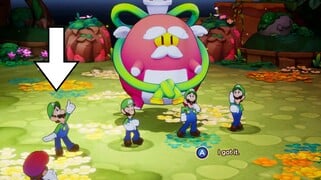
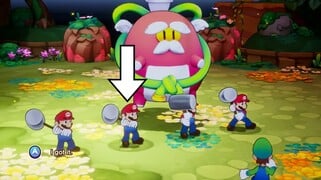
Before Mario or Luigi gets their turn, the Great Conductor has the captured character and their clones perform various battle animations. The clones will perform incorrect animations, while the real one does the correct one. Due to the HP of the cups, it is not likely to break one with one attack. If no cup is broken, the Great Conductor attacks with the cups. There are two attacks that can occur:
 Jump Defense: All the cups line up and charge at the free character in a line formation, with the Great Conductor following from behind the line. The free character must jump over the cups as they charge one by one. After the last cup, the Great Conductor is next. Because he is floating above the ground, he is avoided by staying still. Jumping into him will damage Mario/Luigi. Jumping on a cup will damage it as a counterattack, but because there isn't much time to avoid the next one, it's better to jump over them completely.
 Hammer Defense: The Great Conductor flies up into the air before the cups group up in front of the free character. They "fight" each other by knocking each other out of the way, although they will never attack Mario/Luigi directly. After several seconds of this, the Great Conductor descends upon the character, causing the cups to get scared and flee. A counterattack must be performed on the Great Conductor to stop him from landing on the brother, which will also damage him if done successfully. The cups can also be attacked while they are around, but only counter when the cup containing the real character is in range. You don't want to hit the others.

When a cup is destroyed, one of two things will happen, depending if it's the real character or not:
- If a cup containing the captured character is destroyed, both Bros. will reunite and the Great Conductor will allow for them to perform a Bros. Attack against him. However, if the attack rating is less than "EXCELLENT!", the boss will recover all damage taken from the attack. Additionally, each Bros. Attack must be different too, otherwise he will heal.
- If a cup containing a fake copy is destroyed, the Bros. will seemingly reunite, but the copy will stop and attack the free character, dealing no damage. The Great Conductor will then zap the free character with an unavoidable lightning strike that deals damage. The captured character will then have their cup removed before they return to their position.
So... you want to save the captured character because it allows you to deal damage to the boss while you avoid taking damage! If the free character is defeated by an attack - including a lightning strike - then it will be an immediate game over. Don't let that happen!
Regardless if you're successful or not, the next round of "find the brother" will begin. There are four rounds total, each one having a different number of cups and animations to watch:
- Round 1: Two Luigis that perform jump animations
- Round 2: Three Marios that perform idle animations seen during battle (when it's not Mario's turn)
- Round 3: Four Luigis that perform thinking animations during battle (when it's Luigi's turn)
- Round 4: Four Marios that perform hammer defense animations
Part 2: Go all out!
After three correct guesses (with three EXCELLENT! attacks performed) or all four rounds have passed, the Great Conductor commands the Bros. to perform various Bros. Attacks while he charges up a big lightning attack. It takes three turns to charge, but once it's ready, the boss will use it to wipe out both Mario and Luigi, resulting in a game over.
Now, you have to get rid of the Great Conductor before he gets rid of you! You must perform different Bros. Attacks, and they all have to be EXCELLENTS! Once the Great Conductor loses all of his HP, the battle is won. Don't worry... he's perfectly fine.
Solutions
These four images show the real character to find during the first part of the battle!
Jumping Luigis: The real one jumps with one hand raised and both legs extended away from each other.
Idle Marios: The real one holds his arm while he spins it.
Thinking Luigis: The real one points upwards towards the Command Blocks.
Hammer defense Marios: The real one wields the hammer normally over his shoulders. Don't confuse it with Luigi's animation, which has a longer hammer held further away! Honestly, it's difficult to explain this one. Sorry...


Tips and tricks
Recommended gear
You're stranded on Conductor Island, so it makes sense that there's a peddler here! Here's the best gear he has to offer:
- Boots: Astonishing Boots
- Hammer: Astonishing Hammer
- Wear: Astonishing Wear
This gear is quite expensive however! If you can't afford it, that's alright. The equipment you had for the Glohm Bowser fight will suffice. You could also use the Double-Edged Boots and Hammers, but they're only slightly stronger and cause the Bros. to take damage when attacking... I wouldn't recommend them at this point honestly.
As for the gear you can't find in shops:
- Gobblick Boots DX: Stronger than the Astonishing Boots by four points and grants five points to STACHE. They also restore 10% of all damage dealt, so they're still useful even after Glohm Bowser. A nice reward for defeating Glohm Gobblick.
- Full-Belly Hammer DX: Stronger than the Astonishing Hammer by four points, and increases damage dealt by 30% when at full HP! Found in a ? Block on Conductor Island, so try to find it before the battle!
Use whatever gloves and accessories you wish! Bring ones that fit your playstyle.
Other things
Despite floating above the ground, the Great Conductor can still be hurt by attacks that only hit ground enemies. This includes the Green Shell and Clockout Blow Bros. Attacks.
Like I said earlier, it's better to dodge the cups when you have to defend by jumping, unless the last one contains the real Mario or Luigi.
Items aren't really needed in this fight, unless you have little BP.
The Great Conductor cannot be attacked while the cups are around. Additionally, he will recover from Jump and Hammer attacks, even if they're EXCELLENTS!
I hope you've been practicing your Bros. Attacks! You'll likely have to use ones you don't normally use, so make sure to practice up on your toughest Bros. Attacks before the fight.
Try to start off with your strongest attacks (think Clockout Blow and Yoo Who Cannon). They'll help speed up the fight.
If you deal enough damage, you can actually defeat the Great Conductor before the second part of the battle starts. I've done it!
During the attack when the cups group up, you can counter the same cup multiple times, resulting in lots of damage.
The Great Conductor still takes damage from counterattacks.
Yeah, this one was on the shorter side. The Great Conductor is my least favorite boss in the game, so I'm glad he's over with. We'll be starting 2026 with the second optional boss, Glohm Sharpcask, so that's something to look forward to! Merry Christmas to all, and to all a good rest of 2025!
Killing the Killing Game Roles
Welcome back, readers, to another edition of Killing the Killing Game Roles, the section where we analyze various player roles from past Mario Boards Killing Games in hope of answering the question, what makes for a good role? By analyzing what's come before, we can discover some tricks and tips that could even help you design your own roles!
We're back for the final 'Shroom issue of the year, and with our out-of-this-world special theming, I knew I needed a role that connected straight to space. However, to date, there has been no Ultimate Astronaut or Astrologer role on the Mario Boards. I considered taking a look at an Awards Killing Game Odyssey role with the game's intimate connection to magic and stars, but with the limited time I have and the fuller analysis AKGO roles tend to necessitate, those ideas will be placed on the backburner. Instead, we're returning to the world of Awards Killing Game 3, where today's role may have just enough... alien qualities to qualify.
AKG3 - Ultimate Memory Manipulation Specialist
You are Beheeyem. You were working with your two partners to track down the target you had been ordered to capture, but you seem to have taken a wrong turn. You've been trapped in this Killing Game for now, but, with a little memory manipulation, you won't have a problem avoiding being lynched, will you?
- As Beheeyem, your primary power is your ability to alter people's memories. When you submit your night actions, you may submit a false memory, as simple or as detailed as you would like, which you would like to implant in the minds of other players. At one point in the night, you may flash the colorful lights on your hands, and anyone else who is present to see the flash will have the false memory implanted in their mind. The false memory will be reported in their night results as something they saw during the night, and will be completely indistinguishable from any true recollections. Of course, if you aren't careful, you could always introduce mutual contradictions, so beware of that.
- Since memory manipulation is a very powerful tool, you don't have many other powers. You can, however, use your flashing lights at any point during the night to attempt to blind or distract players. You can only insert a false memory once a night, but feel free to make use of your lights as often as you'd like.
- Finally, you have one power you may only use once in the game. During a day phase, you can tell the hosts that you'd like to set up Trick Room for the following night. Trick Room will be announced as a special weather condition at the start of the night phase, and players' speed stats will be effectively reversed. The fastest players will wake up latest and move slowest, and the slowest players will wake up the earliest and move the fastest.
- As a Beheeyem, you primarily rely on your psychic powers and you lack physical strength. However, you are surprisingly social and, your species having hidden in the Desert Resort for many years, stealthy.
- FA: Your ruse would be ruined completely if you were to give somebody a false memory about themself. How would somebody see their own self doing something across the room? You must take care not to give a player a false memory about their own actions.
Stats
- Strength - 1
- Stealth - 4
- Stamina - 3
- Speed - 3
- Social - 4
The Ultimate Memory Manipulation Specialist is drawn from the Pokémon Beheeyem, but specifically its depiction in the Pokémon Super Mystery Dungeon game. This role came courtesy of Hooded Pitohui (talk), so I wouldn't be able to tell you more about the particulars of the character. What I can tell you is that the MMS was possessed by TPG (talk) for his stint in the Peach's Castle map. How does this role hold up today, and will I be psychically manipulated into calling it the best role ever made?
General Overview
As is apparent by role name and description, the Memory Manipulation Specialist has one centralizing role trait, with a few other powers surrounding it. This key aspect - the memory manipulation - places it in company with a few other roles that focus on messing with another player's interpretation of the night. I'm not sure what a good name for this archetype would be other than, well, memory manipulation. The Psychiatrist from AKGO is another example of this broader archetype, instead theming around amnesia and phobias applied through syringe injection. It's a pretty baseline concept, really: with people's eye witness accounts being some of the most important elements of KG investigation, why not incorporate a role that mixes up the believability of these accounts? In a larger player pool especially, where there's plenty of players to potentially witness someone's actions on the map, a memory manipulator's obscuring nature can be extra fun.
Although this is the main area of expertise, there is also the Trick Room role ability, which... forgive me if I'm mistaken in saying this, but I believe this might be the first role in a Mario Boards KG to produce a unique night/weather condition? There have been plenty since - AKG4 saw roles resulting in Bug Night and Clown Night, as examples - but for my money, I can't recall any from 'Shroom KG or AKG2 that would've caused a night effect. So good on the MMS for breaking new ground for our forum! And if that isn't true, we'll consider this a complimentary back pat anyhow for being one of the earlier examples.
Ability Application
So how do these traits interact with the game itself? We're starting with the big one first. With a simple flash of light, the Memory Manipulation Specialist can subplant a falsified memory of their exact description into the recipient's head. Notably, the role card mentions that the memory can be as detailed of a description as the MMS would like it to be. This is a huge boon for this role overall, and is perfect for establishing tricky false leads for the player's actions. For instance, let's say you plan to stab somebody with a kitchen knife. While camping out in the kitchen, you could flashbang somebody walking by with the memory of an entirely different player rooting around in the silverware drawer, including notable details about how they glance around before searching within. Or, you could give something the fake memory that you're KO'd in the corner, with a large bruise over your head, giving yourself an alibi for a potential gap in your testimony. There's also no pre-written limit to how long the memory has to be, meaning that you could reasonably falsify an entire sequence of events that never happened. This role ability is tailored towards a cunning player who's more willing to think of scenarios where their actions can be easily shrouded by the memory manipulation.
I think the aspect of a flash of light is really interesting too, mechanically. Rather than just targeting a singular player, you have the potential to target an entire room of people - or even more, if you have some way to magnify the light show. There's also the fact that light bends around certain shapes in certain ways, resulting in differing results of who might witness the flash. I like this interplay a lot, because it provides more environmental consideration than just a baseline "I put the memory in this person's head."
Then there's the flashes of light that don't produce memory. There's still some good use cases for these, despite their more limited scope. A distraction technique, for one, or an opportunity to put someone on the back foot if they're attacking you. Whereas the memory manipulation is more of an "active" ability, I see this one as a more "defensive" ability, a good passive back-pocket for its limited uses.
Finally, there's the Trick Room ability. AKG3 was hosted at a time when the Speed stat made a fairly notable impact on night actions; as you can tell, they facilitated the order in which people woke up for the night, and generally had an effect on the speed of actions. So a night element that inverts this dichotomy is interesting... but given that the Memory Manipulation Specialist has a 3 in speed, Trick Room actually has almost no bearing on the player using it. Therefore, it's hard to really imagine its versatility for the MMS, unless they're really privy to where somebody with 5 Speed ended their night. It makes me wonder how else this power could've operated - if it made every player but the MMS remarkably sluggish in one specific room where it's activated, for instance.
Environmental Functionality
In terms of environmental functionality... there's none to consider! This role, as currently written, would work perfectly fine on any KG map the host is designing. I suppose it would be helpful if the map had some other source of lighting, so the quick flashes aren't too disconcerting to other players? But every map has sources of lighting so that's not a concern whatsoever. Just don't design "Cave Where You Can't See Anything KG" and this'll be fine.
Drawbacks & Balances
Despite what seems like a pretty powerful ability, there is something substantial holding this role back: its disconnect to hard evidence.
Here's what I mean. Say the Memory Manipulation Specialist plants the memory in someone's head that there's a massive hole in the ceiling. Okay, great. But if someone goes to investigate that ceiling during the day phase, and there isn't a massive hole present, that's an obvious discrepancy between night results and daytime discoveries. Additionally, other player's night results could prove to be their own contradictory evidence. If you plant the false memory of someone being in a room, but that person was verifiably witnessed in another room by multiple players, your memory planting isn't going to hold much weight. There isn't an obvious, easy way to mitigate this. My best recommendation would probably be ensuring the room looks like how you're making it look in the memory - if you make someone think another player rifled through the silverware drawer, you better be sure to take a knife out of there. Still, this isn't a perfect fix, and means that there are some things this role simply cannot fabricate effectively. In some instances, it might lean more towards providing a minor investigative distraction, over providing the scene that makes a kill attempt viable.
There's also the matter of the flashing light used to activate the memory. If you use this role on multiple nights, there's a good chance players could puzzle out what the cause of the weird memories are. There are some creative workarounds to avoid this, though, like if you cover up the flash with a camera going off, or find some other reason to make it seem like the light was from another source.
Lastly, there's the Forbidden Action, where you cannot accidentally plant a false memory which describes a player, to the player it describes. If I'm making up something Pitohui did, I can't make Pitohui then witness it. This is mostly to add an interesting dynamic to its broader range or group use, and I honestly think it's a fun little bit of limitation. It necessitates more clever play to ensure that nobody's seeing themselves in their mind's eye if the MMS decides to use this role at a party.
Player Responsibility
For the player, they have the primary responsibility of using the memory manipulation smartly. That might seem silly to say; all roles come with the inherent responsibility of playing smart with them. But the Memory Manipulation Specialist comes with few guidelines and many stipulations. There's simultaneously expansiveness in how the memories can be handled and restrictiveness in how those memories are handled effectively. Essentially, the power of the MMS comes down to how the player a) crafts their fake memories and b) delivers those fake memories. If the player can effectively deliver in both areas, I'd say the MMS has a particular potency.
Host Responsibility
Host responsibility isn't as major of a concern for this role. The primary one would be whenever the Trick Room effect is activated, ensuring that the players' night actions are conducted accordingly. For the memory manipulation itself, its responsibility is really in the player's hands.
Overall Thoughts
On the whole, the Memory Manipulation Specialist is a mixed bag. In the current-day Killing Game sphere, this exact powerset would likely be seen as underpowered. Memories matter plenty, but evidence tends to matter more, and plenty of other roles outclass the MMS in what they can deliver physically. That being said, its promise of a confusion role is a compelling one, and I'd recommend reviewing this role as a baseline example of what one in this archetype can look like. With a little bit of buffing and a careful player's hand, a memory manipulator is sure to contribute to a fascinating Killing Game case.
That’s all for this month. Tune in next month for more Killing Game goodness!
Four Steps for a 3D World
Written by: Hooded Pitohui (talk)
When I think of Mario and outer space together, the first level to jump to my mind is the Space Junk Galaxy. Is it the most significant level in the Super Mario Galaxy duology? No. Does it execute on its ideas the best of any galaxy? I wouldn't say so. Does it provide any insight into how the developers of Super Mario Galaxy constructed missions? Well, yes, but I would point to other missions as case studies before it.
So what is it, then, that grips me about this level, and why am I highlighting it in this issue? Partially, it's the aesthetic of the galaxy. The planets and debris of the Space Junk Galaxy are spread thin; there is a sense of emptiness to the galaxy. There are few large planets here, and even the largest here lack the usual happy platforming playground feel of the grassy Honeyhive Galaxy or the lava-filled Melty Molten Galaxy or the icy mountain in the Freezeflame Galaxy. These planets lack atmospheres and lack the standard Mario level themes of lava, ice, castles, caves, water, grass, and desert. They are just isolated drifting junk and rocks, directly exposed to the vacuum of space. The galaxy even goes out of its way to make Mario feel exposed to the void of space, featuring fewer Launch Stars and forcing the player to cross the voids between planetoids by using Sling Pods and Pull Stars.
Between the emphasis on empty space and lovely music, the Space Junk Galaxy captures what Jacob Geller describes as the quiet sadness in Super Mario Galaxy. It is not the fast-paced athletic course or sandbox full of toys seen in the usual 3D Mario level. It may not illuminate the mission design principles of the game, but it speaks to the narrative and aesthetic aims and design principles of Super Mario Galaxy. I am not going to discuss how it fits into the narrative and aesthetic direction of Super Mario Galaxy in great detail; after all, this is a section about level design from a gameplay perspective. I will, however, touch lightly on the topic as we go.
We'll get there in due time, though. For now, let's jump into the mission. The very first mission a player has access to in the Fountain Dome - that is, the second world of the game - "Pull Star Path" emphasizes the emptiness of the Space Junk Galaxy by having Mario cross large fields of asteroids directly with Pull Stars. It's great as an introduction to the galaxy's aesthetics, but how well does it work in terms of gameplay?
| Step | Notes |
|---|---|
Skill Gate 
|
The mission begins with a simple, effective skill gate. Mario starts on a large, empty platform with a long crystal-like planet right in view. A single Pull Star separates the two, prompting the player to grab it and drift past it. It's a simple little test to make sure players can use Pull Stars to navigate stretches of space and to get players used to falling into a planetoid's gravity after using Pull Stars. |
Introduction 
|
The cylindrical shape of the crystal-like planet encourages players to cross to its other end and helps them acclimate to walking on small bodies where gravity permits walking on any part of the surface. On the far end, Pull Stars await. A series of Pull Stars lead the player through a small asteroid field. This is a pretty bog-standard Introduction. There are no threats here; failure results in falling back to the crystal-like planet with no consequence other than a minor loss of progress. There are some Star Bits and Coins scattered around to entice players to experiment with drifting past Pull Stars or using the pointer to collect Star Bits even while using Pull Stars. It's safe and lets players develop familiarity with a mechanic. If there were any question if this was an Introduction zone, the game files outright call this "G Capture Tutorial Zone"! |
So far, this is what we would expect from a mission. Unfortunately, things fall apart right after this (not too surprising, given that this game was developed before the four steps were discussed). Our usual four-step structure is only barely relevant to the remainder of the mission, so I'll approach the rest part-by-part.
| Step | Notes |
|---|---|
Star Chip Spheres 
|
At the end of the asteroid field, Mario is deposited on a trio of glassy spheres with some Zap Balls and five moving Star Chips. This is where the mission's secondary mechanical focus crystallizes. Alongside using Pull Stars to cross gaps, this mission focuses on making sure players can navigate small bodies with a spherical gravity field. Here, players jump between the three spheres and walk all around them to collect the Star Chips. It's an effective little test to ensure players can navigate spheres. It could almost be called a second Introduction section, though the Zap Balls do make it slightly more dangerous than normal. Once all the Star Chips are collected, a Launch Star shoots Mario through a crystal sticking out of one of the galaxy's few large planets, though he only flies by this planet on the way to a... |
Intermission 
|
...disused rocket drifting through space. This pit stop does reinforce the "spherical gravity fields surrounding small objects" element of the mission, but it doesn't do much to build on the idea or introduce new elements to it. For that reason, I wouldn't call it an example of the Development step. Gameplay-wise, the long, cylindrical shape of the rocket does draw players towards its prow (after starting on its aft), and that naturally guides players to the next bunch of Pull Stars. Other than that, this feels like a pause in the mission when it comes to gameplay. |
That moment where Mario smashes through a crystal during the planetary flyby between the three glass spheres and the rocket has little relevance to the mission's gameplay, but it helps to elucidate another of the mission's aims. This mission attempts to introduce the Space Junk Galaxy as a place. It tries to make the Space Junk Galaxy feel like an actual collection of drifting junk that Mario is visiting and exploring, rather than merely a collection of platforms that exist in service of the gameplay.
The first Super Mario Galaxy does this often, actually. Usually it does it by having the player start on the same planet in each mission of a larger galaxy, sometimes showing the starting planet undergoing changes. Before Space Junk, players see this in the Honeyhive Galaxy. The starting planet is welcoming and peaceful in its first mission, is disturbed by the dropping of large stone wheels in the second mission, and turned hostile by a full-on Mandibug invasion in the third. Later, Freezeflame Galaxy hammers home its theme by having hot and cold collide on its previously-peaceful starting planet, and the Melty Molten Galaxy introduces a galaxy-wide meteor storm by stripping away its Lil Cinders and some of its metal platforms to make it feel emptier and less lively during the bombardment. These little touches aren't as extensive as Super Mario Sunshine making whole story arcs for its NPCs across missions, but they make the larger galaxies of Super Mario Galaxy feel more developed as places that exist and change outside of Mario's visits than the levels of Galaxy 2 or 3D World. You can get a little elaboration on this in Quizmelon's special in this very issue.
Returning to our main topic, Space Junk Galaxy builds its sense of space by showing players glimpses of parts of the galaxy they do not visit in a given mission. The asteroid field players venture through at the beginning of the first mission reappears in the second, but the player ventures off in a different direction using a Launch Star on a Starshroom. The second mission asks players to eschew the familiar to confront an external threat that has breached the peaceful Space Junk Galaxy, reinforcing this by having Kamella's airships appear more lively than and better maintained than the abandoned rocket drifting through space in the first mission. Meanwhile, the large planet that players fly by in the first mission reappears in the third, rewarding players with the chance to explore it at long last and re-grounding them in the familiar. It returns in the third mission, because the third mission returns to focusing on the natural state of the Space Junk Galaxy.
As I see it, the flyby after the three spherical planets and the intermission on the rocket don't contribute to the mission's progression from a gameplay perspective - and that's okay! Instead, they contribute to building up the Space Junk Galaxy as a place. We don't usually venture outside of looking at a single mission, but to understand "Pull Star Path", we do have to step back and put it in dialogue with the galaxy's later missions.
All that said, there's more "Pull Star Path" to discuss!
| Step | Notes |
|---|---|
Joining of Mechanics 
|
The "next bunch of Pull Stars" are, interestingly, encased in glass spheres! This has potential, but its potential is woefully squandered. I can't help but think that, if this were moved later into the mission, it could make a good Twist section where the Pull Star focus of the mission and the "learning to walk on small, spherical surfaces" focus of the mission come together. Maybe the Star Chip hunt and the Zap Balls could have been saved for these planets, and these planets could have been spaced out a bit more to make their internal Pull Stars the only way to navigate between them. As they are actually implemented, though, these planets... just don't add much, only leading to a second bunch of Pull Stars in an asteroid-lined path. |
Development 
|
I'm being very, very generous in calling this a "Development" section. It's really just a slightly longer version of the asteroid field from the mission's start, with the only complication being one turn that players have to navigate. It's the bare minimum to qualify as Development. Some of the debris here is pretty, though. |
Penultimate Planet 
|
Past the second asteroid field, Mario falls onto the base of a T-shaped planet. One could possibly argue this develops on walking across the surface of unusual planetoids with spherical gravity fields, especially with some hidden ? Blocks on the other side of the T's stem, but I think that's a bit of a stretch. Players are guided towards the top of the T by arrows on the ground and the shape of the planet itself, contending with a few Spoings to reach it. At the top, there are some Toads (and a single Goomba) trapped in crystals that players must free in order to advance. It's a bit out of left field, with no indications the Toads are here beforehand, and the whole sequence feels set apart from the rest of the mission. |
At this point, I feel that the mission has lost its way in terms of gameplay progression. The Pull Star focus entirely disappears, and acclimating players to walking on small planetoids also begins to disappear as a focus. From a gameplay perspective, the shift to freeing Toads is inexplicable. It's a stark contrast to Space Junk's later missions, which have well-defined and well-developed mechanics like shell throwing or Sling Pod use. Yet, while questionable from a gameplay perspective, this segment of the mission again helps to develop the galaxy's narrative - and a narrative that stretches outside of this galaxy alone.
The appearance of the Spoings foreshadows the third mission of Space Junk Galaxy, where they appear in greater numbers and their silk becomes prominent in the form of Sling Pods. Tarantox, whose nest can be seen in the background of the previous missions, gets his reveal and his moment in the spotlight in the third mission. Having the Spoings appear in mission one establishes them as an internal threat. Unlike Kamella, they're already in Space Junk Galaxy, biding their time and quietly spreading to the point they infest much of the galaxy by the third mission.
What about the Toads? Well, the Toad Brigade reappears in the later missions of the Space Junk Galaxy, with their Starshrooms providing access to Launch Stars that whisk Mario away to, say, Kamella's fleet. This appearance helps to set those later appearances up, but it's also, subtly, an introduction to the Starshroom. After the Toads are encountered in the Honeyhive Galaxy, they don't appear much in the Terrace galaxies. Instead, they hang out on the Comet Observatory, working with the Lumas on some kind of spacecraft. Once the player obtains seven stars, they complete this spacecraft, with the Starshroom appearing in the Observatory's Garage. After collecting seven stars, players gain access to the optional Flipswitch Galaxy and the boss-focused Bowser Jr.'s Robot Reactor. Presumably, the developers didn't want players to miss the first appearance of a Starshroom in a galaxy, so they opted not to place it in the former, and they didn't feel it fit the tone of the latter. Space Junk Galaxy becomes an ideal candidate for introducing the Starshroom, being all but required for casual players advancing through new levels as quickly as possible while not having the tension of a major boss battle. This odd moment with the Toads is included to cap off the story of the Starshroom's construction.
Once again, to understand what this mission is doing, we have to place it in dialogue with other pieces of the game. This method won't help us much with the final portion of the mission, though.
| Step | Notes |
|---|---|
Ending 
|
The mission concludes by sending Mario to a platform overlooking an empty void surrounded by floating blocks. Upon approaching the void, the blocks snap into place, forming a pathway. As Mario moves away, the blocks return to their original positions. This area tasks the player with navigating a self-assembling and self-destroying pathway in order to collect five Silver Stars. It has, ah, absolutely nothing to do with the rest of the mission. You'd think there might be some Pull Stars used to cross a gap somewhere, but, nope! This is entirely disconnected from the rest of the mission! It's fun, but it feels tacked-on, almost as if the developers didn't have a good idea for ending this mission and grafted on a different idea. |
Is "Pull Star Path" a well-designed mission when seen through the lens of our usual four steps? Not at all. Is it well-designed from a gameplay standpoint in general? Ehhh, it's a bit of a mishmash of underdeveloped ideas, so I wouldn't give it any commendations. At most, it's sufficient. It's sufficiently fun from a gameplay standpoint, but not groundbreaking or memorable.
No, what makes this mission memorable is the way it introduces the Space Junk Galaxy as a place. Its strength is in establishing the aesthetics and atmosphere of the galaxy, and setting up a narrative for the galaxy as a whole. I'm sure gameplay was a consideration for this mission's designers, but I do not think it was their sole consideration, or even their highest priority. Super Mario Galaxy has a unique blend of gameplay, aesthetic, and narrative that sets it apart from other 3D Mario games. It's a game that feels more intentional in its themes and narrative focus. It strives to be more than just a typical 3D Mario game - and I'm not the only one who feels that way! In trying to be more than a 3D platformer, Super Mario Galaxy necessarily grapples with a tension between establishing and advancing its narrative and themes and delivering the polished, breezy, and fun gameplay experience expected from Super Mario. Oftentimes, it finds elegant solutions to this tension and blends its gameplay and narrative magnificently. At other times, it sacrifices one of its goals for the benefit of the other. I think that happens here in "Pull Star Path"... but, then, the next two missions in the galaxy build upon the atmosphere and narrative it has set up while having tightly-designed gameplay progression, so I don't think that's to Space Junk Galaxy's detriment.
All of this is to say, what "Pull Star Path" teaches us is that, while it's important to always keep a level's mechanical progression in mind so you can present players with new and satisfying challenges, there are times it's okay to prioritize a level's aesthetics or narrative over introducing a new mechanic. With that cosmic lesson learned, four trapped Toads, three encased Pull Stars, two asteroid fields, and one lovely musical track in the form of "Space Junk Road", this has been Four Steps for a 3D World!
Rhythm Review
Hello and welcome back to Rhythm Review! This is Zange, and I have been so horrifically busy since Thanksgiving that it’s a miracle my sections got done this month! Not gonna dwell on that too much. Anyways, last month we covered Stage 6 of the original Rhythm Tengoku on the GBA, including our first remix with EVERY rhythm minigame! This month, we’re trucking right along into Stage 7. We’re still in sequel territory and it’s not getting any easier!
As a reminder: In most Rhythm Heaven games, a stage consists of four rhythm minigames, followed by one remix, in which all the other minigames in the stage are put together in a new way to new music. However, Rhythm Tengoku is weird and has five minigames in each stage instead of four, and there is still a remix. Let’s jump in!
Karate Man 2

Starting off the set is Karate Man 2! Karate Joe is back, baby! Much like the original Karate Man, you hit the A button to punch flowerpots and other objects that get thrown at you in rhythm. They’ve switched out the yellow background for purple, but otherwise it’s visually the same as well!
Gimmicks
The big gimmick here is that the tempo will shift throughout the song - it could be normal, it could slow down, it could speed up, anything is possible! Worth noting though, the tempo shifts are the same every time with one exception: the tempo of the music at the very end for the last input will always be random.
How to Get That Superb
The criteria for a Superb here is pretty simple: You need to have good timing when the song slows down and speeds up, and there’s an input near the end where the tempo is super slow that you need to hit perfectly. It sounds pretty simple, but this rhythm minigame is INSANELY strict when it comes to grading. Don’t be too shocked if it takes you a few good tries to get it…
Difficulty Rating
Hooo boy, we’re really getting into the tricky ones now… Due to the potential for the tempo shifts to throw players off and the insanely strict grading when it comes to getting a Superb, I’m giving this a 3/5.
Rhythm Tweezers 2

Next up, we have Rhythm Tweezers 2! I hope you enjoyed your first round of vegetable hair plucking, because there’s more of them this time! Similar to the original Rhythm Tweezers, you’ll hit either the A button or the D-pad to pluck out hairs from the vegetables in the rhythm presented to you. Pluck more hairs = more profit!!
Gimmicks
Some of the patterns here are significantly more complicated than what you see in the original. Don’t be surprised if you have to alternate between the A button and the D-pad here because I’m telling you now, it WILL happen.
How to Get That Superb
Pretty straightforward criteria here for a superb. You need to make sure you have good timing when plucking the long hairs, have good timing in sections where there’s a lot of hairs, and perfectly pluck the clump of three very close hairs at the end. It might take you a bit to nail the timing for the clump at the end, but a Superb here is very doable.
Difficulty Rating
We’ll give this a 2.5/5, as it is harder than the original but the grading here is more lenient compared to Karate Man 2.
Ninja no Shison

Moving on, we have Ninja no Shison! This time, you’re playing a man trying to defend his lady from a group of thugs! They’re chucking rocks instead of arrows, and the stick is your sword! It’s almost like you’re the descendant of the ninja if you think about it… Anyways, gameplay is identical to that of Ninja Bodyguard. Interesting to note that Remix 5 marks the debut of the visuals that are used here!
Gimmicks
Much like Rhythm Tweezers 2, many of the patterns you’ll see in Ninja no Shison are more complicated than what you’ll see in the original. This includes a five-rock strike and one instance where you need to block two rocks almost simultaneously.
How to Get That Superb
In order to get a Superb here, you have to be able to perfectly nail both the five-rock strike and the two near-simultaneous rocks, on top of having good timing throughout the rest of the rhythm minigame. This will probably take you a few tries, as the timing for both of those strikes is noooot particularly easy.
Difficulty Rating
I think we’re gonna go with a 2.7/5 here, that feels pretty fair in comparison to everything else happening in this set.
Night Walk 2

We now go to Night Walk 2! We’re once again going for a nice stroll among the stars! Just like the original Night Walk, you’ll hit the A button to jump in time to the music!
Gimmicks
Night Walk 2 brings us something truly devastating compared to the original: electric fish in the sky. If you hit the A button while you are right under one of these fish, you will get shocked and the rhythm minigame will immediately end. When you encounter one of these electric fish, you are supposed to NOT jump. It will not count as a miss if you do this.
How to Get That Superb
Much like the first Night Walk, as long as you’re able to make it to the end while staying consistently on beat with your jumps, you should be able to get the Superb here. As long as the electric fish don’t mess you up and make you start over, this should be a slam dunk.
Difficulty Rating
Even with the electric fish being here, this isn’t that much harder than the original… We’ll give this a 1.7/5
Marching Orders 2

Capping off our normal rhythm minigames in this set is Marching Orders 2! This time, you and your fellow soldiers are… dressed up as bunnies? And taking orders from girl also dressed like a bunny?? Weird game… Anyways, like the original Marching Orders, you’ll either march to the beat (A button), stop marching (B button), face right (right on the D-pad), or face left (left on the D-pad) depending on the commands given. Time to march our cute bunny selves to victory!
Gimmicks
For starters, this sequel is significantly longer than the original. Additionally, some of the commands are shouted quickly, meaning you’ll have less time to react. There are also a few instances near the end where you will have to turn your head in a given direction while you are marching. Talk about a bump in difficulty…
How to Get That Superb
Okay, the criteria for getting a Superb here are a liiiittle different compared to the original. Part of it is actually remembering all the cues from the original, since there’s not any new ones introduced. Additionally, you need to be able to have consistently good timing on your marches, and good timing on the head turns even while marching. This should be a fairly easy one to get, though a refresher on the Japanese words for ‘left’ and ‘right’ might be helpful before going into this.
Difficulty Rating
Crazy to think the original of this was all the way back in Stage 1… Anyways, I’m gonna give this a 1.8/5, because it is a bit more difficult than the original and the extended length absolutely contributes to that.
Remix 7

We’ve finally reached the remix for this stage! This particular remix is unique in that it’s not quite a remix of rhythm minigames, it’s actually a remix of remixes! That’s right, the background music for this remix is a medley of the songs from Remixes 1,2 and 4. The gameplay tries to blend elements of the original remixes with new things that weren’t in the originals. It’s actually an incredible concept for a remix and I’m kind of sad that it hasn’t been done again since. (sidenote Rhythm Heaven Groove was NOT released at the time of writing, so it’s still possible…!)
Gimmicks
We didn’t really discuss this with Remix 6 due to the special nature of that one, but with remixes that appear in sequel sets, they don’t just remix the rhythm minigames in that set. They can remix ANY of the rhythm minigames that have appeared in the game. So stay on your toes here, because anything and everything is fair game! Not really a gameplay gimmick, but this remix also introduces visuals for a handful of rhythm minigames that aren’t seen anywhere else.
How to Get That Superb
You’re probably sick and tired of hearing me say this by now but I’m gonna say it anyways: This is a remix! All remixes use the same lines of text depending on what result you get, so it’s a lot harder to tell where the line is between a Superb and an OK. However, if you’ve gotten a majority of Superbs up to this point, you’ll probably get it here too.
Difficulty Rating
Maaaan some of these transitions are snappy… This feels about on the same level as the last remix, so we’ll give it a 3.2/5.
Final Remarks
I’m slowly realizing that most of the sequels in this stage come from Stage 1 and I don’t know how I feel about that… I do enjoy the changes they made to make them more difficult though; it makes them feel very distinct in that manner. We’re almost at the last stage of the game though, and there are certainly some doozies in there. I’ll see you back here next month for Stage 8!
Pitohui's Pokémon Academy
Written by: Hooded Pitohui (talk)

Salutations, class. I presume you're excited for the holidays, yes? December is truly a wonderful time of the year, what with the cheer, and the chill, and the end of the term. The lengthened nights and cool air make this time of year ideal for camping beneath the great expanse of the sky and admiring the celestial dome. The luminous stars and the beautiful moon stoke the imagination. With their great sizes and the vast distances between them, they inspire awe. With their transiting across our sky and allowing us to trace out patterns, they inspire whimsy. Who among us has not, at some point or another, imagined a creature descending to the Earth on the back of a streaking meteorite?
Perhaps one day we shall find such creatures... or perhaps, we will discover, that they are already in our midst. For ages it has been speculated that the Cleffa line which now populates this planet came to us from beyond the stars. Now, one must always keep a healthy skepticism regarding so fantastical a claim, but... I must admit, once one witnesses a sparkling Mega Clefable in flight, the fantastical begins to feel concerningly plausible.
We have much yet to discuss, so I will belabor the point no longer. To close out this year with a surprise, I have brought along a Clefable... as well as its Mega Stone, the Clefablite. For today's session, our topic will be raising a Mega Clefable. This, however, will require that we familiarize ourselves with new paradigms in battling, acclimatizing ourselves to the fast-paced battles practiced in Lumiose City. Shall we begin?
| The following information applies to Pokémon Legends Z-A |

It sounds simple on the surface, and in practice, it... remains simple. It does, however, require re-evaluating certain moves or strategies, and throwing out past assumptions regarding how particular moves function. I do not intend to overwhelm you by launching into every detail and particular case right this moment. Truthfully, the system is so new that I don't know all of its finer details either! Just know for now that Abilities do not exist in Legends Z-A (put an asterisk on that for the future), so we will not be covering them here. We will discuss a few other new elements that must be considered when selecting a moveset later, and will touch upon other changes to the battle system or particular moves as they become relevant.
What I will add here is that the format of competitive battles (dropping the flavoring for a moment - player vs. player battles) is markedly different than past games. Here, battles take the form of a timed battle royale with up to four participants. Participants are limited to three switch-outs over the course of the battle, making deciding when to swap a Pokémon an important strategic decision. Landing the blow which KOs an opposing Pokémon earns you a point. Whoever has the most points when time expires wins. This makes having a strategy for scoring KOs on weakened foes vitally important. All of that said, however... I am not the most qualified to instruct you in competitive battling, and I will not attempt to do so. As always, we will discuss general strategies for raising Pokémon, which you can try out, learn from, and improve as you wish.
To close out this preamble, I'd like to express gratitude to the Bulbagarden Archives, from which the images used here are sourced. IVs, EVs, and the like remain relevant in Lumiose, so our usual reference for terminology can be found below!
Base Stats: Base stats are the values associated with a particular Pokémon species, and are the same across every individual Pokémon of a given species. You have no influence on them. You can think of them as traits tied to a species. A chimp isn't ever going to be able to get as good as digging as a mole will be, and, likewise, an Abra is never going to have the defensive prowess a Shuckle has.
Individual Values (IVs): Individual values, as their name implies, are associated with individual Pokémon. They range from 0 to 31 in each stat, with 31 being considered a "perfect" IV and higher numbers corresponding to different stats. Magikarp A and Magikarp B will have the same base stats, but they may very well have different IVs. To stick with the animal analogy, one mole may be born with larger claws than another mole, and that first mole is probably going to have an easier time digging through dirt than the latter. Individual values are set in stone, strictly speaking, but you can use Hyper Training (from Generation VII onwards) to functionally get a perfect IV in a stat.
Effort Values (EVs): Effort values are the one thing you can easily change. A Pokémon can earn, primarily through battling, but also through means like the use of certain items or mechanics like Super Training, up to a total of 510 effort values, with up to 252 in any given stat. To finish off the animal analogy, no matter what kind of claws a mole is born with, moles who have more experience digging are probably going to be better at digging than moles which have never dug.
Nature: A Pokémon's nature is, more or a less, a stat modifier with a name meant to make it sound like a Pokémon has some personality. Natures will raise one stat by ten percent and lower another stat by ten percent. Some natures raise and lower the same stat, canceling out the effect and leaving stats unchanged. Natures can be functionally changed with the use of special mint items from Generation VIII onwards.
STAB: STAB stands for Same-Type Attack Bonus, and refers to the boosted power of moves that match the type of the move's user. To illustrate this, consider the case of a Lombre, a dual-type Pokémon which is both a Water-type and a Grass-type. Any Water-type moves Lombre uses will have their power boosted by 1.5x, and any Grass-type moves Lombre uses will, likewise, have their power boosted by 1.5x. (There are circumstances where this does not apply, and, while the 1.5x multiplier is typical, some games use other multipliers.)
Finally, we can turn to Clefable! Now, to begin with, we're going to equip Clefable with its Mega Stone, allowing it to Mega Evolve once the Mega Gauge is full. One fills the Mega Gauge by using moves or collecting Mega Energy orbs that appear on the field. The Mega Gauge is shared by the party, so to make the most of Mega Clefable, you'll either need to lead off with a different Pokémon and hold Clefable in reserve while the gauge builds up or you'll need to have Clefable in battle for some time. For this reason, it's worth considering Clefable's base stats alongside Mega Clefable's.

Fortunately, Clefable's base stats and Mega Clefable's base stats have the same overall leanings, simplifying matters. Whether Mega Evolved or not, Clefable's highest stat is special attack, then it has strong HP and special defense while lacking in attack and speed. Physical defense is middling in its base form but grows to a respectable 93. Putting it all together, Clefable is a bulky special attacker. To take advantage of that massive special attack, we'll invest maximally into it, ensuring it has a 31 IV and 252 EVs.
We then turn to the question of which defensive stat(s) to invest in. You might think it worthwhile to invest maximally into special defense, since it is Clefable's next highest stat. That could make Clefable a formidable obstacle to special attackers, but... the greatest threats to Mega Clefable are physical. Its five weaknesses are Ice, Electric, Rock, Poison, and Steel. The latter three types heavily lean physical, and Steel-types are a very common sight. Steel-types are Mega Clefable's biggest concern, and special defense investment does little to aid it against them. You might think we'd invest in defense, then, but we do want to take advantage of that high special defense too, so let's split the difference and invest maximally in HP. The remaining EVs can go towards further bolstering special defense.
As a tip, if you're pressed on time and want to save some EV grinding, you can catch an Alpha Clefairy in Wild Zone 19 at night. As an Alpha Pokémon, it will come with its HP EVs already maxed out, and it will have a selection of three 31 IVs. Although, you may want to avoid it and Hyper Train a smaller specimen if you plan to use it competitively. Large Pokémon make easier targets, and with Clefable being a special attacker that avoids close-range combat, it doesn't benefit much from its larger size. This new style of battling certainly creates new considerations that we must learn to navigate together!

|
Name: | Mega Clefable | Base HP: | 95 | |
| Category: | Fairy | Base Attack: | 80 | ||
| Type: | Fairy | Flying | Base Defense: | 93 | |
| Item | Clefablite |
Base Special Attack: | 135 | ||
| Notes: | N/A | Base Special Defense: | 110 | ||

|
Base Speed: | 70 | |||
As for a nature, we want one which drops attack, since we won't be using that stat. We don't need a speed increase, so we can throw out Timid, leaving us with Modest (+sp. att.), Bold (+def), or Calm (+sp. def). To, again, maximize Mega Clefable's KO potential, I suggest Modest, but do feel free to experiment.
| Level: 58 | HP IV | 31 | HP EVs: | 252 | HP: | 232 | ||

|
Attack IV | 31 | Attack EVs: | 0 | Attack: | 103 | ||
| Defense IV | 31 | Defense EVs: | 0 | Defense: | 130 | |||
| Special Attack IV | 31 | Special Attack EVs: | 252 | Special Attack: | 237 | |||
| Special Defense IV | 31 | Special Defense EVs: | 6 | Special Defense: | 151 | |||
| Nature: Modest | Speed IV | 31 | Speed EVs: | 0 | Speed: | 104 | ||
With Mega Clefable's stats determined, we can begin building a moveset. Er, well, under normal circumstances, we could begin. With the new style of battling however, there are new traits of moves we need to discuss. You see, in addition to base power, moves now have casting times and cooldowns. Additionally, numerical accuracy has been replaced with move-specific casting behaviors and certain ranges within which a move can hit. Suffice to say, now you need to consider how long it takes a move to start-up and complete its animation, how long you'll need to wait before you are able to re-use a move, and how the move travels through a physical space. I've added some new columns to our usual move lists, so let me go over what each column means.
New Move Traits
Power: This is familiar to us, and I will likely add it to non-Z-A move tables going forward. This is the move's listed base power. The higher the number, the more damage the move deals. What's unique to Z-A is the Plus Moves mechanic. For any Pokémon, some energy from the Mega Gauge can be used to turn the next move used into a Plus Move, which will increase its base power and may affect other aspects of the move. For Mega Evolved Pokémon, all moves are treated as Plus Moves. For this reason, I've listed the Plus Move's base power in parentheses. For this month, since we're covering a Mega Clefable, you can focus exclusively on the numbers in parentheses.
Casting Time: This measures the time (in seconds) you'll have to wait after selecting a move before you're able to select another move. This is actually sub-divided into two parts - start-up and the attack loop. Start-up is the time it takes to initiate a move after selecting it, while the attack loop is the time it takes for the move's animation to finish. For simplicity's sake, we'll only consider the combined casting time. There's not yet (to my knowledge) a robust, complete resource listing the casting times of moves, so for now I've referenced a spreadsheet by Reddit user mole602, ultimately sourced from the Japanese fansite Yakkun. If you know of a better resource, let me know!
Cooldown: After using a move, there is a set period where you cannot use the same move again. This is called its "cooldown", and is expressed in seconds. More powerful moves tend to have greater cooldowns. For this reason, you'll sometimes want to consider having secondary STAB moves (even on monotype Pokémon) in Z-A so that you are able to alternate between your STAB options while each one resets. Of course, that comes at the cost of coverage, so think carefully! Cooldown is impacted by a Pokémon's speed stat, with higher speed reducing the cooldown of a Pokémon's move. Cooldown can be reduced to a minimum of three seconds.
Distance: This is a move's reach. This affects where a Pokémon needs to position itself to use a move and how far the move can travel. Different moves will travel through space in different ways, with a set of "casting archetypes" dictating this behavior. We will discuss those archetypes in another session. For now, just know that a small number means the user will need to get quite close to their opponent, while higher numbers mean a move can be launched from farther away. If I list dashes, it means a move either travels a very long linear distance forward or that it affects the user and distance does not apply. Distance and casting archetypes are not listed directly in the game, so for these I am relying upon a spreadsheet and Reddit post by Reddit user ragonc (from who I also take the term "casting archetypes"). Again, if you know of or discover a better resource, let me know!
Now, all of that said, we can still begin by searching for a reliable, respectably-powerful STAB move. That has not changed. Turning our attention to Fairy-type moves, our best options are Moonblast and Dazzling Gleam. Since we have two reasonable choices, let's use these moves as a case study in grappling with Z-A's new traits.
| Name | Category | Power (+) | Description | Casting (s) | Cooldown (s) | Distance |
|---|---|---|---|---|---|---|
| Moonblast | 95 (114) | The user attacks by using the power of the moon. This may also lower targets' Sp. Atk stats. | 2.67 | 8 | --- | |
| Dazzling Gleam | 80 (96) | The user attacks with a powerful flash of light. | 2.33 | 8 | 2 |
These moves have the same cooldown time, so we don't need to consider that in choosing between them. On the other hand, Moonblast takes slightly longer to cast, but has higher power and the potential for a stat drop (stat buffs and debuffs work differently in the Z-A battling system, but, again, we'll discuss that in another session). At first glance, this seems like a simple tradeoff between casting time and power, with Dazzling Gleam launching slightly faster but doing less damage in return. You might think that the choice comes down to a preference for rapid attacks versus a preference for powerful attacks.


That's not the entire story, however. Look at the range of each move. Dazzling Gleam, with a 2, requires the user to get very close to the opponent to hit them with a burst of light. Moonblast, meanwhile, can be fired from (practically) any distance, and will travel in a straight line towards its target. You'll recall that Mega Clefable has worse defense than special defense, and that we cited physically-focused Steel-types as the greatest threat to Mega Clefable earlier. Getting close to a foe to unleash Dazzling Gleam puts Clefable at great risk from short-range physical attackers. Running Dazzling Gleam risks Clefable drawing close to a Steel-type, whereas running Moonblast allows it to keep some distance. As you can see, this battling system makes the move selection process a slightly more complicated exercise!
Moonblast's higher power takes advantage of Mega Clefable's massive special attack and allows it to snipe weakened foes from a distance to score KOs. Add to that Dazzling Gleam's downside of bringing Mega Clefable close to physically-oriented opponents, and it's clear that our choice of STAB move ought to be Moonblast.
Our session is already near its end! We have had much to cover this month! I do not intend to keep you beyond our scheduled time, so let's briefly touch on the rest of Mega Clefable's moveset.
| Name | Category | Power (+) | Description | Casting (s) | Cooldown (s) | Distance |
|---|---|---|---|---|---|---|
| Air Slash | 75 (90) | The user attacks with a blade of air that slices even the sky. This may also make targets flinch. | 2.33 | 7 | --- | |
| Flamethrower | 90 (108) | The user attacks with a stream of fierce flames. This may also leave targets with a burn. | 2.67 | 8 | --- | |
| Moonlight | [+30% HP] | The user restores some HP by bathing in the soothing light of the moon. | 3.84 | 15 | --- |
As I mentioned earlier, you will want to consider a secondary STAB move under this system. Since Mega Clefable is a dual-type, we can select a Flying-type move to make use of its secondary typing. Our sole option here is Air Slash, but fortunately Air Slash serves us well. It's another long-distance move and it has a shorter casting time and cooldown than our primary STAB move. It means Air Slash should just about always be ready to go after using one other move, making it a reliable option to fall back on.
With two STAB moves selected, we ought to think about a coverage move. Mega Clefable has access to Electric-type, Fighting-type, Fire-type, Ghost-type, Ice-type, Grass-type, and Psychic-type special moves with a reasonable amount of power. We've identified Steel-types as the greatest threats, so we should choose a move which is supereffective against them. That gives us either the Fighting-type or the Fire-type. The former is super-effective against three of Mega Clefable's weaknesses (Ice, Rock, Steel), and is represented by Focus Blast.
Focus Blast is a move which can hit from a distance, and it does have a great 120 base power (144 as a Plus Move). On the other hand, however, it has a casting time of 2.83 seconds and a whopping cooldown time of 12 seconds. It still may be viable, assuming that Mega Clefable can leverage its special attack to get a KO with Focus Blast, but if the opponent manages to dodge, Mega Clefable is left vulnerable for quite some time. You might experiment with it, but I will avoid it for now.

Looking at the Fire-type, which is supereffective against Steel and Ice, there's a choice between Fire Blast, Mystical Fire, and Flamethrower. Fire Blast shares the issue of a long cooldown time with Focus Blast, so we'll set it aside. Flamethrower and Mystical Fire both have 8 seconds of cooldown time and 2.67 seconds of casting time. That's still lengthy if they miss, but with some distance and Air Slash possibly causing an opponent to flinch, it's not impossible Mega Clefable will have a second chance to fire them off. Mystical Fire has lower base power (75, 90 as a Plus Move) but inflicts a special attack debuff that bolsters Clefable's bulk. Flamethrower has higher base power (90, 108 as a Plus Move) and a slight chance of inflicting a burn, which reduces the power of the afflicted Pokémon's physical attacks. Given their casting time and cooldown time are the same, the extra power of Flamethrower makes it the better coverage move. While the burn chance isn't high enough to be relied upon, if a physically-oriented opponent does receive a burn, that's a major boon to Mega Clefable and greatly reinforces its bulk.
On the note of reinforcing Mega Clefable's bulk, we'll finish off its moveset by giving it a healing move. While Moonlight does require a considerable time investment, restoring 30% (possibly more? I couldn't find a decisive answer on if that amount is boosted by it being a Plus Move) of Mega Clefable's HP is invaluable. If Mega Clefable's HP has been chipped away by a few attacks, use Moonlight to top it off and then go on the offensive while it cools down.
My goodness! You have been an admirable bunch, sorting through this deluge of information. Our time is up for this session, so I must wrap up the lecture. As always, I encourage you not to view this as a definitive guide to raising a Mega Clefable, but as a starting point for your own experimentation. This system of battling is as new to me as it is to you, and there are elements of it that are still actively under investigation. We have much to learn together! We cannot hope to master any new system all at once, however. Some time to digest this information would do all of us well. Perhaps it's time to go out in the night to stargaze and dream, hm? I have no assignment for you, so spend some time enjoying the beauty of the cosmos. I will see you next year, most likely with a mix of sessions dedicated to the traditional battle system and sessions exploring this new system of real-time battling from Lumiose City. Until then, take care.
So You Want to Romance the Three Kingdoms?
Hello and welcome back to So You Want to Romance the Three Kingdoms, The 'Shroom's top Romance of the Three Kingdoms Part IV: Wall of Fire guide! Last month, we managed a successful diplomatic coup against Yuan Shao by convincing (bribing) Gao Lan into switching sides, bringing Nan Pi and the soldiers garrisoning it to our side! This month we begin the process of managing our growing empire.
Step 15: Managing Our Holdings
Firstly we're going to do two things. The first thing we're going to do is send Gongsun Du to Nan Pi. This is because we don't want the same thing that happened to Yuan Shao to happen to us. By sending Gongsun Du, who currently has a loyalty of 99, we're going to prevent Yuan Shao from rebribing Gao Lan into rejoining him. Next, we're going to reward Gao Lan with 100 gold. Just because we paid him 1,000 gold doesn't mean he's particularly loyal to us. In fact, he currently only has a loyalty of 71, because it turns out that a man who will betray one guy might not be against betraying you! So we're going to give him and Gongsun Du 100 gold, which will boost Gongsun Du's loyalty to 100 and Gao Lan's loyalty to 78, which is a huge jump.

Next, we're going to return to Bei Hai and reward Xin Pi, Taishi Ci, and Zhao Yun. Taishi Ci and Zhao Yun are the most important to reward because their loyalties are only 81 and 70 respectively. Unfortunately money is pretty tight right now, so we can only give them 86 pieces each, so we're not going to be able to get the full loyalty bonus. This is sad, but, still, any amount will do!
With that we can move onto the next month of July, where the harvest has finally come in throughout the nation. We did pretty good! In Nan Pi, we now have 8,043 barrels of provisions in our granaries, and in Bei Hai we have 3,982 barrels. Also, with the harvest, revolts have broken out throughout the country from peasants who are angered over having their hard work "stolen" from them. Luckily none of them happen in our borders thanks to the wise and generous leadership of Lord Kong Rong ensuring the peasants are provided with full bellies. But what does happen to us is that somebody (probably Yuan Shao) begins spreading rumors about us in Nan Pi, making the people doubt our virtue - which doesn't even make sense! Just because he took the town through trickery instead of butchery, suddenly Lord Kong Rong isn't virtuous enough to rule China? Preposterous!
Here in July, we're going to do something that on the surface looks a little silly. We're going to send Gongsun Du back to Bei Hai and he's going to take 2,000 gold with him. What's cool is now that we've got a second city under our command, we can start moving resources from city to city.

There are two different ways you can move resources. There's the "move" function, where you can send an officer to a neighboring city with the resources you want to transfer. If you do this, the resources will always arrive in the city without any problems, but the drawback is you have to do it one city at a time. As a result, if you're trying to send, say gold or soldiers, to a city that doesn't border the city the resources are in, it can take forever. The other method is the "send" function. This operates the same as the "move" function, but instead of one of your officers personally escorting the resources, the officer instead delegates it. The plus side with this option is that you can send stuff like gold, provisions, soldiers, or weapons anywhere that you control. The downside is that you run the risk of the stuff getting stolen by bandits, even the soldiers. I'm sure that logically that means the soldiers are joining the bandits, but I think the idea that they're stealing people is funny!
Because we only have one pair of cities, we're just going to use the "move" function. In exchange, we're going to send Xin Pi to Nan Pi and he's actually going to stay in Nan Pi.

Now, you're probably wondering why we're exchanging officers like this. The answer is twofold. The first and most important reason is that Xin Pi has the highest recruit stat, while neither Gao Lan nor Gongsun Du are skilled in recruiting. If there are any free officers in Nan Pi, we're not able to get them without Xin Pi there, and currently there has been a free officer there for two turns in the form of the young officer Zhang Yan. While not a great officer with his low stats and few skills, he would be very important to have in this current low officer climate where we're splitting seven officers between two cities. That's why we're sending Xin Pi to Nan Pi; that way, both cities have the ability to recruit any wandering officers. The other reason is that we'll have two decent officers in both cities for city development reasons. It'll also help bring the people to our side because seasoned bureaucrat Xin Pi has a much higher charm stat than professional soldier Gao Lan does, so when he gives food to the people he'll increase their loyalty more.
This is going to solidify our officer core for at least right now. We're not going to make any changes with where officers are until we either recruit more wanderers or Taishi Ci and Zhao Yun finish training the soldiers in Bei Hai. With that, we're going to boost the economy in Nan Pi by getting Xin Pi and Gao Lan to work on it with a budget of 1,300 gold for the rest of the year. We're also going to reward Gao Lan with 100 gold, bringing his loyalty up to 85, and have him give food to the people to bring their spirit stat to 64. In the future we'll mostly have Xin Pi handle that because his stat is higher. Back in Bei Hai with the 2,000 gold we got from Nan Pi, we're going to make a slight investment in both the economy and farming of our city by giving Kong Rong and Taishi Ci 500 gold to work on farming and Zhao Yun and Gongsun Du 500 gold to work on economy. This might be enough to last the next six months. Also, every month for the next five months, we're going to give Zhao Yun and Taishi Ci 100 gold each to improve their loyalty while Lord Kong Rong gives the people 1,000 barrels of provisions to bring the spirit of Bei Hai up to 74.
Step 16: Preparing for War
As the month of July passes and August begins, Lord Kong Rong decides it's time to start thinking about a subject most uncomfortable - war. But before that, some good news! It turns out Zhang Yan has yet to leave Nan Pi. Hurrying to him quickly before he departs, Xin Pi manages to catch him just before he can leave the city and in a single meeting (not counting the save state…) manages to convince the young up-and-comer to join the Kong Rong administration of Nan Pi! In celebration, both Zhang Yan and Gao Lan are rewarded with 100 gold.

Now, like I said earlier, Zhang Yan isn't exactly a great officer. He does, however, have a slightly better politic stat than Gao Lan (44 to 40), so we'll go ahead and pull Gao Lan off of the economic development project and allow him to focus solely on his army! His army, while good, could always be better, so we're going to put Gao Lan in charge of a quick two month crash training course for the soldiers of Nan Pi. "Why two months?", you ask? That's because Taishi Ci and Zhao Yun have two months until their training session finishes up in Bei Hai.
As a quick side note, from here onward, I'm going to be dropping the mentioning of rewards and giving food to the people. Just as a general tip, keep doing that as long as you have money and provisions until your officers' loyalties get to 100 and the cities' spirit stats reach 80 (the max you can do with just giving). Obviously if you don't have money or provisions, then don't do it. But just make sure you keep a close eye on both of those things while you play!
Returning to the armed forces, you might be wondering why it's important to link up the two trainings. It's because it's about time for war! Now, if I'd have known I was going to be able to take Nan Pi like I did, I would have already invaded one of Yuan Shao's cities before he had any time to rebuild his forces. Sadly, because Taishi Ci and Zhao Yun were in the middle of training, that wasn't possible. While officers in charge of training can lead troops in defense of your cities, they aren't able to lead offensive excursions until their training is complete. As a result, we had to wait many more months then I would have liked in order to conquer one of Yuan Shao's cities.

Now, which city are we going to conquer, you ask? Well, that's what our spy is going to help us determine. We're going to be sending a spy for one month into the Yo Territory to assess the troop strength of Yuan Shao's city. Now, Lord Kong Rong attempted to undertake such a dangerous task himself, but quite simply it would be foolish to allow him do so! Instead, through correspondents, Xin Pi has reported that he will undertake the mission for the good of the empire, leaving in October under the cover of darkness to reveal such information.

As October comes and the snow begins to fall, the training in both of our cities concludes and it's time to make our move. Sending Taishi Ci and Zhao Yun with 160k soldiers to link up with Gao Lan's forces so as to swell the ranks in Nan Pi to 357k soldiers, we leave behind 108k soldiers for the protection of Bei Hai. As that happens, the honorable Xin Pi sneaks into the Yo region, with the forces ready to go as soon as Xin Pi returns. The snow might be falling even harder as October turns to November, but that does nothing to stop Xin Pi and his mission. He returns with detailed information on the entire Yo region! And this pretty much broke the way I wanted it to. In the city of Bei Ping, which is Yuan Shao's city that connects to an unclaimed city and his other city of Dai Xian, there stands an army only 61k strong. In addition, for some reason, his entire officer corp is again with him in Bei Ping, which is good for us for a reason I'll get into in a second.
I'll be frank. I actually reloaded the save state to see if this would happen, because originally when I was doing this, his officer corp was in Dai Xian, and Dai Xian borders Dong Zhou's city of- Wait. What do you mean his name is Dong Zhuo??? Since when??? ALWAYS!? I've been calling him Dong Zhou this whole time! Why didn't anyone tell me! Ohhhhh, I've been making an idiot out of myself!
Anyway, I didn't realize that the tyrant formerly-known-as-Dong-Zhou-but-apparently-always-known-as-Dong-Zhuo's city of Jin Yang (which borders Yuan Shao's city of Dai Xian) is in the Yo region. That means I didn't realize that I could have seen his city's troop strength, so I was worried that Dong Zhuo was going to have this massive army that I didn't wanna deal with right now. Turns out that's not the case! His army is only 84k strong, which means he wouldn't have invaded me as I took care of Yuan Shao. But anyways, live and learn!
Step 17: The War for Bei Ping
With the exact troop strength of each of Yuan Shao's cities revealed, it's time for our first march of war. Our target? The city of Bei Ping, where Yuan Shao currently holds court!
As a safety measure. I also checked the strength of Ping Yuan, which is the only city that borders Nan Pi which is not under the control of Yuan Shao (it's controlled by Romance of the Three Kingdoms hero Liu Bei, and honestly he's not much to worry about with only 113k soldiers). Even after sending the bulk of our army to Bei Ping, we'll easily be able to fend him off with Nan Pi's defenders. I also realized that Liu Bei has been doing shit like spreading rumors about us and setting our granaries on fire. That's not very virtuous Mr. "I will save the Han Dynasty"! You're talking a lot of shit for a guy with only 113k troops and five officers. Don't worry, Lord Kong Rong will remember this! You're gonna get yours, I promise you, just not now! For now, it's time to march on Yuan Shao!
Before we can invade using the "war" function, Xin Pi has a cunning plan! Now, this is something that will happen just about every time you go to war. Your officers will suggest some sort of thing you can do like bribing an officer to betray the enemy or attempting to burn down their shit. It's up to you to say yes or no.

It's actually a pretty fun little mechanic because it makes it feel like your officers are actually advising you, and sometimes they'll actually suggest things that work out! Sometimes what they suggest isn't practical because it'll take more than one turn, and other times they just fail, but that's okay!
Back to Xin Pi, his cunning plan is that we should ask King Niaowan, one of the Chinese tribal kings, to invade. Now, normally I'm all about using the tribal kings, but this time I'm going to reject Xin Pi's advice. See, if King Niaowan agrees to invade, he'll do it after our turn, which means that that there's a chance that Yuan Shao will move his officers to Dai Xian, which will screw up my plans. So sorry Xin Pi, Lord Kong Rong must reject your advice!
Now it's time to organize your army! The way it works is like this. You can deploy up to five units, each commanded by a commanding officer, and each unit can have up to three Lt. Commanders. A Lt. Commander is someone who can take control if your commanding officer is injured or captured in a duel. For this invasion, we're going to be deploying just two forces: one led by overall battle commander Zhao Yun and the other led by Taishi Ci.
This is also where the skills of "infantry" or "cavalry" or "archery" come into play. If an officer has that skill and commands a unit of that kind, that unit will be more powerful. Luckily Zhao Yun has the "infantry" skill, but sadly Taishi Ci does not. When you're picking officers to lead the troops, you want to pick officers that have high a "lead" stat, with a high "power" stat helping them in duels. Because of this, Zhao Yun, who has 96 "lead", will command the overall army. Taishi Ci, with "82" lead, will command a smaller but still significant force! Zhao Yun shall lead 157k infantry men into battle while Taishi Ci will command 100k infantry. The reason we're doing all infantry is that this is more than likely going to be a siege battle. In other words, we're going to be scaling Yuan Shao's castle walls. Because of this, it's too dangerous to try and deploy cavalry because, as it turns out, ponies can't climb ladders! If we deploy any cavalry and Yuan Shao puts his units at the top of the castle walls, our cavalry will be completely useless. So for now, all sieges will be all infantry battles.
When it comes to the logistics of the battle, we shall take 357 gold pieces (you use gold to try and bribe enemy officers, which we don't have enough gold in general to do anyway). On the provisions front, we're going to take 3,000 barrels of provisions. Unlike in Nobunaga's Ambition, running out of food is not an instant loss; instead, your army starts to lose spirit on each turn that passes after you run out of food, causing them to fight worse and eventually start fleeing 'cause apparently soldiers don't like eating boot leather or something! So you wanna make sure you bring plenty of provisions to battle with you! With our army organized, it's time to head into battle against the forces of Yuan Shao.

The way war works in this game is similar to Nobunaga's Ambition in that it's a turn-based battle structure where you place your units on the field and your opponent places his units on the field. Each unit type (cavalry, infantry, archery, plus a couple ones we'll get into when we get them) have their own range of movement as well as different places they're best at. For example, archery is best at the top of castles and cavalry is better in field battles or at the bottom of castles. The main difference from Nobunaga's Ambition is really that each unit is now commanded by an actual officer, so it's not just a generic "train" stat that matters. Your officers' skills and "lead" stats dramatically affect how well a unit will fight, so an infantry unit under Zhao Yun will fight better than an infantry unit under Taishi Ci because Zhao Yun has a better "lead" stat and the infantry skill. I believe the bar at the top near the turn counter represents your soldiers' spirit. The lower it gets, the lower your soldiers' spirit will be. If it gets really low or all the way to empty, your soldiers will, as said earlier, fight less effectively or simply attempt to flee. You lose spirit by either running out of food or getting your ass kicked.
Another difference is that, while a standard battle in both Nobunaga's Ambition and Romance of the Three Kingdoms Part IV: Wall of Fire last 30 days (or 30 turns in Romance), in Nobunaga's Ambition a battle that doesn't end in 30 days is a loss for the invader. But in Romance, the battle will resume the following month in that city at the end of your next turn. There is also a weather and trap system where, depending on your officers' skills, you can dig pits for the enemy to fall in or set fires to burn your enemies, but we'll talk about that more when and if it becomes relevant.
Turning to the battle at hand, for some reason, despite attacking me at his castle walls, the bulk of Yuan Shao's forces met us at the gate. That's crazy considering we have like triple the soldiers he does.

This will make the battle far easier, because we don't have to worry about climbing the ladders. In addition, Yuan Shao split his forces into four units, each commanded by a different family member. Considering he only had 61k troops, this means he can only have at max 15k-ish in each unit. Normally in these battles taking out the commanding unit is the best way to go, but I'm trying to capture officers. Plus, fleeing soldiers will just end up in Dia Xian anyway, so I'm out for blood.
Immediately as the battle starts, a number of officers under Yuan Shao's command flee. Whether they fled under the orders of Yuan Shao or out of cowardice, I don't know, but regardless we did capture one of them, so we're at least not leaving here empty-handed on the officer front!!! The first move we're going to make is to send Taishi Ci after the crossbow unit commanded by Yuan Shang, who is Yuan Shao's heir. The combat in this game is really weird because, despite having nearly five times the soldiers as his unit, we still do equal damage. Unlike Nobunaga's Ambition, it never feels like your overwhelming numbers actually lead to your benefit in this game. Anyway, we each hit for one damage, bringing Yuan Shang's unit to 19k soldiers. Also in our turn, we have Zhao Yun move to strike Yuan Xi, doing two damage while only receiving one, bringing the enemy unit to only 10k.
During Yuan Shao's turn, the coward flees, leaving his family to fight for him and doing limited damage. Back on the offensive, Taishi Ci switches focus to the small unit, moving around Yuan Shang to attack Yuan Xi for one damage, bringing them down to 8k troops. With that, Zhao Yun moves in for the kill, doing an infantry charge against Yuan Xi. To elaborate, the two standard infantry attacks are "ground" and "charge". "Charge" is the most useful attack because it's basically an infantry rush; it does damage the fastest but you also take the most damage back like a real infantry charge! The charge completely destroys Yuan Xi's unit, which falls apart. Yuan Xi and the officers under his command are captured!
With that, our forces can turn their attention to Yuan Shang's unit. A single charge from Zhao Yun shatters the unit, with Yuan Shang and those under his command captured as well!

Taishi Ci then moves to cut off Yuan Shao, who has yet to actually engage in the battle like a coward! Over the next few turns, Yuan Shao continues to run while Yuan Tan, who is the only one taking advantage of the high ground, ineffectually shoots arrows at us (I guess that's the reason Yuan Shao choose Yuan Shang as his successor). Finally, Yuan Shao turns to face Taishi Ci. His forces inflict one damage on Taishi Ci while taking two damage in return. On our turn, we manage to get Zhao Yun to the flank of Yuan Shao and, with a ground attack, the general inflicts two more damage, reducing Shao to 24k soldiers. Taishi Ci then launches a charge against Yuan Shao's forces, dealing massive damage.
This was kind of a mistake on my part because Yuan Shao's fled the battle with his forces on his turn, barely managing to get away with just 5k soldiers. The reason this was a misake is because an enemy general will attempt to flee when their troop numbers get too low. It's possible that if I had instead done a ground attacking using Taishi Ci's unit, then Yuan Shao wouldn't have fled. If he had stayed, then I could have smashed Yuan Shao's unit completely on the next turn and captured him. Of course, it's possible he would have fled anyways; I don't exactly know what metric the game uses to determine when it's time for an enemy to cut and run. Regardless, Yuan Shao manages to just barely slink away and in the confusion Yuan Tan also manages to get away. But his army is scattered and a number of his generals have been captured, making this a magnificent victory for the forces of Lord Kong Rong! With his retreat, Bei Ping now falls under our control!

Hearing of such a magnificent victory and of the thorough destruction of Yuan Shao's forces, Lord Kong Rong has ordered a magnificent banquet be held in celebration all throughout the cities under his control. So while I would like to deal with the fate of the many POWs captured in the Battle of Bei Ping, I'm afraid that must wait. I must attend the grand celebration Lord Kong Rong is throwing in celebration of the fall of Bei Ping and the destruction of Yuan Shao!

An Overly Detailed and Funny Walkthrough of Mega Man 4
Played by Sparks through the Mega Man Legacy Collection for the Nintendo Switch.
Welcome everybody to the final part of An Overly Detailed and Funny Walkthrough of Mega Man 4! Last month, I infiltrated Dr. Cossack's fortress and defeated him in battle! In a surprising turn of events, Dr. Wily forced Cossack to battle Mega Man to protect his daughter Kalinka, making him the real villain. Now it's up to us to put a stop to Wily's plans once and for all! What better way than to do it at his fortress?
Because we're continuing right after Dr. Cossack's fortress without a break, remaining weapon energy carries over to here. Make sure to always recharge your energy!
Now onto the first stage of Wily's fortress!
Dr. Wily stage 1
So here we are - Dr. Wily's fortress. In this first stage, we're already inside, so there's no need to get in! We start in a room where there's only one way to go - up. After climbing a ladder, we enter a room with stairs leading to another ladder, although two Mettaurs guard it. They're easy to get rid of. The room afterwards has more climbing, this time with four Mettaurs, two of which have more HP than usual and spin, shooting out three bullets one by one. They're just like that one Mettaur from Dust Man's stage.

After climbing up some more, we enter a long hallway containing many Mettaurs of the normal and spinning varieties. You probably guessed it, but Mettaurs are the main enemies in this stage! Thankfully they're easy to deal with, so take your time and get rid of them as you proceed. A large health powerup lies on a high platform, and a large weapon capsule is located in a small wall opening near the end. To get to the next room, we must fall down a hole!

This next room has another pit to fall in, but it's underwater! After we go down some more, there's an underwater hallway we must get through. There are spikes everywhere and Scuba Mettaurs are ready to attack, so this is the perfect time to use Rush Marine! You can get by without it, but there's one particularly tricky jump I have to accomplish, and I didn't want to risk it. Oh, and make sure you move to the right after descending here to avoid landing in spikes! A ladder at the end brings us back to dry ground.

I spy the next ladder to get to, but it's too high up. Fortunately, green blocks appearing from the wall make getting there a reality! They disappear after a few seconds, so be quick! If you fall, you'll have to avoid a sawblade enemy as you reach the starting area. The block pattern here is simple. The next room has more of these blocks, but falling now results in an instant KO thanks to the spikes covering the ground. Be sure to watch the blocks' patterns a few times before you try to get through! There's solid ground on the far right of the room + blocks that'll take you back to try again, so it's not too bad. When I got to that platform, I used Wire to grab the ceiling so I didn't have to use the remaining blocks! Sometimes you gotta think outside the box.
One last hallway before the boss! There are more Mettaurs throughout, with some being on platforms in the air. There are even areas holding water. One of them has an E Tank just waiting to be grabbed! There's also a large weapon capsule to recharge one of your weapons. This room is easy, but the boss is much tougher...
Mettaur Daddy fight

This stage prominently features Mettaurs as the enemies, so why not have one as a boss? This is a big Mettaur known as the Mettaur Daddy! He's also a hard boss, so don't be fooled because it's a Mettaur!
The Mettaur Daddy spends most of his time on the ground protected by his helmet. Like any Mettaur, he cannot be hurt while he's protected. The boss will then stand up, allowing for him to take damage. Afterwards, he'll jump towards Mega Man's location and slam the ground upon impact, stunning Mega Man if he is on the ground. A few seconds later, four Mettaurs fall down and run to the left and right sides of the battlefield until they disappear from view. These Mettaurs can be defeated.
So... what's the problem? The Mettaur Daddy doesn't give out a warning when he jumps. This means that he can jump when you least expect it, so you've always gotta be on guard. Avoiding him when he jumps is also difficult because he's surprisingly quick, and touching him will deal heavy damage to you. Shorter jumps are harder to avoid than bigger ones. Even if you do dodge the jump, you'll probably not have enough time to jump before he lands, resulting in you taking damage from the falling Mettaurs. Even they fall at random positions, but it seems they never land directly in the center of the arena. To best avoid the boss's attack, slide when he leaps and quickly jump into the air when you're in the clear. You'll be free to move to avoid the falling Mettaurs.
To make the fight much easier, use his weakness - the Dust Crusher. I knew this battle is a tough one, so I had to use it to achieve victory easily! You'll likely use up at least half of its energy, but it's worth it.
Alright, with the Mettaur Daddy dealt with, stage 2 is next!
Dr. Wily stage 2
I'm assuming we're deeper into the fortress? Now we have purple walls, and I approve of that!
In this first room, we are given a choice between four "paths" to take; three of them are low gaps, so we'll have to slide. The other one leads to a dead end, but we can see where the paths lead! Two of them lead to spikes, so take the third gap from the bottom and move right after the slide! You'll land on a small platform above a sea of spikes. There's a ladder leading downwards to the next room, but be sure to carefully jump over the mini spike wall protecting it.
The ladder takes us to a small room with floating platforms above spikes. There are also two ladybug enemies that intend to mess with you. A pit leads to the next area, but would you rather get rid of the ladybugs or avoid them? After falling some more, we must quickly move to the left or right to avoid falling into spikes! To the left is another pit leading down, but the right has a small platform next to another pit. An E Tank is at the top right corner of the room, but I'm not getting it for two reasons: One, it's difficult to reach and two, I already have 8. I recommend falling into the rightmost pit because it's the better path to take.

If you fall down the left hole then you'll have to get pass a ground saw enemy that's impossible to avoid unless you use Dive Missile. The other path (the one I took) only has caterpillars from Skull Man's stage. Easy! The paths combine into one as we make progress, which takes us to the end of the room. We must reach a high-up ladder above a lethal pit, so we'll need to use Rush Jet or Balloon. The final piece of solid ground before the hole has a saw enemy. It's very difficult to use an ability while it's around, so I Dive Missiled it to remove the problem.

Climbing this ladder brings us to a room where we must make another decision. There are two ladders on the top corners to choose from, with one leading to the correct path while the other leads to - - oh hey Eddie! Didn't expect to see you here. He's in an area where he can't move, so we'll have to reach him. He gives me an E Tank, so now I have nine! Now, I use the platforms in the room to get to the ladder on the right. The left ladder leads to a dead end with a saw enemy, but the correct ladder leads to a mini maze with some caterpillars. OK then! Another ladder at the end brings us to the next area.

Now we're in another hallway with platforms in the air. Mummies from Pharaoh Man's stage block the way and attempt to hinder Mega Man, but they're still easy to deal with. Just jump/slide to avoid their flying heads. One of the high-up platforms has a large health powerup. A ladder at the end allows us to climb to the next room. It's another choice room (with ladders too!) but there are three bats here as well. Get rid of the bats before reaching to one of the ladders. Because the platforms are too high to reach with a normal jump, you'll need assistance from Rush Coil or something! Unlike last time, both ladders actually help you progress! The left one leads to a small space where you'll have to slide and quickly grab the ladder before landing in the spikes. I chose the right ladder because it brings me to a skull generator so I can fully recharge all my weapons! I recommend choosing this path if you're low on weapon energy. I even got two 1-Ups while grinding!
After climbing up yet another ladder, you'll be brought to another small room. This one has those pesky spinning car enemies, so act fast before one of them hits you! The second one is easier due to being on a different elevation. Be mindful of the gap between the ladder and solid ground as you reach another ladder. The final room before the boss is a hallway with two of those red capsule-like enemies with the two types of projectiles. They're located on solid ground behind groups of floating platforms above spikes, so be cautious! The first one can be taken out on the ladder you climbed there with.
What could this boss be?
Garbage Disposal Machine fight

Now what is this thing? I think I read somewhere that it's a garbage disposal machine, so I'll go with that. When I was a kid, I called this thing a cow because it looked like one... to me at least! But for the sake of professionalism amongst the silliness, I'll refer to the boss as a garbage disposal machine. It's a cow...
The boss is atop a ledge and has two attacks:
- Launching bombs that curve downward, exploding when they hit the ground
- Shooting out fiery projectiles from its "mouth" that travel in a straight path
The boss performs one of these attacks every second - what it does is random. Sometimes it'll switch between the two attacks constantly or perform one attack several times in a row.
To deal damage to this machine, we must attack the green circle on its forehead. Attacking it anywhere else won't make a dent. Fortunately, there just so happens to be two platforms that travel along rails in a "0" shape we can use to get in range! I prefer the one further away because I have more time to react to the boss's attacks. To avoid the bombs it tosses, I jump away from them at the right time and land right back on the platform. The fire projectiles are simple, as I can simply leap over them.
If I remember, this boss is weak to the Ring Boomerang. You'll have to use the platform closest to it to attack with the special weapon, but it'll speed up this fight. If you choose to battle with the Mega Buster like I did, you'll need to time your charged shots. It may take a while though, so keep at it until you win!
Goodbye cow garbage disposal machine! It's time for stage 3 - the skull!
Dr. Wily stage 3
The starting room of this stage has four goodies to grab - all found on ledges by the walls: an E Tank, a 1-Up, and two large weapon energy capsules. I don't need any of them because I have full weapon energy and E Tanks and 1-Ups don't go any higher than 9... there's only one way to go, and that's down!

Upon landing, we're "greeted" by two of those flying shield enemies. You're likely to land on one of them, so the game apologizes by providing two small health powerups on a ledge by the hole leading further downward. The next room is a fall straight down, but there are ledges to the left, each containing something. The top ledge has many small weapon energy capsules while the other two have a saw enemy. If you need more weapon energy, be sure to go left immediately when descending here! You don't want to touch the saws.
The next area is another small room, but with two spinning enemies from Bright Man's stage. Easy Peasy! One even gave me a 1-Up, but sadly I can't hold anymore. I appreciate the generosity though! There is then one more room before a boss gate, and it has another flying shield enemy. Thankfully this time you don't have to worry about landing on it. You can take a high ledge path to avoid the enemy completely, but you'll miss out on a large health powerup. Beyond the boss gate is a road leading to a teleporter. After entering it, we're transported to a room where we must fall down again. We land in a familiar-looking area:

Behold the "Robot Master rematch" room! Like in Mega Man 2 and 3, we have to defeat all Robot Masters again. Each teleporter leads to one. Each one defeated drops a large health powerup; be sure to grab it before you leave! Below is a list of where the teleporters lead and the weapon you should use against the bosses!
- Top left: Drill Man (use Dive Missile)
- Middle left: Bright Man (use Rain Flush, but be sure to shoot him with the Mega Buster first so he doesn't freeze you!)
- Bottom left: Skull Man (use Dust Crusher)
- Bottom middle left: Dive Man (use Skull Barrier)
- Bottom middle right: Toad Man (use Drill Bomb)
- Bottom right: Dust Man (use Ring Boomerang)
- Middle right: Ring Man (use Pharaoh Shot)
- Top right: Pharaoh Man (use Flash Stopper)
After defeating every Robot Master, a new teleporter appears in the top center of the room. This one leads to a large machine created by Dr. Wily!
Dr. Wily fight

This battle is fought in two phases. In the first phase, the machine moves up and down, occasionally firing three large pink energy projectiles. I know a trick to getting through!
Stand right next to the machine, close enough so you'll avoid its attacks but not close enough as if you'll take damage by touching it. Whenever there's an opening to attack, jump up and release a fully charged Mega Buster on the front of the machine! Keep repeating this until you deplete all the machine's health. Easy, right? Phase two is MUCH tougher.

Wily's machine has taken some damage. The front of it is now completely gone, allowing for Wily to be seen controlling it. He now slowly moves the machine left and right instead of up and down, shooting more pink energy projectiles at regular intervals without stopping. These projectiles are shot directly at Mega Man this time as well! Dodging them is very hard, as you'll need to "fake out" Wily by jumping so they'll miss, but that leaves you open to another projectile.
I found myself getting hit so many times that I had to use an E Tank. The best advice I can give is to stay on the left side of the screen and use carefully timed jumps to dodge the attacks. Sometimes I moved closer to the machine after a high shot to make the next projectile miss. And I haven't even got to how to attack the boss! You must use fully-charged Mega Buster shots on the blue circle of the machine. That means you'll need to time your attacks at the end of jumps to even get a chance at hurting it. It's safe to say that this is the hardest boss in the game.

After the machine loses all of its HP, Dr. Wily escapes in a capsule while the machine explodes. We're not done just yet! Another spot opens on the map - another skull. This is the true final level!
Dr. Wily stage 4

This stage is very easy and short. Mega Man starts in a room where the only way forward is to fall down (again). We then land in a small hallway where caterpillars try to ambush us, so be cautious! The boss gate is found at the end of the hallway. Be sure to fully charge Pharaoh Shot before entering the boss gate!
Wily Capsule fight

The boss room is pitch black, and Wily is nowhere to be seen... at first. Dr. Wily is in a capsule and teleports around the battlefield, but because the room is dark, we can't see him. Occasionally, small spheres of energy quickly spin and combine to form a larger energy bullet that quickly flies at Mega Man's position. The smaller spheres do not damage Mega Man, but the large one does. The energy can form anywhere on the screen, including below the floor. When the energy spheres combine, Dr. Wily briefly appears for a split second before disappearing.
How does one defeat Wily? To do so, charge up Pharaoh Shot and hold it. There will be a large sandy projectile when fully charged. When you see Wily, aim the Pharaoh Shot at him to damage him. Despite not being visible, he will still take heavy damage! If he is above Mega Man, simply jump so the Pharaoh Shot above Mega Man can hurt him. Be quick though, as he'll move to another spot if you're not fast enough! Attacking him is kinda annoying, but this battle is much easier than the previous one. Just be sure not to run out of Pharaoh Shot! If you do, it's no big deal as you can replenish the weapon from the caterpillars. When Wily loses all of his HP, his capsule is destroyed and the battle is won!
Ending

After Wily's defeat, the lights in the room turn on. Wily then does his usual "Please spare me! I promise to be a better person!" thing before he escapes via revolving door on the wall. The fortress then enters "self-destruct" mode and Mega Man leaves too.

Dr. Wily is then seen flying away in his UFO before the fortress starts exploding. Mega Man escapes right before Wily's fortress explodes in a pink skull shape.

During the credits, Mega Man rides a train back home, passing by beautiful 8-bit scenery.

When the train stops, Mega Man jumps off and reunites with Rush and Roll.
What a great way to wrap up 2025! To kick off 2026, I'll begin my Mega Man 5 walkthrough in An Overly Detailed and Funny Walkthrough of Mega Man 5! May you have the Happiest of Holidays and New Year, and I'll see you next time!

An Octet Gazette
Written by: Museful Traveler (talk)
Welcome back to An Octet Gazette, all you readers of The 'Shroom! It has been a spell since I've been able to put together a new edition of this section. With Octopath Traveler Zero having just released, this is as good a time to return to it as any, I suppose! I won't be covering any information related to Zero, both because I haven't had the chance to experience much of it yet and because it doesn't make for as clean a comparison with its predecessors. For now, we'll stick to finishing our comparisons between Octopath Traveler and Octopath Traveler II.
We're finally wrapping up our look at the traveler-specific traits of the sixteen main characters in aforementioned pair of games. There's a primer here if you need it. As a reminder, there are some story beats that are hinted at through the EX Skills of these characters. If you'd prefer to remain completely unspoiled, you can hop down to the SOTM poll and spread some votes around!
To begin, we'll look at the pious and principled clerics.
| Ophilia Clement | Temenos Mistral | |
|---|---|---|
| Artwork |  |
 |
| Path Action(s) | Guide | Guide (Day), Coerce (Night) |
| Talent | Summon | Moonlight Judgement |
| EX Skills | N/A | Prayer for Plenty, Heavenly Shine |
| Latent Power | N/A | Judgement |
| Notes | N/A | N/A |
After having so much to discuss with the hunters, it feels a bit odd to return to the sparseness of these tables! Starting with the path action that Ophilia and Temenos share, Guide is fairly simple. They can approach an NPC on the overworld and opt to Guide them if their level is high enough. An NPC who is successfully guided will follow them around on the overworld and can be summoned into battle, where they'll perform some skills of their own after the summoner acts or take some hits on the summoner's behalf. If you remember discussing Allure with the dancers, then you already know this; Guide is just the noble counterpart to Allure.

Just like with the dancers, the summoning aspect was considered a whole talent in the first game. Fortunately, the second fixed this by folding it into the mechanics of the path action itself, freeing Temenos up to get a more unique and more beneficial talent. Unlike with the dancers, his talent does not interact with the summoning system. Instead, his talent interacts with the new day/night cycle. With Moonlight Judgement, Temenos inflicts all common enemies with one turn of blindness and three turns of physical and elemental attack debuffs at the start of battles during the night. This is a great ability. Even against difficult encounters, it gives you a pretty safe turn to set-up with stat boosts, and against the encounters close to your level, it makes it that much easier to earn the "Untouched" (take no damage) bonus for extra money.
Speaking of abilities exclusive to the nighttime, Temenos has a secondary path action called "Coerce". Coerce offers a new method of obtaining information, supplementing Inquire and Scrutinize. Rather than require Temenos be at a certain level or come with the risk of reputation damage if it fails, it sends Temenos into a one-on-one battle with the targeted NPC. Befitting his role as an inquisitor, this battle is framed as an abstraction for an interrogation; it's a mental battle, in other words. As such, rather than defeating the targeted NPC, the victory condition is breaking the targeted NPC by depleting their shield points. Successfully break them, and they'll surrender their information, which can reveal hidden items, make other path actions more effective, add new items to local shops, provide a discount at the local inn, and more. Plus, you always get fun flavor text out of it.
That covers everything there is to contrast directly against Ophilia, so we can get into Temenos' EX Skills and Latent Power now. As usual, I'll let the table do the talking on the former.
| Name | Description | Type | SP Cost |
|---|---|---|---|
| Prayer for Plenty | Heals an ally, granting them extra HP if they exceed their max HP | 20 | |
| Heavenly Shine | Sacrifice all of the user's SP to deal massive damage to all foes | All |
As a quick note, both of these skills can be powered up by Advanced Magic and Alephan's Wisdom for greater effect. Heavenly Shine is a major contributing factor to Temenos' nickname of "Temenuke", burning up all of his SP in exchange for a mighty, all-encompassing attack. I personally didn't use it much, but with the right set-up to restore his SP (not at all difficult by the late-game), it can have some utility.
Far more useful is Prayer for Plenty, the EX Skill I wrung the most use out of in my playthrough. Prayer for Plenty heals while ignoring the HP caps of each traveler. If a character normally has a maximum of, say (these are not representative numbers), 2,500 HP, and they're at 1,000 HP and get healed for 3,000 HP, then they'll now have 4,500 HP. As you might imagine, this is great, especially for late-game bosses who can dish out multiple powerful attacks in one turn. It can turn even the squishiest of characters into damage sponges if paired with the right set-up. That extra HP vanishes once it's lost, so you can't top it off with normal healing... but if you use a third-level, boosted Prayer for Profusion, you'll probably be ready to unleash another one by the time you slip back under the HP cap, anyway.
To go with his great talent and amazing EX Skills, Temenos has a pretty solid Latent Power. Judgement allows Temenos' attacks to reduce his target's shield points, regardless of if he's striking their weaknesses or not. It's useful early in the game when you may not have all of the weapon types and magic types available in the party, and still has niche uses in the waning stages of the game. It's not spectacular, especially compared to the other Latent Powers, but it's valuable in its own right.
That brings us to the end of everything I have to say about the clerics, so let's move on to the last duo of travelers! Like the hunters, we have a whole specialized and in-depth mechanic to discuss with the apothecaries!
| Alfyn Greengrass | Castti Florenz | |
|---|---|---|
| Artwork |  |
 |
| Path Action(s) | Inquire | Inquire (Day), Soothe (Night) |
| Talent | Concoct | Concoct |
| EX Skills | N/A | Drastic Measures, Remedy |
| Latent Power | N/A | Every Drop Counts |
| Notes | N/A | N/A |
For the apothecaries, we're going to once again eschew our usual order of business and begin with their talent. Both Alfyn and Castti share the "Concoct" talent, which allows them to mix various ingredients (called "Materials" in-game) during battle to create concoctions capable of healing/buffing allies or damaging/debuffing foes.
Mixing Medications and Producing Poisons
The fundamentals of the Concoct system are shared between the two games. In each case, Alfyn or Castti can use their action on a turn to make a concoction. This involves selecting from a list of ingredients in the party's inventory. For Alfyn, this is always limited to two ingredients. For Castti, this involves two ingredients by default, but Boosting allows for an additional ingredient for each BP spent. Depending on the ingredients used, the concoction will be medicinal (heals HP, SP, or BP, may cure some conditions and provide some buffs) or harmful (targets foes, dealing various elemental damage types and possibly inflicting status conditions or debuffs).
The two games differ in how the ingredients are combined in each game and in the presentation of the system. In the first game, the effects of Alfyn's concoctions are hidden from the player. Until a given pair of ingredients are used together for the first time, there is no way of knowing exactly what they will do. Now, there are patterns. Dusts will create harmful concoctions that target all foes, while seeds make single-target concoctions. Using Noxroot in harmful concoctions will always result in the concoction dealing fire damage. Identifying these patterns can make it easier to deduce the effects of an unknown concoction, but a player going in blind will still need to do some experimentation to begin working out these patterns.

This is made a little challenging by Alfyn's system being a "base + modifier" system of combining ingredients. What that means is that all of Alfyn's concoctions must use one of eight base ingredients. Soothing Seeds, Soothing Dusts, Purifying Seeds, and Purifying Dusts all produce medicinal concoctions, while Injurious Seeds, Injurious Dusts, Ruinous Seeds, and Ruinous Dusts all produce harmful concoctions. Their exact effect depends on what modifying ingredient they're paired with, but these eight base ingredients determine the strength of the concoction and whether it will target a single foe/ally or all foes/allies. That's fine and dandy, but it can be a bit of a pain to track down where those seeds and dusts can be purchased. Once you know what shops stock them, it's fine, but these base ingredients are precious in the early-game when you don't have access to much of the map. You need to experiment, but it can also feel wasteful to use a Soothing Dust when you don't know what you'll get from it!
On the flipside, once you do know where to get the necessary base ingredients and have access to their higher-quality forms, Alfyn's Concoct becomes a versatile tool that can grant the whole party 2 BP at once or whittle down the shield points of a whole group of enemies at once with a two-hit blast of elemental magic. Overall, Alfyn's Concoct starts off weak, difficult to master, and limited by a lack of materials, but grows into an invaluable skill by the lategame. If you'd like to see what all it can do, the FANDOM Octopath Traveler Wiki has a great table showing all the possible combinations of ingredients.
Castti's Concoct in the second game, meanwhile, is more straightforward. Rather than a "base + modifier" system, every ingredient has its own set effect, with the final concoction stringing all those effects together into one turn. The effects of the ingredients are clearly laid out, so there's no need for experimentation and identifying patterns. Toss in the ingredient that does what you need, and you're off to the races. Where Alfyn used the base ingredient to determine whether a concoction was medicinal or harmful, Castti sorts them into two separate sub-menus, with the two types each drawing from a different selection of ingredients. Additionally, to remedy the early-game shortage of ingredients, Castti can always toss in some limitless weeds to get a weak, random effect (positive or negative depending on the concoction type).

Aside from making the Concoct system more transparent, this also allows it to integrate the Boost system. Rather than getting a greater effect by using better ingredients, you get more effects at once by spending BP and tossing in additional ingredients. You can also use the Strengthening Serum ingredient to boost the effects of other ingredients by a set amount, or a Diffusing Serum to extend the effect of the concoction to all foes/allies, with these more or less replacing the Seeds/Dusts dichotomy of the first game.
The second game uses a simplified, more accessible system, but balances it by restricting what it can accomplish. For example, where Alfyn could use any type of magic through his concoctions, Castti only gets access to Wind, Light, and Dark. This results in a system that's great and easy to use in the early portions of the game, but which falls off in usefulness towards the latter stages of the game. It still has some uses for a quick BP boost or setting up an enemy to Break at the right moment, but it gets outclassed by the other options available to you. If you want a full listing of Castti's ingredients and their effects, this Reddit post by IDKbutKirb is a great resource.
Unlike with the hunters, I wouldn't call this change a straight upgrade. It does make mastering Concoct far easier, and I did use Castti's Concoct much more than I used Alfyn's, but each approach has its merits. I like the versatility of Alfyn's system and enjoy the way it permits experimentation, but I also like the simplicity of Castti's system and the way it addresses the early-game shortage of materials. I feel like there's a potential to blend elements of each into an even better system for a future game, but we'll see what happens.
Diagnosis of the Rest
Moving on, the path action that both apothecaries share is Inquire. This is simply the noble counterpart to the scholars' Scrutinize, allowing Castti or Alfyn to collect information from NPCs if their level is high enough. At night, Castti can instead use Soothe. This is an alternative to knocking out NPCs with Challenge or Provoke, and avoids a battle by using a certain medicinal item to put the NPC to sleep. Each NPC requires a specific item to make them sleep, though, and these items are in short supply, so it's usually only worthwhile if you really need to avoid a battle.
That's everything there is to say about Alfyn for the purpose of this section, so here's a table with Castti's EX skills!
| Name | Description | Type | SP Cost |
|---|---|---|---|
| Drastic Measures | Strikes a single foe with a powerful axe attack while removing their negative status effects and debuffs. Each debuff or status effect removed increases the attack's power. | 18 | |
| Remedy | Grants three status buffs to a random ally. | 22 |
Drastic Measures is a fairly straightforward skill. I didn't use it often myself, but it pairs nicely with the Concoct system. Use a harmful concoction to inflict an enemy with some status conditions and debuffs, then Boost and use Drastic Measures to deal major damage (it's especially great if Castti sub-classes into the warrior job). Remedy, is, uh... Remedy exists. I am sure there are use cases for it, but I don't recall ever making use of it. It's a bit outclassed by more targeted buffing options and other strategies for spreading buffs around.
As for Castti's Latent Power... weeeell, on the surface, it's not the most useful, but it's also not a poor one. Every Drop Counts allows Castti to make a Concoction without actually using up the selected ingredients. This is, again, great early on, and less useful later once she has a large stockpile of ingredients. It sure pleases me, though, speaking as someone who always ends up going "but what if I need it later?" in RPGs. It's neat it interacts with Concoct, but overall it follows the same trajectory as a result.
With that, there are no more traveler-specific traits to discuss! Next year, this section will wrap up with a few editions covering miscellaneous changes between the two games, ranging from the addition of the day/night cycle to the addition of Crossed Paths storylines to some changes in how sidequests work. As always, my gratitude goes to the Fandom Octopath wiki for their repository of character art. May you ring in a wonderful new year! See you in 2026!