World B-2: Difference between revisions
Trig Jegman (talk | contribs) |
m (→Gallery) |
||
| (12 intermediate revisions by 5 users not shown) | |||
| Line 1: | Line 1: | ||
{{distinguish|Level B-2}} | {{distinguish|Level B-2}} | ||
{{ | {{level infobox | ||
|title=World B-2 | |title=World B-2 | ||
|image=[[File: | |image=[[File:SMBLL World B-2 Screenshot.png]] | ||
|code=World B-2 | |code=World B-2 | ||
|world=[[World B]] | |world=[[World B]] | ||
|game=''[[Super Mario Bros.: The Lost Levels]]'' | |game=''[[Super Mario Bros.: The Lost Levels]]'' | ||
|limit=400 seconds | |limit=400 seconds | ||
| | |before_alt= | ||
|before=[[World B-1|<<]] | |before=[[World B-1|<<]] | ||
|after=[[World B-3|>>]] | |after=[[World B-3|>>]] | ||
|secret= | |secret= | ||
}} | }} | ||
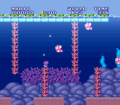
'''World B-2''' is the second level of [[World B]] in ''[[Super Mario Bros.: The Lost Levels]]'', taking place underwater. | '''World B-2''' is the second level of [[World B]] in ''[[Super Mario Bros.: The Lost Levels]]'' and the tenth secret level overall in said game, taking place underwater. | ||
==Layout== | ==Layout== | ||
After a transition showing the player character walking into a [[Warp Pipe]], the player will be dropped into the underwater segment, which contains [[Cheep Cheep]]s that swim through the walls. After swimming through a narrow corridor with a [[Blooper]] at the end, there is a flight of stairs with a [[Koopa Paratroopa]] jumping down, followed by a row of [[Coin]]s on the waterbed with a [[Koopa Troopa]]. Next, the player has to swim through coral walls while avoiding a Blooper, Cheep Cheeps, a Koopa Paratroopa, and a Koopa Troopa. After a square cove with a Blooper in it are downward moving [[lift]]s that will push the player into the chasm below if they get caught underneath. Next is a large block with Coins underneath that is followed by a large [[Fire Bar]], a Blooper, and a Koopa Paratroopa before the Warp Pipe to the [[Goal Pole]]. | After a transition showing the player character walking into a [[Warp Pipe]], the player will be dropped into the underwater segment, which contains [[Cheep Cheep]]s that swim through the walls. After swimming through a narrow corridor with a [[Blooper]] at the end, there is a flight of stairs with a [[Koopa Paratroopa]] jumping down, followed by a row of [[Coin]]s on the waterbed with a [[Koopa Troopa]]. Next, the player has to swim through coral walls while avoiding a Blooper, Cheep Cheeps, a Koopa Paratroopa, and a Koopa Troopa. After a square cove with a Blooper in it are downward moving [[lift]]s that will push the player into the chasm below if they get caught underneath. Next is a large block with Coins underneath that is followed by a large [[Fire Bar]], a Blooper, and a Koopa Paratroopa before the Warp Pipe to the [[Goal Pole]]. | ||
==Enemies== | ==Enemies== | ||
{|class="wikitable" | |||
|- | |||
!Name | |||
!Count | |||
|- | |||
|[[File:SMB Blooper Sprite.gif]]<br>[[Blooper|Bloober]] | |||
|6 | |||
|- | |||
|[[File:SMB Swimming Cheep Cheep Sprite.gif]]<br>[[Cheep Cheep|Cheep-cheep]] | |||
|(infinitely spawned off screen from the right) | |||
|- | |||
|[[File:SMB Green Koopa Paratroopa Sprite.gif]]<br>[[Koopa Paratroopa|Green Koopa Paratroopa]] | |||
|2 | |||
|- | |||
|[[File:Green Koopa Troopa SMB.gif]]<br>[[Koopa Troopa|Green Koopa Troopa]] | |||
|2 | |||
|- | |||
|[[File:FireRodSMB.gif]]<br>[[Fire Bar|Fire-Bar]] | |||
|1 | |||
|- | |||
|[[File:SMB Red Koopa Paratroopa Sprite.gif]]<br>[[Koopa Paratroopa|Red Koopa Paratroopa]] | |||
|1 | |||
|- | |||
|[[File:SMBLL Red Piranha Plant.png]]<br>[[Piranha Plant]] | |||
|1 | |||
|} | |||
==Level statistics== | ==Level statistics== | ||
[[File:SMAS LL World B-2 Title Card.png|thumb | [[File:SMAS LL World B-2 Title Card.png|thumb|Course icon]] | ||
{|class="wikitable" | |||
|- | |||
!Feature | |||
!Count | |||
!Notes | |||
|- | |||
|[[File:SMBCoin.gif]]<br>[[Coin]] | |||
|64 | |||
|2 in [[Hidden Block]]s, and 62 underwater. | |||
|} | |||
{{ | ==Level maps== | ||
{{ | {{Wide image|NES LL World B-2 Map.png|3696|Map of World B-2}} | ||
[[Category: | {{Wide image|SMAS LL World B-2 Map.png|3552|Map of World B-2 (''[[Super Mario All-Stars]]'' version)}} | ||
[[Category:Super Mario Bros.: The Lost Levels | |||
==Gallery== | |||
<gallery> | |||
SMAS LL World B-2 Screenshot.png|''[[Super Mario All-Stars]]'' version | |||
</gallery> | |||
{{SMBTLL levels}} | |||
[[Category:Aquatic areas]] | |||
[[Category:Super Mario Bros.: The Lost Levels levels]] | |||
Latest revision as of 09:20, October 9, 2023
- Not to be confused with Level B-2.
| Level | |
|---|---|
| World B-2 | |

| |
| Level code | World B-2 |
| World | World B |
| Game | Super Mario Bros.: The Lost Levels |
| Time limit | 400 seconds |
| << Directory of levels >> | |
World B-2 is the second level of World B in Super Mario Bros.: The Lost Levels and the tenth secret level overall in said game, taking place underwater.
Layout[edit]
After a transition showing the player character walking into a Warp Pipe, the player will be dropped into the underwater segment, which contains Cheep Cheeps that swim through the walls. After swimming through a narrow corridor with a Blooper at the end, there is a flight of stairs with a Koopa Paratroopa jumping down, followed by a row of Coins on the waterbed with a Koopa Troopa. Next, the player has to swim through coral walls while avoiding a Blooper, Cheep Cheeps, a Koopa Paratroopa, and a Koopa Troopa. After a square cove with a Blooper in it are downward moving lifts that will push the player into the chasm below if they get caught underneath. Next is a large block with Coins underneath that is followed by a large Fire Bar, a Blooper, and a Koopa Paratroopa before the Warp Pipe to the Goal Pole.
Enemies[edit]
| Name | Count |
|---|---|
Bloober |
6 |
Cheep-cheep |
(infinitely spawned off screen from the right) |
Green Koopa Paratroopa |
2 |
Green Koopa Troopa |
2 |
 Fire-Bar |
1 |
Red Koopa Paratroopa |
1 |
Piranha Plant |
1 |
Level statistics[edit]

| Feature | Count | Notes |
|---|---|---|
Coin |
64 | 2 in Hidden Blocks, and 62 underwater. |
Level maps[edit]


Gallery[edit]
Super Mario All-Stars version
