User:Spencer PK/Sandbox
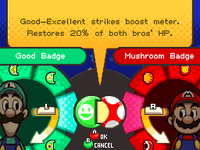
Badges are items used in-battle by Mario and Luigi in Mario & Luigi: Bowser's Inside Story. Unlike the previous games in the series, where badges are a type of equipment, badges are instead tied to a meter that appears in-battle and fills when Mario or Luigi perform successful Action Commands. When the meter fills, the respective attacker's badge in the meter moves closer to the other badge. When the meter fills enough, both badges will combine, allowing an effect to be released by tapping it with on the touch screen.
The first two badges, the Good Badge and the Mushroom Badge, are the "treasure of e'erlasting wonder" given by Princess Lipid in the Flab Zone. Later in the game, when Mario and Luigi escape from Bowser's body and arrive at Toad Town, they can shop at the Badge Shop there to buy all other badges except for one. Finally, when Mario and Luigi both reach Rainbow Rank by reaching Level 40, the Excellent!! Badge is awarded.
Mario & Luigi: Dream Team has a similar badge system that is expanded upon. The remake of Mario & Luigi: Bowser's Inside Story, Mario & Luigi: Bowser's Inside Story + Bowser Jr.'s Journey, has a similar badge system, but introduces new badges, effects, and mechanics inspired by Mario & Luigi: Dream Team.
Use
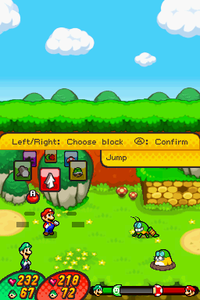
Mario and Luigi each must equip a badge, and each has four types they can use to change the type of effect and strength of the effect. Mario's badges are the right side and determine the effect. Luigi's badges are the left side and determine the strength of the effect, what rating of Action Command is needed to fill the meter, and the size of the meter.[1] The equipped badge combo can be changed from the star menu, the menu before challenging a boss in the Gauntlet, or in battle with the Change Badges Command Block. Changing badges will reset the badge meter, and doing so in-battle costs Mario or Luigi's turn. In the Gauntlet, the badge meter always starts empty (except for Class 7, where the meter's progress is kept between the fights).
When the meter is full, the effect will be stored there until it is tapped with during Mario or Luigi's turn, allowing it to be used whenever needed. Using the effect does not cost Mario or Luigi's turn. Only one effect can be stored at a time.
When Luigi battles alone while separated from Mario in Dimble Wood, badges cannot be used.
Badge meter fill calculation
The amount the badge meter fills by depends on the attack.[1] Normal attacks fill the least, Special Attacks fill more, and the harder or more expensive Special Attacks fill the most.
| Icon | Attack | Amount filled (units) |
|---|---|---|
| Jump | 20 | |
| Hammer | 20 | |
| Green Shell | 25 | |
| Fire Flower | 25 | |
| Jump Helmet | 45 | |
| Yoo Who Cannon | 35 | |
| Super Bouncer | 45 | |
| Mighty Meteor | 45 | |
| Spin Pipe | 45 | |
| Snack Basket | 35 | |
| Magic Window | 35 | |
| Falling Star | 45 |
The amount the badge meter needs to be filled before filling completely depends on the badge combo.[1] Luigi's weaker badges take longer to fill, but are easier because lower Action Command ratings can fill the meter. Luigi's stronger badges are faster to fill, but are harder because higher, perfect, or successive perfect Action Command ratings are required to fill the meter.
List of badges
| Name | Icon | Price (coins) | Location | In-game description | Notes |
|---|---|---|---|---|---|
| Mushroom Badge | — | Obtained from Princess Lipid | Harnesses the meter's power to restore your HP.[a 1] | Stronger versions of this badge's effect also cure negative status effects. | |
| Powerful Badge | 2000 | Bought from Toad Town's Badge Shop | Harnesses the meter's power to make your attack power go up. | Badge combos involving this badge grants the Super Strike status effect to both brothers, which multiplies the damage the bros' next singular hit does. | |
| Bonus Badge | 500 | Bought from Toad Town's Badge Shop | Harnesses the meter's power to earn you extra bonus coins. | Stronger versions of this badge's effect also boost EXP gained. | |
| Bro Badge | 1000 | Bought from Toad Town's Badge Shop | Harnesses the meter's power to restore your SP. | — | |
| Good Badge | — | Obtained from Princess Lipid | Good to Excellent strikes boost meter. Meter effect is very low.[a 1] | Mario or Luigi must achieve at least a Good rating to fill the meter. This badge's meter is the largest, making it fill the slowest. | |
| Great Badge | 500 | Bought from Toad Town's Badge Shop | Great to Excellent strikes boost meter. Meter effect is medium. | Mario or Luigi must achieve at least a Great rating to fill the meter. Makes the meter's size smaller, allowing it to be filled faster. | |
| Excellent! Badge | 1000 | Bought from Toad Town's Badge Shop | Excellent strikes boost meter. Meter effect is high. | Mario or Luigi must achieve an Excellent rating to fill the meter. Makes the meter's size the smallest, allowing it to be filled the fastest. | |
| Excellent!! Badge | — | Obtained after Mario and Luigi both reach Rainbow Rank (Level 40) | Successive Excellent strikes make the meter's effects unrivaled.[a 1] | Mario or Luigi must achieve successive Excellent ratings to fill the meter. If the attacker gets lower than that, their side of the bar shatters and is drained completely. If an Excellent is not possible at the time, the meter does not break. The size of the meter with the Excellent!! Badge is the same as the Excellent! Badge.[1] |
Combined effects
Here are all badge combos as well as the size of each combo's meter.[1]
| Badge | Mushroom Badge |
Powerful Badge |
Bonus Badge |
Bro Badge |
|---|---|---|---|---|
| Good Badge |
Good-Excellent strikes boost meter. Restores 20% of both bros' HP. Meter size: 240 units |
Good-Excellent strikes boost meter. Next attack does 1.2x damage.[b 1] Meter size: 220 units |
Good-Excellent strikes boost meter. Multiplies received coins by 1.2. Meter size: 220 units |
Good-Excellent strikes boost meter. Restores 20% of both bros' SP. Meter size: 260 units |
| Great Badge |
Great-Excellent strikes boost meter. Restores 30% of both bros' HP. Meter size: 180 units |
Great-Excellent strikes boost meter. Next attack does 1.5x damage. Meter size: 160 units |
Great-Excellent strikes boost meter. Multiplies received coins by 1.4. Meter size: 160 units |
Great-Excellent strikes boost meter. Restores 30% of both bros' SP. Meter size: 200 units |
| Excellent! Badge |
Excellent strikes boost meter. Restores 50% of both bros' HP and cures status effects. Meter size: 160 units |
Excellent strikes boost meter. Next attack does 2x damage. Meter size: 140 units |
Excellent strikes boost meter. Multiplies received coins by 1.6 and gained EXP by 1.2. Meter size: 140 units |
Excellent strikes boost meter. Restores 50% of both bros' SP. Meter size: 180 units |
| Excellent!! Badge |
Excellent strikes boost meter. Fully restores both bros' HP and cures status effects. Meter size: 160 units |
Excellent strikes boost meter. Next attack does 4x damage. Meter size: 140 units |
Excellent strikes boost meter. Multiplies received coins by 2 and gained EXP by 1.5. Meter size: 140 units |
Excellent strikes boost meter. Fully restores both bros' SP. Meter size: 180 units |
Notes
- Attacks can end before the highest Action Command rating is received if the enemy is defeated during the attack. This can prevent the badge meter from charging if Mario and Luigi are too powerful and use a multi-hit move against an enemy. Single hit moves (Hammer, Jump Helmet, Falling Star), or moves that give the desired Action Command rating before hitting the enemy (Snack Basket) can always charge the badge meter.
- The effects of the Powerful Badge and Super Strike, because it multiplies the damage of the next singular hit, is best used for the strongest single-hitting Special Attacks. Jump Helmet and Falling Star benefit the most, while multi-hit attacks like Yoo Who Cannon and Magic Window hardly benefit.
- If the Bonus Badge with an EXP bonus is used in a battle where Mario, Luigi, and Bowser all get EXP, Bowser's EXP gain will be unaffected by the Bonus Badge.
- Coin and EXP multipliers from the Bonus Badge stack additively with gear items that also boost the amount gained.
- For an example with coins, having Excellent!!+Bonus active (+100%), Coin Socks active (+50%), and the Challenge Medal equipped (+50%) all at once will sum to a +200% bonus, or 3× coins earned.
- For an example with EXP, having Excellent!+Bonus active (+20%) and EXP Socks active (+30%) all at once will sum to a +50% bonus, or 1.5× EXP earned.
Gallery
See also
- Badge (Mario & Luigi: Dream Team)
- Battle Card (Mario & Luigi: Paper Jam)
- Badge (Mario & Luigi: Bowser's Inside Story + Bowser Jr.'s Journey)
- Battle Plug
References
- ^ a b c d e f Jdaster64 (February 18, 2013). Bowser’s Inside Story Equipment details…. The Super Mario Files (English). Retrieved March 11, 2025.
- ^ Mario & Luigi: Bowser's Inside Story. The Cutting Room Floor (English). Retrieved May 3, 2025.
Sandbox notes
To do
- The small badge icons would work better in List of shops in Mario & Luigi: Bowser's Inside Story instead of the high-res badge images.
- Are badges items, game mechanics, or both?
Critical hit information
Notes for an eventual Mario & Luigi series critical hit article.
- Superstar Saga: 2×. Tested by using fire attacks on Pestnuts and Gold Beanies, which have the same DEFENCE value. I needed to use the Scandal Jeans so the Gold Beanie would not run away.
- Partners in Time:
2×. Tested by using Bro Flowers and Ice Flowers on a Red Coconutter, which are weak to ice. Bro/Ice Flowers have the same attack power.Nvm it's actually 1.6×. Damage rounding can make flower crits look like double. - Bowser's Inside Story: 1.5×. Tested by throwing 3 fireballs with Mario at a Stonk. Calculating the damage, then multiplying by 1.5× gave the displayed number in-game. 194*24/99*(0.066*3)=9.312, 9.312*1.5=13.968, rounds up to 14 which is the final damage.
- Dream Team: 1.5×. Dreamy Bowser and his arms are different targets who are statistically identical, but Dreamy Bowser takes critical damage from jump-type moves.
- Paper Jam: 1.3×. In my testing, a single Luigi fireball vs. a Spiny and a Paper Spiny dealt 35 and 46 damage respectively. 35 × 1.3 = 45.5, rounds up to 46. Spinies and Paper Spinies are statistically identical.
- Remakes: can't test from not owning them, but I assume it is 1.3× in both. No idea if Critical+Lucky is possible there.
- Brothership: This game introduces random damage variance to all attacks, which really sucks for an investigation like this. I have no idea how strong a critical, buster critical, or buster critical with 2 or 3 specialist Battle Plugs are. In all my play, I never got a LUCKY in a (buster) critical hit, which makes me believe they cannot happen together.


