The 'Shroom:Issue 192/Strategy Wing

Director's Notes
Written by: Hooded Pitohui (talk)

Hello, readers of The 'Shroom, and welcome to the March 2023 edition of Strategy Wing! Flowers are blooming as spring arrives, and, here in Strategy Wing, a new section has bloomed, too! This month, we welcome Four Steps for a 3D World, a new section where I'll be analyzing the structure of Super Mario 3D World levels through the lens of Hayashida's professed level design philosophy. If you've thought "I like Strategy Wing, but what it really needs is a section about Mario," this is your lucky month, and you should give the section a look! If you're sitting there and asking yourself who Hayashida is, well, that's answered in the section, so consider that another reason to check it out!
Of course, you won't want to miss the perennials in the Strategy Wing garden, either! I hear there's someone frightening in the depths of the jungle that you can read more about in File City Files. Maybe Shoey can send them to Koops if he discovers their identity! I think our tactician could use any extra help he can get, as he has a battle of attrition before him in Koops, Your Emblem is on Fire this month. It's not all battles in the Strategy Wing offices this month, though! No, we're promoting peace in the office, too, or Waluigi Time is, at least, in Digging Deeper.
There's plenty of reading awaiting all of you, so I won't keep you much longer. Before you go, though, I'll remind you that, if you ever want to join our Strategy Wing team, you can head to the sign up page and send an application to our Statistics Manager, Meta Knight. Whether you want to give us challenges and tips like Digging Deeper does, you want to walk us through a game like File City Files does, or you want to dissect and analyze a game like Four Steps for a 3D World does, we'll find a place for you! Come and join us! The office door is open!
Section of the Month
Waluigi Time (talk) went beyond infinity, and apparently that takes you to the world of Minecraft! It's a good thing he went there, though, seeing as he's now taking first place for teaching us how to take on the Vegan Challenge in Minecraft. Congratulations, Waluigi Time. I promise that no wolves, squid, or Piglin Brutes were harmed in the making of this trophy! Coming in second place, we can thank Mustard Machine (talk) for helping us bolster commerce in File City by getting Betamon to join the city (along with two other, slightly less useful and totally useless, respectively, Digimon) and teaching us how to clean up Sukamon last month. Rounding out the top three, Koops (talk) treated us to some royal drama last month. Do you think we might get more as our quest continues? Maybe we can get MKBC2 to make a reality show out of it, if we do... Or maybe we'll settle for an awards show, thanking all of our writers for their great contributions! Okay, maybe TV broadcasters and squabbling royals won't be thanking the Strategy Wing team for their hard work, but we can! Be sure to keep voting to express your gratitude, and, if you like something a writer is doing, don't be afraid to let them know directly. I'm sure they'd appreciate it!
| STRATEGY WING SECTION OF THE MONTH | ||||
|---|---|---|---|---|
| Place | Section | Votes | % | Writer |
| 1st | Digging Deeper | 8 | 44.44% | Waluigi Time (talk) |
| 2nd | File City Files | 6 | 33.33% | Mustard Machine (talk) |
| 3rd | Koops, Your Emblem is on Fire | 3 | 16.67% | Koops (talk) |
Digging Deeper
Written by: Waluigi Time (talk)
Hello there, 'Shroom readers, and welcome back to Digging Deeper! I originally had something different planned for this time, but after last month's issue, Shy Guy on Wheels asked me if it was okay to use End Crystals in the Vegan Challenge to indirectly kill mobs on the protected list. (The answer is... maybe. The challenge is basically whatever you want to make of it, so if trying to get around the restrictions in creative ways sounds like something you'd have fun with, go for it!)
But that got me thinking about something new, so we're going to shift gears a bit today. This month's challenge is the "Pacifist" Challenge! Like last time, this works on pretty much any version of Minecraft with mobs in it. Just keep in mind that some of this information may not apply on older versions.
What have I gotten myself into now?

To start things off, we're going to be taking a look at an often overlooked button on the pause screen called Statistics. If you didn't already know, Minecraft actually keeps track of a lot of things per player per world! Ever wanted to know how much cake you've eaten, how many times you've jumped, how many music discs you've listened to, or how many times you've picked up any specific item in the game? That's all in there, and a whole lot of other stuff. If you're interested in the most minute details of your Minecraft world, you can spend a lot of time in here. (This menu is unfortunately only available in Java Edition. Luckily, it's not directly needed for this challenge.)
For our purposes today, we're going to be looking specifically at the Mobs tab. This keeps track of every mob in the game, how many times you've killed that type of mob, and how many times that type of mob has killed you. Personally, I like it when numbers go up in various contexts, but for the "Pacifist" Challenge, you're going to want to keep the number of mobs you've killed at 0. (Well, you probably want to keep the number of times you've been killed by anything at 0 too, but that's not part of the challenge.) That doesn't mean you can't kill mobs... It just means you need to be sneaky about it!
The game gives a surprising amount of leeway with this. I've done a lot of testing, and as far as I can tell, it only registers you as killing a mob if they die from the following:
- Physically hitting them
- Projectiles, such as arrows
- Thrown splash potions or lingering potions
- Firework explosions
- Deflecting a ghast's fireball
- Triggering Thorns armor
Basically, you have to be directly responsible for the killing blow. Otherwise, pretty much anything goes. Punching a mob into danger won't count as a kill, as long as something else finishes the job. You can even make your own tamed wolves attack them, or hit them with a Fire Aspect enchanted weapon and let the fire kill them. Activating redstone contraptions (i.e. firing arrows from a dispenser) is fine too. Honestly, I find the lenience here kind of disappointing. On paper, it takes away a lot of the challenge of finding clever ways to kill mobs, though in practice, not being able to use weapons (or your fists) to take mobs down is probably challenging enough already. I'll be playing by Mojang's rules in this section, but if you'd like to add more restrictions in your own playthrough, by all means, feel free!
It's a dangerous world out there

Even taking the monsters lurking around every dark corner out of the equation, the Minecraft world is a scary place with plenty of ways to die horribly! Luckily, as a general rule, if something can kill you, it can kill a mob. There are exceptions of course, with some mobs having specific immunities and others being vulnerable to things that even you aren't, but for the most part, you can probably make good use of the world around you to outwit your foes. In the interest of keeping this section at a reasonable length, I won't go into exhaustive detail.
A helpful tip is that you can get mobs to go where you want them - ideally places that will make them not exist anymore - by pushing them around. This is sometimes easier said than done, as plenty of mobs will flee from you or are trying to kill you, and even the ones that don't might not always cooperate. Snowballs and eggs are great options for knocking mobs back without dealing any damage (blazes do take damage from snowballs, though), and a fishing rod can be used to pull hooked mobs towards you. You can also punch mobs around, of course, and as I mentioned earlier punching them into something else that kills them won't count against you, just be careful when directly damaging mobs like this.
Bullet point time, go!
- Fall damage is a versatile option that can be used in just about every environment, although flying mobs and a few others are immune or resistant.
- Lava and fire are pretty self explanatory, and will set most mobs ablaze. You can place fire yourself with a flint and steel. Keep in mind that when dealing with lava, any drops will probably end up being incinerated.
- Using Fire Aspect enchanted weapons to inflict burning is fine, just be careful when directly hitting mobs.
- Powder snow will "freeze" mobs (really just another damaging effect) when they're in it too long. A few are immune, and others take extra damage from this.

- Explosions! TNT, End crystals, beds outside of the overworld, and respawn anchors outside of the Nether will all go kaboom when triggered and the game doesn't care if you were the one who set them off. (That being said, getting mobs to trigger TNT on their own via pressure plate is concerningly fun.)
- Dispensers can fire basically any projectile you can think of, only now you won't technically be responsible for it!
- Some blocks, like cacti, magma, and campfires, will cause damage on contact, and berry bushes do so while moving through them. Wither roses give the Wither status while in contact with them.
- Many mobs are susceptible to drowning (and some are damaged just by touching water), but you'll have to put some more effort into this one, since the ones that can drown will float to the top. You'll need to do some building or hold them underwater with a lead.
- Naturally, most aquatic mobs will suffocate outside of water instead.
- All mobs will suffocate when their line of sight is trapped inside a block, which will usually happen from falling blocks such as sand or gravel, but can also be done using pistons.
- Java Edition has a feature called entity cramming, which will cause mobs to suffocate when too many of them are occupying the same space. 24 is the default cap, but this can be changed or disabled with gamerules. While you can, in theory, make a pit of mobs that will take care of anything that falls in, triggering it can be a bit finnicky and there's no guarantee the mob you want to die will be the victim here.
- Dropping an anvil on top of a mob will do a lot of damage. The greater the distance, the better!
- Lightning can be harnessed by crafting a lightning rod, which will attract lightning to specific places. It's a pretty niche option, but it's there. Just don't use this on creepers, villagers, or pigs. They won't be damaged and they'll actually become more dangerous.
- Anything that doesn't fly can be knocked into the void, an endless pit of doom, but unless you're on a specifically designed map or encounter a glitch, you'll only find it in the End. Once anything falls in there, it's gone forever, so no chance of recovering dropped items.
You could probably incorporate any number of these into specifically designed traps to make things easier for you. Any contraptions you build will probably be more useful for defending your base or other key locations than for defending yourself while exploring, though.
Outsourcing!

You can also get other mobs to do your dirty work! Tamed wolves are some of the most versatile and easy to use for this purpose, and will attack almost any mob in the game, assuming you attack that mob first or are attacked by them, and will also attack all types of skeletons unprovoked. When dealing with underwater mobs, axolotls are going to be your best option. Iron golems are another good option for dealing with most hostile mobs, but unless you want to drag them around on leads, they're probably better for defending specific areas. Snow golems aren't able to deal damage (blazes being the sole exception), but they can knock hostile mobs into hazards or traps, so may be situationally useful. Discounting certain tamed mobs, these four combined can deal with every mob currently in the game, although ghasts will prove to be a bit troublesome.

There's plenty of other interactions where mobs will attack specific kinds of mobs, but those are generally going to be a lot more situational, and there's enough other options already that I don't feel the need to mention all of them. If you're feeling gutsy, you can get the warden to attack any mob, and the wither will go after anything that's not undead, but I'm not sure playing with the game's most dangerous mobs to kill a chicken is the best use of your time. You do you, though.
Even if mobs normally don't attack specific ones, you can bait some of them into fighting each other. Mobs with ranged attacks, especially bow users like skeletons and pillagers, are pretty easy to lure into attacking mobs. Creepers are another great option, of course, just keep your distance! Although a downside with them is that if the initial blast doesn't take out your target, you don't have them around anymore to keep attacking for you.
I ruined everything, help
Once again, this challenge is kind of what you make of it, although (at least in Java Edition) its effects are more tangible than in the Vegan Challenge thanks to the Statistics screen. (Well, I guess it's just as tangible there, too, come to think of it.) If you fail the challenge at some point by directly killing a mob, you could either start over in a new world, or continue on and just try to keep your violence to a minimum. It's up to you, really.
Or if you feel like cheating you can just go into your game files and edit the JSON file...
That's all, folks
And that's basically everything you'll need for the "Pacifist" Challenge! I could've gone into more detail about specific scenarios and such, but this was long enough already, and the information here should cover things in most situations. There's plenty of options to work with, so if something doesn't work on a specific mob, try some experimentation! I hope you enjoyed reading this and that you enjoy the challenge if you try it out. If you do, let me know what you think!
I'll be back next month with our previously-scheduled programming, unless of course I come up with something else I feel like putting it off for again. If you have any other ideas for a challenge, let me know and I'll consider writing about it! I also invite anyone to write one of these themselves if they have an idea they want to get out.
File City Files
Welcome back, Strategy Wing readers, to The Shroom's premier Digimon World section, covering the PS1's number one cult hit that only halfway works in Europe (look it up, it's true). Last month, we expanded our city by three residents, adding one really useful Digimon, one not so useful Digimon, and, finally, one worthless Digimon. This month, recruiting Digimon is going to take a back seat, as, instead, we're primarily going to focus on expanding how much of File Island we can explore.
For this month, we're primarily going to be using these Prima guide maps:
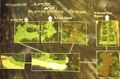
The rich tropical jungle
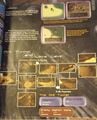
The industrious File Island Mines


The Sniper-Toting Doctor of the Jungle
Returning to the Tropical Jungle, we once again come to the fork in the road from last issue. This time, though, instead of going up, we will continue going right. This will take us to a different part of the Mangrove Region. Avoid the wild Digimon that inhabit it (in the day, Yanmamon, and J-Mojiyamon in the night) and head up. This will take to you the Amida Forest. Once you enter the Amida Forest, a voice will call out, calling you a trespasser and threatening to shoot, but we're gonna go ahead and call that bluff and start making our way through the forest!

If you attempt to go straight through the forest, you'll quickly find out the voice is not bluffing and that he will in fact shoot you. There's no way to dodge said shots, and each shot takes half of your HP, so if you're going to just charge through, you'll want to bring plenty of healing items! But if you don't want to be shot - for some weird reason - you can instead take advantage of the built-in cover of the forest and sort of zig and zag between trees to lower the chance of you get shot. There are also items scattered about the forest. These are an attempt to get you out in the open. These items are basically just standard items, the usual stuff like meat, Med Recovery, and Autopilots. If they're in your path, go ahead and pick them up, but, if not, ignore them. Once you reach the end of the forest, there will be three different endings. Two of them have blue X's and one has a red circle. Make your way to the red circle and a door will open, out from which will step the mystery assailant. He will reveal himself as Centaurmon and further reveal that he set all of this up as a test, and, that since you passed, he will join the city! Not only does he join the city, but he leaves the way out of the forest open, giving us access to the Ancient Dino Region, a mysterious land where time moves differently. Don't get excited about it yet, because we're gonna adventure through there later.
Purpose in City: Perhaps as a way to make amends for shooting all those Digimon, Centarumon opens a hospital.
An expert doctor, Centarumon can easily cure any Digimon's Sickness and Injury status effects. It's not free, but, luckily, you have great health insurance, so it's pretty cheap.

He also has a machine that fully removes your Digimon's tiredness, as opposed to Punimon, who only eliminates stages of it. Eliminating tiredness is also free. Finally, he also sells bandages (which cure Injury) and medicine (which cures sickness) for 400 and 1,200 bits, respectively. This is so you can cure those status effects without having to return to town. More than likely, the number one thing you're going to use the hospital for is eliminating Tiredness, because that'll make training much easier since you can fully eliminate it in one hour, as opposed to only eliminating a portion of it in that time. The ability to cure status effects can be useful but, I don't know, Injury and Sickness are pretty rare. Injury kind of just happens after combat sometimes, and Sickness can almost be completely avoided if you know what you're doing. So while they're useful features, they aren't going to come up anywhere near as often as the ability to cure tiredness
The Invisible Bridge to Somewhere

Still inside the Tropical Jungle, head back towards the Overdell. At the Overdell, instead of going into the Graveyard, keep right and head into the Great Canyon Entrance. Now, at first glance there doesn't appear to anything of note in here besides of a large canyon.
Those of you with eagle eyes, though, might notice that part of the canyon looks a little bit like an entrance. Head towards it and Mameo (the Digimon World human character) will note that it's dangerous and step back. From there, head back into town and talk to Yuramon (the furry Fresh Digimon who sits in front of Jijimon's house). He'll tell you that there's a rumor about an invisible bridge that's built over the canyon. With the knowledge that there may, in fact, be a bridge there, you're now brave enough to attempt to cross it... and it turns out there is a bridge there! This bridge leads to the Top Area of canyon, but, once again, we'll explore that on a different day.
Working in a Digimine, Going Down Down Down
Head back into the Native Forest and head towards the Drill Tunnel (don't worry, as there's an electric sign that points the way.) Inside the tunnel, there's a part that branches into paths on all sides.
First, head to the left. This will take you to an outside part of the tunnel with a Drimogemon rolling on the floor. If you talk to him, he'll tell you that it's too hot, and then he'll decide that the only way to lower his temperature is to beat some ass and fight you.

He's not a very tough opponent. He only has 1200 HP, so you should be able to defeat him with even a moderately-trained rookie with little trouble, but maybe bring some healing items just in case. After you defeat him, he'll apologize for losing his cool because of the heat and tell you that the tunnel they're digging is inside of a volcano. Now we never need to talk to this Drimogemon again! Now, head back inside the tunnel and take the right path this time. This takes you to the Underground Pond, where another Drimogemon is digging away. He tells you that it'll take awhile for the tunnel to be built, and, after initially getting offended that you're trying to steal the fun by offering to help, he'll let you carry dirt and dump it outside! He even offers you 500 bits per dump!

This is pretty easy, if not a little tedious. All you have to do is Press X next to the pile of dirt and then take it to the entrance of the tunnel. Something to note is that the Goburimon (the little punk ogre Digimon) that would previously attack you in the tunnel will not attack you if you have the dirt bucket attached. In fact, they even thank you for the help!
After each dumped bucket, you not only gain 500 bits, but you also get a stat increase of 50 HP, 5 Offense, and 5 Defense. Like I said, this is a pretty tedious activity because, not only do you have to dump ten loads of dirt, but you also have to talk to Drimogemon every time in order to activate the ability to dump the dirt. What is kind of cool is that you can see Drimogemon make actual progress in the tunnel as you dump the dirt. What's not cool is, after you get your payment for dumping the dirt, you always go back to where you originally started! You also can't dump dirt when your Digimon is sleepy (starting one hour before your Digimon would naturally get sleepy) because Big Government Bidenmon is always telling us when we can and can't work. Also one thing to watch out for is, more than likely, at some point while doing this, your Digimon will need to poop. This can be pretty annoying, because, more than likely, you won't have the Item Shop upgrade that sells Portable Potties. You also can't leave with the dirt bucket, so there's a pretty good chance that you're going to have to poop with just no chance of getting to the bathroom. Honestly, this is really the place where you're most likely to poop on the ground, just because it'll probably come up when there just isn't anything you can do about it. After ten bucket dumps, he says there's no more dirt and to please wait a little while. All you have to do is leave the Drill Tunnel and come back, and the path will be cleared. Well, sort of! On the next screen, there's a really big rock in the way! Drimogemon can't drill through it, but don't worry. While he might not be strong enough, your Digimon is! Pushing the boulder out of the way reveals the Lava Cave, and that's where we will begin next month!
In Sickness and in Health
Earlier in the section, I mentioned two status effects, those being Injury and Sickness, and I decided that I should probably go into a little more detail about what those mean. Injury and Sickness are similar to hunger and tiredness in that they exist outside of battle, unlike more common status effects like Poison and Stun which exist inside of battle.
Of the two, Injury is the easier to explain. Injury can happen whenever you win a fight with a low amount of health remaining. Injury is represented by a thought balloon with a bandage on it. In addition, Injury is healed with a bandage or medicine or by paying the fee at the File City Hospital. Injury is pretty rare. I only remember seeing it like one time. Since Injury can only occur in battles where you end with a low amount of health (I don't have an exact figure, but I'd guess it's somewhere around 25% or less) and, even then, it's a pretty low chance of getting it, you probably won't see it much. Be warned, though, because I believe an Injury that goes unchecked can turn into Sickness... I think? Again, I've only ever seen Injury once, and, let me tell you, it was a hassle and a half to get any information about both Injury and Sickness either online or from my official Prima Digimon World guide.

Sickness, represented by a thought bubble with a needle, on the other hand, is a little harder to explain.
There are two primary ways your Digimon can get sick. The first way is by being in an environment that they aren't suited for. For example, if you take a Digimon like Penguinmon into Lava Cave, hang around too long and your Digimon can get sick from exposure. This is a little tricky to avoid, because the game doesn't actually outright tell you which environments not to take certain Digimon to. Instead, if you ever see the face on the happiness meter flip back and forth from a yellow happy face (or whatever face you currently have) to a blue frowny face, that means your Digimon is in an environment it doesn't like. The more common way for your Digimon to get sick is by eating the wrong thing. There's a couple different food items that can cause Sickness. Some are obvious, like the Moldy Meat item, which, duh, of course Moldy Meat will make a Digimon sick. That one is easy to avoid, because you really shouldn't be having to eat Moldy Meat to satisfy your Digimon's hunger. The other food items that get a Digimon sick are items that have a positive effect but come with the risk of causing Sickness. Items such as the Happy Mushroom, which dramatically increases happiness but has a 35% chance of causing Sickness, and the Digiseabass, which increases a Digimon's lifespan by 2 hours but has a 20% chance of causing Sickness, are in this category. These items are what will probably cause Sickness for your Digimon, because they have an actual tangible benefit that's worth the Sickness. You can in theory get sick from environments, but that seems a lot more random and the odds seem pretty low (something we will discuss much later!). Sickness can be cured by both the bandage and medicine, but the bandage only has a slight chance of curing sickness. You can also skip the items altogether and cure Sickness at the File City Hospital.
So now that we know what causes Sickness and Injury, you might be asking "what do they actually do?", and the answer is a little confusing, because they don't really have an immediate effect on your Digimon. You don't passively lose health, you get the same training results, and I don't even think there's an impact in battle. Instead, it's more a passive debuff, because, firstly, both Sickness and Injury count as care mistakes. Then, secondly, I believe maintaining Sickness or Injury will cause premature death. Luckily, they're really easy to cure once you get Centarumon, since you can either pay 300 bits to be cured in the hospital or you can buy both Bandages and Medicine, which can conveniently be purchased at the hospital. That's going to be the end for this month. Join us next month for another File City Files as we keep on the lookout for new Digimon to bring to the city.
Pitohui's Pokémon Academy
Written by: Hooded Pitohui (talk)
Ah, welcome back, class! Did you all remember to give the wildlife of the Hisui region a cursory look? No? Well, unfortunately, I must ask that you hold those thoughts a little longer. Certain... technological restraints forced me to scupper my original lesson plans for this session. Don't despair your time spent seeking out information, however! We will return to that planned lesson in the future.
For today's session, however, I thought that, since we won't be able to continue on our original trajectory, we would instead examine one of my favorite Pokémon together. For those of you in the north, spring is likely returning with gusto, with its greenery and songbirds, while autumn is arriving for those of you on the southern half of the globe. These seasons are times of change and transition, so I thought it only appropriate to look at a Bug-type Pokémon famous for its metamorphosis! Yes, this month's featured Pokémon may start as a caterpillar, but Dustox emerges as a lovely moth!
Before we continue, I should note that Dustox and its evolutionary line do not reside in the Paldea Region. We're looking back at a Pokémon I raised in the Alola Region (that is to say, in the seventh generation). For more disclaimers, and to get familiar with the course, I recommend that those of you just joining us take a moment to read the condensed course syllabus in the box below.
First, a Smogon University course, this course is not. No, this academy's lessons are designed to get trainers of any stripe thinking about how they can raise their Pokémon, and, as a result, aren't designed to keep up with the widely-accepted metagame for the series. In some cases, the way I've raised my Pokémon may even flies in the face of conventional wisdom. If you're looking for top-tier strategies, do check out Smogon, but if you merely want to get a little deeper into raising Pokémon while still doing things your own way, feel free to use this section as a reference.
Since we all know the importance of citing our sources, I also need to credit the design of some of the tables used in these lectures to Crocodile Dippy, author of the Pocket Handbook which can be found in early editions of Strategy Wing.In addition, should you need a refresher on terms commonly used in this class, you'll want to take a look in this second box. If you ever find yourself lost during class, feel free to message me, and I can update this handout with additional terms.
Base Stats: Base stats are the values associated with a particular Pokémon species, and are the same across every individual Pokémon of a given species. You have no influence on them. You can think of them as traits tied to a species. A chimp isn't ever going to be able to get as good as digging as a mole will be, and, likewise, an Abra is never going to have the defensive prowess a Shuckle has.
Individual Values (IVs): Individual values, as their name implies, are associated with individual Pokémon. They range from 0 to 31 in each stat, with 31 being considered a "perfect" IV and higher numbers corresponding to different stats. Magikarp A and Magikarp B will have the same base stats, but they may very well have different IVs. To stick with the animal analogy, one mole may be born with larger claws than another mole, and that first mole is probably going to have an easier time digging through dirt than the latter. Individual values are set in stone, strictly speaking, but you can use Hyper Training (from Generation VII onwards) to functionally get a perfect IV in a stat.
Effort Values (EVs): Effort values are the one thing you can easily change. A Pokémon can earn, primarily through battling, but also through means like the use of certain items or mechanics like Super Training, up to a total of 510 effort values, with up to 252 in any given stat. To finish off the animal analogy, no matter what kind of claws a mole is born with, moles who have more experience digging are probably going to be better at digging than moles which have never dug.
Nature: A Pokémon's nature is, more or a less, a stat modifier with a name meant to make it sound like a Pokémon has some personality. Natures will raise one stat by ten percent and lower another stat by ten percent. Some natures raise and lower the same stat, canceling out the effect and leaving stats unchanged. Natures can be functionally changed with the use of special mint items from Generation VIII onwards.
STAB: STAB stands for Same-Type Attack Bonus, and refers to the boosted power of moves that match the type of the move's user. To illustrate this, consider the case of a Lombre, a dual-type Pokémon which is both a Water-type and a Grass-type. Any Water-type moves Lombre uses will have their power boosted by 1.5x, and any Grass-type moves Lombre uses will, likewise, have their power boosted by 1.5x. (There are circumstances where this does not apply, and, while the 1.5x multiplier is typical, some games use other multipliers.)
Now, getting class started properly, we'll begin, as we most often do, with an examination of Dustox's base stats. What should immediately stand out to you is that Dustox's offensive stats are horrible. With both of them having fifty base points, Dustox won't be doing much with either its attack or its special attack. We can immediately rule out an offensively-oriented Dustox, so let's turn our attention to Dustox's defensive stats.
Dustox's HP isn't great, its defense is only marginally better, and its special defense is... well, respectable, luckily. To note what you all are likely thinking, yes, Dustox's base stats aren't anything to write home about overall. Bug-types often evolve quickly, but, those insects which evolve the fastest have relatively poor stats compared to other fully-evolved Pokémon. Dustox's relative weakness is no problem for our purposes, though! If you were looking for the most powerful Pokémon, you wouldn't be in this course, now would you? We're going to work with what we have, and what we have here is a sign we should focus on maximizing Dustox's defensive capabilities.

|
Name: | Dustox | Base HP: | 60 | |
| Species: | Poison Moth | Base Attack: | 50 | ||
| Type: | Bug | Poison | Base Defense: | 70 | |
| Abilities: | Shield Dust | Base Special Attack: | 50 | ||
| Compound Eyes | Base Special Defense: | 90 | |||

|
Base Speed: | 65 | |||
With that direction in mind, we'll turn our attention first to physical defense. Dustox's defense is hole in its armor, so to speak, a weak point in need of shoring up. We can do just that by investing the maximum 252 EVs into defense. To further bolster Dustox's defense, we should aim for a nature that raises its defense (as you can see, I didn't do as I should have, here, but you can avoid my mistakes, hm?).
Now, which of the defense-boosting natures should we aim for? To answer that, we'll briefly look at Dustox's offensive stats again, but, this time, we'll pull in its learnset. Looking at our options for Dustox's moves, we find that Dustox has more special options and physical options, and, since attack and special attack are otherwise equal and we want to be able to treat one of them as a dump stat, that tips the scales slightly in favor of special attack. We'll commit to that now, so, since Dustox won't have any physical moves and we don't care about attack at all, we can go with a Bold nature, lowering attack while raising Dustox's defense.
Next, we need to determine how we want to divide our remaining EVs between HP and special defense. Do we want to further bolster Dustox's already moderately high special defense, or do we want to cover for a lower bast stat again? Both options have merit, and either should be fine so long as you pick one and commit to it. Where you might cause yourself a headache is trying to split the EVs between the two. All that will result in is you accomplishing neither goal here. For myself, considering the possibility that Stealth Rock would eat a fixed proportion of Dustox's health on entry (meaning that increasing its HP would simply result in losing more HP before Dustox can even make a move), I thought investing in special defense would be more beneficial, and only gave HP the few EVs which were left after maxing out special defense.
With that settled, we have just one more decision to make before we get into selecting moves. Of Shield Dust and Compound Eyes, which ability should we choose? Well, Compound Eyes only serves to make a Pokémon's attacks more accurate, which isn't very helpful for Dustox. Its learnset doesn't include many moves with spotty accuracy. There's Poison Powder, but you wouldn't use that over Toxic, and Poison-type Pokémon like Dustox have 100% accuracy when using Toxic. Hyper Beam isn't worth using, what with its drawback of requiring a recharging turn, and Dustox doesn't particularly benefit from Swagger. There's nothing here that benefits from Compound Eyes, so Shield Dust is the superior choice for Dustox.
| Level: 50 | HP IV | 31 | HP EVs: | 6 | HP: | 136 | ||

|
Attack IV | 31 | Attack EVs: | 0 | Attack: | 63 | ||
| Defense IV | 31 | Defense EVs: | 252 | Defense: | 122 | |||
| Special Attack IV | 31 | Special Attack EVs: | 0 | Special Attack: | 77 | |||
| Special Defense IV | 31 | Special Defense EVs: | 252 | Special Defense: | 142 | |||
| Nature: Modest | Speed IV | 31 | Speed EVs: | 0 | Speed: | 85 | ||
Now, our discussion of Dustox's moves is where today's class will take an odd turn. You see, when I raised my Dustox, I raised it purely for fun. I admit freely that the moveset I'm presenting to you today is not the most serious possible moveset. I've made a Dustox that is, more or less, the standard archetypal Toxic staller, raised to come out on the field, immediately poison an opponent to cause constant chip damage, and then alternate between healing up and blocking its opponent's attacks. We're going to analyze what I have, but I'll also give you some alternatives you might use to come up with your own strategy and moveset for Dustox.
| Bug Buzz | Special | The user vibrates to generate a damaging sound wave. This may also lower the target's Sp. Def stat. |
| Moonlight | Status | The user restores its own HP. The amount of HP regained varies with the weather. |
| Toxic | Status | A move that leaves the target badly poisoned. Its poison damage worsens every turn. |
| Protect | Status | This move enables the user to protect itself from all attacks. Its chance of failing rises if it is used in succession. |
Rather than starting off with a STAB move, I started building my Dustox's moveset around Toxic. If Dustox can successfully use Toxic, its opponent will be badly poisoned, causing them to take damage each turn, with the proportion of their HP chipped away on each turn gradually increasing. Once the opponent is poisoned, the goal is to keep Dustox in battle as long as possible. To that end, we'll want to add a healing move so that Dustox can bounce back after taking a hit. Now, I taught my Dustox Moonlight, which was... a poor decision on my part, actually. It may be nice thematically, but Dustox has a better option as far as healing moves go, and that's Roost. Where the amount of HP Moonlight restores will vary with the weather (meaning that Dustox won't get as much out of the move if it's, say, raining), Roost will always restore the same amount of HP. Since Dustox is not a Flying-type, there's no downside, either!
Now, I went on to include Protect, because this allows Dustox to shield itself from most hits altogether, giving it a free turn to let poison do the work of whittling down the health of its opponent. Of course, using Protect twice in a row is risky, but that doesn't matter if Protect is alternated with Moonlight/Roost. Now, will the ideal scenario of Dustox being able to keep its HP topped off by alternating between protecting itself and healing up ever happen in practice? Truth be told, it's going to be a very rare scenario. There will be plenty of Pokémon capable of doing enough damage to Dustox in one hit to render this strategy non-viable. That's why I think it best to discuss an alternative with all of you.
Dustox, you see, has access to a powerful status move known as Quiver Dance. Quiver Dance allows a Pokémon to raise its special attack, special defense, and speed all at once. A few uses of Quiver Dance can make any Pokémon dangerous, capable of striking quickly and doing great damage with its special moves. In Dustox's case, it also further boosts up its respectable special defense. If you are certain you'll focus on keeping Dustox out when facing special attackers, you might consider giving it Quiver Dance. Let its special defense, combined with Roost, help it to get an opportunity to use Quiver Dance a few times, then let it strike hard with a STAB move.
As for what that STAB move should be... Well, whether you raise a Dustox similar to mine or you incorporate Quiver Dance, I suggest Bug Buzz. Frankly, I suggest Bug Buzz no matter how you raise your Dustox. It's simply a reliable, fairly powerful special Bug-type move that will serve Dustox's needs. It also has a small chance of lowering the opponent's special defense, which will make Bug Buzz hit even harder.
That about covers it for today's lesson. If nothing else, I hope it was a break from the offensively-oriented Pokémon we've focused on in our past few sessions. I wouldn't feel it right to assign more work before our next course when the studious among you haven't yet had a chance to use your recently-acquired knowledge on Hisui, so, lucky you all, you get a break between this session and our next. You're dismissed, so feel free to leave if you're so inclined, but, if you'd like, why not come up here and spend a moment admiring Dustox up close? No matter what others may see, I maintain that it's an adorable Pokémon!
Four Steps for a 3D World
Written by: Hooded Pitohui (talk)
Have you ever wondered how a Super Mario game's levels are designed? Have you paused while walking along the catwalks in Ricco Harbor, or while long jumping under Thwomps in the Supermassive Galaxy and asked yourself how a Mario level gets made? When you look at a game like the original Super Mario Galaxy, where one minute you can be walking along an eerie beach, then passing over a deep and ominous cavern, then jumping up over industrial-looking moving metal platforms, then on a giant glass sphere with tennis balls bouncing around inside and a watermelon in the center, you might wonder if the developers just whip up one piece of a stage at a time before stringing them together.
As secretive as Nintendo is, we may never know in detail how Pinna Park came to be, or why there's a twisting rocky spiral above the skies of Beach Bowl, but, now and again, we do get some insight as to how Mario levels are made. In 2011, Koichi Hayashida, the director of Super Mario Galaxy 2 and Super Mario 3D Land, gave us some insight into his method of designing levels for 3D Super Mario titles. In an interview with the website "Game Developer", Hayashida spoke on how his level design philosophy emphasizes the importance of introducing a clear concept in each level, and building the level around that concept from the level's start to the level's end. He broke down the process of having a player learn and master a level's concept into four broad steps. In his own words:
First, you have to learn how to use that gameplay mechanic, and then the stage will offer you a slightly more complicated scenario in which you have to use it. And then the next step is something crazy happens that makes you think about it in a way you weren't expecting. And then you get to demonstrate, finally, what sort of mastery you've gained over it.
It's very similar to a narrative structure that you find in four-panel comics. Something that's talked a lot about in Japanese manga, for example, is a phrase, kishoutenketsu, where you introduce a concept, and then in the next panel you develop the idea a little bit more; in the third panel there's something of a change-up, and then in the fourth panel you have your conclusion.
According to Hayashida, using lessons he learned from Super Mario Galaxy 2, he solidified this level design structure of introduction, development, twist, and conclusion, and then put it to use in Super Mario 3D Land. Yet, Hayashida served as the director for another game after Super Mario 3D Land, also directing 2013's Super Mario 3D World. Did Hayashida's four broad steps for designing levels continue to guide him while overseeing Super Mario 3D World? Knowing the outlines of his approach to designing levels, if we scrutinize the game's stages, can we dissect them and pick apart the four steps in each? That's what we're going to find out together in this column!
As levels later in the game bring back concepts and mechanics that players are expected to be familiar with, it might be slightly more difficult to look for this four-step structure in levels that come late into the game, so, for today, we're going to look at a level that comes early. In the second world, players arrive at a level featuring a brand new power-up, the Double Cherry. How effectively does Double Cherry Pass introduce this new power-up and the new mechanic that comes with it? How apparent, if present at all, is this four-step structure meant to ease players into a level's core concept while delivering a fun experience? Let's find out!
| Step | Notes |
|---|---|
Introduction
|
The level begins with a large, open area surrounded by fences that keep you from dying or losing clones unless you jump over them. The Double Cherry is immediately presented to you, so you can't miss it. A simple Galoomba that you can easily defeat stands in a hilly area right past the start, teaching you both how to defeat enemies while managing your clones and, potentially, that your clones disappear when you get hit, counting as extra protection until only one of you remains. The hills, meanwhile, offer plenty of walls to get stuck on and plenty of reasons to jump around as you hit the blocks placed above them, teaching you how to maneuver your clones by rewarding you for naturally playing and exploring. An extra Double Cherry can be found, teaching you that you can have more than one clone, and some crates and clear pipes are found before a proper warp pipe, to teach you how clones can be used to clear out large fields of obstacles and how clones interact with pipes. |
Development
|
After the pipe comes a narrow, walled-in, flat area where a large group of Blocksteppers are marching. Using what you have learned from the crates and the Galoomba, you know how to defeat them and proceed (also claiming another Double Cherry, having learned to seek out extras already). Two switches reward you with a Green Star if you stand on both at the same time, putting to use your acquired skill of maneuvering clones and teaching you that keeping a certain number of clones can be important, as some puzzles will reward you if you have enough clones. There are two clear pipes in this section, one which only travels in a loop, and they're right next to one another. You need to have developed your skill moving clones into the right clear pipe to get past this without losing clones or wasting too much time. This seems to signal that moving clones through clear pipes will get more complex soon. |
Twist
|
Now, you're confronted with Blocksteppers on hills. You have to deal with a more complex and more abundant enemy while knowing how to maneuver your clones on more complex terrain. On top of that, a Red Ring and accompanying Red Coin challenge are found on the hills, forcing you to navigate the terrain and enemies at a more frantic pace. Shortly afterwards, you encounter a Fire Bro. jumping around hills with clear pipes embedded in the walls. You're suddenly confronted with having to manage an enemy who moves swiftly around the complex terrain and who fires projectiles that can travel in unexpected directions, especially if they travel through the clear pipes. It seems you're expected to use the clear pipes to your advantage, positioning your clones on hills of different levels and using the clear pipes to fire your own projectiles or to get close. It's a more complex, frantic fight to cap off the level. |
Conclusion
|
After traveling through a final pipe, you arrive at a wide open space with a few hills leading to a flagpole and a platform that rises only if you have four or more clones. If you've mastered the use of the Double Cherry, you should have enough clones to ride it to a Green Star, and it should be easy to hop up the hills to get to the top of the flagpole. |
After breaking down the level, it seems safe to say that the four-step structure is as expressly clear in this level as it will ever be. Double Cherry Pass hews closely to the four-step structure, enough so that it's easy to identify each step. More than that, every element in the level, right down to the crates, has seemingly been incorporated with that four-step structure in mind. The clear pipes might show it best, prominent through the first three steps, always building on what you, the player, have learned so far and adding a new wrinkle.
Double Cherry Pass turned out to be a great case study, but there's plenty of other 3D World levels to cover! Will this structure be this apparent in all of them, or will some, for better or worse, have variations on it? When is it good to stick to this structure closely, and when does a designer need to change it up? Come back next month, and we'll continue breaking levels down to find out! With four steps, a 3D world, two games before Super Mario 3D World that helped Hayashida solidify this design philosophy, and one level to look at a month, we'll learn more about the structure and creation of 3D Super Mario levels!
Koops, Your Emblem is on Fire
No way, another upload after a mere month?
Vaida
A deserter from Bern's wyvern riders. Brutal.

Level 9 Wyvern Lord
HP: 43 ~ 48 (60%)
Str: 20 ~ 23 (45%)
Skl: 19 ~ 21 (25%)
Spd: 13 ~ 15 (40%)
Luck: 11 (30%)
Def: 21 ~ 23 (25%)
Res: 6 ~ 7 (15%)
Con: 12
Move: 8
Weapon Ranks: A Swords, A Lances
Vaida is yet another prepromote with pretty good stats. She is the last flier to join the party and certainly a welcome addition, not only bringing the total count of fliers to five (5) whole units, but also requiring zero investment to boot, with impressive strength and total bulk, as well as good enough speed. Her weapons ranks are also very high, allowing her to wield pretty much every sword and every lance in the game, an advantage she has over all other fliers. She's also the one flier with the single highest Con stat, sitting at a solid 12, which is 2 more than a promoted Heath. Though this Con is great, her one real problem outside of availability is a lack of actual aid, making it impossible for her to rescue/drop units any heavier than 8 Con due to how mounted aid works. The good news is that there are some good units that are lighter than that, and most of those who aren't are mounted anyway.
It really puts it in perspective that she was a boss in a previous map with those same stats (+ the uber spear bonuses).
That does it for this time. Next time, we have a two-parter. See you then.
| The 'Shroom: Issue 192 | |
|---|---|
| Staff sections | Staff Notes • The 'Shroom Spotlight |
| Features | Fake News • Fun Stuff • Palette Swap • Pipe Plaza • Critic Corner • Strategy Wing |