Gallery:Super Mario 64 DS: Difference between revisions
Megadardery (talk | contribs) No edit summary |
No edit summary |
||
| Line 34: | Line 34: | ||
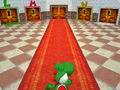
File:RecRoom.png|The Rec Room | File:RecRoom.png|The Rec Room | ||
</gallery></center> | </gallery></center> | ||
=== | ==Course maps== | ||
===Main courses=== | |||
<center><gallery> | <center><gallery> | ||
File:SM64DS-Bob-omb Battlefield Map.PNG|[[Bob-omb Battlefield]] | File:SM64DS-Bob-omb Battlefield Map.PNG|[[Bob-omb Battlefield]] | ||
File:SM64-Whomps Fortress Map.PNG|[[Whomp's Fortress]] | File:SM64-Whomps Fortress Map.PNG|[[Whomp's Fortress]] | ||
File:SM64DS-Jolly Roger Bay Map.PNG|[[Jolly Roger Bay]] | File:SM64DS-Jolly Roger Bay Map.PNG|[[Jolly Roger Bay]] | ||
File:SM64DS-Cool Cool Mountain Map.PNG|[[Cool, Cool Mountain]] | File:SM64DS-Cool Cool Mountain Map.PNG|[[Cool, Cool Mountain]] | ||
File:SM64DS-Cool Cool Mountain Map2.PNG|Cool, Cool Mountain | File:SM64DS-Cool Cool Mountain Map2.PNG|Ice slide in Cool, Cool Mountain | ||
File:SM64DS-Big Boos Haunt Map.PNG|[[Big Boo's Haunt]] | File:SM64DS-Big Boos Haunt Map.PNG|[[Big Boo's Haunt]] | ||
File:SM64DS-Big Boos Haunt Map2.PNG|Big Boo's Haunt | File:SM64DS-Big Boos Haunt Map2.PNG|First floor of the Big Boo's Haunt mansion | ||
File:SM64DS-Big Boos Haunt Map3.PNG|Big Boo's Haunt | File:SM64DS-Big Boos Haunt Map3.PNG|Second floor of the Big Boo's Haunt mansion | ||
File:SM64DS-Big Boos Haunt | File:SM64DS-Big Boos Haunt Map4.PNG|Merry-Go-Round area of Big Boo's Haunt | ||
File:SM64DS-Big Boos Haunt | File:SM64DS-Big Boos Haunt Map5.PNG|Secret Room map | ||
File:SM64DS-Hazy Maze Cave Map.PNG|[[Hazy Maze Cave]] | File:SM64DS-Hazy Maze Cave Map.PNG|[[Hazy Maze Cave]] | ||
File:SM64DS-Hazy maze Cave Map2.PNG|Hazy Maze Cave | File:SM64DS-Hazy maze Cave Map2.PNG|The cavern of Hazy Maze Cave | ||
File:SM64DS-Lethal Lava Land Map.PNG|[[Lethal Lava Land]] | File:SM64DS-Lethal Lava Land Map.PNG|[[Lethal Lava Land]] | ||
File:SM64DS-Lethal Lava Land Map2.PNG|Lethal Lava Land | File:SM64DS-Lethal Lava Land Map2.PNG|Volcano of Lethal Lava Land | ||
File:SM64DS-Shifting Sand Land Map.PNG|[[Shifting Sand Land]] | File:SM64DS-Shifting Sand Land Map.PNG|[[Shifting Sand Land]] | ||
File:SM64DS-Shifting Sand Land Map2.PNG|Shifting Sand Land | File:SM64DS-Shifting Sand Land Map2.PNG|The Pyramid of Shifting Sand Land | ||
File:SM64DS-Shifting Sand Land Map3.PNG| | File:SM64DS-Shifting Sand Land Map3.PNG|[[Eyerok]]'s room in Shifting Sand Land | ||
File:SM64DS-Dire Dire Docks Map.PNG|[[Dire, Dire Docks]] | File:SM64DS-Dire Dire Docks Map.PNG|[[Dire, Dire Docks]] | ||
File:SM64DS-Snowmans Land Map.PNG|[[Snowman's Land]] | File:SM64DS-Snowmans Land Map.PNG|[[Snowman's Land]] | ||
File:SM64DS-Snowmans Land Map2.PNG|Snowman's Land | File:SM64DS-Snowmans Land Map2.PNG|The igloo in Snowman's Land | ||
File:SM64DS-Wet Dry World Map.PNG|[[Wet-Dry World]] | File:SM64DS-Wet Dry World Map.PNG|[[Wet-Dry World]] | ||
File:SM64DS-Wet Dry World Map2.PNG|Wet-Dry World | File:SM64DS-Wet Dry World Map2.PNG|Downtown in Wet-Dry World | ||
File:SM64DS-Tall Tall Mountain Map.PNG|[[Tall, Tall Mountain]] | File:SM64DS-Tall Tall Mountain Map.PNG|[[Tall, Tall Mountain]] | ||
File:SM64DS-Tall Tall Mountain Map2.PNG|Tall, Tall Mountain | File:SM64DS-Tall Tall Mountain Map2.PNG|Secret slide in Tall, Tall Mountain | ||
File:SM64DS-Tiny Huge Island Map.PNG|[[Tiny-Huge Island]] | File:SM64DS-Tiny Huge Island Map.PNG|The "tiny" [[Tiny-Huge Island]] | ||
File:SM64DS-Tiny Huge Island Map2.PNG|Tiny-Huge Island | File:SM64DS-Tiny Huge Island Map2.PNG|The "huge" Tiny-Huge Island | ||
File:SM64DS-Tiny Huge Island Map3.PNG|Tiny-Huge Island | File:SM64DS-Tiny Huge Island Map3.PNG|The cave in Tiny-Huge Island | ||
File:SM64DS-Tiny Huge Island Map4.PNG| | File:SM64DS-Tiny Huge Island Map4.PNG|The [[Wiggler]] battle area in Tiny-Huge Island | ||
File:SM64DS-Tick Tock Clock Map.PNG|[[Tick Tock Clock]] | File:SM64DS-Tick Tock Clock Map.PNG|[[Tick Tock Clock]] | ||
File:SM64DS-Rainbow Ride Map.PNG|[[Rainbow Ride]] | File:SM64DS-Rainbow Ride Map.PNG|[[Rainbow Ride]] | ||
</gallery></center> | |||
===Secret courses=== | |||
<center><gallery> | |||
File:SM64DS-Peach Slide Map.PNG|[[The Princess's Secret Slide]] | File:SM64DS-Peach Slide Map.PNG|[[The Princess's Secret Slide]] | ||
File:SM64DS-The Secret Aquarium Map.PNG|[[The Secret Aquarium]] | File:SM64DS-The Secret Aquarium Map.PNG|[[The Secret Aquarium]] | ||
File:SM64DS-Battle Fort Map.PNG|[[Battle Fort]] | File:SM64DS-Battle Fort Map.PNG|[[Battle Fort]] | ||
File:SM64DS-Switch Area Map.PNG|[[Tower of the Wing Cap]] | File:SM64DS-Switch Area Map.PNG|[[Tower of the Wing Cap]] | ||
File:SM64DS-Behind the Waterfall Map.PNG|[[Behind the Waterfall]] | File:SM64DS-Behind the Waterfall Map.PNG|[[Cavern of the Metal Cap|Behind the Waterfall]] | ||
File:SM64DS-Secret Under The Moat Map.PNG|[[The Secret Under the Moat]] | File:SM64DS-Secret Under The Moat Map.PNG|[[Vanish Cap Under the Moat|The Secret Under the Moat]] | ||
File:SM64DS-Over the Rainbows Map.PNG|[[Over the Rainbows]] | File:SM64DS-Over the Rainbows Map.PNG|[[Wing Mario Over the Rainbow|Over the Rainbows]] | ||
File:SM64DS-Sunshine Isles Map.PNG|[[Sunshine Isles]] | File:SM64DS-Sunshine Isles Map.PNG|[[Sunshine Isles]] | ||
File:SM64DS-Goomboss Battle Map.PNG|[[Goomboss Battle]] | File:SM64DS-Goomboss Battle Map.PNG|[[Goomboss Battle]] | ||
File:SM64DS-Goomboss Battle Map2.PNG| | File:SM64DS-Goomboss Battle Map2.PNG|Battle area | ||
File:SM64DS-Big Boo Battle Map.PNG|[[Big Boo Battle]] | File:SM64DS-Big Boo Battle Map.PNG|[[Big Boo Battle]] | ||
File:SM64DS-Big Boo Battle Map2.PNG| | File:SM64DS-Big Boo Battle Map2.PNG|Battle area | ||
</gallery></center> | </gallery></center> | ||
==Box art & Logos== | ==Box art & Logos== | ||
<center><gallery> | <center><gallery> | ||
Revision as of 02:18, December 5, 2012
The following is a gallery of Super Mario 64 DS.
Artwork
Main Characters
- Yoshi SM64DS.png
- Mariogood.PNG
- Luigihop.jpg
- WarioGoodQual.PNG
- Yoshi wearing mario's hat.jpg
Yoshi with Mario's hat
- TheBIGGER4.PNG
Cover Render


Miscellaneous
- FlatHats.png
The essential headgear.
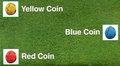
The three different coins


Screenshots
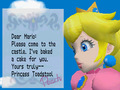
Peach's message to Mario.
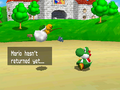
Lakitu telling Yoshi that Mario didn't return from the castle yet.

The cake in the ending.
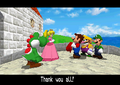
Peach thanking Mario, Luigi, Wario, and Yoshi for saving her.
The door with M, L, or W above it represents the room where the plumbers are trapped. After unlocking one, the player can swap characters.
- BowserSM64DS.jpg
Mario battling Bowser
The Rec Room


Course maps
Main courses
- SM64DS-Bob-omb Battlefield Map.PNG
- SM64-Whomps Fortress Map.PNG
- SM64DS-Jolly Roger Bay Map.PNG
- SM64DS-Cool Cool Mountain Map.PNG
- SM64DS-Cool Cool Mountain Map2.PNG
Ice slide in Cool, Cool Mountain
- SM64DS-Big Boos Haunt Map.PNG
- SM64DS-Big Boos Haunt Map2.PNG
First floor of the Big Boo's Haunt mansion
- SM64DS-Big Boos Haunt Map3.PNG
Second floor of the Big Boo's Haunt mansion
- SM64DS-Big Boos Haunt Map4.PNG
Merry-Go-Round area of Big Boo's Haunt
- SM64DS-Big Boos Haunt Map5.PNG
Secret Room map
- SM64DS-Hazy Maze Cave Map.PNG
- SM64DS-Hazy maze Cave Map2.PNG
The cavern of Hazy Maze Cave
- SM64DS-Lethal Lava Land Map.PNG
- SM64DS-Lethal Lava Land Map2.PNG
Volcano of Lethal Lava Land
- SM64DS-Shifting Sand Land Map.PNG
- SM64DS-Shifting Sand Land Map2.PNG
The Pyramid of Shifting Sand Land
- SM64DS-Shifting Sand Land Map3.PNG
Eyerok's room in Shifting Sand Land
- SM64DS-Dire Dire Docks Map.PNG
- SM64DS-Snowmans Land Map.PNG
- SM64DS-Snowmans Land Map2.PNG
The igloo in Snowman's Land
- SM64DS-Wet Dry World Map.PNG
- SM64DS-Wet Dry World Map2.PNG
Downtown in Wet-Dry World
- SM64DS-Tall Tall Mountain Map.PNG
- SM64DS-Tall Tall Mountain Map2.PNG
Secret slide in Tall, Tall Mountain
- SM64DS-Tiny Huge Island Map.PNG
The "tiny" Tiny-Huge Island
- SM64DS-Tiny Huge Island Map2.PNG
The "huge" Tiny-Huge Island
- SM64DS-Tiny Huge Island Map3.PNG
The cave in Tiny-Huge Island
- SM64DS-Tiny Huge Island Map4.PNG
The Wiggler battle area in Tiny-Huge Island
- SM64DS-Tick Tock Clock Map.PNG
- SM64DS-Rainbow Ride Map.PNG
Secret courses
- SM64DS-Peach Slide Map.PNG
- SM64DS-The Secret Aquarium Map.PNG
- SM64DS-Battle Fort Map.PNG
- SM64DS-Switch Area Map.PNG
- SM64DS-Behind the Waterfall Map.PNG
- SM64DS-Secret Under The Moat Map.PNG
- SM64DS-Over the Rainbows Map.PNG
- SM64DS-Sunshine Isles Map.PNG
- SM64DS-Goomboss Battle Map.PNG
- SM64DS-Goomboss Battle Map2.PNG
Battle area
- SM64DS-Big Boo Battle Map.PNG
- SM64DS-Big Boo Battle Map2.PNG
Battle area
Box art & Logos
- Super Mario 64 DS logo.png
Game logo
Japanese box art
UK Box art
- SM64DS Australia.jpg
Australian Box art
US Box art


