Yoshi's Island 1: Difference between revisions
mNo edit summary |
(→Gallery: Per discussion in Category talk:Dinosaur Land.) |
||
| (18 intermediate revisions by 12 users not shown) | |||
| Line 1: | Line 1: | ||
{{ | {{level infobox | ||
|title=Yoshi's Island 1 | |title=Yoshi's Island 1 | ||
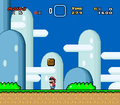
|image=[[File:YoshisIsland1.png|256px]] | |image=[[File:YoshisIsland1.png|256px]] | ||
Mario standing on the edge of a platform | [[Mario]] standing on the edge of a [[platform]] | ||
|code=1-1 | |code=1-1 | ||
|world=[[Yoshi's Island ( | |world=[[Yoshi's Island (location)#Super Mario World|Yoshi's Island]] | ||
|game=''[[Super Mario World]]'' | |game=''[[Super Mario World]]'' | ||
|limit=300 seconds | |limit=300 seconds | ||
| Line 11: | Line 11: | ||
|secret= | |secret= | ||
}} | }} | ||
'''Yoshi's Island 1''' is the first level on [[Yoshi's Island ( | '''Yoshi's Island 1''' is the first [[level]] on [[Yoshi's Island (location)#Super Mario World|Yoshi's Island]] in ''[[Super Mario World]]'' and the first level of the game. Though it is possible to beat the game without playing this level, it is the only way to reach the [[Yellow Switch Palace]] and to activate the yellow [[! Block]]s. [[Rex]]es are the most common enemies in Yoshi's Island 1. The level has a grassland theme. | ||
==Overview== | ==Overview== | ||
[[File:SMW Yoshi's Island 1 Pipe Cannon.png|thumb|left|[[Pipe Cannon]] | [[File:SMW Yoshi's Island 1 Pipe Cannon.png|thumb|left|A [[Pipe Cannon]]]] | ||
A [[Beach Koopa|Koopa without a Shell]], sliding down a hill, is at the start of the level. The first [[Dragon Coin]] is found here as well, and soon after, a [[Banzai Bill]] is shot towards the player, followed by the first Rex. A | A [[Beach Koopa|Koopa without a Shell]], sliding down a hill, is at the start of the level. The first [[Dragon Coin]] is found here as well, and soon after, a [[Banzai Bill]] is shot towards the player, followed by the first Rex. A [[Flying ? Block|Flying Prize Block]] yields a [[Super Mushroom]]. After a couple of more Rexes and the second Dragon Coin, a Super Mushroom pops out of a bush when the player passes. Just after another Rex, the player reaches a blue [[Warp Pipe]] containing a [[Jumping Piranha Plant]]. Only the pipe to the right can be entered, but first the [[Rotating Block]]s have to be destroyed, which is not possible when [[Mario]] or [[Luigi]] is in his [[Small Mario|small form]]. Slipping into the pipe brings the player to a small area underground. The first regular [[coin]]s of the game can be found here, as well as the third Dragon Coin. To reach the latter, the player has to destroy the Rotating Blocks again. Leaving the room causes the player to be shot out of the Warp Pipe and right through the [[Midway Gate]]. When choosing not to use the underground way, the player finds another Jumping Piranha Plant and Rex. | ||
The [[Message Block]] ahead provides information about using the [[Item | The [[Message Block]] ahead provides information about using the [[item storage|Item Stock]]. After a series of Rexes, the fourth Dragon Coin can be found on top of a hill; the hillside allows the player to [[slide]] down and defeat the oncoming Rex. If Mario or Luigi is in his [[Super Mario (form)|Super form]], [[crouch|duck]]ing right after sliding is recommended because there is another Banzai Bill. Soon after, the player reaches another Message Block, which tells them about picking up and throwing a Koopa Shell. The player can use this hint exactly at this point: They can pick up the [[Red Shell]] ahead and throw it up to hit the Rotating Block, which releases a [[1-Up Mushroom]]. The 1-Up Mushroom moves over the clouds above and finally falls down to the right. Having the yellow ! Blocks activated is useful here to catch the 1-Up Mushroom as it drops. A bit farther, the player finds a [[? Block|Prize Block]] that contains a Super Mushroom or a [[Fire Flower]], depending on Mario or Luigi's current form. After another Banzai Bill and a Jumping Piranha Plant, the fifth and final Dragon Coin can be found, followed by the [[Giant Gate]]. This, however, is protected by a [[Chargin' Chuck]], the first in the game. When not [[stomp]]ed on, the Chargin' Chuck does not move, instead continually jumping up. | ||
{{br|left}} | {{br|left}} | ||
== | ==Dragon Coins== | ||
*'''Dragon Coin 1:''' Next to the slanted platform with the | *'''Dragon Coin 1:''' Next to the slanted [[platform]] with the Koopa without a Shell. | ||
*'''Dragon Coin 2:''' Next to the set of three slanted platforms. | *'''Dragon Coin 2:''' Next to the set of three slanted platforms. | ||
*'''Dragon Coin 3:''' In the underground area, under three | *'''Dragon Coin 3:''' In the underground area, under three Rotating Blocks. Requires a [[Spin Jump]]. | ||
*'''Dragon Coin 4:''' On top of a bigger set of three platforms. | *'''Dragon Coin 4:''' On top of a bigger set of three platforms. | ||
*'''Dragon Coin 5:''' Just before the | *'''Dragon Coin 5:''' Just before the Giant Gate, next to a green pipe. | ||
==Enemies== | ==Enemies== | ||
{|border=1 cellspacing=0 cellpadding=3 style="border-collapse:collapse"style="text-align: center" | |||
!Sprite | |||
!Name | |||
!Count | |||
|- | |||
|[[File:SMW KoopaTroopaNoShell Blue.png]] | |||
|[[Beach Koopa|Koopa without a Shell]] (blue) | |||
|1 | |||
|- | |||
|[[File:Banzai Bill SMW.png]] | |||
|[[Banzai Bill]] | |||
|4 | |||
|- | |||
|[[File:SMW Rex.png]] | |||
|[[Rex]] | |||
|18 | |||
|- | |||
|[[File:SMWJumpingPiranhaPlant.png]] | |||
|[[Jumping Piranha Plant]] | |||
|3 | |||
|- | |||
|[[File:SMW Clappin' Chuck.gif]] | |||
|[[Chargin' Chuck|Clappin' Chuck]] | |||
|1 | |||
|- | |||
|[[File:SMWCharginChuck.png]] | |||
|Lookout Chuck | |||
|1 (if stomped) | |||
|} | |||
==Names in other languages== | ==Names in other languages== | ||
| Line 38: | Line 61: | ||
|Jap=ヨースターとう コース1 | |Jap=ヨースターとう コース1 | ||
|JapR=Yōsutā Tō Kōsu 1 | |JapR=Yōsutā Tō Kōsu 1 | ||
|JapM= | |JapM=Yoster Island Course 1 | ||
|Spa=Isla de Yoshi 1 | |Spa=Isla de Yoshi 1 | ||
|SpaM=Yoshi's Island 1 | |SpaM=Yoshi's Island 1 | ||
| Line 45: | Line 68: | ||
|Ger=Yoshi-Insel 1 | |Ger=Yoshi-Insel 1 | ||
|GerM=Yoshi Island 1 | |GerM=Yoshi Island 1 | ||
|Chi=耀西岛 1 | |||
|ChiR=Yàoxidǎo 1 | |||
|ChiM=Yoshi's Island 1 | |||
|Ita=Isola Yoshi 1 | |||
|ItaM=Yoshi's Island 1 | |||
}} | }} | ||
{{SMW | |||
==Gallery== | |||
<gallery> | |||
Super Mario World Empty Block Screenshot.png|[[Mario]] after using a [[Flying ? Block|Flying Prize Block]] | |||
</gallery> | |||
{{SMW levels}} | |||
[[Category:Yoshi's Island]] | [[Category:Yoshi's Island]] | ||
[[Category:Grasslands]] | [[Category:Grasslands]] | ||
[[Category:Super Mario World | [[Category:Super Mario World levels]] | ||
Revision as of 14:23, January 26, 2024
| Level | |
|---|---|
| Yoshi's Island 1 | |

| |
| Level code | 1-1 |
| World | Yoshi's Island |
| Game | Super Mario World |
| Time limit | 300 seconds |
| << Directory of levels >> | |
Yoshi's Island 1 is the first level on Yoshi's Island in Super Mario World and the first level of the game. Though it is possible to beat the game without playing this level, it is the only way to reach the Yellow Switch Palace and to activate the yellow ! Blocks. Rexes are the most common enemies in Yoshi's Island 1. The level has a grassland theme.
Overview

A Koopa without a Shell, sliding down a hill, is at the start of the level. The first Dragon Coin is found here as well, and soon after, a Banzai Bill is shot towards the player, followed by the first Rex. A Flying Prize Block yields a Super Mushroom. After a couple of more Rexes and the second Dragon Coin, a Super Mushroom pops out of a bush when the player passes. Just after another Rex, the player reaches a blue Warp Pipe containing a Jumping Piranha Plant. Only the pipe to the right can be entered, but first the Rotating Blocks have to be destroyed, which is not possible when Mario or Luigi is in his small form. Slipping into the pipe brings the player to a small area underground. The first regular coins of the game can be found here, as well as the third Dragon Coin. To reach the latter, the player has to destroy the Rotating Blocks again. Leaving the room causes the player to be shot out of the Warp Pipe and right through the Midway Gate. When choosing not to use the underground way, the player finds another Jumping Piranha Plant and Rex.
The Message Block ahead provides information about using the Item Stock. After a series of Rexes, the fourth Dragon Coin can be found on top of a hill; the hillside allows the player to slide down and defeat the oncoming Rex. If Mario or Luigi is in his Super form, ducking right after sliding is recommended because there is another Banzai Bill. Soon after, the player reaches another Message Block, which tells them about picking up and throwing a Koopa Shell. The player can use this hint exactly at this point: They can pick up the Red Shell ahead and throw it up to hit the Rotating Block, which releases a 1-Up Mushroom. The 1-Up Mushroom moves over the clouds above and finally falls down to the right. Having the yellow ! Blocks activated is useful here to catch the 1-Up Mushroom as it drops. A bit farther, the player finds a Prize Block that contains a Super Mushroom or a Fire Flower, depending on Mario or Luigi's current form. After another Banzai Bill and a Jumping Piranha Plant, the fifth and final Dragon Coin can be found, followed by the Giant Gate. This, however, is protected by a Chargin' Chuck, the first in the game. When not stomped on, the Chargin' Chuck does not move, instead continually jumping up.
Dragon Coins
- Dragon Coin 1: Next to the slanted platform with the Koopa without a Shell.
- Dragon Coin 2: Next to the set of three slanted platforms.
- Dragon Coin 3: In the underground area, under three Rotating Blocks. Requires a Spin Jump.
- Dragon Coin 4: On top of a bigger set of three platforms.
- Dragon Coin 5: Just before the Giant Gate, next to a green pipe.
Enemies
| Sprite | Name | Count |
|---|---|---|
| Koopa without a Shell (blue) | 1 | |

|
Banzai Bill | 4 |
| Rex | 18 | |
| Jumping Piranha Plant | 3 | |
| Clappin' Chuck | 1 | |
| Lookout Chuck | 1 (if stomped) |
Names in other languages
| Language | Name | Meaning |
|---|---|---|
| Japanese | ヨースターとう コース1 Yōsutā Tō Kōsu 1 |
Yoster Island Course 1 |
| Chinese | 耀西岛 1 Yàoxidǎo 1 |
Yoshi's Island 1 |
| French | Ile de Yoshi 1 |
Yoshi's Island 1 |
| German | Yoshi-Insel 1 |
Yoshi Island 1 |
| Italian | Isola Yoshi 1 |
Yoshi's Island 1 |
| Spanish | Isla de Yoshi 1 |
Yoshi's Island 1 |
Gallery
Mario after using a Flying Prize Block
