Kumotori Yama: Difference between revisions
LinkTheLefty (talk | contribs) mNo edit summary |
LinkTheLefty (talk | contribs) mNo edit summary |
||
| Line 1: | Line 1: | ||
{{anotherlanguage}} | {{anotherlanguage}} | ||
[[File:M&WLevel3.png|frame|right]] | [[File:M&WLevel3.png|frame|right]] | ||
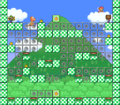
'''Kumotori Yama''' (くもとり<span class="explain" title="やま">山</span><ref>''Mario | '''Kumotori Yama''' (くもとり<span class="explain" title="やま">山</span><ref>''Mario & Wario'' instruction booklet, page 12.</ref>) is the third stage found in ''[[Mario & Wario]]''. Its name means "Cloud-Bird Mountain", and is shared with an actual mountain in Japan, [[wikipedia:Mount Kumotori|Mount Kumotori]]. In the game, it is an area with the eponymous smiling green mountain close in the background, with a friendly [[Super Koopa]] sitting on a cloud. [[Wario]] throws a [[barrel]] onto the character's head during the stage intro. | ||
==Level 3-1== | ==Level 3-1== | ||
Revision as of 00:01, May 4, 2015

Kumotori Yama (くもとり山[1]) is the third stage found in Mario & Wario. Its name means "Cloud-Bird Mountain", and is shared with an actual mountain in Japan, Mount Kumotori. In the game, it is an area with the eponymous smiling green mountain close in the background, with a friendly Super Koopa sitting on a cloud. Wario throws a barrel onto the character's head during the stage intro.
Level 3-1
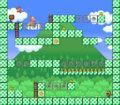
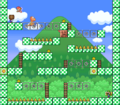
The beginning of this course introduces the player to Timer Blocks, which differ from Flip-Flop Blocks in that they flop by themselves after a short time once activated. Once the player gets the timing right, Wanda's character is allowed to proceed to the part of the course with spikes as a consequence. Luigi is in the bottom right.
Level 3-2
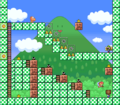
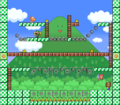
Wanda must guide her character to the elevator on the left by activating Timer Blocks over the pit of spikes at the right time. There is more of this at the top, along with some Rock Blocks. A Star rests atop one of the Rock Blocks, and it will fall through the deactivated Timer Blocks if the player isn't careful, showing that the object in this game have weight.
Level 3-3
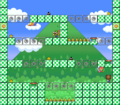
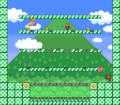
This course has more Rock Blocks and reintroduces the Dodorigesu Jr. enemies. At the top lies a stairway of Timer Blocks over spikes, which requires timing as the character begins to fall.
Level 3-4
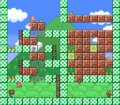
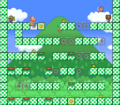
This course reacquaints the player with Jump Blocks, with Timer Blocks above them. The path is otherwise mostly linear.
Level 3-5
There are elevators, spikes, and Timer Blocks in the first half of this course. The character must reach the top flooring and make their way to the right section, which is lined with Rock Blocks, spikes, and Coin Blocks.
Level 3-6
The character starts at the top left and must make their way over to the bottom right. There is a suggested path of Timer Blocks, but the player can make a shortcut by falling and activating a lower one at the right moment.
Level 3-7
There are several rows of blocks the character must traverse while avoiding the spiked pit. The bottom row is a row of large Timer Blocks, the next row is an alternating row of large and tiny Timer Blocks, the next is an optional row of tiny Rock Blocks which hold some Stars, and the last is an obstacle course of elevators and tiny Timer Blocks.
Level 3-8
This next course has very little danger, with small Jump Blocks, tiny Timer Blocks and Flip-Flop Blocks. The player must approach Luigi from below, as he is surrounded by Jump Blocks. Gathering the Stars is out of the way.
Level 3-9
This course contains more Jump and Timer Blocks. Luigi is in the top left and must be reached from a Jump Block to a Coin Block, then to a Timer Block.
Level 3-10
This course looks intimidating with its many Timer Blocks, but way becomes simple once the Jump Blocks starting from the bottom left are reached.
Gallery
LEVEL3-1

LEVEL3-2
LEVEL3-3
LEVEL3-4
LEVEL3-5
LEVEL3-6
LEVEL3-7
LEVEL3-8
LEVEL3-9
LEVEL3-10


References
- ^ Mario & Wario instruction booklet, page 12.