Donut Ghost House: Difference between revisions
No edit summary |
PlugMeister (talk | contribs) No edit summary |
||
| (43 intermediate revisions by 24 users not shown) | |||
| Line 1: | Line 1: | ||
{{level | {{level infobox | ||
|title=Donut Ghost House | |title=Donut Ghost House | ||
|image=[[ | |image=[[File:Donut Ghost House.png]]<br>Mario looking at Boos | ||
|code=2-GH | |code=2-GH | ||
|world=[[Donut Plains]] | |||
|game=''[[Super Mario World]]'' | |game=''[[Super Mario World]]'' | ||
|limit=300 seconds | |limit=300 seconds | ||
| | |before=[[Donut Secret 1|<<]] [[Donut Plains 2|<<]] | ||
|after=[[Donut Plains 3|>>]] | |after=[[Donut Plains 3|>>]] | ||
|secret=[[Top Secret Area|**]] | |secret=[[Top Secret Area|**]] | ||
}} | }} | ||
'''Donut Ghost House''' is | '''Donut Ghost House''' is one of two [[Ghost House]]s in the [[Donut Plains]] and the first one visited in ''[[Super Mario World]]''. As such, it serves as an introduction to [[Boo]]s. It is one of two Ghost Houses in the original game to not feature [[Dragon Coin]]s, the other being [[Choco-Ghost House]]. | ||
==Overview== | ==Overview== | ||
[[File:Coin Snake.png|thumb|left|Control Coin area.]] | |||
The Ghost House consists of four rooms. In the first one, the player jumps over a series of [[pit]]s while avoiding contact with the [[Boo Crew]] flying overhead. In the second room, there is a staircase with a [[Warp Door|door]] at the top. Entering this door transports the player to the area below the staircase, allowing them to hit a [[Rotating Block]] that they could not before. A [[P Switch|Switch Block]] is inside, and hitting this makes a [[coin]] arrow appear, which points to another door left of the staircase. This door leads to a small room that is empty except for a single [[? Block]]. Hitting this block releases a [[Control Coin]], and exiting this room returns the player to the foot of the staircase in the second room. The player reaches the final room by entering the door at the top of the staircase while ignoring the entrance to the Control Coin room. It is visually identical to the second room, and the player is placed under the staircase upon entry. Hitting the Rotating Block in this room causes a [[Beanstalk]] to grow, allowing the player to climb up to the exit door. Entering the door at the top of the staircase transports the player to the second room (i.e. the room with the Switch Block). | |||
In the second room, | {{br|left}} | ||
==Exits== | ==Exits== | ||
| Line 24: | Line 21: | ||
===Secret Exit=== | ===Secret Exit=== | ||
In the first room, above the Boos, there is a platform that can only be reached by flying up through an opening to its left as [[Cape Mario|Caped Mario]] (or Caped Luigi), where another Boo Crew is found. Running across it, the player eventually reaches an area with four Rotating Blocks and a door. The blocks contain transparent [[1-Up Mushroom]], and the door leads to a [[Giant Gate]], which itself provides access to the [[Top Secret Area]]. | |||
==Enemies== | ==Enemies== | ||
{|border=1 cellspacing=0 cellpadding=3 style="border-collapse:collapse"style="text-align: center" | |||
!Sprite | |||
!Name | |||
!Count | |||
|- | |||
|[[File:SMW-Boo Buddy Swarm Portion.png]] | |||
|[[Boo Crew]] | |||
|2 | |||
|- | |||
|[[File:SMWBooBuddy.png]] | |||
|[[Boo]] | |||
|8 | |||
|} | |||
==Names in other languages== | ==Names in other languages== | ||
{{ | {{foreign names | ||
|Jap=ドーナツへいやのオバケやしき | |Jap=ドーナツへいやのオバケやしき | ||
|JapR=Dōnatsu Heiya no Obake Yashiki | |JapR=Dōnatsu Heiya no Obake Yashiki | ||
|JapM= | |JapM=Doughnut Plains' Ghost House | ||
|Spa=1ª Casa Encantada | |Spa=1ª Casa Encantada | ||
|SpaM=1st Haunted House}} | |SpaM=1st Haunted House | ||
|Fre=Manoir Beignet | |||
{{SMW | |FreM=Donut Manor | ||
|Ger=Donut-Spukhaus | |||
[[Category: Ghost Houses]] | |GerM=Donut Ghosthouse | ||
[[Category: | |Chi=甜圈平原鬼屋 | ||
|ChiR=Tiánquān Píngyuán Guǐwū | |||
|ChiM=Donut Plains Ghost House | |||
|Ita=Casa Infestata di Pianura Ciambella | |||
|ItaM=Donut Plain's Ghost House | |||
}} | |||
==Trivia== | |||
*In the original SNES version, the [[Message Block]] at the beginning of the level reads, "This is a Ghost House. Can you find the exit? Hee, hee, hee... Don't get lost!". In the GBA version, an extra sentence was added at the end, reading "Hey, haven't we met somewhere before?", referencing Boos' prior appearance in ''[[Super Mario Bros. 3]]''. | |||
{{SMW levels}} | |||
[[Category:Ghost Houses]] | |||
[[Category:Super Mario World levels]] | |||
Latest revision as of 11:40, April 14, 2024
| Level | |
|---|---|
| Donut Ghost House | |
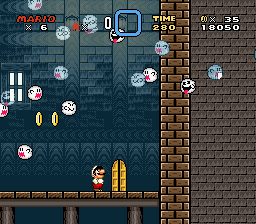
 Mario looking at Boos | |
| Level code | 2-GH |
| World | Donut Plains |
| Game | Super Mario World |
| Time limit | 300 seconds |
| << << Directory of levels >> ** | |
Donut Ghost House is one of two Ghost Houses in the Donut Plains and the first one visited in Super Mario World. As such, it serves as an introduction to Boos. It is one of two Ghost Houses in the original game to not feature Dragon Coins, the other being Choco-Ghost House.
Overview[edit]
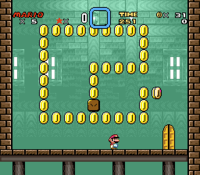
The Ghost House consists of four rooms. In the first one, the player jumps over a series of pits while avoiding contact with the Boo Crew flying overhead. In the second room, there is a staircase with a door at the top. Entering this door transports the player to the area below the staircase, allowing them to hit a Rotating Block that they could not before. A Switch Block is inside, and hitting this makes a coin arrow appear, which points to another door left of the staircase. This door leads to a small room that is empty except for a single ? Block. Hitting this block releases a Control Coin, and exiting this room returns the player to the foot of the staircase in the second room. The player reaches the final room by entering the door at the top of the staircase while ignoring the entrance to the Control Coin room. It is visually identical to the second room, and the player is placed under the staircase upon entry. Hitting the Rotating Block in this room causes a Beanstalk to grow, allowing the player to climb up to the exit door. Entering the door at the top of the staircase transports the player to the second room (i.e. the room with the Switch Block).
Exits[edit]
The above-mentioned regular exit, when used, makes a bridge appear that crosses the river in the East, allowing Mario or Luigi to go to Donut Plains 3.
Secret Exit[edit]
In the first room, above the Boos, there is a platform that can only be reached by flying up through an opening to its left as Caped Mario (or Caped Luigi), where another Boo Crew is found. Running across it, the player eventually reaches an area with four Rotating Blocks and a door. The blocks contain transparent 1-Up Mushroom, and the door leads to a Giant Gate, which itself provides access to the Top Secret Area.
Enemies[edit]
| Sprite | Name | Count |
|---|---|---|

|
Boo Crew | 2 |
| Boo | 8 |
Names in other languages[edit]
| Language | Name | Meaning |
|---|---|---|
| Japanese | ドーナツへいやのオバケやしき Dōnatsu Heiya no Obake Yashiki |
Doughnut Plains' Ghost House |
| Chinese | 甜圈平原鬼屋 Tiánquān Píngyuán Guǐwū |
Donut Plains Ghost House |
| French | Manoir Beignet |
Donut Manor |
| German | Donut-Spukhaus |
Donut Ghosthouse |
| Italian | Casa Infestata di Pianura Ciambella |
Donut Plain's Ghost House |
| Spanish | 1ª Casa Encantada |
1st Haunted House |
Trivia[edit]
- In the original SNES version, the Message Block at the beginning of the level reads, "This is a Ghost House. Can you find the exit? Hee, hee, hee... Don't get lost!". In the GBA version, an extra sentence was added at the end, reading "Hey, haven't we met somewhere before?", referencing Boos' prior appearance in Super Mario Bros. 3.
