|
|
| (35 intermediate revisions by 10 users not shown) |
| Line 1: |
Line 1: |
| {{italic title|World 5 (''Super Mario Bros.: The Lost Levels'')}} | | {{italic title|id=yes}} |
| {{worldbox | | {{world infobox |
| |title=World 5
| | |image=[[File:SMBDX World 4.png]] |
| |image=[[File:SMBDX World 4.PNG]] | | |game=''[[Super Mario Bros.: The Lost Levels]]'' |
| |app=''[[Super Mario Bros.: The Lost Levels]]'' | | |levels=4 |
| |lev=4 | |
| |before=[[World 4 (Super Mario Bros.: The Lost Levels)|<<]] | | |before=[[World 4 (Super Mario Bros.: The Lost Levels)|<<]] |
| |after=[[World 6 (Super Mario Bros.: The Lost Levels)|>>]] | | |after=[[World 6 (Super Mario Bros.: The Lost Levels)|>>]] |
| }} | | }} |
| '''World 5''' is the fifth normal world that was first featured in the game ''[[Super Mario Bros.: The Lost Levels]]''. After this world, the player will gain access to [[World 6 (Super Mario Bros.: The Lost Levels)|World 6]]. | | '''World 5''' is the fifth normal world of ''[[Super Mario Bros.: The Lost Levels]]''. After this world, the player will gain access to [[World 6 (Super Mario Bros.: The Lost Levels)|World 6]]. |
|
| |
|
| ==Level information== | | ==Level information== |
| Line 15: |
Line 14: |
| !width="5%"|Level | | !width="5%"|Level |
| !width="1%"|Preview | | !width="1%"|Preview |
| !width="20%"|Description | | !width="20%"|Summary |
| |- | | |- |
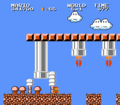
| |World 5-1 | | |[[World 5-1 (Super Mario Bros.: The Lost Levels)|World 5-1]] |
| |style="background: #202020" |[[File:World 5-1LL.PNG]] | | |style="background: #202020" |[[File:SMAS LL World 5-1 Title Card.png]] |
| |This is the first level to feature strong winds. The player finds four [[Question Block|? Block]]s containing [[coin]]s along with [[Buzzy Beetle]]s. Then, the player must pass a red [[Piranha Plant]] coming out of the [[Warp Pipe|pipe]]. The player now has to jump from gap to gap while avoiding Piranha Plants. After, the player finds a [[Koopa Paratroopa]]. Two [[Bill Blaster]]s and three [[Koopa Troopa]]s are here. Another Piranha Plant and a Koopa Paratroopa appears. The player can go down the first pipe shown here, which leads him or her to a Bonus Room. The player has to run and [[jump]] to get on top of the second pipe here, while avoiding a Koopa Paratroopa. Three Goombas and another Red Piranha Plant are shown here, and this is also the exit of the Bonus Room from earlier. The player must climb the staircase, and a heavy wind starts to blow the player. He or she must jump from gap to gap to reach the other side of the level. The wind now stops. A Bill Blaster and two Piranha Plants comes in the player's way. Three Piranha Plants in pipes protruding slightly above the ground and a Koopa Paratroopa appears. Then, a Buzzy Beetle and two [[Goomba]]s walks by the player. Three coins can then be seen floating in the air, with a Red Piranha Plant underneath the coins. As the player advances, he or she meets up with three more Koopa Troopas, another Piranha Plant, and another set of three Koopa Troopas. The player needs to jump from the block on the ground to get to the staircase. He or she also has to use the Koopa Paratroopas over here and bounce off them to reach the other side. Eventually, the player see a set of [[Brick Block]]s with Koopa Paratroopas on each side. If the player hits the topmost right one, a [[Beanstalk|Vine]] appears, which leads the player to [[Coin Heaven]] and also a [[Warp Pipe]] to [[World 6 (Super Mario Bros.: The Lost Levels)|World 6]]. If the player advances forward, he or she finds two Koopa Paratroopas and also two [[Hidden Block]]s, which serves as a staircase to the stone blocks high above the player. The player advances, and a Piranha Plant, along with the [[Flagpole]] can be seen. The player must slide down the Flagpole to enter World 5-2. If the player jumps over the Flagpole, and continues forward, he or she eventually reaches the World 6 warp zone. | | |The first level of World 5 is a long level with several tall platforms, hanging [[Warp Pipe|pipe]]s, and [[wind]]. |
| |- | | |- |
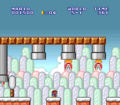
| |World 5-2 | | |[[World 5-2 (Super Mario Bros.: The Lost Levels)|World 5-2]] |
| |style="background: #202020" |[[File:World 5-2LL.PNG]] | | |style="background: #202020" |[[File:SMAS LL World 5-2 Title Card.png]] |
| |The player is in an underground level. A couple of Piranha Plants and a Koopa Troopa can be seen here. The player has to jump to reach the ? Blocks, in which five of them contain coins and one contains a [[Poison Mushroom]], and a set of Koopa Troopas. The player sees a lone Piranha Plant, and can choose to go either Up or Down. The Up route contains coins, while the down route contains a Brick Block with a power-up inside of it. After the routes merge together again, a Brick Block with a [[Star]] inside of it, a Piranha Plant, and two Buzzy Beetles along with a Koopa Troopa are in this area of the level. The player finds another Piranha Plant, and the top right Brick Block from the pipe it's on contains a [[1-Up Mushroom]]. A couple more Piranha Plants and a lone Koopa Troopa are set here. The player now finds a multiple Coin Block hidden in the left Brick Block, and another Vine which leads the player to a Warp Zone, giving the player access to [[World 8 (Super Mario Bros.: The Lost Levels)|World 8]] on the lone rightmost Brick Block. The player now has to jump from a row of moving platforms that moves either up or down continuously and can either take the route that leads up, which leads the player to yet another Warp Zone that gives the player access to [[World 7 (Super Mario Bros.: The Lost Levels)|World 7]]; Or, the player can take the normal route while collecting coins and facing a couple more Piranha Plants. The player now can see the exit pipe, and, upon entering it, the player finds him or herself outside. The player must climb the staircase until he or she reaches the Flagpole here. The player must slide down it to open up World 5-3. | | |The second level of World 5 is an underground level with various platforms. |
| |- | | |- |
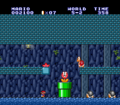
| |World 5-3 | | |[[World 5-3 (Super Mario Bros.: The Lost Levels)|World 5-3]] |
| |style="background: #202020" |[[File:World 5-3LL.PNG]] | | |style="background: #202020" |[[File:SMAS LL World 5-3 Title Card.png]] |
| |The player sees an automatic platform that takes the player across the level. The player must stand on it. A Piranha Plant can be seen to start off. The player eventually finds two Koopa Paratroopas, and a pipe that leads the player to a Bonus Room, and also the next area of the level. He or she then finds a [[Blooper]] floating in the air, along with some Blocks and a Koopa Paratroopa. Two Piranha Plants can be seen on the ground. If the player does not take the exit to the next area of this level, then the area repeats until the player does so. In the next area of the level, the player encounters two Piranha Plants, and [[Bullet Bill]]s are shot off the screen. The player then finds two platforms that are connected together with a coin on top of one of the platforms, and a platform protruding from the ground that contains more coins. Another Blooper can be seen here, along with a moving platform. The player needs to bounce off the Koopa Paratroopa over here to reach the platform with coins. The player then needs to hop across 3 platforms, which falls to get onto another platform. He or she now finds two platforms connected to each other, with two coins on each of them, and two Blocks along with the Flagpole. The player must slide down the Flagpole to reach the final [[level]] in this World, which is World 5-4. | | |The third level of World 5 is an athletic level with a puzzle the player must solve to move forward. |
| |- | | |- |
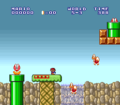
| |World 5-4 | | |[[World 5-4 (Super Mario Bros.: The Lost Levels)|World 5-4]] |
| |style="background: #202020" |[[File:World 1-4.PNG]] | | |style="background: #202020" |[[File:SMAS Bowser Title Card.png]] |
| |The player starts off by seeing a platform that falls down if he or she steps on it, along with some [[Lava Bubble]]s and a [[Fire Bar]]. The player finds more Fire Bars, and a Brick Block over a Fire Bar which contains a power-up. Now, the player must jump from ledge to ledge, until he or she reaches a platform, which has a Fire Bar that the player must avoid. The player can then take two routes here; either go up and collect coins while avoiding a Lava Bubble, or jumping from platform to platform while avoiding a Lava Bubble. Another Fire Bar is set in this area. The player must jump from Block to Block while avoiding two Lava Bubbles to cross the lava. Some Fire Bars can be seen here. The player must now avoid two Lava Bubbles and a huge Fire Bar by cautiously advancing from block to block. A [[Bowser Impostor]] now starts to shoot [[fireball]]s at the player. If the player doesn't have a power-up, he or she can safely walk under the Fire Bars seen here, however if he or she does not, then the player must carefully make his or her way across these two Fire Bars. The Bowser Impostor is among a Lava Bubble, a lot of Brick Blocks, and a moving platform. After the player touches the [[axe]], or defeats the impostor with fireballs (showing that it's actually a [[Lakitu]]), he or she rescues the [[Toad (species)|Toad]] and gains access to World 6-1. | | |The fourth level of World 5 is a [[castle]] with many [[lava]] pits and [[Fire Bar]]s. |
| |} | | |} |
|
| |
|
| ==Level maps== | | ==Gallery== |
| ===The Lost Levels=== | | ===Level maps=== |
| '''<center><gallery widths="500px" heights="40px">
| | ====''The Lost Levels''==== |
| File:SMBTLL 5-1.png|World 5-1
| | <gallery widths="500px" heights="40px"> |
| File:SMBTLL World 5-2.png|World 5-2
| | NES LL World 5-1 Map.png|World 5-1 |
| File:SMBTLL World 5-3.png|World 5-3
| | NES LL World 5-2 Map.png|World 5-2 |
| File:SMBTLL World 5-4.png|World 5-4
| | NES LL World 5-3 Map.png|World 5-3 |
| </gallery></center> | | NES LL World 5-4 Map.png|World 5-4 |
| ===All-Star=== | | </gallery> |
| '''<center><gallery widths="500px" heights="40px">
| | |
| File:World 5-1 TLL.png|World 5-1
| | ====''All-Stars''==== |
| File:World 5-2 TLL.png|World 5-2
| | <gallery widths="500px" heights="40px"> |
| File:World 5-3 TLL.png|World 5-3
| | SMAS LL World 5-1 Map.png|World 5-1 |
| File:World 5-4 TLL.png|World 5-4
| | SMAS LL World 5-2 Map.png|World 5-2 |
| </gallery></center> | | SMAS LL World 5-3 Map.png|World 5-3 |
| {{BoxTop}} | | SMAS LL World 5-4 Map.png|World 5-4 |
| | </gallery> |
| | |
| | ===Screenshots=== |
| | <gallery> |
| | SMBLL World 5-1 Screenshot.png|World 5-1 (original) |
| | SMAS LL World 5-1 Screenshot.png|World 5-1 (''All-Stars'') |
| | SMAS LL World 5-2 Screenshot.png|World 5-2 |
| | SMAS LL World 5-3 Screenshot.png|World 5-3 |
| | SMAS LL World 5-4 Screenshot.png|World 5-4 |
| | </gallery> |
| | |
| | {{SMBTLL levels}} |
| {{SMB}} | | {{SMB}} |
| [[Category:Places]]
| |
| [[Category:Levels]]
| |
| [[Category:Worlds]]
| |
| [[Category:Grasslands]] | | [[Category:Grasslands]] |
| [[Category:Bodies of Water]] | | [[Category:Aquatic areas]] |
| [[Category:Sky Locations]] | | [[Category:Sky areas]] |
| [[Category:Snowscapes]] | | [[Category:Snowscapes]] |
| | [[Category:Super Mario Bros.: The Lost Levels worlds]] |