Ropey Rumpus: Difference between revisions
(Per proposal) |
No edit summary |
||
| (18 intermediate revisions by 7 users not shown) | |||
| Line 1: | Line 1: | ||
{{ | {{DKC level infobox | ||
|image=[[File:Ropey Rumpus.png | |image=[[File:Ropey Rumpus.png]] | ||
|code=6 - 5 | |code=6 - 5 | ||
|world=[[Razor Ridge]] | |world=[[Razor Ridge]] | ||
|game=''[[Donkey Kong Country 3: Dixie Kong's Double Trouble!]] | |game=''[[Donkey Kong Country 3: Dixie Kong's Double Trouble!]] | ||
| | |track=Rockface Rumble | ||
|before=[[Pot Hole Panic (Donkey Kong Country 3: Dixie Kong's Double Trouble!)|<<]] | |before=[[Pot Hole Panic (Donkey Kong Country 3: Dixie Kong's Double Trouble!)|<<]] | ||
|after=[[Barbos's Barrier|>>]] | |after=[[Barbos's Barrier|>>]] | ||
| | |before3=[[Pot Hole Panic (Donkey Kong Country 3: Dixie Kong's Double Trouble!)|<<]] | ||
| | |after3=[[Kroctopus Krush|>>]] | ||
}} | }} | ||
'''Ropey Rumpus''' is the thirtieth [[level]] in ''[[Donkey Kong Country 3: Dixie Kong's Double Trouble!]]'' It is also the fifth and final non-boss level of [[Razor Ridge]]. | '''Ropey Rumpus''' is the thirtieth [[level]] in ''[[Donkey Kong Country 3: Dixie Kong's Double Trouble!]]'' It is also the fifth and final non-boss level of [[Razor Ridge]]. It takes place at a cliffside where [[Dixie Kong|Dixie]] and [[Kiddy Kong|Kiddy]] have to climb across horizontal [[rope]]s to get across large gaps. Both red and green [[Buzz (enemy)|Buzz]]es are the main and only enemy of the level, and they appear around the ropes. Green Buzzes fly in patterns, such as up and down or in a circle, while red Buzzes are usually stagnant in one place. About halfway into the level, the [[Kong]]s have the option to free [[Parry (character)|Parry]] from his [[Animal Crate]]. | ||
==Layout== | |||
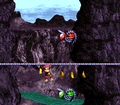
[[File:Ropey Rumpus GBA Buzzes.png|thumb|left|Ropey Rumpus in the Game Boy Advance version]] | |||
The level begins with a small tunnel leading to a long tightrope. Climbing across this rope, the heroes will avoiding some Buzzes and move along some small platforms to walk through a small tunnel again. They will grab onto another tightrope after that and climb across to find more Buzzes. Once they dodge the pests, they will go through another tunnel to find a set of ropes to help them reach a higher part of the mountain. As they hop up each rope, they will dodge many red and green Buzzes. Heading west into another tunnel, the group will find [[KONG Letters|the letter K]] and travel across the next tightrope. The tightrope will lead them over a very large abyss, though it will also be surrounded by restless Buzzes, swarming all around. Soon, the Kongs will hop up a few small tightropes and make a 180 degree turn to a higher area. As they climb up the tightropes in this direction, they will maneuver over and under several more Buzzes until they find another area with many tightropes, all parallel to each other. Getting up these ropes without being disturbed by the Buzzes in the center of them, the heroes will make their way to the [[Star Barrel]]. | |||
About halfway into the level, the apes will clamber between some more Buzzes and enter another area full of parallel tightropes. Dodging the enemies flying quickly around the area, the Kongs should climb up all the ropes and begin to travel west again on a longer tightrope. They will jump over more Buzzes on the way and soon find the letter N on solid ground. Heading through a small tunnel, they will hop up another set of parallel ropes and make it to a higher area of the mountain. There, they will meet Parry the Parallel Bird and move across a long, straight path of tightropes. Climbing along the tightropes, they will dodge many more Buzzes, most of them moving in circular motions, until they find the letter G, as well as the [[No Animal Sign]], which will turn Parry into a [[Bonus Barrel]] if it survived the journey. Just a little farther from there, [[Dixie Kong|Dixie]] and [[Kiddy Kong|Kiddy]] will find the [[Level Flag]], and raising it ends the level, allowing them to continue to [[Barbos's Barrier]] (or [[Kroctopus Krush]] in the [[Donkey Kong Country 3 (Game Boy Advance)|Game Boy Advance version]]). | |||
== | ==Items and objects== | ||
The | The following items and objects appear in the following quantities: | ||
<gallery> | |||
Banana Bunch DKC SNES.png|[[Banana Bunch]] (3) | |||
Bear Coin.png|[[Bear coin]] (4) | |||
DK Barrel.png|[[DK Barrel]] (3) | |||
Red Extra Life Balloon DKC3.png|[[Red Balloon]] (2) | |||
SteelKeg.png|[[Iron Barrel|Steel Barrel]] (1) | |||
</gallery> | |||
===K-O-N-G Letters=== | |||
*'''K:''' Found by going up several horizontal ropes | |||
*'''O:''' In a spot where there is a red Buzz below a vertically moving green Buzz, drop directly down to find two bear coins on the right ledge, and the "O" on the left. | |||
*'''N:''' Shortly after the Koin | |||
*'''G:''' Found right before the Level Flag | |||
===DK Coin=== | |||
[[File:Ropey Rumpus Koin.png|thumb|The Koin of Ropey Rumpus]] | |||
A little before the letter N, the Kongs must go left across a tightrope and jump over three green Buzzes. If they drop off the rope, the Kongs should land in a large alcove with a [[Koin]]. They must pick up a nearby [[Iron Barrel|Steel Barrel]] and throw at the wall on either side of Koin. The Steel Barrel bounces off and hits into Koin, and the Kongs are rewarded the [[DK Coin]]. | |||
{{br}} | |||
== | ==Bonus Levels== | ||
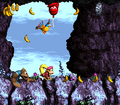
[[File:Ropey Rumpus GBA Bonus Level 2.png|thumb|The second Bonus Level of Ropey Rumpus, as seen in the Game Boy Advance version]] | |||
*Under the letter K on a wooden platform, the Kongs | Ropey Rumpus has two [[Bonus room|Bonus Levels]], listed by type: | ||
*After the letter N, the | *'''''Find the Coin!''''': Under the letter K on a wooden platform, the Kongs find a [[TNT Barrel]]. They must carry it across the area, by jumping to the right and avoiding many Buzzes along the way. After this, the Kongs land on a small platform at the side of the mountain. They must use the TNT Barrel to blast away the wall, revealing the entrance to the first [[Bonus Barrel]]. In the [[Bonus Level]], the Kongs have 15 seconds to climb across a long tightrope and collect the [[Bonus Coin (Donkey Kong franchise)|Bonus Coin]] on the other side. They must dodge several Buzzes encircling various sections of the rope. | ||
*'''''Collect 15 Bananas!''''': After the letter N, the Kongs can find Parry in its Animal Crate. The Kongs must continue with it throughout the level and take it past a No Animal Sign, which turns Parry into a Bonus Barrel. In the Bonus Level, the Kongs must collect 15 [[green banana]]s while two Buzzes encircle the inside of the rope. | |||
{{br}} | |||
== | ==Gallery== | ||
<gallery> | |||
Ropey Rumpus DKC3 tightrope.png|Dixie climbing across a tightrope between two Buzzes | |||
Ropey Rumpus DKC3 Parry and items.png|Parry collecting items above the Kongs | |||
Ropey Rumpus GBA several Buzzes.png|The Kongs on a tightrope between several Buzzes in the Game Boy Advance remake | |||
</gallery> | |||
==Names in other languages== | ==Names in other languages== | ||
| Line 34: | Line 58: | ||
|Spa=Tímido Jaleo | |Spa=Tímido Jaleo | ||
|SpaM=Shy Rumpus | |SpaM=Shy Rumpus | ||
| | |Fre=Cordes Confuses | ||
| | |FreM=Confused Ropes | ||
|Ger=Ropey Rumpus | |Ger=Ropey Rumpus | ||
|GerM=Ropey Rumpus | |GerM=Ropey Rumpus | ||
| Line 43: | Line 67: | ||
{{DKC3}} | {{DKC3}} | ||
[[Category:Mountains]] | [[Category:Mountains]] | ||
[[ | [[Category:Donkey Kong Country 3: Dixie Kong's Double Trouble! levels]] | ||
Latest revision as of 17:13, January 20, 2024
| Level | |
|---|---|
| Ropey Rumpus | |

| |
| Level code | 6 - 5 |
| World | Razor Ridge |
| Game | Donkey Kong Country 3: Dixie Kong's Double Trouble! |
| Music track | Rockface Rumble |
| << Directory of levels (SNES) >> | |
| << Directory of levels (GBA) >> | |
Ropey Rumpus is the thirtieth level in Donkey Kong Country 3: Dixie Kong's Double Trouble! It is also the fifth and final non-boss level of Razor Ridge. It takes place at a cliffside where Dixie and Kiddy have to climb across horizontal ropes to get across large gaps. Both red and green Buzzes are the main and only enemy of the level, and they appear around the ropes. Green Buzzes fly in patterns, such as up and down or in a circle, while red Buzzes are usually stagnant in one place. About halfway into the level, the Kongs have the option to free Parry from his Animal Crate.
Layout[edit]

The level begins with a small tunnel leading to a long tightrope. Climbing across this rope, the heroes will avoiding some Buzzes and move along some small platforms to walk through a small tunnel again. They will grab onto another tightrope after that and climb across to find more Buzzes. Once they dodge the pests, they will go through another tunnel to find a set of ropes to help them reach a higher part of the mountain. As they hop up each rope, they will dodge many red and green Buzzes. Heading west into another tunnel, the group will find the letter K and travel across the next tightrope. The tightrope will lead them over a very large abyss, though it will also be surrounded by restless Buzzes, swarming all around. Soon, the Kongs will hop up a few small tightropes and make a 180 degree turn to a higher area. As they climb up the tightropes in this direction, they will maneuver over and under several more Buzzes until they find another area with many tightropes, all parallel to each other. Getting up these ropes without being disturbed by the Buzzes in the center of them, the heroes will make their way to the Star Barrel.
About halfway into the level, the apes will clamber between some more Buzzes and enter another area full of parallel tightropes. Dodging the enemies flying quickly around the area, the Kongs should climb up all the ropes and begin to travel west again on a longer tightrope. They will jump over more Buzzes on the way and soon find the letter N on solid ground. Heading through a small tunnel, they will hop up another set of parallel ropes and make it to a higher area of the mountain. There, they will meet Parry the Parallel Bird and move across a long, straight path of tightropes. Climbing along the tightropes, they will dodge many more Buzzes, most of them moving in circular motions, until they find the letter G, as well as the No Animal Sign, which will turn Parry into a Bonus Barrel if it survived the journey. Just a little farther from there, Dixie and Kiddy will find the Level Flag, and raising it ends the level, allowing them to continue to Barbos's Barrier (or Kroctopus Krush in the Game Boy Advance version).
Items and objects[edit]
The following items and objects appear in the following quantities:

Banana Bunch (3)

Bear coin (4)

DK Barrel (3)

Red Balloon (2)

Steel Barrel (1)


K-O-N-G Letters[edit]
- K: Found by going up several horizontal ropes
- O: In a spot where there is a red Buzz below a vertically moving green Buzz, drop directly down to find two bear coins on the right ledge, and the "O" on the left.
- N: Shortly after the Koin
- G: Found right before the Level Flag
DK Coin[edit]

A little before the letter N, the Kongs must go left across a tightrope and jump over three green Buzzes. If they drop off the rope, the Kongs should land in a large alcove with a Koin. They must pick up a nearby Steel Barrel and throw at the wall on either side of Koin. The Steel Barrel bounces off and hits into Koin, and the Kongs are rewarded the DK Coin.
Bonus Levels[edit]

Ropey Rumpus has two Bonus Levels, listed by type:
- Find the Coin!: Under the letter K on a wooden platform, the Kongs find a TNT Barrel. They must carry it across the area, by jumping to the right and avoiding many Buzzes along the way. After this, the Kongs land on a small platform at the side of the mountain. They must use the TNT Barrel to blast away the wall, revealing the entrance to the first Bonus Barrel. In the Bonus Level, the Kongs have 15 seconds to climb across a long tightrope and collect the Bonus Coin on the other side. They must dodge several Buzzes encircling various sections of the rope.
- Collect 15 Bananas!: After the letter N, the Kongs can find Parry in its Animal Crate. The Kongs must continue with it throughout the level and take it past a No Animal Sign, which turns Parry into a Bonus Barrel. In the Bonus Level, the Kongs must collect 15 green bananas while two Buzzes encircle the inside of the rope.
Gallery[edit]
Dixie climbing across a tightrope between two Buzzes
Parry collecting items above the Kongs
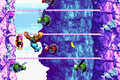
The Kongs on a tightrope between several Buzzes in the Game Boy Advance remake


Names in other languages[edit]
| Language | Name | Meaning |
|---|---|---|
| Japanese | ロープで大騒ぎ Rōpu de ōsawagi |
Roar on the Rope |
| French | Cordes Confuses |
Confused Ropes |
| German | Ropey Rumpus |
Ropey Rumpus |
| Italian | Sul Filo della Liana |
On the Liana's Thread |
| Spanish | Tímido Jaleo |
Shy Rumpus |