Glimmer's Galleon (Donkey Kong Country 2: Diddy's Kong Quest)
Template:Level Glimmer's Galleon is the twelfth level of Donkey Kong Country 2: Diddy's Kong Quest and Donkey Kong Land 2. It is the second area of Krem Quay in Donkey Kong Country 2, as well as the seventh area of Krem Cauldron in Donkey Kong Land 2.
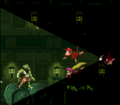
The level takes place in the flooded cargo hold of a crashed Kremling galleon. There is hardly any natural light to be found, but fortunately, Glimmer will find the Kongs soon after they enter the level, illuminating the way for them. However, in Donkey Kong Land 2, Glimmer does not appear, and instead, certain barrels are scattered throughout the level, which light up the area when touched. They will cease to give off light after a few moments. Floatsams, Puftups, Shuris, Lockjaws, and a single Klomp populate this level as well, and with Enguarde nowhere to be found, they can pose quite a challenge.
Level Layout
Donkey Kong Country 2
At the start of this level, the animals must swim in the direction of bananas, which are in the formation of an arrow. After they pass the level's only Klomp, Glimmer will appear and light the way through the dark. The monkeys must continue their way through and avoid a few Flotsams swimming along. Eventually, there will be a fork-in-the-road. The heroes must travel either the up most route, or the route under it. Either way, they will pass a Lockjaw and end up at the same point. After that, the Kongs need to move on and watch out for slithering Flotsams. They will then see a group of bananas in the formation of an arrow, which points north. The heroes should follow it and avoid three deadly Lockjaws, who will charge at them to attack. When they can no longer go north, the monkeys need to travel west, where there are a few Flotsams and other hazards. At that dead-end, the group must swim south and then west whrn they meet up with more foes. Eventually, the heroes will find and be able to break open the Star Barrel.
From here, the Kongs must continue their way through all the sunken luggage and watch out for enemies. They will meets some Shuris and Puftups, as they both travel upwards through all the crates. Eventually, they should follow a trail of bananas leading to a Lockjaw, as well as bananas in the formation of an arrow, directing them north. The monkeys should come up to another Lockjaw on their way up, where they should then adventure east. There are many Shuris on the way, and they will swerve out of tight spaces to attack them. Soon, the group will make it to bananas in the formation of an arrow pointing east, as well as a Puftup in their path. After that villain explodes, the heroes must avoid the spikes it throws at them, and swim along. Not long after, they will find two Lockjaws in a small space. The monkeys must pass these hazards and travel south, then east between some crates. Here, they should find three Puftups surrounding them. They will all explode and shoot spikes at the heroes, so they must be careful. When they are avoided, the Kongs must then swim up the narrow pathway and get in a barrel nearby. It will shoot them out of the water, where they can finish the level.
Donkey Kong Land 2
From the beginning of the dark level, the heroes must follow the trail of bananas and touch the Light Barrel. It will illuminate the surrounding darkness, but only for a short time. Quickly, the monkeys must swim through the deep water and find a barrel, which contains Enguarde the Swordfish, as well as another Light Barrel. Now, the group needs to move along, making way north. There are a few Puftups and Flotsams and the way, but if Enguarde is in their team, it should be a snap. They will eventually find bananas in the formation of an arrow. The arrow points east, in which the Kongs or swordfish must follow. There is another Light Barrel on the way, and the heroes will find a second arrow, along with yet another Light Barrel to brighten the darkness. The light will last very shortly, and the heroes need to race up to the next Light Barrel to keep it on. Otherwise, I would be too dark to see anything! Moving on, they must defeat more enemies and touch more Light Barrels, as they follow along the path going east, and later, southeast. Soon, the Kongs should find an arrow pointing north. From there, they must travel slightly north and continue along the path between the luggage. They need to keep going north, until they see another Light Barrel and the Star Barrel.
At this point, the monkeys must follow the arrow pointing east. They will pass two Flotsams, and then run into a dead end, where they'll have to adventure downwards, where there is an Enguarde barrel. If they have not gotten the helpful buddy yet, the heroes should get Enguarde out of it. From here, they must travel west, defeating almost countless enemies, including Lockjaws, Flotsams, Shuris, and Puftups. With the help of the swordfish, though, this task should be easy. At the dead end later, they need to swim down and around all the crates and touch a Light Barrel. They will soon come up to another Light Barrel to light the dark, and then move on east, where there is a "No Animal" sign, making Enguarde disappear. After this, the heroes, without their swordfish buddy, must swim in a U shape and touch all the short-lasting Light Barrels on the way. Then, there will be a spring atop some crates nearby, leading out of the level. The monkeys must hop out of the water, and finally complete the level.
Secrets
Donkey Kong Country 2
Bonus Barrel(s)
Right at the start of the level, the Kongs should swim strait up and go in between several barrels. Once they are in a more spacious area, they should see an open crate jutting from the wall. When the heroes go in the crate, they will end up at the first Bonus Level, where they must swim around many crates and barrels. They have around forty seconds to get to the end of the stage. If they make it there in time, the monkeys will be awarded with a Kremkoin.
Near the end of the level and by a Puftup, the Kongs should see a formation of bananas making an arrow, which points east. Instead of following this, they need to travel south, where they will see a Lockjaw. Under it is a tight passage, which the heroes must squeeze through. After this, the will see an open crate. If they go in it, they will get to te Bonus Level. Here, the monkeys will go through a maze and find the Kremkoin at the end of it. This maze appears to be more complex than previous one, but, luckily, the Kongs have up to forty seconds to get through. Soon, they should find the Kremkoin.
DK Coin
To find the DK Coin, the group must swim through the crates above the larger, open crate that leads to the first Bonus Level. Here, they should find some bananas in the shape of the number 3. From there, the heroes must feel around the crates above them until they go through another one. It will lead them to bananas in the shape of the number 4, as well as the DK Coin.
Golden Feather (GBA Only)
To find the Golden Feather, the Kongs must swim past the letter N, where they should eventually be surrounded by three Shuris in an open area. From here, they need to swim around some crates and travel north, where they will run in to a bunch of crates. The Golden Feather should be squeezed in a tight area around crates.
Donkey Kong Land 2
Bonus Barrel(s)
At the very start of the level, the monkey must go backwards and not follow the trail of bananas in front of them. They should come up to a Light Barrel to brighten the darkness. Then, the group must continue to swim east, until they eventually come up to the Bonus Barrel, leading to the Bonus Level. At this Bonus Stage, the Kongs need to collect the stars that are scattered about around the luggage. When all is obtained, the Kremkoin will appear.
Right before the end of the level, the Kongs must feel around the barrels to the right. A couple are fake, or in the background, and the heroes can go right through them. Past these, they will be a rather vast area, filled with several Puftups, who float about, guarding the second Bonus Barrel. Once the Kongs maneuver around them, they should see the Bonus Barrel out of the water. When jumped in, it will take the monkeys to the Bonus Level. Here, they must make way through a maze. There are Light Barrels on the way to light up the path. The maze is short, but the monkeys have little time. If they follow the correct path, they will find the Kremkoin.
DK Coin
A while before the Star Barrel, the heroes will find an arrow, formed by bananas, pointing east. There is a Light Barrel next to it. From here, the Kongs need to swim to the wall and up, where they will go through three small crates. If they keep moving on from here, they should come up to the DK Coin.
Gallery
- Swimswimswim65.jpg
- Glimmer's Galleon GBA 65.jpg

Trivia
- In the Game Boy Advance remake, the level is actually a little brighter, as it has been lit up more for the standard Game Boy Advance screen, which lacks a backlight.
- In Donkey Kong Land 2, the level does not feature Glimmer at all. However, the level's name remained as "Glimmer's Galleon".
- The boxart for Donkey Kong Land 2 seems to take place in Glimmer's Galleon, as it is a dark, underwater level. Strangely, Glimmer appears on the box, although he is never seen during gameplay.