Criss Kross Cliffs: Difference between revisions
m (Bot: Automated text replacement (-<br clear=all> +{{br}})) |
No edit summary |
||
| (41 intermediate revisions by 17 users not shown) | |||
| Line 1: | Line 1: | ||
{{level | {{level infobox | ||
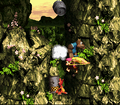
|image=[[File:Criss Kross Cliffs.png|256px]] | |||
|image=[[File: | |||
|code=8 - 2 (SNES)<br>9 - 2 (GBA) | |code=8 - 2 (SNES)<br>9 - 2 (GBA) | ||
|world=[[Krematoa]] | |||
|game=''[[Donkey Kong Country 3: Dixie Kong's Double Trouble!]] | |game=''[[Donkey Kong Country 3: Dixie Kong's Double Trouble!]] | ||
| | |track=Rockface Rumble | ||
|before=[[Stampede Sprint|<<]] | |before=[[Stampede Sprint|<<]] | ||
|after=[[Tyrant Twin Tussle|>>]] | |after=[[Tyrant Twin Tussle|>>]] | ||
}} | }} | ||
'''Criss Kross Cliffs''' is the thirty-seventh [[level]] in | '''Criss Kross Cliffs''' is the thirty-seventh [[level]] in ''[[Donkey Kong Country 3: Dixie Kong's Double Trouble!]]'' and the second level of the lost world, [[Krematoa]]. In the [[Game Boy Advance]] remake, it is the forty-third level, due to the addition of [[Pacifica]] and its six levels. Criss Kross Cliffs has a [[Bazuka]] at the very bottom of the level, where it fires [[Steel Keg]]s directly up the mountain, which [[Dixie Kong|Dixie]] and [[Kiddy Kong]] must bounce on to go up the area. In parts of the stage, the [[Kong]]s must utilize [[Switch Barrel]]s to change the Steel Kegs to [[TNT Barrel]]s to defeat a red [[Buzz (enemy)|Buzz]] blocking the path, then change it back to Steel Kegs. In some segments, the Kongs cannot revert it back to Steel Kegs until a certain point, and must cross the mountain while dodging TNT Barrels to proceed. Aside from Buzzes, there are many horizontal tightropes featuring [[Klasp]]s. As with the other Krematoa levels, the level gets a reddish-orange tint after the [[Knautilus]] is revealed. | ||
Criss Kross Cliffs was made slightly easier for the [[Donkey Kong Country 3 (Game Boy Advance)|Game Boy Advance version]]. The most notable difference is that the Switch Barrels revert back to Steel Kegs automatically after a few seconds, and therefore it is optional to manually revert them. However, touching the sides of the blasting Steel Kegs injures the Kongs. | |||
==Layout== | |||
[[File:CrissKrossCliffs-GBA.png|thumb|left|Criss Kross Cliffs in the Game Boy Advance version]] | |||
When the level begins, the Kongs find [[KONG Letters|the letter K]] above them and ride along some steel barrels being shot from below. They are taken to a higher level, where they find a [[DK Barrel]]. Moving farther up, they hit a Switch Barrel to defeat a red Buzz, then hit it again to turn the [[TNT Barrel]]s back into steel barrels. Continuing upwards, they find another red Buzz in the way, whom they should defeat by climbing up several wooden platforms nearby and hitting a second Switch Barrel. Once the Buzz is defeated, the Kongs are able to bounce to the next area with the barrels, where they jump into a [[Barrel Cannon]] and automatically hit a Switch Barrel. It turns the steel barrels into TNT Barrels, which the Kongs need to avoid. They pass the gap with the TNT barrels shooting upwards and climb upwards, using some wooden platforms. They move across the gap with the TNT Barrels again to find a switch, which turns the barrels back into steel barrels. The Kongs ride up the barrels and move through a large area, followed by a small alcove. If they get in this alcove, they find the [[Star Barrel]]. | |||
About halfway into the level, the Kongs find a fork in the road. Taking the left passage makes them head past some Kuff 'n' Klouts, while heading to the right makes them climb up some horizontal tightropes, avoiding Klasps. The two paths later meet. The Kongs ride up the mountain with more steel barrels and pass the letter G, found in another small alcove. Heading left, the Kongs go to the top of the area with some platforms and defeat a Buzz by using a Switch Barrel. If they move farther up at this point, they are taken to another area, where they will find a Barrel Cannon. It shoots them to a set of tightropes to climb. Once they get up the ropes, they move along more kegs to be taken to a part of the mountain with more horizontal tightropes. After they jump up from the two ropes, they hit a Switch Barrel to defeat a red Buzz in their path. Soon, the Kongs find the [[Level Flag]], which rewards them with one of the Lost World's [[cog (Donkey Kong Country 3: Dixie Kong's Double Trouble!)|cog]]s. | |||
== | ==Enemies== | ||
The following enemies appear in the following quantities: | |||
<gallery> | |||
Bazuka DKC3.png|[[Bazuka]] (3) | |||
Buzz DKC3 green.png|[[Buzz (enemy)|Buzz]] (green) (1) | |||
Buzz DKC3 red.png|Buzz (red) (10) | |||
Klasp DKC3.png|[[Klasp]] (5) | |||
Knik Knak DKC3 red.png|[[Knik-Knak]] (red) (5) | |||
Kuff Klout DKC3.png|[[Kuff 'n' Klout]] (2) | |||
Rekoil DKC3.png|[[Re-Koil]] (11) | |||
</gallery> | |||
==Items and objects== | |||
The following items and objects appear in the following quantities: | |||
<gallery> | |||
DK Barrel.png|[[DK Barrel]] (3) | |||
Green Extra Life Balloon DKC3.png|[[Green Balloon]] (1) | |||
Red Extra Life Balloon DKC3.png|[[Red Balloon]] (1) | |||
SwitchBarrel.png|[[Switch Barrel]] (8) | |||
</gallery> | |||
===K-O-N-G Letters=== | |||
*'''K:''' Just after the level entrance, where it can be reached using a [[team up]] throw. | |||
*'''O:''' Found on a wooden platform after a group of four Re-Koils. | |||
*'''N:''' After the Star Barrel, the Kongs reach a fork in the path. They must go left and jump into a [[Barrel Cannon]], which blasts them to the letter N and a [[bear coin]]. | |||
*'''G:''' After collecting the letter N, the Kongs must go up further on the Steel Kegs. On the right side, they can find an alcove with the letter G. | |||
== | ===DK Coin=== | ||
After obtaining the letter G, the Kongs must continue upward until they find a Switch Barrel on the left. They must jump at it to defeat a red Buzz, then change it back to Steel Kegs. They must continue bouncing up on the Steel Kegs until they find an alcove on the right side. In the alcove is the [[Koin]] and a Steel Keg. As in many other levels, the Kongs must throw the barrel at the wall behind Koin, so that it bounces off and hits Koin in the back. This reveals the [[DK Coin]] for the Kongs to collect. | |||
== | ==Bonus Levels== | ||
* | {{multiframe|[[File:Criss Kross Cliffs Bonus Area 1 GBA.png|200px]] [[File:Criss Kross Cliffs Bonus Area 2 GBA.png|200px]]|size=420|The first and second Bonus Levels respectively}} | ||
Criss Kross Cliffs has two [[Bonus room|Bonus Levels]], listed by type: | |||
*'''Grab 15 Bananas!''': At the start of the level, the Kongs can find the first two red Buzzes to the right as they blast upward. They can find the [[Bonus Barrel]] behind them. The objective is for the Kongs to collect 15 green bananas within 30 seconds, which individually spawn between both ledges. However, Dixie and Kiddy must avoid a [[Bazuka]] as it fires TNT Barrels vertically. After collecting every Banana, the Kongs can collect the [[Bonus Coin (Donkey Kong franchise)|Bonus Coin]] on the ledge to the right. | |||
*'''Bash the Baddies!''': After passing the letter G and Koin, the Kongs must land on an open ground region on the right. They must go all the way east, and use Team Up to enter the second Bonus Barrel above. Dixie and Kiddy's objective is to defeat five Knik-Knaks within 25 seconds. They can only reach them by using Steel Kegs fired from a Bazuka. | |||
{{br}} | |||
==Gallery== | |||
<gallery> | |||
Criss Kross Cliffs platforms.png|Dixie and Kiddy on a platform below some Re-Koils. | |||
Criss Kross Cliffs Klasp.png|Dixie on a tightrope below a Klasp, who is below a Switch Barrel. | |||
Criss Kross Cliffs red tint.png|Criss Kross Cliffs appears in a red tint after the Knautilus is revealed. | |||
Criss Kross Cliffs Bonus Area 1.png|The first bonus area in the SNES version | |||
Criss Kross Cliffs (europe version).png|A Bazuka at the start of the level | |||
</gallery> | |||
==Names in other languages== | ==Names in other languages== | ||
{{ | {{foreign names | ||
|Jap=タル100れんぱつ | |Jap=タル100れんぱつ | ||
|JapR=Taru hyaku(100) renpatsu | |JapR=Taru hyaku(100) renpatsu | ||
| Line 34: | Line 69: | ||
|Spa=Colinas Zigzag | |Spa=Colinas Zigzag | ||
|SpaM=Zigzag Hills | |SpaM=Zigzag Hills | ||
| | |Fre=Monts Mélangés | ||
| | |FreM=Mixed Mountains | ||
|Ger=Klippen-Klamotte | |Ger=Klippen-Klamotte | ||
|GerM=Cliff Junk | |GerM=Cliff Junk | ||
|Ita=Razzi e Guizzi | |||
|ItaM=Rockets and Wriggle | |||
}} | }} | ||
{{DKC3}} | {{DKC3}} | ||
[[Category:Mountains]] | [[Category:Mountains]] | ||
[[ | [[Category:Secret levels]] | ||
[[Category:Donkey Kong Country 3: Dixie Kong's Double Trouble! levels]] | |||
Latest revision as of 17:21, January 20, 2024
| Level | |
|---|---|
| Criss Kross Cliffs | |

| |
| Level code | 8 - 2 (SNES) 9 - 2 (GBA) |
| World | Krematoa |
| Game | Donkey Kong Country 3: Dixie Kong's Double Trouble! |
| Music track | Rockface Rumble |
| << Directory of levels >> | |
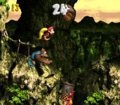
Criss Kross Cliffs is the thirty-seventh level in Donkey Kong Country 3: Dixie Kong's Double Trouble! and the second level of the lost world, Krematoa. In the Game Boy Advance remake, it is the forty-third level, due to the addition of Pacifica and its six levels. Criss Kross Cliffs has a Bazuka at the very bottom of the level, where it fires Steel Kegs directly up the mountain, which Dixie and Kiddy Kong must bounce on to go up the area. In parts of the stage, the Kongs must utilize Switch Barrels to change the Steel Kegs to TNT Barrels to defeat a red Buzz blocking the path, then change it back to Steel Kegs. In some segments, the Kongs cannot revert it back to Steel Kegs until a certain point, and must cross the mountain while dodging TNT Barrels to proceed. Aside from Buzzes, there are many horizontal tightropes featuring Klasps. As with the other Krematoa levels, the level gets a reddish-orange tint after the Knautilus is revealed.
Criss Kross Cliffs was made slightly easier for the Game Boy Advance version. The most notable difference is that the Switch Barrels revert back to Steel Kegs automatically after a few seconds, and therefore it is optional to manually revert them. However, touching the sides of the blasting Steel Kegs injures the Kongs.
Layout[edit]

When the level begins, the Kongs find the letter K above them and ride along some steel barrels being shot from below. They are taken to a higher level, where they find a DK Barrel. Moving farther up, they hit a Switch Barrel to defeat a red Buzz, then hit it again to turn the TNT Barrels back into steel barrels. Continuing upwards, they find another red Buzz in the way, whom they should defeat by climbing up several wooden platforms nearby and hitting a second Switch Barrel. Once the Buzz is defeated, the Kongs are able to bounce to the next area with the barrels, where they jump into a Barrel Cannon and automatically hit a Switch Barrel. It turns the steel barrels into TNT Barrels, which the Kongs need to avoid. They pass the gap with the TNT barrels shooting upwards and climb upwards, using some wooden platforms. They move across the gap with the TNT Barrels again to find a switch, which turns the barrels back into steel barrels. The Kongs ride up the barrels and move through a large area, followed by a small alcove. If they get in this alcove, they find the Star Barrel.
About halfway into the level, the Kongs find a fork in the road. Taking the left passage makes them head past some Kuff 'n' Klouts, while heading to the right makes them climb up some horizontal tightropes, avoiding Klasps. The two paths later meet. The Kongs ride up the mountain with more steel barrels and pass the letter G, found in another small alcove. Heading left, the Kongs go to the top of the area with some platforms and defeat a Buzz by using a Switch Barrel. If they move farther up at this point, they are taken to another area, where they will find a Barrel Cannon. It shoots them to a set of tightropes to climb. Once they get up the ropes, they move along more kegs to be taken to a part of the mountain with more horizontal tightropes. After they jump up from the two ropes, they hit a Switch Barrel to defeat a red Buzz in their path. Soon, the Kongs find the Level Flag, which rewards them with one of the Lost World's cogs.
Enemies[edit]
The following enemies appear in the following quantities:

Bazuka (3)

Buzz (green) (1)

Buzz (red) (10)

Klasp (5)

Knik-Knak (red) (5)

Kuff 'n' Klout (2)

Re-Koil (11)


Items and objects[edit]
The following items and objects appear in the following quantities:

DK Barrel (3)

Green Balloon (1)

Red Balloon (1)

Switch Barrel (8)


K-O-N-G Letters[edit]
- K: Just after the level entrance, where it can be reached using a team up throw.
- O: Found on a wooden platform after a group of four Re-Koils.
- N: After the Star Barrel, the Kongs reach a fork in the path. They must go left and jump into a Barrel Cannon, which blasts them to the letter N and a bear coin.
- G: After collecting the letter N, the Kongs must go up further on the Steel Kegs. On the right side, they can find an alcove with the letter G.
DK Coin[edit]
After obtaining the letter G, the Kongs must continue upward until they find a Switch Barrel on the left. They must jump at it to defeat a red Buzz, then change it back to Steel Kegs. They must continue bouncing up on the Steel Kegs until they find an alcove on the right side. In the alcove is the Koin and a Steel Keg. As in many other levels, the Kongs must throw the barrel at the wall behind Koin, so that it bounces off and hits Koin in the back. This reveals the DK Coin for the Kongs to collect.
Bonus Levels[edit]


Criss Kross Cliffs has two Bonus Levels, listed by type:
- Grab 15 Bananas!: At the start of the level, the Kongs can find the first two red Buzzes to the right as they blast upward. They can find the Bonus Barrel behind them. The objective is for the Kongs to collect 15 green bananas within 30 seconds, which individually spawn between both ledges. However, Dixie and Kiddy must avoid a Bazuka as it fires TNT Barrels vertically. After collecting every Banana, the Kongs can collect the Bonus Coin on the ledge to the right.
- Bash the Baddies!: After passing the letter G and Koin, the Kongs must land on an open ground region on the right. They must go all the way east, and use Team Up to enter the second Bonus Barrel above. Dixie and Kiddy's objective is to defeat five Knik-Knaks within 25 seconds. They can only reach them by using Steel Kegs fired from a Bazuka.
Gallery[edit]
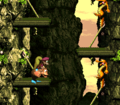
Dixie and Kiddy on a platform below some Re-Koils.
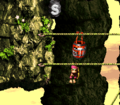
Dixie on a tightrope below a Klasp, who is below a Switch Barrel.
Criss Kross Cliffs appears in a red tint after the Knautilus is revealed.
The first bonus area in the SNES version
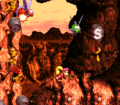
A Bazuka at the start of the level


.png)
Names in other languages[edit]
| Language | Name | Meaning |
|---|---|---|
| Japanese | タル100れんぱつ Taru hyaku(100) renpatsu |
Hundred Barrel Shot |
| French | Monts Mélangés |
Mixed Mountains |
| German | Klippen-Klamotte |
Cliff Junk |
| Italian | Razzi e Guizzi |
Rockets and Wriggle |
| Spanish | Colinas Zigzag |
Zigzag Hills |