The 'Shroom:Issue 200/Zel Says A Lot Of Things About Rayman 3: Hoodlum Havoc
Zel Says A Lot Of Things About Rayman 3: Hoodlum Havoc
Written by: ZelenPixel (talk)
Not sure I'll write anything more for this paper any time soon but I had to pop back in for the big milestone! I will take advantage of my newfound sudden Rayman obsession (or rather the return of it) to ramble about my favorite, Rayman 3. I say everyone who dislikes this game, or how Globox is in it, is wrong and a fool. This is going to be a review and just general coverage of every level, so strap in!
Also, screenshots are taken by me; I have the GOG (PC) version of the game with the Better Rayman 3 mod, so it's in widescreen! Ignore that the screenshots look a bit odd, I technically played windowed but expanded the window to the whole screen so that smushed the game a little. I stretched it back out for screenshots, and tried to clean up the Windows UI thingy in the corner so it's not apparent.
You can read the manual if you want, mostly for the basic plot introduction (page 2) and some character descriptions (page 15) as I won't be introducing them. Well, hopefully you'll know them at least.
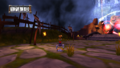
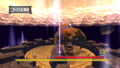
The Fairy Council
This game technically begins with a short sequence of Murfy dragging Rayman around through the air so he can get enough red lums (which refill your health). Not starting with the normal gameplay immediately is admittedly a bit strange, but it doesn't last long, and after that and a lengthy unskippable cutscene (this game loves unskippable cutscenes) you finally get to play, though Rayman has no hands.

As Murfy reads from the manual which he found at some point, the proper plot at this point is that the chief of the black lums, André, is turning other red lums into black lums and those into Hoodlums, which are the main bad guys in this game. They're like scarecrow-looking things that shoot at you, and they have a lot of various types with different functionalities. For example, Hoodmongers are the most basic type and they just shoot at you, Slapdashes show up out of nowhere but are weak and die in one hit, Hoodbooms toss grenades at you, you get it.

Anyway, you run around the Fairy Council and finally locate Globox who just hid in a barrel of plum juice (this will be important later) and Rayman thus gets his hands back. You then chase after André so he doesn't get his hands on the Heart of the World for his Evil Purposes. He doesn't, if only because he accidentally ended up getting eaten by Globox just because he was yelling in fear. So now the plot for the first half of the game is just tossing him around between different Teensy doctors to try and get André out of him.

Ok, now the plot outline at this point is over, let's talk about the actual dang level!!! It makes a very strong first impression, easily the prettiest world with the prettiest music. It's all set at nighttime, heavy on the color blue, and has a lot of various glowy elements, and sometimes reflective surfaces! Gameplay-wise it's not that notable, as it has to introduce you to the general gameplay. In fact, this is the only level where Murfy is here to guide you, filling a similar role to the one he did in Rayman 2, though he's a lot snarkier here (and I think spends more time making funny comments than actually assisting you). I kind of wish he was always like that, to be honest.

As mentioned before, this starts with a short segment where you steer left or right to pick up red lums, and then get into the actual gameplay, where Rayman is handless for a while. It doesn't affect much, since all you can really do at this point is go wherever the game tells you and also knock over some gnomes for points. Oh yeah, the points!

This game has a point system and actually makes good use of it, where you get points through all sorts of things (mostly defeating enemies and picking up gems of different colors, which give out different point amounts), you can get points doubled if you have a combat fatigue (which also gets introduced later in this level), and there is also a combo meter. If you keep getting points continuously for a bit, they get added to the combo meter which is kind of a secondary points counter. All points earned also get added to the combo meter, essentially doubling your points again if you get them consecutively enough. For good scores you mostly just get a Murfy stamp on the level select that smiles instead of frowning, and you unlock some minigames, as well as a random secret in the final level. I think it's pretty fun! It encourages you to explore for secrets (basically every level has some with a green gem, the rarest type of gem that gives you the most points), and just generally try to play well.
Since I brought those up, just what are combat fatigues? They're specific timed powerups found in cans that drop from some specific Hoodlums (or the shoe sometimes. We'll get there). There's several types: Vortex, Heavy Metal Fist, Lockjaw, Shock Rocket and Throttle Copter. Each of them is used for level progression, for example letting you clear some obstacles, but most of them have some combat utility as well. The first one, and the only one introduced in the Fairy Council, is the Vortex. It's one of the ones they carried over into Sparks of Hope! Which I forget is a Mario game! What the Vortex does is it sends out tornadoes that can lower these mushroom-like platforms so you can get on them, and, for combat, the tornadoes for some reason shrink enemies. It also topples over Hoodbooms on stilts, which will be seen later in a few levels.

So that's the basic outline of the game, I guess. A platformer that focuses more on combat and does it pretty well, with a cool points system. Anyway, at the end of the Fairy Council a Teensy directs Rayman and Globox to go to a doctor in Clearleaf Forest to try and deal with this whole situation, and sends both of them to an awesome, if ridiculously bright-colored Teensy (actually Teensie, but the rest of the game, internally anyway, spells Teensy; it's very inconsistent) Highway, which is internally called "sk8" because you skate along some rails to some really cool music. It's a very flashy sequence, and hey, kind of fun too!
Clearleaf Forest

After the Teensy Highway both Rayman and Globox get dropped off at Clearleaf Forest (which is where the level actually starts, as the Highway was still part of Fairy Council). The plot in this level is fairy simple, you just have to make your way through the level in order to reach the Teensy doctor here.
A thing to note is André now keeps forcing Globox to drink plum juice, which he pretty unambiguously gets drunk off of. Apparently this is purely so André could get the plum juice for himself, often yelling that he's thirsty. It seems pretty evident that the Hoodlums love plum juice, in a later level they have so much of this stuff it's ridiculous! Besides some Globox funny dialogue and animations (when drunk he walks by just kind of slithering on the ground strangely like a worm), the gameplay application this mostly has is the one-off sequence in the Clearleaf Forest where he randomly manages to climb a waterfall (with Rayman on his back), in other levels he can hiccup bubbles that Rayman can bounce on much like balloons (though balloons are the ones that always pop when bounced on), and most of the time it just feels like a really easy way to make him be at a different point in the level because he TURNS into a balloon. He seems to think this method of flying is kind of awesome at least! Even if I, the person playing this, just feel uncomfortable about it.

Anyway, this is another fairly basic level. You get introduced to most of the other combat fatigues here. The first one is the Heavy Metal Fist, the red one, which makes Rayman hit strongest in combat, and also lets him destroy these specific doors, which are otherwise unbreakable. Later on, the Lockjaw gets introduced, the blue one and my personal favorite, as it lasts 49 seconds! Each combat fatigue has different lengths for how long it lasts, and Lockjaw lasts the longest. 49 seconds may not sound long, but it feels a lot when actually playing. Anyway, it lets Rayman grab and swing onto various points flying in the air, basically the same as purple lums in Rayman 2 (which are also in Sparks of Hope), and, during combat, the jaws latch onto enemies and electrify them. The third one that gets introduced is the Shock Rocket, the orange one, which lets you control a rocket or missile as it flies. Of course it kills enemies easily, but using it for combat is rather cumbersome, and its main purpose is aiming it at various switches in the environment, dodging various obstacles in the way. They even made a whole minigame out of this, which is a pretty fun one!

At the end of Clearleaf Forest there is the first boss fight, Master Kaag, which is a random baby Hoodlum on a thing that gives him ridiculous legs to stomp around with. You have to try and walk over several switches around the arena to summon a Shock Rocket can and then hit Master Kaag with the rocket, and try to make sure he doesn't stomp the can before you can get to it. It's honestly kind of annoying, and after the fight Rayman gets to use the ridiculous legs himself for a sequence where he gets to stomp random normal Hoodlums and he also gets the worst turn speed imaginable. You can't get damaged by the Hoodlums at all, I guess this is just there for flair?
After the fight Rayman and Globox finally get to the Teensy doctor, but he doesn't succeed at his task of getting André out and boots both Rayman and Globox to another Highway again, this time to the Land of the Livid Dead. You just abruptly fall off at the end of the level, sending you to a completely different level instead for a random diversion in the plot.
The Bog of Murk

This is a really weird level. It just kind of doesn't contribute anything to the plot, but this wasn't like a thing to pad out time or whatever, that level was always planned to be there! As I've said, both Rayman and Globox literally just end up here by mistake. Globox is absent for most of the level and doesn't actually appear in person, but you can hear him offscreen in two sections, and it seems like he just ended up in jail somehow.
Rayman starts this out by unfortunately crashing into Bégoniax's outhouse, for which she threatens to kill him and other stuff. Later in the same section thing you have to fight her. Very unfortunately, her dialogue and lore are genuinely awful and really uncomfortable. I don't want to go into specifics, but you could look at RayWiki if you're curious. This game is... definitely the product of its time sometimes, at least one of the three of the Teensy doctors is frankly designed racist too and several jokes in this game are kind of misogynistic. And this game loves inappropriate jokes. Bégoniax is easily the worst example of this, though. I won't dwell on it.
After this frankly annoying fight Rayman goes through a magic mirror to end up in a different part of the level, and has to travel other random sections until he ends up in Count Razoff's mansion. Razoff is a hunter who immediately decides he wants to hunt Rayman and then tries to shoot him to death throughout the mansion. This is the best part of the Bog of Murk and one of the best parts of the game, as a bit of a gameplay divergence where you have to chase Razoff down to hit him and also hide behind various obstacles so he doesn't hit you with his harpoons, until he just runs off. It's a fun and very memorable part of the game! Throughout the mansion are also various trapped Uglies or Funk Flies, which you can free for some red lums. As a side note, various statues he has in the mansion that you can hide behind mostly reference scrapped creatures from this game, though one of them contains an Ugly and one of them a pair (for some reason) of Ssssam(s) from Rayman 2.

Not much to say about the level itself. It's got some more interesting visuals and music than Clearleaf Forest at least, and the mansion is particularly remarkable (side note; it has a mirror where, if you stand in front of it, Rayman will play a unique animation not seen anywhere else in the game), as well as a secret where you have to get on a boat and get carried off to a place with some good gems, but that's about it? Also this is the first level with Hoodbooms on stilts. I also forgot to say, early on in the level you get introduced to the final combat fatigue, the Throttle Copter, which is the yellow one and the only thing it does is letting Rayman fly with his normal gliding move for a few seconds (normally the helicopter hair), and it has no combat utility. It works for what it's supposed to do!

After the mansion you chase Razoff down in the basement, where he swings around on a cannonball and tries to crush you while you hit him with a Heavy Metal Fist. If you fall down these pits, you can often hear Globox before the "big hand" as he puts it (it's actually called Mawpaw, they're seen throughout the level flying in the sky and are also used for the level's icon in the menu) pulls Rayman back onto the arena. After that fight, Rayman and Globox escape through another magic mirror that finally actually leads where they were intending to go.
The Land of the Livid Dead

To just quote Globox here because this sums the level up, "Ah, the Land of the Livid Dead, at last! In any case, it's nice and calm here! And here I was expecting a scary place filled with terrifying ghouls! Oh, silly Globox!". Which André mocks him for right after. What make this funnier is the fact that the Land of the Livid Dead kept appearing in every subsequent mainline game (and the mobile spinoffs related to those games), where it is, in fact, a pretty typical scary place filled with terrifying ghouls (or grandmas). It doesn't have much in common with the Origins Land of the Livid Dead beyond its name, though. And dead people. Also, it's also very important to mention that at the start of this level in the very first section, Globox just stares at some birds above a tunnel entrance and keeps repeatedly mocking them and saying they look stupid.
Anyway, the dead people are Teensies; I somehow forgot to mention the Teensies are found all throughout the game, trapped in cages, and you have to find and rescue them. Every single time they make an excuse for why they can't stay here, which are all very silly, ranging from "I have to go look over there to see if I'm there" and "I need to fire up the barbecue" and "I need to go mow my petunias!" to "OO I GOTTA RETURN MY SOCKS THEY'RE RENTED!!!" and "I have to go potty train my anteater!" and "I have to go, my igloo is melting!". You get it. They don't change anything gameplay-wise, but there's 5 types of Teensies that are encountered throughout the levels, with different designs and dialogue. The ones in this level are Griskins, which are the aforementioned dead people. They're ghost Teensies basically, and speak in monotone, including such quotes/excuses as "I have to go walk my flowers and water my dog" and "Yay. I need to go alphabetize my sausages". They do actually have some gameplay usage in one sublevel (I guess that's what I'm calling these now), but it's mostly a plot thing.
In a section of this level, instead of a can a Hoodlum drops a tiny little Rayman shoe. Upon trying to collect it Rayman shrinks down to ride on his own shoe instead, while the other one starts sliding(?) away from him. The shoe kart sequence mostly has you chase the other shoe down and hit it thrice. It's a bit tricky, you have to pretty much rely on the boost that Rayman can perform here, and hitting walls will cost you a point every time (which is really not a lot at all I guess, but still). After defeating it Rayman turns back to normal and the actual can he needs to progress will actually drop after.
This is also the first level with swimmable water! It won't be anything noteworthy until the end of the level, but for now there's some sections where you can swim on the surface. The game doesn't do anything with this really, but it's neat. This level is kind of the closest to a water level left in the game (there was going to be a proper one that was scrapped).
A later level sublevel thing is possibly the most memorable one in the game. It prominiently features this giant tower, at first seen in a highly transparent but glowy, celestial-looking form. You have to climb the inside of it with the help of some platforming challenges, involving swinging on grappling points with the Lockjaw, and then free the Griskin there, who tells you "One of my brothers is still held captive. Free him, and we'll open up our world for you". Once you free that Teensy too, involving a sequence where you have to toss a plum around this path below the tower and try to not get it into water so you can just stick it onto a pole and jump onto it, you unlock a portal at the entrance of the tower, which leads to a basically complete version of the tower, actually opaque from the inside. You have to climb it upwards, and at the top race the shoe all the way down, in order to leave the tower again. The freed Griskins proceed to zap the Hoodlums at the start of the level with lightning, and then you get to fight a really tough Hoodlum that's a semi-boss fight at this point, and then you'll finally be able to proceed. I probably don't need to say why this whole sequence is so memorable, and the visual of the tower is striking too! And it's just pretty. This is a very pretty game at points.
Outside the tower
Inside at first

Inside later
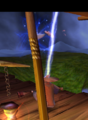
A Griskin zapping a Hoodmonger


After that level you get the actual boss fight level, it being the only sequence that does anything with water. The water controls are nothing like in Rayman 2, they are basically very railroaded but they lead to a pretty neat boss fight! You fight Céloche, a large mechanical thing that you can see climbing into the water at the start of the level. During the fight, it fires out fish that home onto Rayman, and you have to try and dodge them with the loop swim move thingy, and with that aim the fish at Céloche instead to damage it. It also attacks Rayman with lasers, dodged with the same move. This fight is a bit of a gameplay diversion, but I like it a lot honestly!

After that you finally get to go to the Teensy Doctor office. I will even name him because he's the best one! It's Roméo Patti (all Teensy doctor names are puns on some medical-related thing, this being homeopathy, others (all of these characters have very inconsistent names) including autopsy and calory (these are the same guy) and arthritis for some reason). Well that was a tangent. Anyway Roméo is the hippie one, he has cool hair and the worst posture ever and talks all groovy. I'm mostly talking so much about him because I like him a lot, he actually still doesn't succeed at getting André out, and boots both Rayman and Globox again to the Desert of the Knaaren.
The Desert of the Knaaren
If you care, spoilers begin at this section (or they do near the end of it)!!! I'd really recommend playing the game though. It's kind of janky and dated and some levels are annoying, but I like the funny blue guy in it so I can't get mad at it. The majority of the mainline Rayman games (just not Legends because of the Uplay garbage this abysmal company still forces onto it) are available on PC really cheap through GOG, if you want to check them out. That's one option, at least.

Anyway this is where you actually get the spooky level. Even the very first section is striking, with giant bones everywhere that you have to use to get forward because the sand is really hot and hurts you (which you get taught by Globox trying to run on it and literally saying that it hurts). After a fairly normal sequence involving several different combat fatigues, a couple of Teensies tell you "If you want to cross the desert, you'll need to use the tunnels!" and "But it won't be easy! The tunnels are swarming with the Knaaren, and those beasts are in-vin-ci-ble!". The first Teensy, after the second one dips, tells you that the Knaaren are very dangerous and will basically just kill you.

You get introduced to them once you fall down in a cave and they capture Globox. The Knaaren are a species of people living in this desert, with a lot of plot relevance actually! Throughout the level, they will chase Rayman and will hurt him once they get near (and also shove him out of the way, which looks a bit janky since they don't have an animation for this, they just randomly summon a shield that hurts you). You have to find various ways to avoid making contact with them at all, like moving around them or hitting gongs that will distract them. The Knaaren, when chasing you, also say various threats of what they're going to do with Rayman; it's implied they eat brains, but there's also stuff like "make him write bad checks" and "poke him in the eye" alongside just "skin him" and other actually scary things. Also throughout the level you can hear them offscreen, where they're all treated as much goofier, including a Knaaren being sad that his pet rat died, and two Knaaren arguing over whose dad is stronger (one of them says "No way! My dad is stronger than your dad! I heard his friend(s) say that he can even pick up a dog!"). This game doesn't tend to take itself that seriously ever, as you can see!


You go through various mazelike sections, dodging Knaaren and saving Teensies and such. Hoodlums are not found throughout the majority of the level at all, only at the start and at the end, so combat is basically not present here. In a couple of sections, you have to carry a heavy egg to a switch and along the way try to avoid falling off a pathway, or have to put the egg on the ground to kill some Zombie Chickens (returning from Rayman 2!). It's also rather easy to get lost at points. This level honestly drags on for way too long, it's kind of no wonder I disliked it on my first playthrough. I have to commend it for its vibes and the general interesting lore, though!


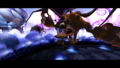
Midway through the level you get introduced to Reflux, a very-distinct looking Knaaren. He's the Knaaren champion, and will be very relevant in the plot later. He decides he's going to be the one to fight Rayman, and they both get into an arena, where Gumsi the child king starts this by kind of yelling at everyone. He says no Knaaren has ever defeated Reflux, and absolutely believes Rayman has no chance against him. Also, Globox is just sort of there in a cage, mostly just excited to see Rayman again, and throughout the boss fight you can see him in the background doing his normal idle animations.
The fight is a very memorable part of the game as well, definitely the best boss fight in the game! You have to keep trying to dodge Reflux's attacks, and climb down onto the nets below the arena to get the Heavy Metal Fist and hit Reflux's staff while he's vulnerable, which actually hurts him somehow. Ironically, despite being the champion of the Knaaren, he's the only one you can actually hit and defeat!

After the fight where Reflux sort of faceplants upon being defeated, Gumsi decides Rayman is worthy of a reward and uses his own scepter to invoke the Leptys (the bird god which the Knaaren worship) and give Rayman some new power. He doesn't get to learn until the next level section thing, which is actually the shortest one in the game (not sure why they didn't just consolidate it into the following one). Here, after defeating a Hoodlum, it turns out the power is using the grimace to turn black lums into red ones (basically as Globox says; also he keeps calling it "the tetris" very consistently throughout the game). This has a gameplay application, as every defeated Hoodlum will let you heal a bit from now on, as long as you grimace in time!

After that is finally some normal combat sequences with Hoodlums, and then Rayman and Globox finally get to the final Teensy doctor. He gets the other two to come in here to help Globox collectively instead, and they actually finally succeed because, as it turns out, André just hates music? André escapes, though, which is troubling, and in fact, he finds and teams up with Reflux, and they steal the scepter from Gumsi in order to use the Leptys' power for themselves! Uh oh!!!
The Longest Shortcut

Ironically the shortest level in the game, Rayman and Globox get directed here by the doctors as a shortcut to get to André and Reflux faster. This level is also a bit of a gameplay diversion, having no combat at all, but it's actually very fun! It consists out of various timed platforming challenges, making use of various combat fatigues and also the shoe is there at one point. It's got a very distinct visual aesthetic, something rather inviting again after how spooky (fittingly I'm writing this on Halloween) the entire previous level was, and at times quite pretty!

Globox here spends the whole time trying to open the same few doors found throughout the three sublevel things. The doors actually open once Rayman gets all the crown pickupables in the level, but Globox is absolutely convinced he's the one actually succeeding at opening the doors the entire time! He does it by just doing the rain dance animation (it resembles the Rayman 2 one but it also literally is just called the rain dance internally, even though he doesn't actually do a rain dance in this game) and spouting random things at the door, like "Abracadabra!" or "Hocus pocus?" or "Mirror, mirror on the wall... Agh that won't work" and a bunch of references I can't really transcribe. He also keeps complaining that "this shortcut ain't so short!" at the start of the latter two sublevel things. So he's mostly sort of useless in this level, but I can't get mad. I just like him a lot, obviously. Also, yeah, no more plum juice shenanigans from now on, since André is out of here now.


Back to gameplay, this level also has some pretty neat secrets. One of them involves getting into a window that doesn't get reflected in the floor below, one of them involves hitting a spinny thing that unlocks a room that has a statue referencing Ly from Rayman 2. And yeah, this level also does a lot with reflections, in particular several segments where you have to jump on platforms that aren't visible normally, but are reflected in the mirrors! I just think this level is neat. I like it a lot.

At the end of the level after finally opening the final door, there is a ginormous ship that the doctors say will help with getting to André and Reflux, so you just get to it, ending the level. Also, this is the final part of the game with swimmable water, which is opaque this time for some reason?
The Summit Beyond the Clouds
As the previous level had you get on the ship at the end, this level starts out with a ship segment. Globox steers it, making comments about the various "fish" (actually Hoodlum submarines) attacking the ship. Also, at the start of the level, he basically decides André is his new child (as if the 650 from the last game weren't enough) and that they're coming to go rescue him, and he also tells him "André, buddy boy, I know it's fun but ya gotta stop being a bully!". Even though André definitely can't hear that!
Anyway, the ship segment is just annoying. You have to run between four different cannons across the ship and hit the Hoodlum subs with them, and there's increasingly more of them as this segment goes on. They damage the ship, and for some reason the damage taken carries over to Rayman's health in the next segment, where he gets onto the actual summit. This is apparently better on a first playthrough since freeing Teensies fully heals you, but on subsequent playthroughs on the same save file you'll have to just not die to the snowballs and other obstacles and hope you'll just get to some red lums in time.


The Summit after the ship segment is the obligatory snow level. It even features ice at points, but you don't slip on it, so it's just visual. I do like this level for the most part, it's just that it starts out badly! You explore the snowy mountain and fight Hoodlums, some pretty typical fare for this game. It's a nice level all things considered! Heh, nice.

After the second sublevel thing you get to a snowboarding segment, with a remix of the song that has been playing in the previous sublevel thing (which is also pretty memorable just because of the percussion that kicks in sometimes!). Here you have to get to the bottom before Globox, who inexplicably got stuck in a block of ice at some point, reaches the bottom himself. If he gets there first though, both him and Rayman get placed at the start of the section to just try again. If you get there on time, THIS time you just drop down for some reason, into the Hoodlum Headquarters.
Hoodlum Headquarters


From a snow level to basically the lava level, this is a factory where the Hoodlums do many various things like making weapons and plum juice, as well as combat training and stuff. Throughout this level a lady keeps speaking off screen, which is just more opportunities for the game's raunchy humor with the way she speaks. Also Globox is just really into that voice and wants Rayman to go hurry so they can meet her, and this actually gets Globox captured later. It just feels really weird, frankly, considering he literally had a wife (Uglette) in the previous game. At least some seemingly-unused subtitles in Rayman 3 HD (the Xbox 360 and PS3 versions) imply that Uglette (not named but Globox just refers to his wife) still, like, exists and he still cares about her... Also there's the fact that the texture for cardboard cutout Globox falls for here has Uglette's internal name from the previous game in it.

Anyway, since Globox got captured he gets to spend the whole time upside down, mostly just seen and heard throughout the level not getting to do anything, but all the blood flowing to his head made him smarter so he gets to do some funny fourth-wall breaks, including flexing how high-poly (not really) his model is, how much animations or behavioral things he has, and also claiming that Mario, alongside some other game protagonists (he mentions "my friends Lara, Snake, Mario, Freeman or Jak" and also claims they're jealous of him) is his friend. He does all of this with a fake British accent. It's really funny, it's just a shame getting to that point for him was Frankly Really Weird.

Anyway. The actual dang level! As I've said it's basically the lava level, having a lot of lava in places, forcing you to platform with good timing to dodge it, and at points evade some steam coming out of pipes and climb various conveyors with platforms on them and stuff. One secret actually features the Robo-Pirates from the previous game, like the Ly secret, and they're all also static, referencing the Last Supper. It's a funny little thing. Also, there's a part of the level where you have to shoot down targets of Rayman and Globox, but not the ones depicting female Hoodlums on them. They all also play voice clips when hit, and the one use for Globox got literally reused in all subsequent mainline games, so if you've played them as him at all it feels very distracting (though funny).

At the end of the level you jump between some platforms (you also see Globox being taken away to some room with a bunch of flying spaceship-like things in it) to go get to the Horrible Machine and fight it. Also André finally takes the microphone from the hostess and stats being the one to talk offscreen instead. This is kind of a boss fight and also kind of not; between phases you have to dodge the attacks from the gun it shoots at you and then shoot this target, which if hit enough will activate some random thing that will summon different kinds of Hoodlums that you then have to fight. It's not too hard, and once you've hit the thing enough it starts breaking, leading to a sequence where you have to escape the factory while André taunts you and floods it with lava. The Horrible Machine exploding very conveniently places Rayman where he actually needs to be, which is the Tower of the Leptys, the final level in the game.
The Tower of the Leptys


Kind of a continuation of the Desert of the Knaaren aesthetic-wise, and with Knaaren statues (though generic Knaaren aren't actually seen), but you actually have to go through and fight Hoodlums. The first sublevel thing is a bit cheap, throwing three of the minibosses from Land of the Livid Dead at you at once to fight (right after already fighting one!), and it's just generally kind of annoying. It's manageable enough, though.


The second sublevel is a lot more striking, with somewhat different aesthetics; you see the sky at points and the occasional lightning strikes actually properly light up the room you're in! I don't have much to say here, the second sublevel is just pretty good. It's also the last normal one in the game. Also, for some reason, unlike the previous sublevel having the Nookins which are appropriately dressed for all the lava everywhere, this time there are Tufkins, which are only seen in the Summit otherwise? They're obviously too warmly-dressed for the occasion.

In the third one, Globox is finally back on the aforementioned flying spaceship-like thing! It's actually called the Armaguiddon, and it controls sort of similarly to the rocket from that combat fatigue, aside from not moving forward all the time. The game also forces in segments where you're moving on rails, but have to use this cannon in first-person on the back of the Armaguiddon to attack the approaching Hoodlums on other, smaller Armaguiddons, which is honestly just kind of a cheap way to introduce a gimmick that the boss fight will use in the literal next sublevel (where it won't even work the same). The segments where you get to steer the ship and fly around yourself are pretty neat, though, one room with a reflective water surface being surprisingly tranquil for what's actually going on at this point in the game.

Speaking of the contrast to what's actually going on, Globox is just not taking any of this seriously at all! He's just sort of having fun the whole time, pointing out the various things in the environment and praising André for all the things in the environment, though adding at one point that "it could use a few more windows though"! (No word on whether André can hear him this time, he's heard offscreen in a few points in the level, though not during the Armaguiddon segment). He also makes silly comments during the segments where you have to fight the Hoodlums, and, in fact, this is where the line I mentioned in the last section was going to be. It's one of the lines he says when you get hit, lines including "Hey, Rayman, you've been hit, now you're it!". The exact line I meant, copied from the subtitles instead of just transcribed by me, is "Rayman. They got me. Tell my wife that she was in my thoughts until the end...ha ha ha!". I just think this is sort of neat. I just cling to anything that can refer to Uglette, she deserves to be in more than one game, dang it!!!

Anyway after the Armaguiddon segment you enter the room before the final boss, you hear André talking to Reflux about how he's going to use their combined powers so he will be able to "reproduce infinitely" and Reflux just keeps saying "Yes, Andy.". He says that twice, and gets mocked with "YES Andy YES Andy! Can't you say anything else??!!" and in response gets "No, Andy." Also, this room is where, if you got enough points throughout the rest of the level (which is frankly really hard because of the Armaguiddon segment), you get access to a secret room where they place a bunch of scrapped creatures from the game with their animations included. It's pretty neat!
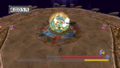
Now onto the fight. You fight Reflux again, while André just kind of hides in his back or something. Also André looks completely different now and more threatening. At first he's still normal sized, and you have to fight him by dodging his attacks, destroying his shield with the Lockjaw and then hitting him with the Heavy Metal Fist. In the second phase he sticks the scepter into his back and grows in size, and during this phase you have to avoid his attacks while circling the arena with the Lockjaw to try and reach his back and attack the scepter. In the third phase he inexplicably starts floating, leading to a platforming challenge with a lot of Throttle Copter cans and disappearing platforms, where you have to reach the top and use the Shock Rocket to hit him one time. Reflux sprouts wings and is off to a different map entirely, and Globox comes back again to also take Rayman there.
First phase of the final Reflux fight
Now onto the second phase
Start of the fourth phase
The part where Reflux heals himself


This is the part of the fight that uses the Armaguiddon's gun. You have to hit Reflux's shield while he chases you, and then try to hit him in the scepter while he tries to punch you mid-flight. After each hit he drops down to the ground and I guess creates more Black Lums that turn into Hoodlums and somehow heal him (featuring a funny exchange between Globox and André in one of the cutscenes leading to that part), and you enter a sequence where you try to destroy as many Hoodlums as possible, which is actually a gameplay sequence that hasn't been seen before! You repeat this all a few times, maybe also end up dying and restarting this phase because you have to be rather precise with hitting Reflux, but either way, eventually he finally dies, crystallizing and shattering. André gets released from the top and then you just have to grimace him to end the game, which is really not hard because he otherwise just sticks around permanently at a certain range close to Rayman, and you can just sort of walk around the arena and see him not fly over these glowing cracks in the ground for some reason, or something.

Either way, Rayman turning him into a red lum finishes the game, which ends the Hoodlums' invasion. Ending up at the place Rayman and Globox were at the start of the game, the latter is not happy about this and just wants his Andy back, but then they both just sleep it off. It's then revealed that, sometime ago, Rayman's hands while he slept unknowingly were the things responsible for scaring a red lum into André at all and kicking off the events of the game!
Whatever else

It should be clear by now that I love Rayman 3, even though it's rather dated at points (this sure is a 2003 game), and I still do have a lot of things to complain about it, like the raunchy jokes or some questionable ones or just several annoying gameplay segments. But I can't get mad at it! The core of the gameplay is fun, and frankly Globox carries the entire game. He's funny and just endearing. I think the voice actors are all doing a great job here. I mean, I don't know voice acting well enough to determine whether something is voiced bad or not, but it's worth noting they got several big movie voice actors for this, specifically Globox and Murfy's! The former has an article on this wiki. See, it's relevant to the Mario newspaper!
I still recommend this game, though you'd have to be prepared for some... baggage first, I guess. The PC version is available on GOG really cheap, and, if I may, I also want to recommend the Rayman Control Panel, which is very useful for various tweaks and other things with Rayman games. I'd just generally recommend getting into the series (beyond just Rayman Legends!!!), it's been getting a surprising amount of things lately so now's a good time!