Tidal Terror
Template:Levelbox Tidal Terror is the fourteenth level in Donkey Kong Country Returns and Donkey Kong Country Returns 3D, as well as the seventh area in the Beach world.
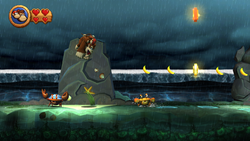
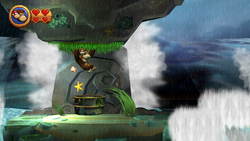
This level is unique compared to other beach levels because it features strong waves that constantly wash over the rock pathways of the level. The waves are so strong that they easily wipe away Donkey Kong and Diddy Kong instantly, along with any item or enemy in their path. Therefore, anytime the Kongs are out of a cave, they must hide behind large rock walls to avoid being swept away. However, the waves move fast and there are not many walls to protect the heroes, so they have to move quickly from wall to wall, some of which crumble when hit by the waves. Near the end there is a ship wreckage that the Kongs can use for protection, though the waves will still go through the "windows". Enemies in this level include Snaps, Pinchlys, Jelleybobs, Snaggles, and Squidlys. Completing this level leads to the boss stage of the Beach world, Pinchin' Pirates.
In the Time Attack mode of the game, a time of 0:53:00 is needed to get a gold medal, a time of 1:20:00 for silver, and a time of 1:42:00 for bronze.
Overview
The level begins with a straight pathway leading towards a Snaps and a Pinchly. Three stone walls are behind the Kongs at this point, with the last two being thin and tall. The first wall is bigger and has an object that can be pounded on repeatedly to reveal bananas. Two more rock walls are ahead with some Snaps in front of them. The second of these walls crumbles when hit by a wave, and the letter K of the K-O-N-G Letters is between it and the first barrier, along with a Banana Coin and bananas. A red button is after another thin rock barrier with a barrel in front of it. Crab enemies run around the button, which can be hit to reveal a barrier that only sticks out of the ground for a few seconds. A giant rock barrier with a gap in front of it is after a long pathway that is almost completely exposed to the waves, with only a small rock wall on it that can only be useful if crouched behind.
Another pathway completely exposed to the waves follows this, with some Pinchlys and a banana-filled object (which releases the items when pounded on) on it. Eventually, a red button can be found that makes a rock wall appear for a short time to shield the primates from the waves. A ceiling covered in a green, grassy turf is ahead that can be climbed along to cross a gap with a Snaggles jumping from it. The letter O is also on a thin pillar in the gap next to the Snaggles. When the heroes cross the gap and get to the end of the turf, they come up to another area exposed to the powerful waves. A ship part is ahead that they can take refuge behind. As they follow the path shielded by this ship part, they come across a wooden pillar, which can be pounded into the ground to reveal a similar pillar nearby, an Extra Life Balloon ascending quickly, a barrel, and some crab enemies. There is also a lone treasure chest here that contains a Banana Coin. The Tutorial Pig waits at the checkpoint behind a rock after this ship barrier.
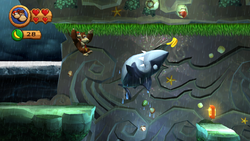
A small rock wall that can only be useful if the Kongs crouch behind it and a Snaps follow the checkpoint. A tunnel area is ahead that has many large abysses at the bottom part of it. Luckily, a climbable turf is on the ceiling in it that the Kongs can use to cross them. After the primates pass the first Snaggles in the tunnel, they climb above a small platform with a Banana Coin. A similar platform with a Snaggles jumping in the gap before it is after this, followed by another platform holding a Banana Bunch ahead of three more Snaggles. The remaining part of the tunnel from here has an abyss in it, with the letter N hovering in it. On the other side of the gap and outside of the tunnel is the first DK Barrel. A gap holding a small platform is nearby, being unblocked by the violent waves. There is an area protected by a rock wall after this. The wall is connected to a ceiling structure covered in a grassy, climbable turf. Below the turf is an object that shoots out bananas when pounded on repeatedly.
This is followed by a few small gaps exposed by waves. Ahead of the gaps are some Snaps that stand in front of some small rock walls that must be crouched under to avoid the waves. There is also a red button here that can be hit to reveal a small rock wall for a few seconds. Another small stone barrier is in this area as well just before a gap. A Snaps and a crumbling rock barrier follow the gap, with more Snaps and a smaller barrier after them. Eventually, Donkey and Diddy can reach an area being protected by a wooden ship part. Windows are in the ship barrier that the waves can shoot through them and hit the primates. Squid Shots fire at the heroes in this area, and the letter G hovers above the second of these foes. Between the first two windows in the ship barrier is also a sandbag that can be broken open by using a nearby barrel. The Kongs reach a giant treasure chest once they pass the last two Squid Shots piled on top of each other. Inside is the Slot Machine Barrel; the level is completed when it is hit.
Secrets
K-O-N-G Letters
- K: Immediately before the first fragile rock barrier that breaks when hit by a wave is the letter K high in the air. The duo can only reach it by bouncing off of the Snaps enemies below it.
- O: The letter O is in the first tunnel area on a platform under the climbable turf after a Snaggles.
- N: The letter N is at the end of the second tunnel area in a gap just before the first DK Barrel. A roll-jump is required to reach it safely, or a well-times use of Diddy's jetpack.
- G: The letter G is above the second Squid Shot at the end of the level. Jumping off of the following two Squid Shots can help the duo reach it.
Puzzle Pieces
- The first Puzzle Piece is located at the start in the first treasure chest. The chest opens if pounded on.
- When the primates reach the area with the first wooden ship barrier protecting them, they must pound on the first pillar sticking out of the ground just before a stray Extra Life Balloon to make another pillar appear nearby, along with the second Puzzle Piece.
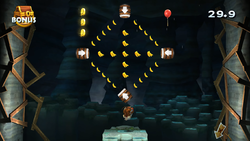
- Immediately before the pillar that appears with the second Puzzle Piece is an area of ground that can be pounded on to drop the Kongs into a Bonus Level. Here, the heroes must shoot around an area with sixty-five bananas, three Banana Coins, and an Extra Life Balloon using four Barrel Cannons. If all of the collectibles are grabbed within thirty seconds, a Puzzle Piece appears.
- Inside the second tunnel area is a treasure chest on the second platform. If it is pounded open, the fourth Puzzle Piece is revealed.
- Behind the first rock wall after the first DK Barrel is a strange object that holds bananas. If it is pounded on, bananas shoot out. Once all of the bananas are released, a Puzzle Piece appears after it is pounded on one more time.
Names in other languages
| Language | Name | Meaning |
|---|---|---|
| Japanese | あらしのビーチ Arashi no Bīchi |
Stormy Beach |
| German | Wellenbrecher-Wahnsinn |
Wavebreaker Madness |
| Korean | 폭풍우 치는 비치 Pokpungu Chineun Bichi |
Storming Beach |
| Spanish | Olas Hostiles |
Hostile Waves |


