The Final Face-Off!
| Wario: Master of Disguise episode | |||
|---|---|---|---|
| The Final Face-Off! | |||

| |||
| Location | Allergia Gardens | ||
| Boss | Terrormisu | ||
| Key items | |||
| Guise/Mastery Gems | None | ||
| |||
| << List of episodes >> | |||

- “Sir, this is the final showdown! Defeat her or lose your soul...forever!”
- —Goodstyle, Wario: Master of Disguise
The Final Face-Off! is the tenth and final main story episode of Wario: Master of Disguise. In this episode, Wario searches Allergia Gardens for the last of the five Wishstone pieces. Throughout the garden, Wario must solve numerous puzzles centered around pressing down mushrooms. Pressing down red mushrooms causes nearby vines to wither, opening new paths, while pressing all of the green mushrooms in an area causes purple doors that normally take Wario back to the same room turn green and lead to a new area. Some of these green mushrooms can only be seen by Genius Wario. There are also large gears that have pairs of switches on them that Wario must press in a specific order to make ladders appear. At the end of the episode, it is revealed that the ancient demon Terrormisu had been sealed inside the Wishstone, and she breaks free upon its reassembly.
Plot

Continuing from where the previous episode left off, Carpaccio leaves in search of the final Wishstone piece. Count Cannoli leads Wario to Allergia Gardens, then tells him that he is done playing tricks on him and that Carpaccio came here to protect the last piece of the Wishstone. When Wario catches up to Carpaccio, he takes the Crimson Diamond off of the door leading to where the final tablet is. Carpaccio then disappears and the color of a nearby door as well as the symbol on it changes. Goodstyle notes that the color of the door has changed and suspects that the garden is full of surprises. In order to change the blue doors back to green, Wario must hit all the green mushrooms in the area.
Wario eventually finds the Crimson Diamond and opens the big door. Carpaccio tries to stop him from reassembling the Wishstone, but Wario ignores him. The Wishstone reforms, and Tiaramisu emerges from it. She reveals that her true name is not Tiaramisu, but Terrormisu, and that she is an ancient demon who had been sealed inside the Wishstone. Goodstyle now tells Wario the full story of the Wishstone. Poobah the Pharaoh had called upon Terrormisu to grant him a wish, but she demanded that he starve his people in exchange for it. The pharaoh agreed, but Terrormisu did not uphold her end of the bargain and instead stole everything from him, turned his palace into a pyramid, and sunk it beneath the desert sand. However, a mysterious stranger showed up and sealed Terrormisu away inside the Wishstone, then split it into five pieces. Terrormisu reveals that Sweatmore Peak is a nexus of dark power, which is how she was able to reach out to him and manipulate him despite being sealed inside the Wishstone. She prepares an attack, but Cannoli arrives just in time to save Carpaccio. He carries him off to safety while Wario fights Terrormisu. Once Wario defeats her, she gives up and flees to her home dimension.
At this point, Goodstyle reveals his true form and identity. He is actually the first member of the Cannoli clan and the one who sealed Terrormisu away inside the Wishstone. He assumed his wand form in order to look for a master who could use his power to defeat Terrormisu once and for all, which is why he led Wario on his hunt for the Wishstone pieces. In exchange for defeating Terrormisu, Goodstyle gives Wario all of the treasure the Cannoli clan had accumulated.
Wario gloats about his newfound riches, but upon returning to the real world, he realizes that he is unable to take the treasure back with him.
Layout

The episode starts on a long bridge. There is a platform high above with a red treasure chest on it that Wicked Wario can fly to. It contains the Prince Redleg Pantaloon. The bridge leads to a section with a low ceiling where Wario will encounter five Sir Worth-A-Lots and a Sir Steal-A-Lot. Past them is a ladder that will take Wario to an area with many doors and colored mushrooms. Here, Wario will witness Carpaccio stealing the Crimson Diamond off of a door. This door leads to the final Wishstone piece, but without the Crimson Diamond, it cannot be opened. After taking the gem, Carpaccio will go through the green door (the only one that is not locked), making it turn purple. If Wario tries to follow him, it will not take him anywhere. He must press all of the green mushrooms (but not the purple one) to make the door usable again. There are four green mushrooms, one of which can only be seen by Genius Wario. After pressing them all, the door turns green again, and Wario can use it. After going through, Wario will find a Sir Worth-A-Lot and two slopes with a pit in the middle. The slope on the right is covered with thorns, and on the left side is another Sir Worth-A-Lot and a red mushroom. From here, the path forks; Wario can either go where the pit leads, or press down the red mushroom to make a nearby vine wither, allowing him to reach a white door.
The white door leads to an area with a large gear and two switches. Wario must step on the switches to turn the gear in the order indicated by the arrows on the right to make a ladder appear. The pit leads to an area with more mushrooms, which can also be accessed by dropping through two Semisolid Platforms near the white door. If the latter method is used, Wario will land in a small alcove with a Sir Worth-A-Lot and a blue block at the end that merges with the pit entrance. The bottom of this area has two Sir Hop-A-Lots, two Sir Worth-A-Lots, and a Sir Steal-A-Lot. Much like before, four green mushrooms must be pressed down to make a purple door turn green. The purple mushroom with raise up any green mushrooms that have been pressed, which can happen if one of the Sir Hop-A-Lots lands on it. However, once all of the green mushrooms are pressed, they cannot be raised again. There is another white door here that takes Wario a place where a Sir Worth-A-Lot and Sir Steal-A-Lot stand above three blocked off red chests. Hitting a laser switch opens the way to the chests, which contain the Freaky Cat Glasses, Nostalgic Memory Picture, and Ears of Sanguineness. There is also a hat switch here. Upon returning to the mushroom area, if Wario had already pressed all of the green mushrooms down, they will remain down and the green door can still be used.

Both paths merge at a section with two Amphibiguns, two Sir Worth-A-Lots, and three Sir Hop-A-Lots on the lower half and crumbling platforms and two chests on the upper half. The chest on the left is red and contains the Fishin' Hole Fishin' Pole, while the one on the right is purple and contains a map of Allergia Gardens. A green mushroom is hidden behind a fake wall on the left. There is a passage on each side of this area, and if Wario continues going through the adjacent screens, he will loop around, which can be seen on the map. The path on the left leads to an area with two Scare-Ohs! and another green mushroom. There is also a set of yellow arrows that only Genius Wario can see; they are used for a gear on the screen directly west of this one, which spawns a ladder. After climbing it, Wario will find another purple door, as well as two Amphibiguns, two Sir Worth-A-Lots, and a Sir Steal-A-Lot. There are four laser switches with each cause a vine to wither, opening the way to more mushrooms. There is one more green mushroom in the area to the left, which is filled with thorns. After pressing all of the green mushrooms, the now-green door will lead to an area with a ladder leading down to an Amphibigun. Directly to the left of the Amphibigun is a vine which must be withered by drawing a block on a nearby red mushroom. Past a Sir Worth-A-Lot is another vine which withers the same way, with another Amphibigun and a white door on the other side of it.

After going through the door, Wario will find a vine blocking the path to a passage filled with thorns and ladders, with a Ratfael nearby. He can drop through some Semisolid Platforms to find two more Ratfaels and a green mushroom. To the right of them is a red mushroom with blue and red colored arrows above it. Drawing a block on the mushroom will wither the vine and get through the thorny passage which has another green mushroom in it and a Ratfael at the end. Wario must then draw a two-block stack so he can crawl through a narrow alcove and reach a red mushroom, as well as an invisible green one. Hitting the red mushroom withers another vine blocking Wario's path. On the way to the purple door at the bottom, Wario will encounter four more Ratfaels and another green mushroom. Once all four of them are pressed, the door turns green and leads to an area where large metal blocks with spikes on the bottom slowly descend from above. Turning into Genius Wario reveals that one of the blocks is an illusion. There are two green mushrooms here that need to be pressed before moving on. The door leads to an isolated section of the previous area, which has a purple chest and a locked door. The chest contains the Yellow Key needed to unlock the door, which takes Wario back to where Carpaccio stole the Crimson Diamond. The Yellow Key will open the other locked door here, leading to an area with two large gears, one blue and one red. The blue and red arrows from before dictate how the gears' switches should be pressed to make a ladder appear. After climbing it, Wario's progress will be halted by two vines. By drawing a block on a red mushroom below the vines then rushing to one above them, Wario can wither the vines and get through. The vines do not stay withered, so Wario must do this quickly.

The next screen features a ladder leading up to some laser switches that trigger the appearance of temporary platforms. Wario can climb them to reach two colored doors, but they are both locked. The path on the right takes Wario to an area with many red mushrooms. These mushrooms will spawn moving platforms when pressed. The mushrooms must be pressed in order to keep spawning more platforms, which will eventually take Wario to a purple chest on the upper-left corner. Alternatively, Arty Wario's blocks can be used to reach the chest. It contains the Red Key. There are also two red chests here, which contain the Forever Tissue Box and Totally Legit UFO Photo. The Red Key unlocks two doors. One of them is below the previous section with the ladder, beneath a concealed Semisolid Platform that only Genius Wario can see. After dropping through it, Wario will be in an area with two Sir Worth-A-Lots. A red locked door can be seen on the bottom-right corner. There are hidden Semisolid Platforms in here as well, and Wario must drop through them to reach the door. After going through it, Wario will encounter two Sir Hop-A-Lots. There is also a hat switch here, as well as a red chest containing the Midterm Clothespins. Going to the left, Wario will end up in an isolated section of the Crimson Diamond door room. At the bottom of a ladder is a red chest containing the Bluebird of Luckiness.

Back in the area with the laser switch platforms, Wario can climb the platforms to reach the other Red Key door. On the other side is a tall vertical passage lined with thorns that Wicked Wario must fly through. At the end of it is a red chest containing the Wooden Nostril Cleaners. Down below, Wario will find a Sir Worth-A-Lot and a large pile of blue blocks. There is a red mushroom to the right of the blue block pile and a purple chest blocked by a vine above it. To reach the chest, Wario must push the uppermost blue block to the right, then hit the mushroom with Genius Wario's boxing glove to wither the vine. Then, he must stand on the left edge of the blue block pile and quickly draw three blocks to reach the chest before the vine returns to normal. The chest contains the Blue Key. On the right is a crumbling platform Wario can drop through to reach the bottom of the room, where he will encounter three Sir Worth-A-Lots. The vine on the left that blocks the way back to the door can be withered by pressing the red mushroom again. After going through the blue door, Wario must climb his way up to a ledge and hit a laser switch to wither another vine blocking his way, then fly through some thorns to reach an area with six red mushrooms and two blue blocks. To open the way forward, all six mushrooms must be pressed simultaneously. To do so, Wario needs to draw a block to the left of the blue block stack, then stand on top of it and push the blue block on top to the right so it lands on top of one of the mushrooms. He must then draw two blocks on top of the blue block he just pushed so he can get on the right side of the other blue block and push it to the left, making it fall on top of another mushroom. Wario can then draw blocks on top of three of the other mushrooms and stand on the last one. There is a purple chest at the end of the room, past a Sir Worth-A-Lot and two Amphibiguns. The chest holds the Crimson Diamond. After bringing it back to the door that Carpaccio stole it off of, Wario will find the final Wishstone piece. Once the Wishstone is reassembled, Terrormisu emerges from it, commencing the game's final battle.
Enemies
| Sprite | Name | Count |
|---|---|---|
| Sir Worth-A-Lot | 23 | |
| Sir Steal-A-Lot | 4 | |
| Sir Hop-A-Lot | 7 | |
| Amphibigun | 8 | |
| Scare-Oh! | 2 | |
| Ratfael | 8 | |
| Treasure Pest | 1 |
Treasure chest locations
A Treasure Pest will appear in place of one of the red chests, making it unobtainable on the first run.
| Chest color | Treasure | Description | Worth | Location |
|---|---|---|---|---|
Prince Redleg Pantaloon |
A mysterious phantom, wearing brilliant white tights and billowy red pantaloons, who appears in the dreams of young maidens. Huzzah, romance! | $21,930 | In the starting area on a high platform, reached by using Wicked Wario. | |
Freaky Cat Glasses |
These chic cat glasses let you see in the dark, but they also make you look really creepy. It's up to you to decide if that's a bad thing or not. | $3,212 | In a room behind a white door in the second green mushroom room. Cosmic Wario's laser must be used to hit a switch to access the chest. | |
Nostalgic Memory Picture |
A picture of that perfect day long ago... The mere sight of this is enough to make even the bravest of men weep with uncontainable joy. | $156 | ||
Ears of Sanguineness |
The wearer of this stunning headgear can hear nothing but good news. It's perfect for those who live the high-stress lifestyle of today's go-go world. | $2,094 | ||
| Allergia Gardens Map | N/A | N/A | In the upper-right corner of the room with the crumbling bridge and central platform with two Amphibiguns pointed in opposite directions. | |
Fishin' Hole Fishin' Pole |
This magic fishing pole will catch a fish every time you dip it in the water! But only crappie. Which actually taste better than they sound. | $188 | In the upper-left corner of the room where the map is. | |
| "It's a shiny yellow key. It should open a door of the same color." | N/A | In the isolated central area of the first room with Ratfaels, accessed by activating the green door in the bottom-right corner of the room, then doing the same in the next room. | ||
Forever Tissue Box |
This magical box never runs out of tissue! It makes a perfect gift for allergy sufferers or wussy little crybabies who sob during films when puppies get lost and have to wander home. | $101 | In the room with red mushrooms that spawn moving platforms, below the first mushroom. | |
Totally Legit UFO Photo |
A UFO photo, completely undoctored in every way. You can even see the string that holds the saucer in place. What will those crafty aliens think of next? | $833 | In the upper-right corner of the room with red mushrooms that spawn moving platforms. | |
| "I got a shiny red key. It should open a door of the same color." | N/A | In the upper-left corner of the room with the Totally Legit UFO Photo, accessed either by pressing the mushrooms in order or using Arty Wario's blocks. | ||
Midterm Clothespins |
These clothespins are designed to clip your eyelids to your face. Perfect for late-night cramming sessions or plastic surgery on the cheap. | $404 | Obtained by dropping down with Dragon Wario from the room to the left of where the Red Key is and unlocking the red door with the key. | |
Bluebird of Luckiness |
A blue bird that brings good luck and vast fortune to any who possess it. It can also escape from even the sturdiest of cages, as it knows how to pick locks and bribe guards. | $997 | In an isolated area in the room with the first green mushroom puzzle, accessed by going to the left from where the Midterm Clothespins are. | |
Wooden Nostril Cleaners |
Ancient wooden nose pickers. Guaranteed not to splinter while inside the nostrils, or your money back. Also usable as a nose-piercing device. | $640 | In the room to the right of the tall room with the red and blue doors, accessed with the Red Key. | |
| "This key is glowing blue. It should open a door of the same color." | N/A | In the upper-right corner of the room with the Wooden Nostril Cleaners. | ||
| "Now I can open that door! Time for the big showdown!" | N/A | Obtained by unlocking the blue door and continuing upward into the above room where the chest is. |
Gallery
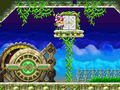
The green gear device
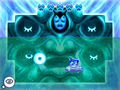
Terrormisu's first form

Terrormisu's second form
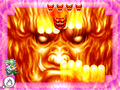
Terrormisu's third form
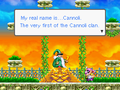
Goodstyle reveals his true form and identity.


Trivia
- This is the only non-special episode with no green chests in it, and by extension, the only one with no new Guise Gems or Mastery Gems to obtain.