The 'Shroom:Issue 114/Strategy Wing
Director Notes
Written by: Meta Knight (talk)
Hello everyone and welcome to this month's issue of Strategy Wing! I would like to thank everyone that voted last month, your feedback is excellent! The results were fairly balanced, and overall it appears that you want a bit of everything. More Mario sections and More Walkthroughs have tied for the most votes.
| What would you like to see in Strategy Wing? | ||||
|---|---|---|---|---|
| Name | Votes (75) | Percentage | ||
| More Mario Sections | 12 | 16.00% | ||
| More Walkthroughs | 12 | 16.00% | ||
| More Challenges | 11 | 14.67% | ||
| More Facts | 11 | 14.67% | ||
| More Historical analysis | 8 | 10.67% | ||
| More non-Mario sections | 7 | 9.33% | ||
| More in-depth Meta sections | 4 | 5.33% | ||
| Everything is perfect right now | 4 | 5.33% | ||
| O. more metroid | 1 | 1.33% | ||
| O. Everything except Mario tbh | 1 | 1.33% | ||
| O. More tips / strategies for popular Mario games | 1 | 1.33% | ||
| O. How to Win in Bosses | 1 | 1.33% | ||
| O. I | 1 | 1.33% | ||
| O. cheat codes | 1 | 1.33% | ||
I would also like to remind you that if you have an idea for a section, or want to write about snazzy Mario tips, or have a walkthrough for a game, feel free to sign up! We aren't just limited to Mario either, you can dive into other franchises as well such as Pokémon, Zelda, Kirby, etc. I would like to thank the writers for this sub-team once again for their hard work that they put into their sections: Yoshi876 (talk), Paper Yoshi (talk), Superchao (talk), RandomYoshi (talk), and everyone else who has written in the past.
Finally, I have provided a special edition of Pokémon Calendar for you this month. With all that out of the way, I hope you will enjoy this month's issue of Strategy Wing.
Section of the Month
| STRATEGY WING SECTION OF THE MONTH | ||||
|---|---|---|---|---|
| Place | Section | Votes | % | Writer |
| 1st | Party Trick! | 9 | 50.00% | Meta Knight & RandomYoshi |
| 2nd | Mario Kart: Wheel Tips Corner | 4 | 22.22% | Yoshi876 |
| 2nd | Let's Play Showcase | 4 | 22.22% | Superchao |
Yoshi876 takes a look at the best and worst tracks from this year's Awards results!
[read more]
Meta Knight continues his walktrhough of Metroid 1, and obtains more items in Brinstar and Norfair.
[read more]
Meta Knight and RandomYoshi take a look at some minigames and a board from Mario Party 3.
[read more]
Meta Knight looks at the sweet and strange Pokémon titles released on a day in September.
[read more]
Mario Kart: Wheel Tips Corner
Hello 'Shroom racers! And welcome to Mario Kart Wheel Tips Corner, here I plan to give you just some extra tips to help you with your racing, or just some changes in a track that might catch you off guard if you aren't prepared for them. So the lights are out, let's start racing.
Kool Karts
You can't race if you don't have a Kart to do it in, so in this section I'll give you some facts about a Kart, Bike, ATV or even tyres and gliders that you can use hopefully for racing success.
This month's Kool Part is a tire. Yes, this month I am looking at the Retro Off-Road, from Mario Kart 8. And unfortunately, it's going to be a short look at this tire. Although it has a very nice design, it offers no stat boosts whatsoever, so if you're not fussed about getting the best out of your Kart then these tires are probably quite a good choice.
What's Changed?
Retro tracks are now a huge portion of the Mario Kart games, typically amounting to half the courses in the game. But usually these courses change some things up, so in this section I'll help you find out "What's Changed" in the retro tracks.
This time we're going to take a look at what you voted as Best Mario Kart track: Waluigi Pinball. This track first appeared in Mario Kart DS before returning in Mario Kart 7. There were graphical changes as per usual, alongside a few other changes. As tricks were introduced after Mario Kart DS' release the ramps can now be tricked off of, also coins have been scattered around on the track. The main change, however, is that the boost pad at the start of the track is now a glide ramp, and racers are no longer immune to items in there, meaning if you get hit, you'll need to be rescued by Lakitu.
Ace Shortcut
In this small section I give you a way to shave a few seconds off your time, whether you know about it or not. Be warned, most of these shortcuts will require a Mushroom.
This issue I bring you a shortcut from the original Rainbow Road, otherwise known as the winner of the Worst Mario Kart track.
As you approach the end of the track, it splits into two, with a Thwomp on either side. If you use a Mushroom you can boost through the gap and just plow straight on through.
Galactic Expedition
Written By: Meta Knight (talk)
Metroid 1 Walkthrough
Current Inventory: 0 or 1 Energy Tanks, 5 Missiles, Morph Ball, Morph Ball Bomb
Goal: Obtain more Missiles, the Ice Beam, Long Beam, High-Jump Boots, and Screw Attack
Greetings everyone to this month's Galactic Expedition. Let's dive right into it and grab some more upgrades. Last time, we stopped just as we got the bombs in Brinstar. You will want to head to the right all the way until you make it back to the yellow chamber. From here, proceed left. Be sure to grab the Energy Tank that's sitting there if you haven't already got it. This will give you an extra 100 units to your health, and refill your energy as well. These items are extremely useful. You can carry up to six, but there exist eight in total.
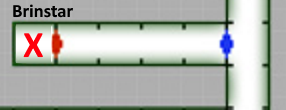
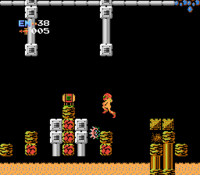
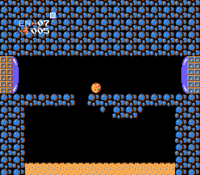
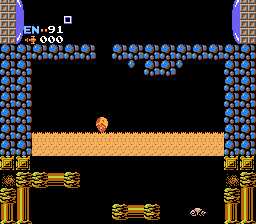
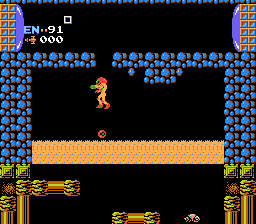
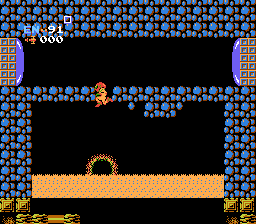
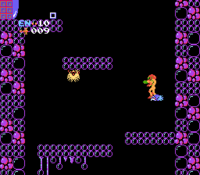
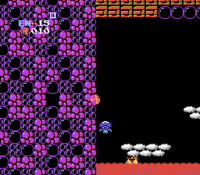
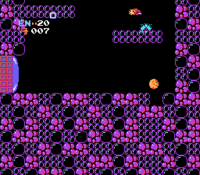
When you enter the next room, go into Morph Ball mode. There is a hidden block near the center that you can bomb. Break it, then go down the chamber. You may have to farm for Missiles to get past the red door, but you will be able to obtain the Ice Beam! This weapon freezes enemies, allowing you to jump on them. When climbing out of the chamber, you can shoot the block that was bombed, but you still will not be able to jump out. You could time your jump to have the block spawn on top of you, but there is another method. Shoot the block to create an opening, then quickly lay a bomb. When the bomb is planted, get out of Morph Ball mode so that when the bomb explodes Samus gets pushed up a bit. This happens in a lot of Metroid games, however there's something in Metroid 1 that makes this interesting. When you're propelled up, you can still jump to get extra height. So when the bomb goes off, and Samus gets pushed up a bit, at the peak of her jump, push the jump button and you'll be able to escape the pit. With that, you can keep going. There are other ways to make use of this technique, such as one I'll show next time.
| Image Guide: Getting out of Ice Beam Chamber |
|---|
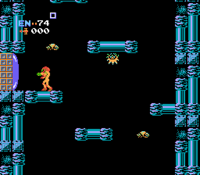
Once you're out of there, keep going left. You will come across a room that looks identical to the one that you bombed to get to the Ice Beam. DO NOT go down there. This is a beginner's trap. There is nothing down there, and it takes a long time to get back up. If you get stuck down there, you will have to time jumps with spawning blocks, but that is pretty tedious. Proceed left until you get back to the tall yellow chamber. You will see a door on the left. Go back through it to get to the tall blue chamber. Climb up until you see a door on the left. It appears as though you can continue to climb, but ignore what's up there for now. Go in the door and you will soon be granted with the Long Beam. With this item in hand, you will no longer have to worry about your range, as you can shoot across the entire screen.
Go back into the yellow chamber. If you wish to go up to the top door and get missiles, you can. However, you'll want to go back for the Varia Suit later anyway so for now go into the bottom door. Proceed all the way to the right and you will eventually come across an elevator. Take it down into Norfair.
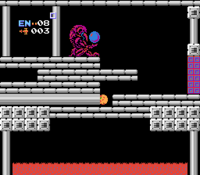
Norfair is where we'll be doing the bulk of our missile gathering. Head left to pick up a Missile tank. Once you grab it, you can keep going left. The wall appears to be a dead end, but if you go into Morph Ball, you can move through it. You'll be stopped, but can easily use a bomb to go all the way through. In the next room, head down and to the right. You should be able to find another Missile tank. Head back to where the elevator is.
Past this red door, is another Ice Beam. You don't really need it right now, but if you decide to get the Wave Beam later, then it may be a good idea to remember this spot, as you will need the Ice Beam to fight the Metroids, and Metroid 1 doesn't let you keep both beams at once, or the option to switch between them.
Still in the room with this second Ice Beam, you will actually want to bomb the silver piping underneath it. This will reveal a hidden passage that you can use to move left. Be sure to freeze enemies to use as platforms, and bomb through walls where you can. Eventually, You'll come across another tall chamber. Climb your way to the top, and head right, using the same tactics you have been to get through Norfair. You will come across 2 more Missile tanks.
After getting the Missile tanks, when you keep going right, you will end up at the top of the tall purple chamber you were in before. The ground appears to be solid, but there is a breakable block that you can use to get down. If you take the first door on the left that you see, and proceed through the room, you can obtain a whopping 3 more Missile Tanks.
When you are satisfied with the Missiles you have, go all the way to the bottom of the tall purple chamber. There is a hidden block for you to bomb. Go down there. You will have to bomb whenever you get stopped to get past the barrier, but I'm sure you've gotten used to that by now. You will come across a door on the left. Enter it, and through this room will be the High-Jump Boots. This will increase your jump height. Do not leave this room though. Similar to the Ice Beam in Norfair, the pipe can be bombed and used as a passageway.
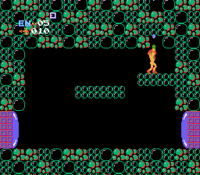
Take this route, and proceed left until you arrive at a green room. Jump up to the platform above. It appears to be a dead-end, but you can shoot the ceiling and get through. Time your jumps so that when you are in the air, the block spawns beneath you. This way, you can make your way up to the top. When you enter the door to the left, you will be in another long room. However, there is such a reward here. Keep making your way left and you will be rewarded with the Screw Attack!
With that, I think that's a good place to end this trip. We made a boat-load of progress though, obtaining many of Samus's major upgrades. Thank you all for reading, and I hope you have happy adventures.
Party Trick!
Written By: ![]() Meta Knight (talk), and
Meta Knight (talk), and ![]() RandomYoshi (talk)
RandomYoshi (talk)
![]() It's party time! In this issue of Party Trick, we will be looking at a board, as well as some minigames from Mario Party 3.
It's party time! In this issue of Party Trick, we will be looking at a board, as well as some minigames from Mario Party 3.
![]() Hello, all! This time we'll be taking a close look at Chilly Waters, the first board in the Nintendo 64 game, Mario Party 3. All boards in Mario Party 3 are sorted by a hierarchy of difficulty that the game has three tiers for, meaning each board has a difficulty of one star out of three, two stars out of three, or three stars out of three. The more stars, the more difficult the board is to play. Being the first board in the game, Chilly Waters naturally has a difficulty of one star out of three. Now, let's see if this judgement actually holds up!
Hello, all! This time we'll be taking a close look at Chilly Waters, the first board in the Nintendo 64 game, Mario Party 3. All boards in Mario Party 3 are sorted by a hierarchy of difficulty that the game has three tiers for, meaning each board has a difficulty of one star out of three, two stars out of three, or three stars out of three. The more stars, the more difficult the board is to play. Being the first board in the game, Chilly Waters naturally has a difficulty of one star out of three. Now, let's see if this judgement actually holds up!
One thing that I need to introduce here is the Bank Space, exclusive to Mario Party 2, Mario Party 3, and appearing as a capsule in Mario Party 5. When you pass the Bank Space, you need to deposit five coins into the bank. This is true for all boards that feature the space, except for one board. These coins pile up and the player who lands on the space will gain all of the coins in the bank. The banks also share all coins deposited since last time someone cashed in, or the start of the game. This is integral in understanding the very first move in Chilly Waters. Being exactly six spaces away from the start, there is a 40% probability that the player will need to deposit money into the bank on the first turn, and there is a 10% probability that the player will land on a Red Space on their first turn. The rest of the spaces are Blue Spaces. There's also a Bank Space on the topmost part of the map. Here's the bad news, though. No matter what you do, you will never be able to completely avoid these Bank Spaces. Tough luck. But what you can do is to constantly purchase Skeleton Keys and just use the door that leads to Boo every time. However, this strategy will pretty much lock you into one single loop, making you an extremely predictable player. Making yourself an extremely predictable player is bad because this means it's way easier for your opponents to screw you over, since your plan hinges on so many variables being just right for you. Furthermore, this makes you skip out on the majority of Star Spaces, which is no good because you want these Stars to actually win. I presume you're reading a piece of strategy because you want to obtain an edge over your competition. If so, you should heed my advice here in this paragraph.
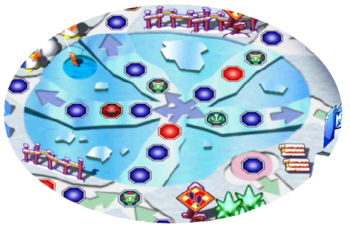
Now, onto the rest of the board. One part I'd like to highlight is the circle in the middle, the one that looks like a Star-shaped junction. The rules that govern this specific part of the board are rather peculiar. If you and another person end your turns here, the ice will start to crack. You will then both be sent to the Blue Space to the bottom right of the image, the encircled with a red circle. This leads into a small path consisting of four spaces: one Battle Space, two Blue Spaces and an Item Space. There's also another mechanic hiding here. See those arrows that promise a way out of the circle? That's only if you're lucky. See, your character may randomly slip if you try to take those paths. Therefore, I do not advise you to use a Mushroom or a Gold Mushroom. There's one very natural question to ask here. If I use a Reverse Mushroom, will I be stopped if I decide to leave the junction backwards? The answer is no. As long as the path you're using to leave the junction does not show an arrow on it, you will not be stopped at all. It's incredibly frustrating to roll a high roll, like a 24, only to slip up and only get to use three out of your 24 steps. Don't think this could happen? It definitely could. It happened to me. I was angry. It was not fun. Just save your Mushroom until you're out of this part of the map.
The next thing I'd like to talk about is the outer part of the map. I bet you're wondering about the other Blue Spaces with red circles around them, and I also bet you're confused about what the Happening Spaces do, and if they're linked in any way, shape or form. Turns out, they are! If you happen to land on a Happening Space (pun not intended), you may face the Action Time of this board! What will happen when Action Time triggers is a gigantic snowball will land on the board. This snowball will then roll down the lane you're standing on. If you manage to avoid it by pressing ![]() at the right time, you will stay in place, but if you don't succeed at dodging the snowball then you'll flee to the nearest red circle on the board. That's why it's important to know where those are before you make your move so you know how to use this feature in the best way possible. Sometimes, the strategically superior move is actually to fail the Action Time. But it may not be the best choice of action you can take at certain times. It all depends on where you want to move.
at the right time, you will stay in place, but if you don't succeed at dodging the snowball then you'll flee to the nearest red circle on the board. That's why it's important to know where those are before you make your move so you know how to use this feature in the best way possible. Sometimes, the strategically superior move is actually to fail the Action Time. But it may not be the best choice of action you can take at certain times. It all depends on where you want to move.
Now, onto something different, namely how useful common items are here! For one, let's investigate how useful Skeleton Keys are in this board. There are two gates that can be opened by using a Skeleton Key. One of them is located on the north-west part of the map, the other on the south-east part of the map. There are only a few instances where you'd want to use a Skeleton Key on the north-west door. The only use it has is obtaining access to a potential Star Space, a space that can be accessed by going through the star-shaped junction in the middle of the board anyway. If you really, really hate the chance of your turn arbitrarily stopping just because you're unable to leave that junction, that is when you should consider using this gate. Now, onto the second gate! The second gate is definitely more useful since it allows you to take a quick visit to Boo, and visiting Boo is always good. Let's now talk about Mushrooms. If you are at the star-shaped junction it's not that useful to gamble away first having to get a good roll and relying on the chance that you'll leave the junction, as previously mentioned. But if you're on the outskirts of the level and not on that junction, use Mushrooms all you want. As for the other items, they're all extremely situational and the board really doesn't help alleviate that in most cases. Just use your best judgement when using these items and you'll be good to go!
![]() First up on our minigame list, let's take a look at Toadstool Titan. In this minigame, four players start out in each corner of a square room. There are several blocks on the ceiling. You move around with the control stick, and jump to break the blocks. However, one of the blocks will contain a Mushroom. This will cause whoever touches it to grow in size. From that point, they will be able to charge in any direction. If they hit someone, that player is eliminated. Whoever is the last person standing wins, or whoever is still surviving if time runs out. There are a few ways to manipulate this game. One thing to note is that whoever hits the block with the mushroom, doesn't necessarily mean that they will get the mushroom. It is possible for other players to steal it. If someone else hits the block, maybe you can try jumping over their head to try and grab the mushroom before they get it. If you hit the block, make sure to block the other player's jump if they try to steal it from you. If someone else gets the mushroom, you will need to do what you can to evade them. It would be wise to stay on the opposite end of whoever has the mushroom. This will make it so that you have more time to react to their charge. Additionally, it's a good idea to stay away from the other players. This is so that whoever has the mushroom will be more likely to charge for someone other than you. Of course, they might gang up on you for whatever reason, but that's a part of Mario Party. If you have the mushroom, try to predict where they will run. If they are constantly running, try to intercept them. Toadstool Titan is a relatively complex minigame, but man it's a lot of fun.
First up on our minigame list, let's take a look at Toadstool Titan. In this minigame, four players start out in each corner of a square room. There are several blocks on the ceiling. You move around with the control stick, and jump to break the blocks. However, one of the blocks will contain a Mushroom. This will cause whoever touches it to grow in size. From that point, they will be able to charge in any direction. If they hit someone, that player is eliminated. Whoever is the last person standing wins, or whoever is still surviving if time runs out. There are a few ways to manipulate this game. One thing to note is that whoever hits the block with the mushroom, doesn't necessarily mean that they will get the mushroom. It is possible for other players to steal it. If someone else hits the block, maybe you can try jumping over their head to try and grab the mushroom before they get it. If you hit the block, make sure to block the other player's jump if they try to steal it from you. If someone else gets the mushroom, you will need to do what you can to evade them. It would be wise to stay on the opposite end of whoever has the mushroom. This will make it so that you have more time to react to their charge. Additionally, it's a good idea to stay away from the other players. This is so that whoever has the mushroom will be more likely to charge for someone other than you. Of course, they might gang up on you for whatever reason, but that's a part of Mario Party. If you have the mushroom, try to predict where they will run. If they are constantly running, try to intercept them. Toadstool Titan is a relatively complex minigame, but man it's a lot of fun.
Next up on our list is Snowball Summit. In this minigame, players are on the peak of a mountain covered in snow. You have to make a snowball by tapping B, then roll it around. As you roll the snowball around, it will grow in size. The goal is to knock off all the other players and be the last one standing, or survive until the timer runs out if more than one person last that long. The bigger the snowball, the more power you possess. However, you also move slower, so you will have to plan your strategy carefully. One of the most important ways to survive is to always have a snowball ready. This is because if a snowball hits another snowball, they will cancel out, and no one will be knocked back. So you are able to use your snowball both offensively and defensively. You are also able to throw the snowball, but keep in mind you leave yourself wide open. If you need to reload, do so in a place away from other players. You would not want to get hit while restocking your snowball. If you build a giant snowball, then bump into someone from behind, that usually works pretty well. If someone tries to do this to you, quickly turn around with your snowball so that you can block it. Try to do what you can to become king or queen of the mountain.
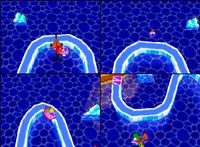
Finally, lets take a look at Frigid Bridges. This game is really simple to understand, but somewhat difficult to pull off. Players start on little ice islands, and try to make their way to the center. You carry a block across an icy bridge. When you get to the island, your character will place the block down, and you have to go back to get more. The first person to place three blocks at the goal wins. The thing to know about this minigame is the bridge is really narrow, and on top of that, it has ice physics. So don't be afraid to stop in a few places. Additionally, there is a Cheep Cheep that will jump across in one of the straighter sections, and if it hits you, you'll be bumped off, costing precious time. Precision of the analog is key here. If you happen to be playing on the virtual console or for whatever reason you're stuck with a D-Pad, this game gets exponentially more difficult, as the bridges are in more complex angles than a simple 45°. What I mean is there is more than 8 directions to move in. So if you're using a D-Pad, get a rythym of moving down, then right quickly. If you're using an analog, then congratulations this minigame is slightly easier! You still have to watch out for the ice physics and Cheep Cheep no matter what though. Good luck!
Pokémon Calendar
Written By: Meta Knight (talk)
Hello, readers, and welcome to a special September edition of Pokémon Calender!! Let's take a look at what came out on a day in September.
| Abb. | Console/Store |
|---|---|
| N64 | Nintendo 64 |
| GCN | Nintendo GameCube |
| Wii | Nintendo Wii |
| Wii U | Nintendo Wii U |
| GB | Game Boy |
| VB | Virtual Boy |
| GBC | Game Boy Color |
| GBA | Game Boy Advance |
| NDS | Nintendo DS |
| 3DS | Nintendo 3DS |
| WiiVC | Wii Shop - Virtual Console |
| 3DSVC | Nintendo eShop (3DS) - Virtual Console |
| WiiUVC | Nintendo eShop (Wii U) - Virtual Console |
| ARC | Arcade |
| WND | Windows |
| PDM | Pedometer |
| PIC | Sega Pico |
| BEE | Advanced Pico Beena |
| Abb. | Region |
|---|---|
| NA | North America |
| JP | Japan |
| EU | Europe |
| UK | United Kingdom |
| IT | Italy |
| AU | Australia/New Zealand |
| KO | Republic of Korea |
- September 12th
- 1998 (NA): Pokémon Yellow (GBC)
- 2009 (JP):
- Pokémon Heartgold (NDS)
- Pokémon Soulsilver (NDS)
- Pokéwalker (PDM)
- September 13th
- 2007 (JP):
- 2008 (JP): Pokémon Platinum (NDS)
- 2014 (JP): Super Smash Bros. for Nintendo 3DS (3DS)
- September 14th, 2007 (JP): Pokémon Battrio (ARC)
- September 16th (JP): Pokémon Emerald (GBA)
- September 17th:
- 2009 (JP): Pokémon Diamond & Pearl: Search for Pokémon! Adventure in the Maze! (BEE)
- 2015 (JP): Pokémon Super Mystery Dungeon (3DS)
- September 18th
- 2010 (JP):
- Pokémon Black (NDS)
- Pokémon White (NDS)
- Pokémon Dream World (WND)
- 2010 (JP):
- September 21st, 2000 (JP): Pokémon Puzzle Challenge (GBC)
- September 24th, 2003 (JP): Pokémon Advanced Generation: I've Begun Hiragana and Katakana! (PIC)
- September 28th
- 1998 (NA):
- Pokémon Red (GB)
- Pokémon Blue (GB)
- 2006 (JP):
- Pokémon Diamond (NDS)
- Pokémon Pearl (NDS)
- 1998 (NA):
Well that's all this month! See you all whenever I do another one of these!
| The 'Shroom: Issue 114 | |
|---|---|
| Staff sections | Staff Notes • Awards Director Election • The 'Shroom Spotlight |
| Features | Fake News • Fun Stuff • Palette Swap • Pipe Plaza • Critic Corner• Strategy Wing |
| Specials | Anton's Awards Reflections • 'Shroom Awards VII • Ultimate Music Battle |

