Pot Hole Panic (Donkey Kong Land): Difference between revisions
mNo edit summary |
(dk wiki) |
||
| Line 8: | Line 8: | ||
|after=[[Mountain Mayhem|>>]] | |after=[[Mountain Mayhem|>>]] | ||
}} | }} | ||
'''Pot Hole Panic''' is the seventeenth [[level]] in ''[[Donkey Kong Land]]'' | '''Pot Hole Panic''' is the seventeenth [[level]] in ''[[Donkey Kong Land]]'' and the first level of [[Monkey Mountains & Chimpanzee Clouds|Monkey Mountains]]. | ||
==Summary== | |||
Pot Hole Panic is a cave level which features [[tire (object)|tire]]s, and they allow [[Donkey Kong]] and [[Diddy Kong]] to reach higher ledges, cross abysses, and even for accessing both [[Bonus Area]]s. At the start of the level, the [[Kong]]s encounter an [[Army]] and some [[Zinger]]s. If the [[Kong]]s move the tire between the Zingers, they can reach the first DK Barrel and the letter K. Beyond that, the Kongs must avoid [[Klaptrap]]s and go through some crawlspaces. Towards the end, the Kongs encounter a perched [[Necky]] and a tire allowing them to reach the second DK Barrel and the letter N. [[Rambi the Rhino]] appears in the first Bonus Area. | |||
== | ==Layout== | ||
From the start of the level, the Kongs must travel to the right and bounce off of a tire to reach a high up [[DK Barrel]]. After this, they have to walk a little farther into the dark cave. There are several ledges that they must climb up, and once up them all, the Kongs should see a big wall in the way. They can crawl into the small space under it and get to the other side of it. This must be done again, as there is another wall in the Kongs' path. After they get under all the walls, the heroes must ride across a small platform to get across a wide gap. Once they are over this pit, they should make their way down a large ledge and crawl under a wall, followed by a second one. Getting this obstacle done takes the Kongs to an area with a dangerous Krusha. They need to jump over the foe and continue on. Another pit must be crossed after this. [[Donkey Kong|Donkey]] and [[Diddy Kong]] should use a nearby platform to cross it, and then jump over a lone Zinger to get to the other end safely. After this, they need to use a tire to reach a high ledge, and then walk down several ledges. These ledges are occupied by Kritters and other foes, so the Kongs should be careful. Soon, the heroes make it to the end of a ledge, which they should jump off to find the [[Continue Point]]. | From the start of the level, the Kongs must travel to the right and bounce off of a tire to reach a high up [[DK Barrel]]. After this, they have to walk a little farther into the dark cave. There are several ledges that they must climb up, and once up them all, the Kongs should see a big wall in the way. They can crawl into the small space under it and get to the other side of it. This must be done again, as there is another wall in the Kongs' path. After they get under all the walls, the heroes must ride across a small platform to get across a wide gap. Once they are over this pit, they should make their way down a large ledge and crawl under a wall, followed by a second one. Getting this obstacle done takes the Kongs to an area with a dangerous Krusha. They need to jump over the foe and continue on. Another pit must be crossed after this. [[Donkey Kong|Donkey]] and [[Diddy Kong]] should use a nearby platform to cross it, and then jump over a lone Zinger to get to the other end safely. After this, they need to use a tire to reach a high ledge, and then walk down several ledges. These ledges are occupied by Kritters and other foes, so the Kongs should be careful. Soon, the heroes make it to the end of a ledge, which they should jump off to find the [[Continue Point]]. | ||
From this point, the group should find a tire laying around. They should push it under some Zingers and down a ledge, then stop. With the tire, they should bounce to a high ledge. Here, there is a DK Barrel to break, and the Kongs must carry on from here. After cross a small pit, they must keep going east and defeat a Kritter. Walking a little farther takes them to a Necky, who has to be avoided at all costs. The heroes need to dodge a few more enemies after that and soon cross another wide abyss with the aid of a moving platform. As the platform swings over the pit, the Kongs must jump over a Zinger and land on another platform. This one takes them to the other side of the pit, where they can see a portal. It takes them out of the level. | From this point, the group should find a tire laying around. They should push it under some Zingers and down a ledge, then stop. With the tire, they should bounce to a high ledge. Here, there is a DK Barrel to break, and the Kongs must carry on from here. After cross a small pit, they must keep going east and defeat a Kritter. Walking a little farther takes them to a Necky, who has to be avoided at all costs. The heroes need to dodge a few more enemies after that and soon cross another wide abyss with the aid of a moving platform. As the platform swings over the pit, the Kongs must jump over a Zinger and land on another platform. This one takes them to the other side of the pit, where they can see a portal. It takes them out of the level. | ||
== | ==Enemies== | ||
* | *[[Army]]: 1 | ||
* | *[[Necky]]: 1 | ||
*[[Klap Trap]]: 5 | |||
*[[Krusha]]: 1 | |||
*[[Kritter]]: 5 | |||
*[[Zinger]]: 7 | |||
== | ==Items== | ||
* | ===K-O-N-G Letters=== | ||
*'''K:''' Found by moving the bouncy tire to the banana trail and bouncing up it | |||
*'''O:''' Also found by moving a tire to a banana trail, this one after some Klatrap, and jumping up | |||
*'''N:''' Above the perched Necky | |||
*'''G:''' In the second bonus room | |||
==Bonus Areas== | |||
{|class=wikitable | |||
!Image | |||
!Description | |||
|- | |||
|[[File:Pot Hole Panic DKL Bonus Area 1.png]] | |||
|Donkey Kong or Diddy must push the second [[tire]] of the level past the letter O and down a crawlspace. Once they are between the walls, the active Kong must bounce to an [[Auto-Fire Barrel]] at the left to access the first [[Bonus Area]]. [[Rambi the Rhino|Rambi]]'s [[Animal Crate]] is at the start, giving the Kongs the option to ride him in the Bonus Area. Rambi can charge into a few Kritters along the way, then cross a small gap to reach some bananas, and then jump into an Auto-Fire Barrel to leave the Bonus Area. When the Kongs return into the main level, they no longer have Rambi with them. | |||
|- | |||
|[[File:Pot Hole Panic DKL Bonus Area 2.png]] | |||
|Just before the letter N, the Kongs must push the tire on the ledge slightly left onto the lower path, where they must push it to the right while avoiding a few Zingers. Shortly after this, the Kongs come across a tall line of bananas. From here, the Kongs must bounce on the tire and enter an Auto-Fire Barrel above to enter the second Bonus Area. The Bonus Area takes place on a ship deck with the letter G, with a [[Mincer]] horizontally moving underneath it. With a timed jump, the Kongs can reach the letter G and exit from an Auto-Fire Barrel to the right. | |||
|} | |||
==Gallery== | |||
<gallery> | |||
Pot Hole Panic DKL letter O.png|Donkey Kong bounces up to the letter O | |||
Pot Hole Panic DKL Bonus Barrel 1.png|Donkey Kong bounces up to the first Bonus Barrel | |||
Pot Hole Panic DKL Necky.png|Diddy Kong bounces on a tire next to a perched Necky and the letter N | |||
</gallery> | |||
==Names in other languages== | ==Names in other languages== | ||
| Line 31: | Line 59: | ||
|Spa=Pánico en la cueva | |Spa=Pánico en la cueva | ||
|SpaM=Panic in the cave}} | |SpaM=Panic in the cave}} | ||
==Trivia== | |||
*There is a [[Pot Hole Panic (Donkey Kong Country 3: Dixie Kong's Double Trouble!)|level]] in ''[[Donkey Kong Country 3: Dixie Kong's Double Trouble!]]'' that shares its name with this one. It is also set in a cavern, but is otherwise not based upon this level. | |||
{{br}} | {{br}} | ||
{{DKL}} | {{DKL}} | ||
[[Category:Subterranean Areas]] | [[Category:Subterranean Areas]] | ||
[[Category:Donkey Kong Land Levels]] | [[Category:Donkey Kong Land Levels]] | ||
Revision as of 10:26, October 14, 2019
Template:Levelbox Pot Hole Panic is the seventeenth level in Donkey Kong Land and the first level of Monkey Mountains.
Summary
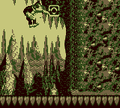
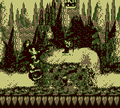
Pot Hole Panic is a cave level which features tires, and they allow Donkey Kong and Diddy Kong to reach higher ledges, cross abysses, and even for accessing both Bonus Areas. At the start of the level, the Kongs encounter an Army and some Zingers. If the Kongs move the tire between the Zingers, they can reach the first DK Barrel and the letter K. Beyond that, the Kongs must avoid Klaptraps and go through some crawlspaces. Towards the end, the Kongs encounter a perched Necky and a tire allowing them to reach the second DK Barrel and the letter N. Rambi the Rhino appears in the first Bonus Area.
Layout
From the start of the level, the Kongs must travel to the right and bounce off of a tire to reach a high up DK Barrel. After this, they have to walk a little farther into the dark cave. There are several ledges that they must climb up, and once up them all, the Kongs should see a big wall in the way. They can crawl into the small space under it and get to the other side of it. This must be done again, as there is another wall in the Kongs' path. After they get under all the walls, the heroes must ride across a small platform to get across a wide gap. Once they are over this pit, they should make their way down a large ledge and crawl under a wall, followed by a second one. Getting this obstacle done takes the Kongs to an area with a dangerous Krusha. They need to jump over the foe and continue on. Another pit must be crossed after this. Donkey and Diddy Kong should use a nearby platform to cross it, and then jump over a lone Zinger to get to the other end safely. After this, they need to use a tire to reach a high ledge, and then walk down several ledges. These ledges are occupied by Kritters and other foes, so the Kongs should be careful. Soon, the heroes make it to the end of a ledge, which they should jump off to find the Continue Point.
From this point, the group should find a tire laying around. They should push it under some Zingers and down a ledge, then stop. With the tire, they should bounce to a high ledge. Here, there is a DK Barrel to break, and the Kongs must carry on from here. After cross a small pit, they must keep going east and defeat a Kritter. Walking a little farther takes them to a Necky, who has to be avoided at all costs. The heroes need to dodge a few more enemies after that and soon cross another wide abyss with the aid of a moving platform. As the platform swings over the pit, the Kongs must jump over a Zinger and land on another platform. This one takes them to the other side of the pit, where they can see a portal. It takes them out of the level.
Enemies
Items
K-O-N-G Letters
- K: Found by moving the bouncy tire to the banana trail and bouncing up it
- O: Also found by moving a tire to a banana trail, this one after some Klatrap, and jumping up
- N: Above the perched Necky
- G: In the second bonus room
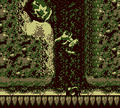
Bonus Areas
| Image | Description |
|---|---|

|
Donkey Kong or Diddy must push the second tire of the level past the letter O and down a crawlspace. Once they are between the walls, the active Kong must bounce to an Auto-Fire Barrel at the left to access the first Bonus Area. Rambi's Animal Crate is at the start, giving the Kongs the option to ride him in the Bonus Area. Rambi can charge into a few Kritters along the way, then cross a small gap to reach some bananas, and then jump into an Auto-Fire Barrel to leave the Bonus Area. When the Kongs return into the main level, they no longer have Rambi with them. |

|
Just before the letter N, the Kongs must push the tire on the ledge slightly left onto the lower path, where they must push it to the right while avoiding a few Zingers. Shortly after this, the Kongs come across a tall line of bananas. From here, the Kongs must bounce on the tire and enter an Auto-Fire Barrel above to enter the second Bonus Area. The Bonus Area takes place on a ship deck with the letter G, with a Mincer horizontally moving underneath it. With a timed jump, the Kongs can reach the letter G and exit from an Auto-Fire Barrel to the right. |
Gallery
Donkey Kong bounces up to the letter O
Donkey Kong bounces up to the first Bonus Barrel
Diddy Kong bounces on a tire next to a perched Necky and the letter N


Names in other languages
| Language | Name | Meaning |
|---|---|---|
| Japanese | ふもとの洞窟 Fumoto no dōkutsu |
Foothill Cave |
| Spanish | Pánico en la cueva |
Panic in the cave |
Trivia
- There is a level in Donkey Kong Country 3: Dixie Kong's Double Trouble! that shares its name with this one. It is also set in a cavern, but is otherwise not based upon this level.