Parrot Chute Panic (Donkey Kong Country 2: Diddy's Kong Quest)
Template:Levelbox Parrot Chute Panic is the twenty-sixth level of Donkey Kong Country 2: Diddy's Kong Quest and the fourth area of Gloomy Gulch. The level's name is a play on "parrot" and "parachute," referencing how Quawks slowly glides downward while carrying the Kongs.
In the last of all the hive levels, the Kongs must use the help of Quawks to descend through the dangerous area. The primates must use the parrot to slowly glide downward and avoid several Zingers crowding the hive below. Therefore, the Animal Friend serves as a huge help for the Kongs who cannot descend as easily with their abilities alone. Though the Zingers themselves are the primary obstacle in this level, Klampons, Spinies, and Click-Clacks also stand in the way of the Kongs. Squawks the Parrot appears in this level along with Quawks, but he only appears in a Bonus Level. Similar to the previous non-boss hive levels, honey appears here, and the primates cannot walk through it easily due to its stickiness.
Level layout

The level begins on a flat ledge with a gap ahead of it. A DK Barrel wobbles above the gap. If the heroes drop into the gap, they fall past many floating bananas and an alcove containing a DK Coin, and then land on another flat surface with some honey splattered on it. The honey is sticky so the Kongs cannot walk through it easily. A Quawks waits for them in a small gap. Once they grab onto the parrot, they slowly descend through a small passage with a few Zingers in the center of it. At the bottom of the passage, the Quawks drops the Kongs, who then land on more honey. A crate lies next to the honey, followed by a Zinger floating in the air and a Klampon who marches along a flat pathway found in a slightly lower area. The crate can be used to break open a nearby wall. If they enter the opening in the wall once they do so, they enter a hidden area with many bananas that form the shape of the Rareware logo. After they travel through the exit of this area, they reach a thin passage that they must drop though to reach the letter K, many bananas, and a Banana Coin, and then land in an area located farther into the level.
A Quawks hovers in a gap near the Klampon to the left of the aforementioned wall. It can pull the heroes into a wider passage with more Zingers around it. Some of these wasp enemies are placed in the center of the passage, while others line the walls. Another letter K is between two of the Zingers in the center of the area. The Quawks soon drops them above a few Zingers that they must avoid. After a small spot of honey, a Zinger can be found. If the heroes drop into the gap next to it, they land in a lower section of the level, where there are two additional Klampons and a DK Barrel. A pair of Zingers surround the third Quawks, who is present nearby. The bird helps them travel through a narrow passage with more Zingers in it. As before, some of the foes line the walls, while others fly in the middle of the area. The primates come past a Banana Coin and some bananas as they descend.
The parrot soon carries them into a narrower passage, which is followed by a wide room with a few more Zinger in it. Two Spinies walk along some sticky honey at the bottom of the room. The letter O is next to them. On the opposite side of the area, a small gap can be found. If they drop into it, they land on a Quawks, who carries them farther down the level, where there are more Zingers. This time, the passage is narrower than usual. A platform can be found in the center of the area with one of the Zingers on it. A Banana Bunch can be found on the right side of the platform, but only a single banana is on the left side. After the heroes fly over a trio of Zingers at the small turn, they Quawks prepares to drop them. Once they let go, they fall past a few ledges and land next to the Star Barrel in a small gap.

A Quawks and a DK Barrel are in this gap. The Quawks carries them into a narrow passage, where they must maneuver around Zingers by flying from left to right in the area. The parrot soon drops them on a flat piece of land with a crate on it. Another Quawks is in the air near here over a gap. It can slowly lead the heroes down through the gap, which features some Zingers moving back a forth across the area. Once they pass three Zingers, the Quawks drops them onto a large, flat ledge with a Spiny on it. A gap is near here with the letter N by it. If the Kongs fall into the gap, they land in a slightly lower elevation, where they can find a Quawks in a small gap. This Animal Friend carries them through another narrow passage infested with dangerous Zingers, who are scattered all around. Three platforms are in the center of the area farther down. A trio of bananas are on the one side of the first two platforms, while Zingers wait to attack on the other sides. The third platform has collectibles all around it, although the right side has more valuable items by it.
After the heroes pass these platforms, they ride through narrow turns that have Zingers around them. Soon, the Quawks drops the Kongs past a Zinger and through a narrower passage. An area of land is under here with a Klampon and a DK Barrel on it. A small gap is to the left of here that leads down to a tight passage with three Click-Clacks in it. After dropping off of the ledge near the trio, the Kongs can find a small hill with a gap next to it. A Quawks waits here. This parrot guides the group deeper into the hive, where Zingers line the walls around a few sharp turns. After three turns, the bird drops the heroes into the claws of another Quawks. It pulls them past a small group of Zingers found along the walls and in the middle of the path. A wider area follows here with some Zingers flying back and forth. Another Zinger in this area also flies in a circular path, surrounding the letter G. After passing a few pairs of Zingers floating from left to right, the parrot leads them into a narrow passage and prepares to drop them onto a pile of sticky honey. Once they reach land, they can see the End of Level Target just ahead. If they hit it, they complete the level. If they jump to it from a hidden hook found to the right of it, they can win a prize.
Secrets
K-O-N-G Letters
- K: The Kongs rides towards the letter K soon after they grab onto the second Quawks.
- K: An additional letter K is located in this level. After the heroes drop from the first Quawks, they can find a crate that they must use to destroy a wall to the left. Once they break open the wall, they must walk into the opening in order to access a hidden area full of bananas in the shape of the Rareware logo. Once they exit this area, they can find the second letter K above a narrow passage.
- O: Shortly after the entrance to the first Bonus Level, the heroes can encounter two Spinies. The letter O is next to them.
- N: The letter N is at the end of the ledge found after the second Quawks from the Star Barrel.
- G: As the Kongs ride down with the last Quawks in the level, they can find a lone Zinger surrounding the letter G.
Bonus Levels

- Near the beginning of the level, the primates encounter two Klampons and then descend through the hive with Quawks. After the bird maneuvers around several Zingers, it enters a more spacious area. Here, the bird should hurry to the left side, where it can hover over an small land structure. The X button can be pressed in order to jump off the bird, putting the Kongs on foot again. An entryway is nearby that leads into a Bonus Level. Here they need to get on Squawks the Parrot and fly upwards through a curvy hive area. Eventually, if they reach the highest point of the area within the time limit of 15 seconds, they discover a Kremkoin, which they must grab within the remaining time.
- After the heroes let go of the second Quawks past the Star Barrel, they must jump across an abyss and grab onto a hidden, gooey honey wall. They must climb up the wall and then enter the opening in at the top of it to access a Bonus Level. In this Bonus Level, the Kongs must cling onto Squawks and fly around the hive. Within the time limit of 25 seconds, they must use the parrot buddy to defeat six Zingers to make a Kremkoin appear at the end of the bonus. After they pass the fifth Zinger, they reach a No Animal Sign that causes Squawks to disappear. A TNT Barrel also appears when this happens, which the heroes can use to defeat the final Zinger, who is located nearby.
DK Coin
- When the Kongs jump down into the abyss at the beginning of the level, they should use Dixie's helicopter spin and hug the left wall. If they do so, they land into a small gap in the wall, where the DK Coin is placed.
Golden Feather (Game Boy Advance version only)
- After passing three Click-Clacks, the heroes must descend through more of the hive with Quawks. As they go, they should see the Golden Feather in plain sight up in a tight corner.
Photograph (Game Boy Advance version only)
- To find the photograph found exclusively in the Game Boy Advance remake of Donkey Kong Country 2, the heroes should head slightly past the Star Barrel to find a crate lying on the ground. They should let go of Quawks and then pick up the crate. Nearby in a pit, they can see a Zinger with a camera icon over its head. The heroes have to throw the crate at this foe to defeat it and claim the photograph, which gives them a picture of a Zinger for the third page of their scrapbook.
Gallery
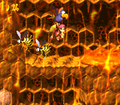
The Kongs ride Quawks in the original version of the level.
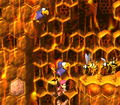

The Kongs lower themselves towards the letter K in the Game Boy Advance version of the level.


Names in other languages
| Language | Name | Meaning |
|---|---|---|
| Japanese | パラシュート パニック Parashūto panikku |
Parachute Panic |
| German | Papageien-Absturz |
Parrot Fall |
| Spanish | Pánico Lorito |
Parrot Panic |