Krockhead Klamber (Donkey Kong Country 2: Diddy's Kong Quest)
Template:Levelbox Krockhead Klamber is the thirteenth level of Donkey Kong Country 2: Diddy's Kong Quest. It is also the third area of Krem Quay.
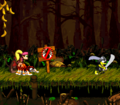
This the second swamp level and it marks the first appearance of the Kutlass enemies. The Kongs' main challenge here is having to rely on KrocHeads to be used as stepping stones to cross the water. However, most of the crocodiles only emerge from the surface of the water whenever a Krockhead Barrel is hit. Hitting these barrels only causes them to stay above the surface for a limited amount of time, so Diddy and Dixie Kong must cross the water with them quickly. There are also some KrocHeads throughout the level that emerge without hitting any barrels, although they only stay at the surface for a few seconds. Kaboings, Klingers, Zingers and Flitters can also be found here and on many occasions, the Flitters must be bounced on to cross small portions of the water. Other obstacles that must be used to cross the water include large barrels and vines that the heroes can grab onto. Squitter the Spider is located in this level, but only in one of its Bonus Levels.
Level layout

The Kongs begin the level in front of a pair of Zingers, who they can travel over with their Team-up move in order to reach a hidden area that consists of a treasure chest containing a red Extra Life Balloon and a pit with a few Zingers and a Flitter above it. With their super-jump ability, the heroes can cross the pit to reach a platform that holds an arrow pointing to the left that is formed by bananas, which is followed by two more of groups of two Zingers that they must pass. A Banana Coin is between the two groups, and a treasure chest containing a DK Coin follows them. There is also an Auto Fire Barrel above the previous pit, and the primates can enter it to be shot back to the beginning of the level.
If Diddy and Dixie head to the right from the starting point on the level, instead of traveling over the Zingers behind them, they come up to a DK Barrel that is guarded by a yellow Kutlass. A large area of water is ahead of here, and a pair of vines with a Flitter between them float on it. Some platforms that float at the surface of the water are also ahead of here; the first platform holds some bananas, the second carries a crate, and the third supports a hopping Kaboing. The first two of the platforms are separated by a wide gap, but the Kongs can cross this gap by bouncing on a Flitter that flies over it. Once the heroes cross the platform with the Kaboing on it, they reach another two vines that surround a Flitter, who orbits the letter K. Two more solid platforms follow these vines, and both of them support Kaboings. If the primates manage to pass these foes and travel ahead, they reach a vine that is guarded by a Zinger.

A quadruplet of Flitters are present near here, and one of them hovers over a Banana Coin. Diddy and Dixie must bounce on the insects in order to cross a portion of the swamp and reach an additional vine that is followed by some solid platforms. The first platform holds a DK Barrel, while the two ahead of it are jumped on by a Kaboing, who jumps back and forth with the two platforms. A Flitter also hovers over the third platform. Once the primates travel past this platform, they grab onto a vine that is followed by a Flitter, who is surrounded by a Zinger. While dodging the restless Zinger, they can bounce on the Flitter in order to reach another vine. An additional vine is ahead of it, and a KrocHead with the letter O above its head is between them. The Kongs can discover a third vine after here, and a Flitter being orbited by a Zinger is to the left of it. To the right of the vine, the primates can find a Flitter with a Zinger next to it and the final vine before the Star Barrel, which hovers nearby above a KrocHead.
A long, solid area of land is ahead of here, and an Auto Fire Barrel that can shoot them straight up into the air is next to it. The area of land holds a yellow Kutlass and a No Animal Sign with Squitter pictured on it. An arrow formed by bananas is also above the sign, and it points towards a hidden Bonus Barrel. If this is entered, the heroes reach a Bonus Level that contains Squitter. If they exit the bonus with Squitter and pass the No Animal Sign, the spider disappears and they are given a red Extra Life Balloon. If the duo continues from here, they reach a Krockhead Barrel that causes the two KrocHeads in the water area nearby to stick their heads out. They must use the crocodiles to reach a pair of vines with a Banana Coin guarded by a Zinger between them. A DK Barrel is to the left of the first vine. After the primates pass the second vine and dodge a Zinger in mid-air, they land on a solid platform with a Krockhead Barrel and, in the Game Boy Advance version only, a Golden Feather above it. A Zinger hovers over the barrel and the feather.

If they hit the barrel, four KrocHeads emerge from the water. The Kongs can use these nearby creatures to reach a vine that they can use to reach a solid platform that a Zinger guards. An additional platform follows here, and it holds a small crate that they can defeat enemies with. If the two friends continue from here, they reach a vine with a Klinger on it and another Krockhead Barrel that floats above the dangerous water. After they hit the barrel, a KrocHead appears under them. Some more KrocHeads are ahead of here that appear after the barrel is touched, and a Flitter is between every two KrocHeads. The letter N is also between the second and third KrocHeads in the area. Soon, the primates reach a solid platform with a DK Barrel high above it. They can only reach the barrel if they use their Team-up move or jump to it from the vine found to the right, which holds a Klinger.
Another vine with a Klinger on it is near here, and it is followed by a quadruplet of Flitters that the heroes must bounce on to cross a small portion of the water area. The two friends can find a pair of vines after the section of Flitters, and one of these vines holds a Klinger. A Krockhead Barrel floats above the water next to the vines, and once it is touched, some KrocHeads appear ahead above the water. Two of these KrocHeads are guarded by Zingers, and a red KrocHead follows them that can fling the Kongs to a Krockhead Barrel located nearby. After they hit it, some more KrocHeads appear, who can enable them to cross a portion of the water area and reach a pair of vines with a solid section of land next to them. An End of Level Target is on this land area, and a Zinger floats above it. If they hit the target, the level is completed; they can also win a prize from the target if they jump on it from the top of the previous vine.
Enemies
Items
- Banana Coin: 3
- Barrels:
- DK Barrel: 4
- Krockhead Barrel: 5
- Crate: 2
- Extra Life Balloon: 2
- Treasure Chest: 2
K-O-N-G Letters
- K: Near the beginning of the level, the primates come up to the third Flitter in the level, who hovers around the letter K.
- O: Shortly after the heroes pass the second DK Barrel in the level, they come up to a KrocHead between two vines with the letter O above it.
- N: Immediately after the duo crosses the third Krockhead Barrel in the level, they find the letter N above a Flitter, who they must bounce on to reach the letter.
- G: The letter G is one of the prizes that can be given from the End of Level Target. They must jump on this target from a nearby vine in order to win a prize from it. The prize they win from the target depends on when they hit it.
The letter N
The letter G


DK Coin
- At the very beginning of the level, the Kongs must look behind themselves to discover two Zingers. Carefully, they need to use their Team-up move and toss one another over them. From here, they must cross a pit using their super-jump ability, while dodging a few Zingers that float in their way. There are two groups of Zingers piled on top of each other ahead of here, and the Kongs must use their Team-up move again to travel past them, where a treasure chest containing a DK Coin is located.
Golden Feather (Game Boy Advance version only)

- Shortly after passing the Star Barrel, the heroes travel to the second Krockhead Barrel, which is surrounded by a Zinger. The Golden Feather is directly above the barrel, and the Kongs can grab it with a simple jump.
Photograph (Game Boy Advance version only)

- As the Kongs bounce along the last set of Flitters in the level, they can find one of them with a photograph over its head. They have to defeat this insect to earn the photo. Once it is obtained, they are given a picture of a Flitter for the third page of their scrapbook.
Bonus Level

- Almost immediately after passing the Star Barrel, the group can discover a Bonus Barrel above a No Animal Sign. An arrow formed by a group of bananas points up to the barrel. They can access this barrel if they use their Team-up move and toss one another into it. Once the heroes are sent to the Bonus Level, they must defeat four Zingers scattered throughout a small area with the help of Squitter the Spider, who stands next to them as they begin the bonus. If the heroes manage to defeat all four Zingers within 15 seconds, a Kremkoin appears for them to grab before the remaining time runs out.
Gallery
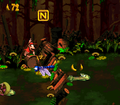
Dixie Kong hits a Krockhead Barrel
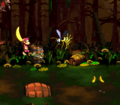
One of the vines that the Kongs must use to progress.
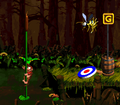
The Kongs and Squitter at the No Animal Sign.

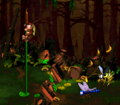
The Kongs ride Squitter in the Game Boy Advance version.


Names in other languages
| Language | Name | Meaning |
|---|---|---|
| Japanese | どろどろクロコジャンプ Dorodoro Kuroko janpu |
Stagnant Croc Jump |
| German | Sumpf des Wahnsinns (SNES) Krockhead-Kraxler (GBA) |
Swamp of Madness Krockhead Clamber |
| Spanish | Subida de Krock |
Krock Rise |