Ghoulish Grotto
Template:Levelbox Ghoulish Grotto is the thirty-sixth and final regular level of Donkey Kong Land III and the sixth level of the Lost World.
Summary
Ghoulish Grotto is similar to Stalagmite Frights, the last level of Tin Can Valley, in that both levels have Boo Barrels and an Animal Friend used during a half of the level. Early in the level, the Dixie Kong and Kiddy Kong must blast through Barrel Cannons to go farther down the level. For most of the level, the Kongs are transformed into Squawks the Parrot, who must travel even farther down the cavern while avoiding Buzzes along the way. Sometimes the Buzzes appear in groups and block the path entirely. Squawks is required to defeat them with his coconuts.
After the No Animal Sign, the Kongs encounter many Kuchukas. Near the end of the level are Boo Barrels, which the Kongs must not enter to avoid being blasted into a Buzz. A few Kopters appear early in the level, and other enemies encountered throughout include Bristles, Krumples, and Kobbles.
Layout

From the start of the level, the Kongs need to travel through the bumpy cave and hop into a lone barrel. This barrel shoots them to an area filled with some enemies. After passing two Kopters, the group need to blast through some more barrels to reach a lower part of the cave. There, they need to head east and beat some enemies. Soon, they find another chain of barrels. They must shoot through it and end up having to go east. Once they hop over many Bristles, they have to jump over a group of Buzzes and jump into an Animal Barrel up the path. It turns them into Squawks. Squawks needs to immediately fly upwards and follow arrows, made of bananas, to make his way through the area. Traveling to lower parts of the level, the parrot soon have to defeat two small groups of Buzzes blocking his path. After getting through this area, the bird needs to hover east and beat some Re-Koils, as well as another set of Buzzes blocking the hero's path. Heading down the thin path, the parrot finds the Star Barrel.
Halfway through the level, Squawks has to fly down the straight pathway and pass the No Animal Sign, bringing the Kongs back into their original forms. After that, the group have to climb up a few ledges while avoid some Kuchukas to find a small pit. They must use the barrel inside of it to travel to a lower area of the stage. There, they need to journey west and move away from some Kuchukas again. After this, they have to drop down from a ledge and continue west to find more enemies. The heroes have to beat all these foes and drop down from another ledge. In an even lower part of the level, the monkeys have to walk down a long pathway, knocking out some Bristles. Soon, they find another pit. Following the arrows nearby, created by bananas, the Kongs need to drop into it and travel east. After passing a lone Krumple, they enter an area with some Boo Barrels and Buzzes. The Boo Barrels, aiming at the Buzzes, appears and disappears constantly, and when they disappear, the apes have to run under the Buzzes to avoid being forced into them. Once this area is cleared, Dixie and Kiddy must go farther east and defeat various enemies. Soon, after passing a few Kuchukas, can go to the Level Flag.
Enemies
Items
- Banana Bunch: 1
- Bear Coin: 1
- DK Barrel: 3
- Red Balloon: 2
K-O-N-G Letters
- K: Found past a Kobble, near a Kopter.
- O: As Squawks, the letter O is west of a banana arrow pointing west.
- N: The Kongs will be launched into the letter N in a barrel cannon past two Kuchukas.
- G: In an area patrolled by two Kobbles.
DK Coin
| Image | Location |
|---|---|

|
After passing the letter K and two Kopters, Dixie or Kiddy must jump over a Barrel Cannon and land on an area with a Tin Barrel. The active Kong must pick up the Tin Barrel and carry it past a Bristles until they reach the Koin. They must throw the Tin Barrel behind Koin, causing it to ricochet into Koin from behind and defeat him. The Kongs are rewarded with the DK Coin. |
Bonus Levels
It has been requested that more images be uploaded for this section. Remove this notice only after the additional image(s) have been added.
| Image | Type and description |
|---|---|
| Collect the Stars! The first Bonus Barrel in under a small gap and under the second Buzz, who is flying up and down over it. To access the Bonus Barrel, the Kongs can either jump between the Buzzes to land in the area below or transform into Squawks, backtrack to the area and spit coconut at the Buzzes from a distance before crossing the No Animal Sign. In the Bonus Level, Dixie and Kiddy have 20 seconds to collect 20 stars along the way. To get them, the Kongs must blast from many Barrel Cannons, which the stars are located between. The Kongs can optionally go on a platform near the start with a DK Barrel and a Red Balloon. After the Kongs collect every star, the Bonus Coin appears on a ledge at the top-right of the area. | |
| Bash the Baddies! After the letter N, the Kongs encounter the level's second Boo Barrel, who is over a small pit. As the Boo Barrel changes directions, the Kongs must only jump into it while it points up, allowing them to be blasted up to a hidden platform, which the Bonus Barrel is hovering above. In the Bonus Level, the Kongs have 30 seconds to defeat five Rekoils. When the Kongs defeat every enemy, the Bonus Coin appears at the right end of the area. |
Gallery
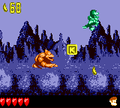
Kiddy approaches the letter K
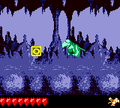
Squawks flies to the letter O
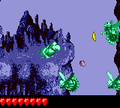
Squawks defeats a Buzz in Ghoulish Grotto
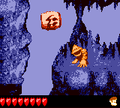
Kiddy standing next to a Boo Barrel that takes him to the second Bonus Barrel


Names in other languages
| Language | Name | Meaning |
|---|---|---|
| Japanese | ぶきみなどうくつ Bukimina Doukutsu |
Eerie Cave |