The 'Shroom:Issue 165/Strategy Wing

Director Notes
Written by: Hooded Pitohui (talk)

Welcome, readers of The 'Shroom, to the final edition of Strategy Wing in the year of 2020! We're not only welcoming you, but our new fungal overlords. Yes, as you've seen elsewhere, the Shroobs have conquered our fair 'Shroom HQ. Thankfully, we've been left in the hands of Commander Shroob, which isn't too bad for us. After all, as a commander of Shroob forces, he's well-versed in strategy. Why, already our Graphic Design Manager, The Pyro Guy (talk), has graciously gifted me with an updated staff portrait. It is certainly much appreciated! I needed some extra light for my office. It makes reading all these books on my shelves easier.
Needless to say, our writers have risen to the call and have produced sections themed around the Shroobs themselves or topics related to them, like time travel and babies. There's still no Koops, Your Emblem is on Fire this month, but we do have a new writer making her debut with The 'Shroom! Be sure to take a look at ZelenPixel (talk)'s new section, Kingdom Battle Ramble, for a primer on the heroes working to save the Mushroom Kingdom from time-traveling invaders from another world (invaders who are, of course, inferior to the Shroobs) in Mario + Rabbids Kingdom Battle. We have our usual assortment of great sections on top of this new one, so please be sure to read everything our writers have put together for this special edition of Strategy Wing!
Do note that, due to the quantity of images it has this month, Parallax has been moved to the bottom of the page to make it easier to read our other sections this month without having to scroll too much. As cliché as the phrase may be, it's last but certainly not least, so be sure you don't overlook it and the very special (and work-intensive) surprise Ray Trace has in it this month.
As always, if you have any topic you'd like to write in detail about, take a look at our Sign-up page! We'd be happy to have you join us as a member of the Strategy Wing Team! Whether you want to follow Parallax's example and provide a guide on a topic you know well or you would like to make your own version of Mach Speed Mayhem to teach us everything about some obscure interest you have, we can find a place for you. You had your month off, but it's time already to start voting in Mach Speed Mayhem, so don't forget to vote for the F-Zero driver you would like to see covered in January!
Section of the Month
Superchao (talk) didn't even need the power of the Reactor Might to take the top spot in last place's rankings with his Zoda-focused Mach Speed Mayhem! As much as he must have suffered, having to watch the whole F-Zero anime to document the insanity of Zoda's story, it's a fitting reward. Thank you to all of our writers, and thanks to you readers out there for voting! Give our team of writers a gift this holiday season by voting again this month!
| STRATEGY WING SECTION OF THE MONTH | ||||
|---|---|---|---|---|
| Place | Section | Votes | % | Writer |
| 1st | Mach Speed Mayhem | 9 | 42.86% | Superchao |
| 2nd | Racing Like the Staff | 7 | 33.33% | Yoshi876 |
| 3rd | Parallax | 5 | 23.81% | Bazooka Mario and Ray Trace |
Find out who stands against time-traveling invaders in Mario + Rabbids Kingdom Battle!
[read more]
Kingdom Battle Ramble
Written by: ZelenPixel (talk)
Ya girl Zelen here, with my debut in the paper, as I saw an opportunity to babble about a game I really like, with more people to read it than just, like, three!!! Writing this is going to help me not stress over other things as much, so it's nice! So anyway, if you've known me for any amount of time at all, you'll probably know I really like Mario + Rabbids Kingdom Battle, for some reason. I got it on sale in June this year, and I've never played a game with this kind of gameplay style at the time, so I definitely did not expect to get so into it! I found the gameplay fun enough to 100% the game (and the Donkey Kong Adventure DLC!), and then keep coming back to it anyway! I could ramble more about why I just love this lovably ridiculous game so much, but this paragraph is getting a li'l too long!
With that aside, the focus of the section is that I'm going to be discussing two playable characters per month, their personality, what they do in the story and their capabilities in battle. I will also try to provide some tips, but if you want to learn further about battling effectively, you'd probably need to look deeper elsewhere - I can't be that skilled! I'm going to be covering the playable characters in the order they appear in the Battle HQ character selection. This first issue will be a li'l different, since I'm going to discuss Beep-0 first, for some story basics, and only after then Mario and Rabbid Peach. Anyway, let's get started!
Beep-0

If you think about it, he's technically the only true playable character? We don't count that for the section, though! Story-wise, Beep-0 is first seen at the very start in the game, during the intro, where the Genius Girl has invented the SupaMerge to solve an energy crisis. Beep-0 only incomprehensibly beeps at this point, but he does object at her mentioning how she was put onto the cover of the Tech magazine, using singular "me" instead of plural "us". He wants some credit too! The SupaMerge overheats, and the Genius Girl decides to take a break. Then a whole bunch of Rabbids randomly show up in a washing machine and wreck havoc everywhere! One, later named Spawny, decides to check out the SupaMerge and proceeds to cause far too much havoc, merging several other Rabbids into existence, and then beams the washing machine, which is basically how the whole crossover happens. Beep-0 also gets affected by this, and mostly just gets ears and the ability to make.. comprehensible beeps? Either way, he lands with Mario and a few of the Rabbids, and they all team up to go catch Spawny. It escalates from there.
Beep-0 himself is the actual character you move around in the overworld, with the party of three characters following him, and he acts as the local equivalent of Paper Mario tattle partners, if that makes sense. Near certain places of interest, a button prompt will pop up that will make him comment on it. He's also responsible for speaking for all the other heroes, down to cutting off Mario from speaking at one point! Beep-0 also teaches you some combat basics, thus an early name Tuttorio, and also acts as the cursor in battle, thus another early name... the cursor. His personality includes possibly being an "insecure egomaniac", actually swearing on at least four occacions in the game (though censored), really really liking puns ("I dolphinately need time to mullet this over before I give a reel opinion. Hee hee!! I have a full terabyte of fish puns.")... I do like him overall, though he is a bit mean to people sometimes! I think he's got plenty of funny lines, too. He's a neat li'l guy! Okie dokie, now onto the actual focus of the section!
Mario

Mario, the leader of the team, who is also in the title of the game! Mario's the jack of all trades, and, in the base game, he's required to be in your team at all times, alongside at least one of the Rabbids. Character-wise, he acts as you'd expect, and he balances out the crazier stuff the Rabbids keep doing. As for the story, Mario, along with other base Mario characters, gets sucked into the glitch vortex during the intro. Curiously, he tries to rescue Luigi over Peach! Mario, still, ends up falling into the Ancient Gardens, alongside Beep-0, Rabbid Peach and Rabbid Luigi, all becoming a team shortly after. Mario doesn't do much notable things in the story after that, but he has some funny reactions in the cutscenes at times!
Battle
| Health Points: | 220-350 |
|---|---|
| Area of Movement: | 6-7 Cells |
| Pipe Exit Range: | 3-4 Cells |
| Dash: | 20-130 DMG |
| Stomp: | 6 Cells (initial jump range) 30-150 DMG 3-6 Cells (stomp jump range) |
| Primary weapon: | Blaster |
| Secondary weapon: | Melee |
| Hero Sight: | 80%-130% DMG Cooldown 3-2 Turns |
| M-Power: | 20%-70% DMG Cooldown 3-1 Turns |
The in-game description states: "Mario's offensive talents make him a natural choice to lead the charge in battle. He is a mid-to-close range fighter with excellent mobility." As I mentioned earlier, he's got some average stats, but they're by no means bad! He is, overall, pretty good for dishing out damage, while not completely specializing on that.
The stats are on the right! For all the stats used in this section, points go from the default stats the character has initially, to the maximum stats upgraded with the Skill Tree. Note that you can't max out every stat, as the game simply doesn't have enough Skill Orbs for it!
Mario has a singular Dash with surprisingly good maximum damage (only behind Rabbid Luigi's Dash), and his Team Jump can allow him to land on one enemy and deal them some damage! Stomping on a baddie's noggin can also be used to gain additional range from the Team Jump. Also, everyone's Team Jump can be upgraded to a Cleansing Team Jump; this is an upgrade which lets them clear an ally's status effect if they bounce off of them. Very important to have, and it costs little Skill Orbs, so you'll need it on everyone!
Mario's primary weapon is the Blaster, a simple, yet versatile weapon with average range and damage that fires one shot. Secondary weapons are more specialised, stronger weapons with a specific cooldown, and Mario's are called Melee, which are hammers, standard for Mario to use! A Melee weapon can only be used on enemies Mario is standing right next to, but it will also damage any baddies within a bigger range, using a big ol' shockwave! It's quite a powerful attack, but the drawback is that it's really not ranged at all. I like using it together with Mario's stomp! Mario's weapons alternate between having the Bounce effect, which will launch a foe, potentially out of the battlefield for a bonus 30 points of damage, and Honey, which will rid them of all means of movement for the turn.
Mario has offensive-oriented Techniques. These are special moves that do a variety of things and have a specific cooldown. The first one, Hero Sight, allows him to automatically attack any moving enemy within range if he spots them - that also includes if the enemy simply walks into view, gets pushed, bounced, and whatever else! He attacks them with his Blaster, for a percent of the damage it deals normally, with the max upgrade even dealing more than that! It can also be upgraded to give him another shot attempt, which can either be used on the same enemy twice if the first attack doesn't defeat them, or on two separate enemies! M-Power simply boosts the attack power of Mario and any allies within range for the turn. I recommend using it at the start of every battle for a boost, since usually your team starts the battle in close range to each other. The boost is also a pretty hefty upgrade to their attack, so use it as often as you can!
Rabbid Peach

This may just show how much I can end up writing about a character I really, really like! As in, she's unironically one of my comfort characters at the time of writing, and I'm gonna embrace that, dangit! Anyway, like Mario, she's also available from the very start of the game, alongside Rabbid Luigi. She is more of a healer in battle.
Her personality is that she is very smug, and, unsurprising for a Rabbid, prone to being kinda rude to people. Still, she usually makes up with them anyway, and kind of abruptly sometimes! Oh, and another notable trait is that she just won't leave her phone alone and also takes, like, a million selfies, including situations in which one should not be taking selfies in whatsoever. She takes selfies in front of the giant glitch vortexes in the sky every time Beep-0 points them out, because that's just nothing to worry about, apparently. Rabbid Peach also has a crush on Mario, because of course! The official Instagram, which is a thing that exists, also reveals that she seems to love herself more than anyone else (even Mario), and also... likes puns a lot? I don't know why this seems to be a sort of prominent character trait, but I love that!
She is also seen in the intro, initially as a generic Rabbid putting on a random wig. I'm pretty sure it didn't look like any Mario character's hair in particular. Anyway, due to the SupaMerge shenanigans going on, that is now Rabbid Peach! She also ends up in the Ancient Gardens with Mario soon after. Throughout the world we have some outstanding moments, like throwing things (and Rabbid Luigi) at the sunflower after they hand out a single coin instead of a more reasonable reward, just casually taking a selfie while being smacked around by Pirabbid Plant, and the most notable is after the boss fight! After Rabbid Kong's defeat, he climbs onto a not-so-stable tower made of toy blocks, and Rabbid Peach just casually knocks it over, despite the team trying to get her to not do that! She also takes a few selfies with him while he's falling. This will totally not come back to bite her later. After, she shares some funny pics with Rabbid Luigi, while Luigi Mario is completely forbidden from getting to look at them. He keeps peeking anyway.
Rabbid Peach also ends up meeting (Human) Peach halfway through Ancient Gardens, at her castle, and acts all upset over it. Beep-0 says Rabbid Peach takes her cosplay stuff too seriously. Later on, at the end of Sherbet Desert, right before the Icicle Golem fight the heroes get frozen over, and then Peach shows up and frees them. If the second team member (the third one will be out of battle for the whole duration) is Rabbid Peach, you get an extra bit in the cutscene where she tries to make sure Mario and Peach don't get to hug, because that's her Mario, apparently! By the end of the fight, however, she gains enough respect for Peach to just put down Icicle Golem's head and let her absolutely punt it! Rabbid Peach doesn't do much else for the rest of the game, until about the ending, which I won't get into detail about since it's a bit spoilery. But it's cute! Another note is that the unused in-game script, at one point, says the heroes shake at yet another huge glitch vortex in the sky, but, quoting directly: "in case one of the Heroes is RABBID PEACH, she won't shake. She'll be the usual badass"!!! Sorry for the bad word usage!
Rabbid Peach also has a big part in the Donkey Kong Adventure DLC campaign, being one of the only three characters you can use in it. During the intro, after Rabbid Kong breaks the time-washing machine (and ends up being sucked into it) and Spawny ends up breaking it further, Rabbid Peach also comes into view, completely unaware of its state, because her phone is low on charge and the washing machine conveniently has a port to charge it, for some reason! Mario and both the Luigis notice something's wrong, and try to stop her, but she plugs the charger in anyway! And then disappears, alongside the machine, and Beep-0. So the machine is broken into pieces now, and all end up on some far-away island. She gets ambushed by some Tropical Ziggies, and inconveniently has no Blasters on hand, but luckily, Donkey Kong to the rescue! Rabbid Cranky also shows up, I guess. So anyway, Rabbid Peach gets a new Blaster shortly before the first battle, which she, for some reason, is dissatisfied with... Come on! It's a gun that is also a shark!
Anyway, her knocking Rabbid Kong off the tower came back to bite her later. He gets ballistic at the sight of her at first, early on in the campaign. She ends up starting the battle low on HP, even, but thankfully, it's possible to just immediately heal! Rabbid Kong's opinions on her seemingly change, though, because she's all show-offy and pretty? Later on, he straight up seems to flirt with her right before another battle. She, of course, responds by kind of flirting with DK, which I like to think was only to just tease Rabbid Kong! I'm not gonna get into the spoilerier details, but we've got some other great stuff from her, of course!
Battle
| Health Points: | 220-290 |
|---|---|
| Area of Movement: | 6-8 Cells |
| Pipe Exit Range: | 3-5 Cells |
| Dash: | 20-100 DMG |
| Team Jump: | 6-8 Cells |
| Primary weapon: | Blaster |
| Secondary weapon: | Sentry |
| Shield: | -40-80% WPN/-30-50% MOV Cooldown 2-1 Turns |
| Heal: | 10-70% HP Cooldown 3-2 Turns |
The in-game description states: "A proficient healer and damage-denier, when this defense-oriented prima donna takes the battlefield she keeps one eye on the enemy, and one on Mario." I sure hope she's not looking into two different directions too hard! She mostly focuses on healing, and some great defense options.
Her HP, surprisingly enough, isn't even that high compared to the other heroes, with the max HP ranking third lowest alongside the base-game heroes (and fourth lowest if you count the DLC as well), but I guess free healing and the shield makes up for it! Her stats are pretty average otherwise.
Rabbid Peach's Team Jump is nothing much to speak of, having some decent range, but her dash can be upgraded into the Stylish Dash, which can be used to attack more than one enemy at a time, up to 4 with upgrades! It's good for inflicting a bunch of them a small amount of damage when needed. You can't spend them all on one enemy, however! Generally, you'll need to use Dashes as often as you can - extra damage will always help!
Her primary weapon is the Blaster, same as Mario, which I've gone over on his section already. The secondary weapon is the Sentry, which is basically an explosive car that chases a select foe! It will take the shortest path to the enemy it can, even going through pipes! After moving for the turn, it will activate its explosive, and any enemy that goes within its range will get blown up for some nice damage. The explosive range will increase as you get more late-game Sentries. If the foe the Sentry was chasing is defeated, it will stop moving and become a sort of landmine! The enemies will also attack your Sentry, which has its own HP, and for that it can be used to activate the enemies' Villain Sight and take the sacrifice for your team. Rabbid Peach's weapons alternate between having Honey, which as mentioned earlier, prevents the enemies' movement, and Push, which acts similarly to Bounce, but it cannot launch the foe to higher areas. Enemies inflicted with Push can collide with each other, pushing them around as well! They can still roll off the battlefield for the same 30 points of damage.
Rabbid Peach's first technique is the Shield, which is just a decent option all-around for defending her from any damage. It's slightly better for defending herself against weapon-based damage, compared to defending against enemy Dashes. Her second technique is Heal, which is a valuable thing to have - it heals herself and the rest of the team within range, and it restores a lot of health too! Pretty sure it's the most you can recover in a single move compared to any other healing options you have, lke the Vamp effect or Peach's Healing Jump. A drawback compared to those options is that it's only usable every few turns, and you might be a bit out of luck if the rest of the team is far away, but it's really good nonetheless!
Oh Beep-0... Man, do you ever realise just how much is a full terabyte of fish puns? That's more space than I have on my PC, and assuming it's all text files, those are really light in size... Is there just every single fish pun in every single concievable language out there?
Anyway, thus concludes my first 'Shroom section! Sorry for not fitting with the Shroob theme! Though, if you count this game also being a Mario RPG and having some time travel, I guess it fits? I'm kind of glad a lot of it was spent just rambling about a comfort character in particular. I don't often get the opportunity to do that, so it's been pretty nice! Also, bonus thanks to the peeps that helped me out for this section!!! Next month I'll be covering the Luigis!
Racing Like the Staff
Hello readers and welcome to Racing like the Staff, a section where I do 150cc on different Mario Kart games, but the twist is, I take on the Grand Prix by using the combination that a staff and expert staff member used in that Cup. If you're still a little confused, by this I mean if the track is in the Mushroom Cup, then that's the Cup that I race in. Unfortunately, I don't have copies of the Mario Kart games before Mario Kart 7, so it's only that, 8 and Deluxe that will be getting this treatment.
Like a couple of months ago, this will be a shorter section than normal as the DLC cups on Mario Kart 8 only have one set of Ghost data to use. As you may have noticed, this month's 'Shroom is based around the Shroob invasion in Mario & Luigi: Partners in Time and I had a difficult challenge deciding how to theme this section. Should I go for a space theme or go for the babies? It would've been great if I could have babies in space, but I could only settle with Metal version, so I opted to go for baby theming and got myself involved in Mario Kart's craziest course: Baby Park!
The combination for the staff for Baby Park is Baby Mario with the Biddybuggy, Normal tyres and the Super Glider, and the stats are as follows:
- Speed – Just under two bars
- Acceleration – Five bars
- Weight – Just under two bars
- Handling – Five bars
- Grip – Just over four bars
Baby Park

Sadly, Baby Park was not as chaotic as the track can sometimes be. I was battling with Roy for third place by the time we made it to the first set of Item Boxes on the first corner, and by the second corner I was able to take Bowser Jr. after he drifted more to the outside and I kept to the inside. After that, there may have been a few close calls with Bullet Bills, but the Super Horn scared off the only Spiny Shell of the track on the last corner of the last lap.
Cheese Land
I didn't get the start I was hoping for after Bowser Jr. not only got ahead of me, but then hit me with a Banana. Somehow I hung onto second place, but Roy soon demoted me down to third after whacking me with a Red Shell just before the first gliding section. However, we all know Roy isn't the smartest Koopaling, and he proved that by gliding straight into the Chain Chomp and allowing me back into second. By this point, I had gotten myself a Mushroom, and used a gliding shortcut to get myself past Bowser Jr. I had a decent lead, but a Spiny Shell put the young Koopa King back onto my tail before something took him out – he might've been hit by Lightning over a gap, but I can't confirm this was the case. I was again hit by another Spiny Shell on the third lap, but the Bob-omb I'd laid out for Bowser Jr. prevented him from overtaking, and I won this race as well.
Wild Woods

Unlike its name, the race for Wild Woods wasn't very wild. Given that he finished second place last race, I thought that Lemmy might challenge me for the lead, but instead it was Bowser Jr. who took not only first, but the Item Box I was aiming for as well. However, on the first split path, he went left and I went right and took the lead. I maintained this for the rest of the race, but on the mini-map, it didn't look too secure, and I wouldn't have been surprised if I'd been passed by both Bowser Jr. and Roy had I been hit by a Spiny Shell.
Animal Crossing
For the first time this section, I didn't have to defend my lead, but like every other time, I didn't start forging one out. And so when Shy Guy hit me with a Red Shell on the stone bridge on the second lap, he was able to get right past me. As we were then hit by Blooper ink, I couldn't see what he spun out on, presumably a Banana peel, but I was able to reclaim first until he hit me with another Red Shell on the second bridge just before the jump. However, in the Item Boxes, I netted myself a Red Shell, and with a spare Mushroom on track, I raced around the rock and then threw it straight at Shy Guy to reclaim the lead just before the third lap. I did keep this lead, but another Red Shell could've given the win to Shy Guy.
This combination was just fine. I won all the races, so I can't complain too much about it, but on the same token, these wins could easily have not happened if someone had Red Shell at the wrong time for me, case in point, Shy Guy overtook me twice on Animal Crossing as I didn't have the pace to keep him far behind. This combination isn't a hinderance to winning, but you might want to look at something a little bit speedier if you want to keep the competition behind you.
Mach Speed Mayhem

Hello, 'Shroom readers! Welcome to another me-decided section! Don't worry, after this we get 11 months straight of me shilling for votes. Yay! Anyhow, for this month, I decided I wanted to pick someone who really nailed the time travel theme, to fit with the Partners in Time focus. That's why I'm pulling the protagonist of the F-Zero anime; #00: Rick Wheeler! Or as he's known in the original, Ryu Suzaku. Rick Wheeler is only his name from the short-lived 4kids dub, but to be frank... it actually sounds like an F-Zero name in a way Ryu Suzaku doesn't. And I'm the one writing this section, so we're sticking with it!
GP Legend series
Naturally, as our main protagonist, Rick is introduced in the very first episode! He's got a solid life in the year 2051. A championship circuit career in the Formula One races, a loving girlfriend, and a good job as a policeman. So, unsurprisingly, it all goes to shit. When crime boss Zoda breaks out of jail and tries to skedaddle, Rick pursues him, and thanks to a devious trap by Zoda consisting of shooting the door off his car, Rick gets severely injured. He's not dead, but current medical science couldn't possibly save him. So instead, the doctors shove him into cryosleep and make him the future's problem. A hundred and fifty years later, the Mobile Task Force, led by Jody Summer, awakens Rick to explain to him they need his help. After an initial awkwardness where Rick panics when the news of "this is the future" is just abruptly dropped on his head (great work, team), he calms down and hears them out, agreeing to join them both as a patrol officer and as an F-Zero racer in the mysterious machine known as the Dragon Bird.
This sets up the basic premise of the first half of the series: Rick's old rival Zoda has been woken up as well, and he's currently running around with the villain group Dark Million. So for that reason, Rick joins the Mobile Task Force, ready to be their flagship hero who foils the evil plans of the villains! He quickly establishes a few significant character relationships - his tense yet understanding connection with Jody Summer, his rivalry/friendship combination with Jack Levin, and most notably considering future events, his tie to Captain Falcon. Which so far isn't much; the Captain has taken a clear interest in him, but Rick doesn't know much about him beyond being a mysterious rival. He does, however, meet coffee shop owner Bart Lemming, who's happy to offer him advice, a tv, and lots and lots of coffee.
Beyond that, there's... not all that much we actually get about Rick himself in the first half of the series! He does get an arc about his racing skill, where he gradually adjusts his 2051 racing to the year 2201, overcoming habits and strategies that worked for the wheeled F1 cars of the past but that simply don't function the way he wants them to when he's in the hovering, boost-centric cars of the future. He picks up the wild child Clank Hughes, and becomes an older brother figure to the budding hacker, helping make sure Clank goes down the right path. There's also the very fun Episode 17, where Rick takes the chance to explore his passion for classic cars, getting really hands on with the maintenance and even naming his car on wheels the Dragon Ghost. He even defeats Octoman in a car chase on the city streets due to his experience with casual driving on wheels, foiling a Dark Million plan to steal these cars and sell them for lots and lots of cash! But beyond these things, we don't really get much. He's very much the Shonen Protagonist Mold - hot blooded, heroic, and focused on that. Outside of his girlfriend, he barely even thinks about the life he left behind.

A couple major changes arrive at the midpoint of the series. First and most notably is the introduction of the Reactor Mights, the legendary items of great power. It turns out, one of them was actually in the Dragon Bird, the whole time! By combining the Reactor Might with his new skill the Spin Booster (where he boosts the machine AND spins it, at the same time!) Rick is able to achieve new heights, ensuring that he wins even more races to stop Dark Million from earning cash. Secondly, his connection to Miss Killer changes. When he first meets Miss Killer way back in episode 8, he can immediately tell that she's pretty similar in appearance to Haruka, but it just results in nostalgia for the past. However, Rick learns that Haruka vanished from history thanks to an old diary, and that changes his perspective. Could Haruka and Miss Killer somehow be connected?
Over the next several episodes, Rick spends his time pondering this possibility and tracking down the Reactor Mights, which amounts to a sum total of finding one Reactor Might and then watching as it falls into an interdimensional wormhole. So much for that. He gets an unexpected break in the case of Haruka, however, when Zoda's Reactor Might decides to remind him "oh yeah there was a girl when I got cryofrozen" and Zoda then uses the Vulcan mind meld to impart this info to Rick, because why bother with actual nuance and whether or not to trust your rival when there's a Reactor Might to simplify the story? Anyhow, Rick proceeds to ponder if Miss Killer is Haruka, but she picks Black Shadow over him, so clearly she's not!
Except it turns out she was brainwashed. Probably should have considered that, Rick my dude.
During this later part, we get another filler episode that focuses on Rick as a character - episode 40. Rick's been getting famous for his victories, and it makes him feel awkward - he's really just here to race and to fight crime, he doesn't want to become the center of attention. In response, Jack Levin takes him on a whirlwind tour of the future in a way Rick hasn't had the chance to experience yet, the two bros bonding as Rick takes in the true excitement of things like an android for an ally or how regular it is to see aliens on his home planet. Their time together is pretty nice, but then they get into a dumb spat over how they like their coffee of all things, which turns into a violent feud for the duration of one race and results in them both losing and Mr. EAD claiming a victory. By the time they're done, they've forgotten what they were even fighting about and make up - so, normal best friend stuff. Honestly, we really could have used a bunch more episodes like this!

Once he's learned Miss Killer and Haruka are one and the same, Rick then learns another very vital piece of information, which triggers the endgame. Namely, he is no less than the DESTINED SAVIOR OF THE UNIVERSE! A great battle between good (represented by Captain Falcon) and evil (represented by Black Shadow) has been going on throughout time, and now they finally have a chance to truly decide the battle one way or another, all thanks to Rick's existence. Whichever side he ends up helping one way or another will be the side that wins, simple as that. Black Shadow tries his best to rig the game in his favor - showing up with his "shadows" to brainwash Rick, confirming that Haruka is Miss Killer and taking her captive, setting up a fake trap as Don Genie and Deathborn, and finally taking on Rick in a one on one race. And that's where we get the famous finale - Rick trying to use his car to reverse the power of Black Shadow's evil device, while Captain Falcon keeps Black Shadow off his tail. It takes Falcon rescuing Haruka and a pep talk from Zoda to inspire Rick, and our hero proceeds to save the day, resulting in the deaths of both Black Shadow and Captain Falcon.
Don't worry, though. As only the one who surpasses Falcon can be the next Falcon, Rick takes up the mantle of Captain Falcon from that day on, complete with a new Blue Falcon. And so, our hero moves forth into a new generation!

There's a few minor things mentioned about Rick during the little end of episode info segments throughout the anime. We get to know his birthday (July 28th - we missed his birthday party!); that he's a neat freak when it comes to his guest bedroom; he grew up on a farm and helped his sick mom while his dad spent his time racing; that the 00 on his car represents the infinity symbol for INFINITE POTENTIAL; and that he likes his coffee black. It would have been interesting to see some of this reflected in the show itself, but c'est la vie.
As for his car! Or, cars, I should say. In the GBA F-Zero: GP legend and F-Zero: Climax games, the Dragon Bird is given the stats of B body, B boost, and B grip, designed as a solid all-around beginner machine. It's the only machine in those two games to be added to the starting lineup alongside the SNES quartet of Falcon, Goroh, Stewart, and Pico - main protagonist status is enough for a promotion! The Dragon Bird is given a bio for Climax - it's a cutting edge, top of the line new machine, designed so that it'd be easy to use for anyone who just picked it up. The problem is, it needs a exceptional pilot who's able to balance every element at once, rather than just focus on one aspect or another, in order to reach its true, complete capability. Nobody in the Mobile Task Force was able to handle it... not until they woke Rick up!

GP Legend also gives our hero a story mode, where he basically just chases Zoda. And that's about it. The problem with GP Legend's story modes is that since they were made mid-anime, they're all very inconclusive and don't result in much beyond people running about. Climax, while it might not give Rick a story, gives him something better - the ability to play in an alternate form! After completing a lot of tasks, the New Captain Falcon is unlocked, complete with the Blue Falcon GT. Rick's version of the classic Falcon machine keeps the B Body, but swaps the boost and grip for a B in the former and a C in the latter. Interestingly, while the other two alternate forms - Berserker and Hyper Zoda - receive new bios, the New Captain Falcon does not. A lack of energy, or just no good ideas? Who knows.
Other Information
So part of why Rick's original name is so much Shonen Anime Protagonist - despite canonically being a New York native - is actually used as a shoutout! To Street Fighter! Y'see, Rick's voice actor, Toshiyuki Morikawa, is also the person who did the voice of Street Fighter's Ryu between 1998 and 2005 - in other words, the time at which the F-Zero anime was airing. We even get a direct reference where Rick wears a white outfit similar to Ryu's in the second to last episode.
That's about all I've got to say on our anime protagonist. Join me in the thread once more, as we resume our voting journey!
Parallax
Written by: Ray Trace (talk) and Bazooka Mario (talk)

Welcome to Parallax. This is a section in Strategy Wing where you will be taught by a Literal Baby In Armor everything you need to know 3D modeling-related (oh and it's co-hosted by a sockpuppet of mine but we don't talk about). From how to create cubes, to how to create many cubes, and how to make ice cubes out of your cubes, anything dealing with the magical third dimension and how to build and improve your craft regarding it, this is the section you may want to give a go.
How was the last issue from my lowly co-writer, eh? Not as bad as I, Ray Trace, most handsome writer on The 'Shroom, right? ...wait you're telling me that I'm just a mere little Baby Luigi clone? How dare you! Anyway, I hope my sister's explanation of a lot of 3D modeling jargon wasn't too hard for y'all to understand but let's take little steps shall we? So what's happening? Oh, all right, it's the month of December. You know, I could be teaching you how to model simple presents (they're just fancy boxes) but this month, The 'Shroom is focused on the anniversary of quite possibly the best RPG (with and without the J) of all time, Mario & Luigi: Partners in Time. I swear it's not because of my likeness stars in there! The theme is Shroob-focused, those nasty little aliens that tried to conquer and subjugate the Mushroom Kingdom but were conquered by nothing more than the tears of our adorable children! That being said, I strongly suggest you don't cause your kids to cry, not everyone you see on the street is a dastardly alien in disguise!
Enough beating around the bush, Ray Trace...what is this section going to be about? Well, I'm going to do something special: I will model a generic Shroob from start to finish, describing all of the steps I do, all in Autodesk Maya 2017. So, I'm gonna fire that sucker up.

Shrooby hoo
Normally, I wouldn't walk through the steps of making the model in day one, in a single issue. You'd be correct to assume why, because I'm not going to showcase all details of the creation for this issue, as it'll take up a significant portion of this section: I'll be displaying only the modeling process, no unwrapping UV's, texture painting, rigging/animating the model, and then modding it into a game this time around. However, let's take a look at the Shroob.

This guy is actually an excellent starter character for the 3D modeling process. He has very simple, round shapes. His face isn't overly detailed. His hands are composed of simple, pincer-like claws rather than five sets of fingers; fingers are pretty much tiny arms and legs which is typically why they are very difficult to model, rig, and animate. And his feet are just simple nubs. And if I were to go into further than just modeling him, his simple shape would make him simpler to unwrap UV's and rigging his model, and his texture work wouldn't be too difficult as it looks relatively simple. He's an effective character to springboard off from if you want to graduate to slightly more complicated characters later on.
One thing modelers do before they make a character is that they get assigned reference sheets to work off from. These reference sheets showcase the front, side, back, top, multiple angles of the models, and you can plop their images into your program of choice, typically by assigning their reference sheet to a 2D flat plane. There are countless of example images of reference pics online, but the example I'll be using is relevant to our subject at hand.

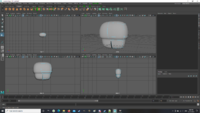
Mario drawn by Yoichi Kotabe, eh? The little rough right image is what these reference sheets typically look like. Anyway, how to plop these sorts of images in the program? In Maya, make sure you press Spacebar to bring up the different views back.

Now, depending on the plane you want to assign an image to, click on "View" and then roll your mouse over to "Image Plane" and then select "Import Image...".

This'll bring up a window. All you have to do is navigate to your desired image and it should then pop up in the program. Observe.


Bingo! That's how you quickly get an image into a plane. There are other ways to do this method of course, but this method is the quickest way that I know of to instantly transfer that ref image into the screen. You can use sprites as an imported ref image into your scene too, but be aware their low resolution may be a hindrance at points, but any reference picture is good for creation. Anyway, I'll be deleting that imported image plane off the scene as it's not important right now, but this tip is extremely helpful when you do have apt reference images to work off from.
Off we go then!
From sugar cube, to eggs, to DK's health meter being cut in half, to hot dogs
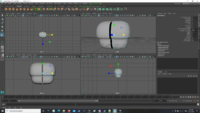
Typically, when modeling, I'd like to leave all views up. All of them prove to be quite helpful when you're in the process with working in a 3D environment, and there's a reason they're open like that in default. You'll soon find out why. And...here's the birth of a lot of the models created from Maya. By clicking on the orange cube icon on the upper left hand corner, this is the thing you will generate.

Yep. This is pretty much the equivalent of hatching out of a square-shaped egg, I know.
But wait. How do models became this more organic form later on? Well, here's a handy little button I like using: the 3 shortcut on the keyboard. So, what happens when you press it?

So, yes. Your organic models quite literally start out as an egg. The 3 shortcut is a preview of what your previewed model will look like when you apply more polys to it, as you transform your blocks into spheres, as the more polys you add to it, the rounder your model gets. However, this is simply a preview: your model does not actually look like this. If you press 1 in the keyboard again, your model will revert to its original display.
Because the character we're creating is symmetrical bilaterally, here is what I do next to ensure that we have a perfectly symmetrical character. Hold right-click on the square, and move your mouse cursor to select on "Face".


This will change your model's outline from green to blue. Doing this ensures you don't mess around with your model's pivot points, aka, spots that your model pivots around whenever you rotate or move a model, and keeping the pivot point in the origin of the grid (0,0,0) is important for the next step I'll be doing. I'll be switching back to the smoothed sphere that we got when we press 3 on the keyboard, because that's the workflow I go with. Anyway, I'll select all when the Face selection is active. This should make your model turn orange. Unlike other programs, Ctrl + A does not select all faces: you do this by double clicking on the model.

Now, select the move icon on the far left part of the screen. The move gizmo should show up. Additionally, when not in select Face mode, this gizmo is indicative of your model's pivot point. You can always adjust pivot points, but that's a bit advanced for the scope of this tutorial, and I generally apply it only when I accidentally mess up by moving the polygon around while not in select Face mode via right-clicking.

I'll be moving the model to the right. And when I'm done, I'll delete the center face. The delete hotkey, as a reminder, should be the same across all programs: it's "delete" on your keyboard.


Oh? What's that? The model changed shape? Yes, this is what happens when you edit in smooth mode when you press the 3 hotkey: your little ball of clay will dynamically change. This is especially true when you add stuff like edgeloops and extrude your faces later on, in which I will showcase eventually. But for now, the focus is creating a bilateral model, for symmetrical purposes. So, I'm going to clone this ball. Click on your half-ball. Make sure the outlines are green this time: if not, an error will pop up saying you have no objects to duplicate. To turn your model's outline green by going in object mode, hold right click on the object and veer your cursor on "Object Mode". Then, click on "Edit" on the upper part of the screen, roll down, and select the box to the right of "Duplicate Special". It is important for you to select that tiny white box next to the hotkey of Ctrl + Shift+ D because it'll bring up a window of options that you require to set up when it's your first time using that function.


These are not the default settings, as a side note, having used the program before. However, I will explain the options that are available to you.
- Geometry type
- Copy: Generates a copy of the object. It's like copy and pasting.
- Instance: Generates a copy that also gets edited live while you are making edits to the original model. This is the option selected when you do symmetry. Note that this applies only when an edit mode is activated that turns your model's outlines blue: it does not go into effect when your model's outlines are green.
Below that, the only other parameter I edited is the Scale parameter, where the first number is set to -1 while the others remain 1. This is to ensure that your copy will be mirrored on the front-facing axis on the other side of the line. You can edit the scale parameters to other values when you want to add symmetry to other parts of the axis, namely top and forward and backward.
Anyway, once you're done setting it up, proceed with "Apply" and you should be greeted with a dupe half-sphere on the other side of the grid. If you get an error, again, make sure your polygon is in object mode rather than edit ie your model's outlines are green, not blue.

You can now work on only one face of the model while your copy should move along as you edit! This is why it is important that your original pivot point is in the origin of the grid: editing the object by moving it around in object mode moves around the pivot as well, and the pivot is where the flip will be calculated. If you move the pivot point of your polygon to, say, -1 on the left axis, -1 will be the new area that your instance will be mirrored to.
Anyway, at this point, this is where you start getting creative and being on your own, experimenting how the program works and using your artistic abilities to bring things to life in a 3D space. Two important tools to keep in mind. One of them is extrude. It is represented by an icon indicating a rectangle moving up on your workspace window, which incidentally contains a lot of icons. Of course, the other icons are helpful and will see use when you get more advanced in the program, but for now, I'll focus on this one.

Selecting a face (from holding right click on the model), and try hitting it, see what happens?


This generates an extra face that you can move around, causing your model to gain an extra edge loop. Extra edgeloops make your model more defined and less...blocky so to speak. Extrusions are most likely used for creating things jutting out of the model, such as limbs and antenna, but extrusions are also used to create holes and craters too, as an intrusion. If you want to create a crater, move the face inward rather than outward.

I'll remind you all that a lot of what I learned from this program is from experimenting around and learning how these functionalities work and eventually getting used to and predicting how it will work. There are potentially quirks associated with this functions I have not explained very well, so I will repeat: experimentation and usage is so vital to learning!
Anyway, another tool I'll talk about next is adding edgeloop. However, one thing you may notice when you first fire up Maya: it's not available on the shelf of icons. While you can take a gander at my screenshots and see that edgeloop icon on there, it's not on there by default. There is an easy way to add the edgeloop icon on there. This handy, pivotal tool to model creation is located under the "Mesh Tools" tab, labeled as "Insert Edgeloop".

However, this is a rather cumbersome way to access that tool every single time you want to add edges to the model, so what do you do to add it to the shelf? Hold "Shift" and "Ctrl", click on it, and it'll add a handy icon on the shelf, making accessibility easier!

As you can see, a second add edgeloop icon popped up. However, we don't be needing the second one, so I'll delete it, by right-clicking it and selecting on delete to remove it from the shelf.

Anyway, what does adding edgeloops do? Well, predictably, they add edgeloops to your model. Whenever you select on the icon, the program will instruct you how to apply it: you click and drag on edges to create an edge. I'll be undoing the extrusions to the model I made earlier so I can showcase what it does. By the way, every time you use this command, you get to see the view of your lower poly model as it requires the model to calculate the appliance of the adding edgeloop tool.


This will add loops to your model. The reason this is important is that with more faces, you have more areas to extrude from, and therefore you can hone in regions where you think your arms, legs, head, etc. should be.
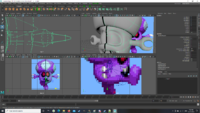
Okay. As of this point, I'll be on my own attempting to quickly recreate the Shroob body with mostly these two tools: extrude and add edgeloop, on top of other tools I will use but not mention in this issue, as I plan on porting this guy to other games. I won't detail everything I did, but I will take snap snapshots for every major detail I had added to the model in the corresponding gallery illustrating the evolution of how a simple ball can be turned into a cute little alien body. My number one advice: the more references you have, the better. The more images you have of the character, the better you are able to recreate it. In addition, if you have existing models of other characters, use them as 3D references too! It's how I modeled I, Ray Trace, and the rest of the Protectors, I had a Baby Luigi reference model to work off of! The process of taking an original model and redrawing it is called retopoing or retopology, which applies to both increasing poly for the model and creating lower poly, level of detail models for game use, while taking assets from another model for use in your own model is called "kitbashing" but that's another subject for another day.
I'll remind you all: save often and create many versions of the file before you induce major changes to your model. Maya is not the most stable of programs and it may crash at the most inopportune moments. While Maya does attempt to have recovery files if it crashes, you are far better off saving often yourself than relying upon it to save lost hours of work.
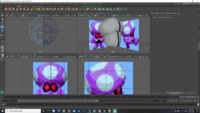
How a Shroob came to be

Just a simple ball right now. The most primitive of Shroob forms.
Extruded model twice, enlarged the cap, looks vaguely like a Mushroom now.
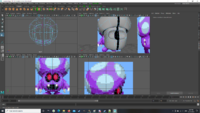
If you want to straighten things out, grab a line of vertices and use the scale function inwards to line 'em up.
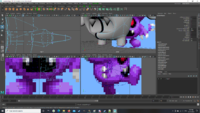
Decided to import some Shroob sprites into the scene, this would help me a lot in creating a more accurate model. Don't have a top or bottom view, so this may prove to be a bit difficult. I also touched up the cap a bit, adding more edgeloops around that area.
A lot of adjustments are made here, including adding more edgeloops. It helps to have a top view and other views, because with only front and side, you're not really gonna see the square shape of your model when it shouldn't be square. How to round out your model: grab corners and scale them accordingly.
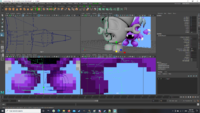
I might have gotten the general shape down. Hopefully. I may add more tweaks down the line, but I'll start modeling its face now.
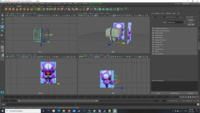
The beginnings of its eye-sockets. I extruded twice: reason being is that two extrusions give the edges of the eyes more definition than simply extruding once.
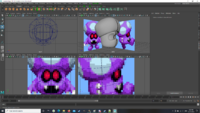
Eyes are starting to look pretty defined now. Their eyeballs look similar to Virus eyes, so I'm not going to make them completely like a void.
Added mouth. Note that the more edges you add to a model, the more progressively difficult it gets. There's a way to collapse vertices so they don't run through the model such as when you create tiny little fingers, but that's rather advanced stuff.

Adding teeth is simple: they're two upside-down cones. There was also other features I did I didn't mention, such as averaging mesh display so the cones don't appear faceted and step snap, which allows rotations to be snapped in perfect angles, good if you want to reorient polygons through rotation.
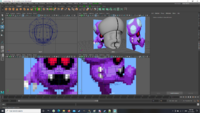
Sorry for not going into too much detail for this one. I extruded the arms, changed the background reference picture, extruded in half to form claws, and did a lot of vertex collapsing to form triangles so the extra verts I added in the claws don't go through the rest of the model. It's best to avoid creation of n-gons, or faces with more than four vertices. A lot of tweaks went into arm creation.
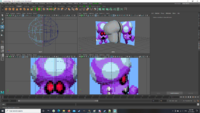
Onto adding the legs. Adding edge loops near edges makes them take on a sharper appearance. It's how you turn hot dogs into cans.
Feet is just a few more extrusions and adding an edgeloop to make the soles of the feet flat, as well as adding edgeloops to sharpen the edges near the bases


Okay, that took a while.
Merging the twin polys
Now, I can always edit some more for a few tweaks to how the overall model looks and yada yada, but for the sake of completing this issue, I'll finally decide to merge the two polys together. If there are further tweaks I need to make, I can always split them apart again and continue editing. So, this is how you combine the two polys together.
Click on your mesh, Shift-Click on the other mesh, so that the lines turn white, then go to "Mesh" on the top and select "Combine".


This'll make your select mesh also turn green, indicating that it's one object now. Now, select all of your middle vertices like this. Hold right-click, and veer your mouse over "vertices" to select them. Be careful to not select any parts that are not in the central alignment of your polgyon.

Then, use the scale function and merge them together.

Once they're like this, hit the "Merge" function on the shelf. This will weld your vertices together, so now you have one polygon.


It looks like you're done, but there's one more step. Hit "1" on your keyboard, and the model will look like this if you export it to other programs if you forget the next step.

Never fear. You have the Smooth function on the shelf. It's the icon with the square turning into multiple squares. Press on it, and your model will increase in poly size if your model is selected via Object Mode and has green outlines!


You can even control how much poly your model will get. You can get standard low poly like this, or you can do ultra poly like this.

This is one of the greatest advantages modeling your own creations has rather than taking someone else's creation: because you have quads, you have much more flexibility over the model than if you took a triangulated, ripped model, so you can pretty much manipulate your model at will.
Anyway, this is pretty much it for this character! I've done most of the process modeling a simple Shroob, with some few advanced processes I didn't mention in order to not convolute the methods too much. The eyes, you can either dictate that by either adding a sphere to where the eye is or make it just a flat texture detail. You can tell that doing this is indeed a lot of work and I was fortunate to get a lot of practice from an instructor, and I haven't even gotten down the more complex stuff you also need to be aware of such as poly-flow, unwrapping UV coordinates for texture placement, texture painting, and how to format your edgeloops when you think about animating your character, such as adding loops whenever there are joints. Not to mention modeling more mechanical, hard surfaces such as your computer has a slightly different method to approach than more organic beings. However, what I outlined here is the pure foundation of most models nowadays, and knowing how to extrude and insert edgeloops will help you get a grasp on the entire process, which use it. Buuuuut of course, there is also sculpting which is...also another process entirely.
So, I'll be ending this section with a Merry Christmas. This took me longer than I thought it would to explain things and yet I still haven't talked much about everything I did. I certainly think it's a testament to how much knowledge I accrued over time without even realizing it, and I am more than happy to share the bare basics about the stuff to you guys. If you want to ask any questions about modeling things yourself, especially with Maya, you are always free to DM me on Discord or PM me on the forums and would love to assist you if you have any troubles. I'll also see you next time in 2021, stay tuned to hear me yammer more about this stuff.
| The 'Shroom: Issue 165 | |
|---|---|
| Staff sections | Staff Notes • The 'Shroom Spotlight • End-of-the-Year Awards • Director Election • 'Shroomfest |
| Features | Fake News • Fun Stuff • Palette Swap • Pipe Plaza • Critic Corner • Strategy Wing |
| Specials | Switch It Up! • Killing The Killing Game |